
2020-2024 Lincoln Aviator Door Panel: Solving Rattles and Matching Sandstone Trim
This guide covers common failure symptoms, compatibility checks for used panels, and a step-by-step replacement overview for the 2020-2024 Lincoln Aviator.
- A common rattle from the passenger door is often the window switch, not the speaker, as noted in TSB SSM 51539.
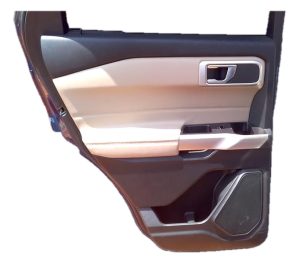
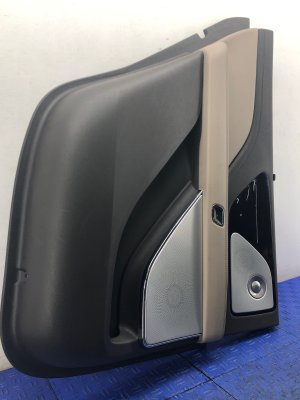
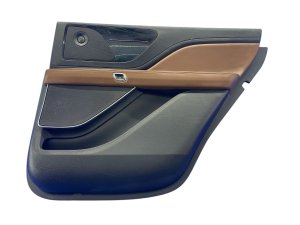
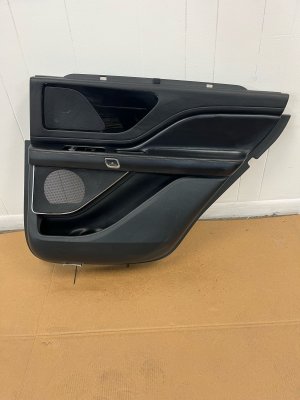
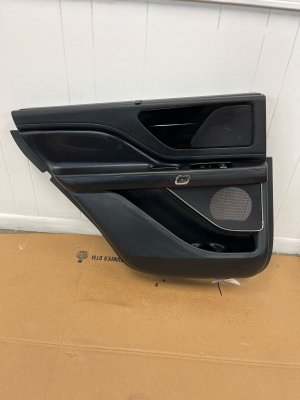
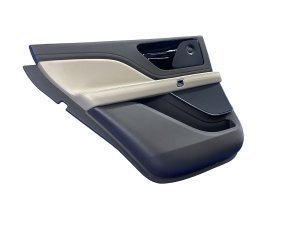
- Compatibility is critical. This panel (LC5Z-7823943-CG) is for the driver's side, Sandstone color only, and will not fit Black Label models.
- The high cost of a new OEM panel makes a verified, damage-free used panel a very cost-effective alternative.
- A widely publicized recall for trim falling off Aviators applies to the EXTERIOR C-pillar, not this interior door panel.
Known Issues for This Vehicle

TSB for Passenger Door Rattle
Some 2020-2023 Aviator models may experience a rattling or buzzing noise that seems to come from the front passenger door speaker, especially when music is playing. Ford issued Technical Service Bulletin (TSB) SSM 51539 to address this specific issue. Technicians found that the noise is often not the speaker itself, but rather the passenger door window control switch vibrating against its bezel. The official fix involves applying special flock tape to the underside of the bezel and the switch to dampen the vibration. If you're diagnosing a rattle, this is a primary suspect.
Important: Exterior Trim Recall Does NOT Apply
Many 2020-2025 Lincoln Aviators were recalled because exterior trim pieces on the C-pillar (the pillar behind the rear door) could detach while driving. This recall is for parts on the outside of the vehicle and is unrelated to the interior door trim panel discussed in this guide. The cause was identified as insufficient adhesive bonding during assembly at a supplier facility.
Symptoms of a Failing Door Panel

- Rattles and Buzzes: As noted in TSB SSM 51539, vibrations, especially in response to audio playback, are a known issue. Loose or broken mounting clips can also cause general rattling over bumps.
- Visible Damage: Scuffs, scratches, cracks, or punctures from daily use are the most common reasons for replacement.
- Peeling or Warped Material: The leather or soft-touch surfaces may begin to peel away from the panel backing, particularly around the armrest or window seal, due to heat and age.
- Malfunctioning Switches: While often a separate component, the switches for windows, locks, or memory seats are mounted in the panel. Damage to the panel can cause the switch mounts to break, leading to loose or inoperable buttons.
- Loose Fit: If the panel feels loose or can be easily pulled away from the door, it indicates that multiple mounting clips have broken or that the panel itself is warped.
Warning: This specific door panel, OEM part number LC5Z-7823943-CG, is for the front left (driver's) side and is specifically for models with the Sandstone interior color. It will not fit vehicles with the high-end 'Black Label' trim package.
Buying a Used Door Interior Trim Panel

Given the high cost of a new OEM panel, a used panel is an excellent value. However, careful inspection is critical to ensure you get a quality part that fits correctly. Here’s what to check:
- Verify Part Number and Color: The most reliable method is to check the sticker on the back of the panel. Confirm it matches your needs. Visually matching the 'Sandstone' color is difficult, so relying on the part number is best.
- Inspect All Mounting Points: Carefully examine the back of the panel. Ensure all the plastic clips (or the sockets they snap into) are present and not broken. Check the plastic bosses where screws are inserted for cracks. A panel with broken mounting points will never fit securely and will likely rattle.
- Check for Warping or Peeling: Lay the panel on a flat surface to check for any significant warping. Pay close attention to the upper edge that meets the window and the area around the armrest, as this is where material separation often begins.
- Confirm Trim Level Options: Aviators have different audio systems. Ensure the speaker grille on the panel matches your vehicle's system (e.g., standard Lincoln Premium Audio vs. the upgraded Revel® Audio System). Also, verify the presence and configuration of memory seat buttons if applicable to your trim level.
- Examine Electrical Connectors: If the wiring harness is attached, inspect all connectors for cracked plastic or bent pins. A damaged connector can be difficult to repair.
- Why Used OEM is a Good Choice: For a luxury vehicle like the Aviator, a used original equipment (OEM) panel is almost always superior to aftermarket alternatives (which are rare for this part anyway). The fit, finish, color match, and material quality of an OEM part will be identical to the original.
Replacement Overview
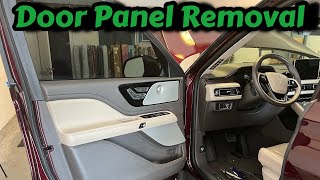
Replacing the door panel is a manageable DIY project for those 🎬 Watch: This step-by-step walkthrough shows you how to remove the panel. with basic tools and patience. The main challenges are locating all the fasteners and carefully disconnecting the multiple electrical connectors without causing damage.
Tools Required:
- Plastic trim removal tool kit
- 10mm socket or driver
- 7mm socket or driver
- Small flathead screwdriver (for releasing connector tabs)
Pro Tip: Use plastic trim tools to avoid scratching the panel or door paint. Before disconnecting the electrical plugs, consider taking a photo with your phone to remember their locations.
- Disconnect the Battery: As a safety precaution, disconnect the negative battery terminal.
- Remove Trim Covers: Use a plastic pry tool to carefully remove the small trim piece behind the interior door handle and the trim plate that houses the window and mirror switch assembly.
- Remove Fasteners: Remove the 10mm screw located behind the door handle trim piece. Then, remove the two 7mm screws located at the very bottom edge of the door panel.
- Release the Clips: Starting from the bottom, use a trim removal tool to pry the panel away from the door frame. You will hear the clips pop as they release. Work your way around the sides of the panel.
- Disconnect Components: Once all clips are free, do not pull the panel away completely. Lift it upwards slightly to unhook it from the top of the window channel. Carefully support the panel and reach behind it to disconnect the multiple electrical connectors for the switches, speaker, and courtesy light. You will also need to disconnect the mechanical door latch cable.
- Installation: Installation is the reverse of removal. Reconnect all cables and electrical plugs, hook the top of the panel over the window channel, and then press firmly around the perimeter to engage all the clips before reinstalling the screws and trim pieces.
Cost Comparison
| Part Type | Estimated Cost |
|---|---|
| New OEM | $1,800 - $2,750 |
| New Aftermarket | Not commonly available |
| Used OEM | $350 - $900+ (depending on condition) |
| Shop Labor | $120 - $200 |
Frequently Asked Questions (FAQ)
Is a rattling door panel related to the big Lincoln Aviator recall?
No. The major recall for 2020-2025 Aviators was for exterior C-pillar trim that could fall off the vehicle. Rattles from the interior door panel are a separate issue, sometimes addressed by TSB SSM 51539 for the passenger side window switch.
How can I be sure I have the 'Sandstone' interior color?
The best way is to check your vehicle's original window sticker or contact a Lincoln dealership with your VIN. While you can compare your panel to online photos, lighting can be deceptive. The part number on the back of the panel is the most definitive way to confirm compatibility.
Can I just replace the armrest or a broken switch?
In most cases, no. The armrest and main body of the door panel are typically a single, integrated piece. While the window switch module can be replaced separately, if its mounting points on the main panel are broken, the new switch will not sit securely. In that situation, replacing the entire panel is the only proper repair.
What is the most common cause of a door panel rattle on the Aviator?
For the front passenger side, a known issue is the window switch vibrating against its bezel when audio is playing, as detailed in TSB SSM 51539. For other rattles, the most common cause is simply broken or loose plastic mounting clips on the back of the panel, which can happen during previous repairs or from age.
Helpful Videos
Technical Specifications
OEM Part Numbers: LC5Z-7823943-CG
Color: Sandstone, Position: Front Left (Driver's Side), Trim Exclusion: Black Label
We Have This Part in Stock

The information in this article is provided for general reference and educational purposes only. Vehicle specifications, procedures, and part compatibility can vary by production date, trim level, and region. Always consult your vehicle's factory service manual and verify part numbers before purchasing or performing repairs. Safety-critical components such as airbags, seat belts, and braking systems should be installed by a qualified professional.
- Lincoln Aviator: