
P0174 on 2007-2014 Chevrolet Silverado 1500: Lean Bank 2 Causes & Fixes
On a 2007-2014 Silverado, P0174 is almost always caused by a vacuum leak. The most common culprits are failed intake manifold gaskets or a cracked PCV tube on the driver's side valve cover. Replacing the original plastic-frame gaskets with an updated metal-frame set (like Fel-Pro MS 98016 T) is a permanent fix. A dirty Mass Airflow (MAF) sensor is the next most likely cause.
- P0174 on this Silverado almost always points to unmetered air entering the engine, not a fuel problem.
- The top two causes are leaking intake manifold gaskets and a cracked PCV hose on the driver's side.
- Diagnose for vacuum leaks using a smoke machine before replacing any parts, especially the O2 sensors.
- Cleaning the MAF sensor is a low-cost, high-reward diagnostic step.
- Be aware of your truck's generation (2007-2013 vs. 2014) as some key parts, like intake gaskets, are different.
What's Unique About the 2007-2014 Chevrolet SILVERADO 1500

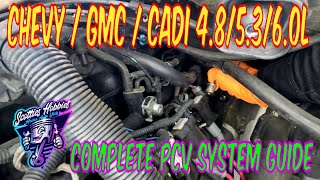
The V8 engines in this generation of Silverado are well-known for specific vacuum leak sources that directly cause the P0174 code. The original plastic-frame intake manifold gaskets are a notorious failure point, cracking over time from heat cycles and exposure to ethanol in fuel. This issue is often more noticeable in cold weather when the plastic contracts, worsening the leak. Additionally, GM has issued a Technical Service Bulletin (TSB #PIP5341) pointing to a specific PCV tube that can be rubbed through by the engine cover, causing a significant vacuum leak and often triggering both P0171 and P0174. These two issues account for a vast majority of lean code problems on this platform.
Diagnostic Flowchart

Tap your situation to follow the diagnostic path that matches what you're seeing on this vehicle.
Generation note: This range covers two Silverado 1500 generations: the GMT900 (2007-2013) and the first year of the K2XX (2014). While many causes are similar, the intake manifold gaskets and PCV systems have different designs and part numbers. The GMT900 is particularly known for the plastic-framed intake gaskets that fail, a problem so common that upgraded metal-carrier gaskets are widely recommended.
Symptoms You May Notice
- Check Engine Light is on
- Rough idle, especially when cold or at stop lights
- Hesitation or stumbling during acceleration
- Reduced engine power
- Poor fuel economy
- Harsh or erratic transmission shifting
- Whistling or hissing noise from the engine bay
- Replacing the oxygen (O2) sensor. The O2 sensor is usually doing its job correctly by reporting the lean condition. Unless diagnostic tests specifically prove the sensor is faulty (e.g., it's stuck at a certain voltage), it is likely not the root cause.
Most Likely Causes

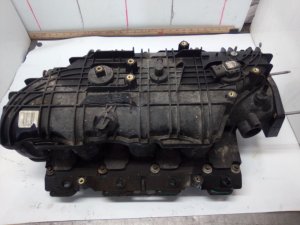
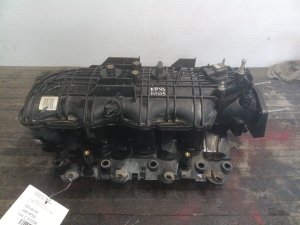
- Leaking Intake Manifold Gaskets 🔴 High Probability → Shop Engine Intake Manifold The original equipment (OE) gaskets for the 2007-2013 (GMT900) models use a plastic carrier that cracks and degrades from engine heat and fuel exposure, a very common failure. The problem is often first noticed during a cold snap, as the materials contract and the leak worsens.
How to confirm: Perform a smoke test to see smoke leaking from where the intake manifold meets the cylinder heads. A simpler, though less precise, method is to spray brake cleaner or a propane torch (unlit) around the gasket area with the engine running; a change in idle RPM indicates a leak. Fuel trims will be high at idle and decrease as RPMs increase.
Typical fix: Replace the intake manifold gaskets. It is highly recommended to use an updated set with a metal frame, such as Fel-Pro PermaDryPlus MS 98016 T, which is designed to be a permanent solution to the OE plastic design flaw.
Est. part cost: $50-$110 - Cracked or Disconnected PCV Tube/Hose 🔴 High Probability → Shop PCV Valve Hose A GM Technical Service Bulletin (TSB #PIP5341) specifically identifies a vacuum leak where the engine cover rubs through the PCV tube located at the left rear of the intake manifold. The hose can also become brittle, soft, or crack at its connection points.
How to confirm: Visually inspect the PCV hose that runs from the driver-side valve cover to the intake manifold. Check for cracks, softness, or collapse, especially at the ends and where it might contact the engine cover. A smoke test will confirm the leak.
Typical fix: Replace the faulty PCV tube. The TSB recommends covering the new tube with conduit to protect it from happening again.
Est. part cost: $20-$50 - Dirty or Faulty Mass Airflow (MAF) Sensor 🟡 Medium Probability → Shop Fuel Injection Air Flow Meter Oil from aftermarket air filters (like K&N) or general road debris can contaminate the sensor's delicate wire, causing it to inaccurately measure the air entering the engine. A TSB (#PIP5446A) also notes to inspect for casting flash near the sensor that can disrupt airflow.
How to confirm: Remove the sensor and inspect for dirt or debris. Cleaning it with a dedicated MAF sensor cleaner is a good first step. 🎬 Watch: How to properly clean your MAF sensor. With a scan tool, a healthy 5.3L engine should read around 5.3 g/s at a stable idle. A reading significantly lower (e.g., 4.3 g/s) while fuel trims are high indicates an under-reporting MAF sensor.
Typical fix: Clean the MAF sensor with a dedicated electronic parts cleaner. If cleaning doesn't resolve the issue, replace the sensor. Be cautious with aftermarket sensors, as some owners report issues and recommend sticking with OEM/ACDelco.
Est. part cost: $15 (cleaner) - $150 (new sensor) - Exhaust Leak Before the Oxygen Sensor ⚪ Low Probability → Shop Oxygen Sensor Exhaust manifold bolts are known to break on these engines, leading to leaks at the manifold-to-head gasket. This allows outside air to be sucked into the exhaust stream, which the O2 sensor reads as a lean condition.
How to confirm: Listen for ticking or hissing noises from the exhaust manifold area, especially on a cold start. Visually inspect the exhaust manifold on Bank 2 (passenger side) for cracks or broken bolts at the cylinder head.
Typical fix: Replace the leaking exhaust manifold gasket and any broken bolts. This can be a difficult repair if bolts are seized or broken flush with the head.
Est. part cost: $20-$200
Rare But Worth Checking
- Failing Fuel Injector on Bank 2: → Shop Fuel Injector If a single injector on Bank 2 is clogged or failing, it can cause a lean condition isolated to that bank. This is less common than a vacuum leak affecting the entire bank.
- Low Fuel Pressure: While a weak fuel pump or clogged filter usually causes both P0171 and P0174, it can sometimes manifest on one bank first. Check fuel pressure at the rail; it should be around 55-62 PSI at key-on or idle.
- Cracked Air Intake Tube: → Shop Engine Air Intake Resonator A crack or tear in the flexible air intake duct *after* the MAF sensor will allow unmetered air to enter the engine, causing lean codes. This is a simple but sometimes overlooked cause.
Diagnosis Steps
- Check for additional trouble codes to see if other systems are involved (e.g., P0171, P0101, P0300).
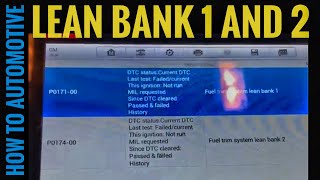
- With a scan tool, observe Long-Term Fuel Trim (LTFT) for both banks at idle. Values over +15% indicate a lean condition. If both banks are high, suspect a common source like the MAF or intake gaskets.
- Increase engine speed to 2,500 RPM and hold. If the LTFT values decrease significantly (move closer to zero), a vacuum leak is the most likely cause.
- Perform a preliminary vacuum leak check. With the engine idling, carefully spray brake cleaner or propane (unlit) around the intake manifold gaskets and vacuum hoses. Listen for any change in engine RPM, which would indicate a leak.
- Perform a smoke test. Introduce smoke into the intake system and look for leaks, paying close attention to the intake manifold gaskets, the PCV tube (per TSB #PIP5341), and the air intake duct after the MAF sensor.
- If no vacuum leaks are found, remove and clean the Mass Airflow (MAF) sensor using a dedicated MAF sensor cleaner. Inspect the intake tube for cracks.
- If the issue persists, check fuel pressure at the fuel rail to rule out a weak fuel pump or clogged filter. Pressure should be 55-62 PSI.
- As a final step, inspect the Bank 2 exhaust manifold for cracks or broken bolts before the upstream O2 sensor.
Parts You'll Likely Need
- Intake Manifold Gasket Set (Upgraded)
(OEM #Fel-Pro MS 98016 T (Metal Carrier Upgrade))— This is the most common failure point causing a vacuum leak. The Fel-Pro metal-carrier gasket is a permanent fix for the failure-prone OE plastic design on 2007-2013 models.
Trusted brands: Fel-Pro
OEM price range: $70-$120 (for OE style)
Aftermarket price range: $50-$90 (for upgraded Fel-Pro) - PCV Tube / Hose (Driver Side)
(OEM #12597774 (fits many 2009-2013 models, verify by VIN))— A known failure point identified in TSB #PIP5341. This hose cracks or gets rubbed through by the engine cover, creating a significant vacuum leak.
Trusted brands: ACDelco, Dorman
OEM price range: $30-$50
Aftermarket price range: $20-$40 - Mass Airflow (MAF) Sensor Cleaner — Often, the MAF sensor is just dirty and does not need replacement. Cleaning is a cheap and effective first step, especially if an oiled aftermarket air filter is used.
Related Codes That Often Appear With This One
- P0171 — System Too Lean (Bank 1). When both P0171 and P0174 are present, it strongly indicates a problem affecting both engine banks, such as a faulty MAF sensor or a major vacuum leak at the intake manifold gaskets or PCV system.
- P0101 — Mass Air Flow (MAF) Circuit Range/Performance. This code often appears with lean codes when the MAF sensor is dirty or failing, as the incorrect airflow reading is the root cause of the fuel mixture problem. TSB #PIP5446A also links these codes.
- P0300 — Random/Multiple Cylinder Misfire Detected. A severe lean condition can lead to misfires across multiple cylinders as the air/fuel mixture fails to ignite properly.
Technical Service Bulletins (TSBs) & Recalls
- SES Lamp P0171 P0174: Advises technicians to inspect the PCV tube on the left side of the engine for a vacuum leak. It notes that the engine cover can rub through the tube located at the left rear of theintake manifold. The fix is to replace the tube and cover it with conduit to prevent a repeat failure.
- Harsh Shift and/or Sputter with Lean/Rich Codes: Instructs technicians to inspect for casting flash (excess material from manufacturing) near the Mass Air Flow sensor bore, which can disrupt airflow and contribute to lean or rich codes (P0171, P0174, P0172, P0175) along with P0101.
Platform-Specific Known Issues

- TSB #PIP5341: A known issue where the PCV tube on the left side of the engine develops a vacuum leak, often because the engine cover rubs a hole in it, causing P0171 and P0174.
- TSB #PIP5446A: Instructs technicians to inspect for casting flash near the Mass Air Flow sensor bore, which can disrupt airflow and contribute to lean or rich codes (P0171, P0174, P0172, P0175) along with P0101.
- GMT900 (2007-2013) Intake Gasket Failure: The original plastic-framed intake manifold gaskets are prone to cracking from heat and fuel exposure, especially in cold weather. Upgrading to a metal-framed gasket like the Fel-Pro MS 98016 T is the recommended permanent fix.
Mechanic-Grade Diagnostic Values
- Mass Airflow (MAF) Sensor at idle — expected: ~1 gram/second per liter of engine displacement (e.g., a 5.3L engine should be around 5.3 g/s). Failure: A significantly lower reading (e.g., 4.3 g/s on a 5.3L) while fuel trims are high suggests the sensor is under-reporting airflow, a classic sign of a vacuum leak or a dirty sensor.
- Upstream Oxygen (O2) Sensor Voltage — expected: Rapidly fluctuating between ~0.1V (lean) and ~0.9V (rich) once the engine is in closed loop.. Failure: A sensor that is stuck low (e.g., < 0.2V) is reporting a lean condition. While this is expected with a vacuum leak, if all leaks are fixed and the sensor remains stuck, the sensor itself may be faulty.
- Long Term Fuel Trim (LTFT) at Idle vs. 2,500 RPM — expected: Normal LTFT is close to 0%, with up to +/- 10% being acceptable.. Failure: If LTFT is high at idle (e.g., +20% or more) but drops significantly towards 0% when held at 2,500 RPM, it is a classic symptom of a vacuum leak.
- Fuel Pressure — expected: 55-62 PSI at the fuel rail with key-on or at idle.. Failure: Pressure significantly below 55 PSI indicates a weak fuel pump or clogged filter, which can cause lean codes.
Scan Tool Commands That Help
- GM Tech 2 / GDS2: Fuel System Diagnostics (Injector Balance Test, Fuel Pump Control) — After checking for vacuum leaks, a bidirectional scan tool like the Tech 2 can command the fuel pump on to verify pressure and perform an injector balance test to identify a clogged or failing injector on Bank 2.
- GM Tech 2 / GDS2: EVAP Purge/Seal — To rule out the EVAP system as a source of a vacuum leak. A technician can command the EVAP purge solenoid closed and monitor fuel trims. If the trims improve, it points to a leak in the EVAP system or a stuck-open purge valve.
Wiring & Ground Locations
- G104 (or G103 depending on source/year) — On the front of the left (driver's side) cylinder head.. A poor ground at this location can cause erratic behavior and incorrect readings from sensors critical to fuel management, including potentially the MAF sensor and ignition system, leading to various driveability issues and fault codes.
- G108 — On the left side of the firewall, near the brake booster.. This ground serves multiple components in the engine bay. Corrosion or a loose connection here can create hard-to-diagnose electrical issues that could mimic sensor failures.
- MAF Sensor Connector — On the air intake tube between the air filter box and the throttle body.. The MAF sensor has a 5-pin connector. The yellow wire is the signal wire, pink is power, and black/white is ground. Verifying power and ground at this connector is a key step before replacing a sensor that shows no reading.
Real Owner Repair Stories
- Reddit user on r/ChevyTrucks (2009 Silverado 1500 5.3L) — P0171 and P0174 codes present.
❌ Tried (didn't work) Checking all sensors.
✅ What actually fixed it The brake booster was leaking vacuum into the cabin. A neighbor heard the vacuum leak from inside the truck, leading to the diagnosis and fix. - Ford Truck Enthusiasts Forum (similar engine principles) (Ford E-Series Van with 5.4L engine) — P0171 and P0174, sluggish response, misfires.
❌ Tried (didn't work) Searching for vacuum leaks with sound tests.
✅ What actually fixed it A fuel pressure test revealed almost zero pressure. The cause was a failed fuel pump. Replacing the fuel pump resolved the lean codes and sluggishness.
"I Checked Everything" — The Actual Cause
- In a case on a 2006 Silverado with P0171/P0174, the owner cleaned the MAF, replaced the gas cap, and checked for leaks with starting fluid with no success. The issue, which occurred mainly with a low fuel tank in hot weather, was ultimately suspected to be a weak fuel pump that couldn't supply adequate pressure under specific conditions, a problem a smoke test would not identify.
- A Reddit user reported chasing P0171/P0174 and, after checking common causes, discovered the issue was a leaking brake booster. The vacuum leak was internal to the booster and could be heard from inside the cab, which is why a standard engine bay smoke test might not have easily revealed it.
OEM Part Supersession History
Unknown→12597774— This is the current OEM part number for the PCV tube that runs from the driver-side valve cover to the intake manifold, which is cited in TSB #PIP5341 as a common failure point.
Heads up: This part fits a wide range of GM vehicles from 2009-2014 and beyond, but VIN verification is always recommended.
Model Year Variations Within This Range
- 2007-2014: While many causes are the same, ground locations and identifiers can vary slightly by year and even by assembly plant. For example, what is labeled G104 (front of left cylinder head) in a 2009 diagram may be referred to as G103 in other documents or years. Always use a wiring diagram specific to the vehicle's VIN for critical electrical diagnosis.
Helpful Videos

We Have This Part in Stock

The information in this article is provided for general reference and educational purposes only. Vehicle specifications, procedures, and part compatibility can vary by production date, trim level, and region. Always consult your vehicle's factory service manual and verify part numbers before purchasing or performing repairs. Safety-critical components such as airbags, seat belts, and braking systems should be installed by a qualified professional.
- Chevrolet SILVERADO 1500:
- 🧭 Diagnostic Flowchart
- 🎬 Helpful Videos
- 🛍️ Shop This Part
- What's Unique About the 2007-2014 Chevrolet SILVERADO 1500
- Symptoms You May Notice
- Most Likely Causes
- Rare But Worth Checking
- Diagnosis Steps
- Parts You'll Likely Need
- Related Codes That Often Appear With This One
- Technical Service Bulletins (TSBs) & Recalls
- Platform-Specific Known Issues
- Mechanic-Grade Diagnostic Values
- Scan Tool Commands That Help
- Wiring & Ground Locations
- Real Owner Repair Stories
- "I Checked Everything" — The Actual Cause
- OEM Part Supersession History
- Model Year Variations Within This Range
- 🎟️ Get 5% Off