
P0455 on 2005-2010 Honda Odyssey: EVAP Large Leak Causes and Fixes
For a 2005-2010 Honda Odyssey, the P0455 code is most often caused by a loose or faulty gas cap. Before buying any parts, tighten the cap until it clicks several times, clear the code, and drive for a few days. If the light returns or you see a "CHECK FUEL CAP" message, a new OEM gas cap is an inexpensive and highly effective next step.
- Always check the gas cap first for a P0455 code. Ensure it's tight and the seal is in good condition.
- This code does not indicate an urgent mechanical problem and the vehicle is safe to drive.
- If a new gas cap doesn't solve the issue, the next most likely culprit is the EVAP purge valve located in the engine compartment.
- For hard-to-find leaks, a professional smoke test is the most effective diagnostic tool.
- Always use an OEM or high-quality replacement gas cap for the best possible seal.
What's Unique About the 2005-2010 Honda Odyssey
The third-generation Honda Odyssey (2005-2010), powered by the J35A V6, has a fairly straightforward EVAP system. Unlike later models with capless fuel fillers that can have their own unique issues, this generation uses a traditional gas cap, which is the most frequent source of a P0455 code. Manufacturer Service Bulletin (dated 2014-02-18) confirms that for this platform, the MIL often comes on with DTC P0455 because the fuel fill cap is loose or has a sticking seal. Owner forums and mechanic reports for this specific vehicle consistently point to starting with the simple and cheap fix: checking and replacing the gas cap. The other two most common failure points on this platform are the purge valve solenoid in the engine bay and the vent solenoid under the vehicle near the charcoal canister.
Symptoms You May Notice
- Check Engine Light is on
- A message on the dashboard may say "CHECK FUEL CAP" which often precedes the Check Engine Light.
- A faint smell of gasoline, especially around the rear of the vehicle or after refueling.
- Vehicle will fail an emissions inspection
- Replacing the purge valve or vent solenoid when the gas cap was the actual, simple problem.
- Replacing the fuel tank pressure sensor, which is less likely to cause a large leak code than a physical leak or a stuck valve.
- Assuming a smoke machine is always needed before thoroughly checking the gas cap and purge valve first.
Most Likely Causes
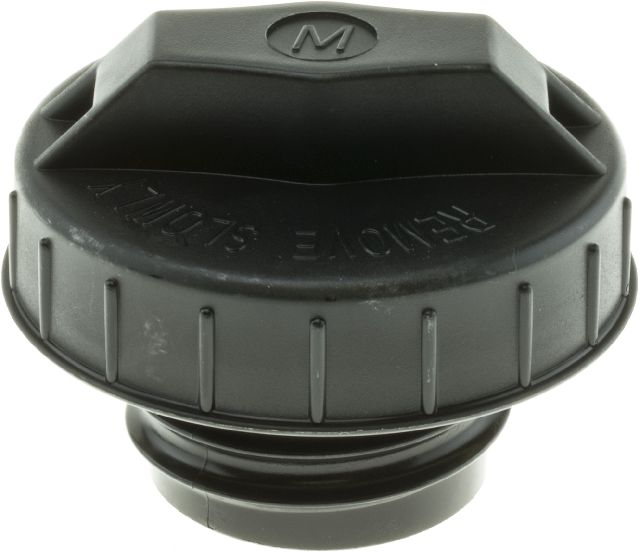
- Loose or Faulty Gas Cap 🔴 High Probability → Shop Fuel Tank Cap The gas cap seal is a simple rubber gasket that degrades over time with exposure to fuel and weather changes. It's the most frequently handled part of the EVAP system and often not tightened properly or its tether can get caught under the seal.
How to confirm: Remove the cap and inspect the rubber seal for cracks, stiffness, or damage. Ensure it is tightened until it clicks at least three times. If the seal looks worn, or if the cap is an aftermarket brand, it's best to replace it with an OEM part.
Typical fix: Tighten the existing cap or replace it with a new one. An OEM (Original Equipment Manufacturer) cap is strongly recommended for best fit and seal.
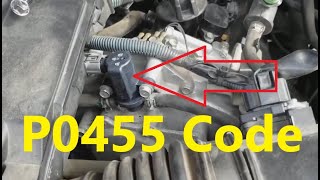
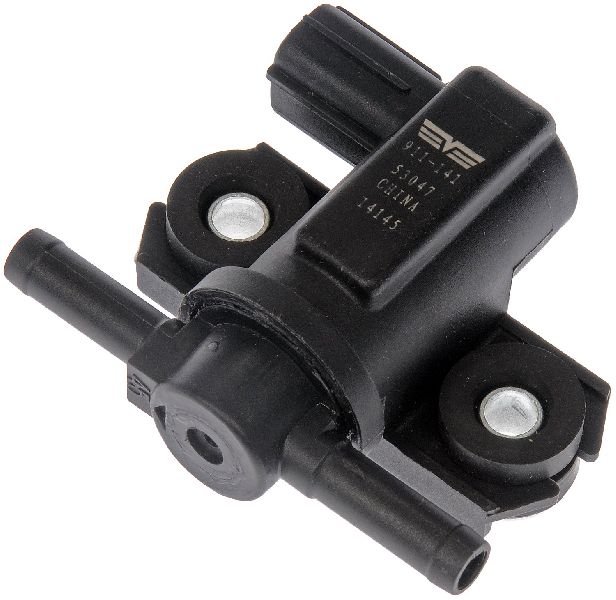
Est. part cost: $15-$40 - Failed EVAP Canister Purge Valve 🟡 Medium Probability → Shop Vapor Canister This valve, located in the engine bay on the intake manifold, can get stuck open or closed over time, causing a leak or a blockage in the system. NHTSA ODI #11442825 notes an instance where an EVAP leak was specifically caused by the system being stuck open, triggering both P0455 and P0456. Forum discussions among Odyssey owners confirm this as a common failure point after the gas cap is ruled out. A Reddit user noted that for these V6 engines, a P0455 code alone often points to a purge valve that intermittently sticks open.
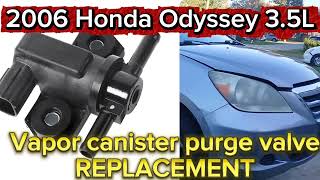
How to confirm: The valve is normally closed. With the vehicle off, remove the valve and try to blow through it. If air passes through, it is stuck open and needs to be replaced. A DIY video for the 2005-2010 Odyssey shows its location on top of the engine and the simple tools (pliers, 10mm socket) needed for replacement.
Typical fix: Replace the purge valve solenoid. It is mounted on the intake manifold with two 10mm bolts and is accessible for DIY replacement. 🎬 Watch: See this step-by-step purge valve replacement walkthrough.
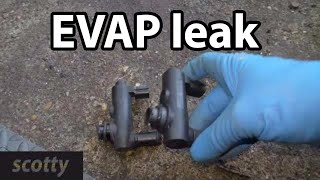
Est. part cost: $40-$100 - Failed EVAP Canister Vent Solenoid/Valve ⚪ Low Probability → Shop Vapor Canister Located underneath the vehicle near the charcoal canister, this valve can get stuck open, often due to road debris, corrosion, or even spider webs clogging the vent tube. It is more exposed to the elements than the purge valve.
How to confirm: A visual inspection for clogs in the attached hoses is a good first step. The valve is normally open and should close when 12V is applied to its terminals. You can test this with a battery or a power probe tool; if it doesn't click or close, it has failed. A mechanic can also command it to close with a scan tool during a smoke test to see if smoke escapes from the valve.
Typical fix: Clean any blockages from the vent hoses or replace the vent solenoid if it has failed electrically or is mechanically stuck. The part often twists into the charcoal canister.
Est. part cost: $55-$110 - Cracked or Disconnected EVAP Hose ⚪ Low Probability Rubber hoses become brittle and crack with age and exposure to heat cycles in the engine bay and under the vehicle. The large size of the leak for P0455 often means a hose has completely disconnected or has a large split.
How to confirm: A visual inspection of all accessible EVAP lines is the first step. For hard-to-find leaks, a professional smoke test is the most effective method. A machine fills the EVAP system with a harmless, visible smoke, and any leaks become obvious.
Typical fix: Replace the cracked or broken section of hose. This can range from a simple DIY fix to a more complex repair if the hose is in a difficult-to-access location.
Est. part cost: $5-$50
Rare But Worth Checking
- Cracked EVAP Charcoal Canister: → Shop Vapor Canister The canister itself is a durable plastic box, but it can be damaged by road debris or a hard impact from underneath. A visual inspection will usually reveal cracks. Replacement involves swapping over hoses and the vent solenoid.
- Rusted Fuel Filler Neck: → Shop Fuel Filler Neck In areas with heavy road salt use, the metal pipe leading from the gas cap to the fuel tank can rust through, creating a large leak. Manufacturer Bulletin #ATS170206 suggests that if a leak is found at the filler neck, technicians should investigate specific components rather than replacing the entire fuel fill pipe immediately. One forum user with a similar vehicle fixed their P0455 by replacing a rusted filler neck after changing other parts failed to solve it.
- Faulty Fuel Tank Pressure (FTP) Sensor: → Shop Fuel Tank While less common for a large leak code, a faulty FTP sensor can give incorrect readings to the ECM, tricking it into thinking there is a leak when there isn't one. However, this failure is more likely to be accompanied by other diagnostic codes.
Diagnosis Steps
- Check for "CHECK FUEL CAP" Message: Note if this message appeared on your dash before the Check Engine Light, as it strongly suggests the cap is the culprit.
- Inspect and Tighten the Gas Cap: Remove the cap. Inspect the rubber seal for cracks or hardness. Check that the tether isn't caught under the seal. Reinstall it and tighten until it clicks at least 3 times. A loose cap is the most common fix.
- Clear the Code and Drive: Use an OBD-II scanner to clear the trouble code. Drive for a few days (this can take multiple drive cycles) to allow the vehicle's computer to re-run the EVAP system test. If the light stays off, the problem is solved.
- Replace the Gas Cap: If the light returns, replace the gas cap with a Genuine Honda part (17670-SJA-013 or 17670-SHJ-A31) as the next most likely and inexpensive step.
- Test the Purge Valve: Locate the EVAP purge valve in the engine bay on the intake manifold. With the engine off, disconnect it and try to blow through it. If air passes, the valve is stuck open and must be replaced.
- Inspect the Vent Solenoid: Locate the vent solenoid and charcoal canister under the vehicle, near the spare tire area. Check the hoses connected to it for blockages, especially from spider webs or debris. Test the solenoid by applying 12V power to see if it actuates (clicks).
- Perform a Smoke Test: If the leak source is still not found, a smoke test is the most reliable method. This involves injecting smoke into the EVAP system (usually via the service port) and looking for where it escapes. This is the best way to find cracked hoses, a leaking canister, or a bad fuel filler neck seal.
Parts You'll Likely Need
- Fuel Cap
(OEM #17670-SJA-013 or 17670-SHJ-A31)— This is the most common cause of a P0455 code due to a worn seal or improper tightening. Using an OEM cap ensures a perfect seal.
Trusted brands: Genuine Honda
OEM price range: $25-$40
Aftermarket price range: $15-$30 - EVAP Canister Purge Valve Solenoid
(OEM #36162-RDV-J01)— This valve is a common failure point that can get stuck open, causing a large leak to be detected by the system. It's located on the intake manifold and is a frequent fix after the gas cap.
Trusted brands: Genuine Honda, Dorman (911-141), Standard Motor Products (CP506)
OEM price range: $70-$100
Aftermarket price range: $40-$80 - EVAP Canister Vent Solenoid
(OEM #17310-SDB-A01 (Solenoid itself, often sold with canister))— This valve, located under the car, can get stuck or its hoses can become clogged with debris
Related Codes That Often Appear With This One
- P0456 — EVAP System Small Leak Detected. If a component is beginning to fail, it might first register as a small leak (P0456) before worsening and triggering the large leak code (P0455). Some users report seeing both codes together.
- P0497 — EVAP System Low Purge Flow. This code often points directly to a problem with the EVAP canister purge valve, which can also cause a P0455 if it's stuck open.
- P0446 — EVAP System Vent Control Circuit. This code points more specifically to an issue with the vent valve/solenoid or its wiring, which can also be a cause for P0455 if the valve is stuck open.
Technical Service Bulletins (TSBs) & Recalls
- TSB 09-042: While for a different code (P2422 - EVAP bypass solenoid valve stuck closed), this TSB is relevant as it notes that spider webs can clog the EVAP vent hose/drain box on this generation of Odyssey. This type of blockage could potentially contribute to EVAP system faults, including P0455 under certain test conditions. No direct TSB for P0455 on this model for a specific part failure has been identified.
- Service Bulletin (dated 2014-02-18): Notes that the MIL may come on with DTC P0455 or P0456 due to a fuel fill cap that is loose or has a sticking seal.
- Bulletin #ATS170206: A tech line summary article advising that if an EVAP system leak (P0455 or P0456) is detected from the filler neck, technicians should replace the mis-installed component rather than the entire fuel fill pipe.
Platform-Specific Known Issues
- Purge Valve Failure is Common After Gas Cap: → Shop Vapor Canister On Odyclub.com forums, multiple owners of 2005-2010 Odysseys report that after replacing the gas cap didn't fix P0455, the next successful repair was replacing the purge valve solenoid on the engine. One user specifically notes it's a 15-minute job with a 10mm socket.
- CHECK FUEL CAP Message as an Early Warning: → Shop Fuel Tank Cap Many owners on forums like Reddit and Odyclub.com report that the first sign of trouble is the "CHECK FUEL CAP" message on the instrument panel. This often appears intermittently for days or weeks before the permanent Check Engine Light with code P0455 is triggered. This strongly indicates the gas cap should be the first part inspected and replaced.
Mechanic-Grade Diagnostic Values
- Fuel Tank Pressure (FTP) Sensor Voltage at atmospheric pressure — expected: 2.45 V - 2.55 V. Failure: A voltage reading outside of this range (e.g., greater than 2.7 V or less than 2.3 V) indicates a system holding pressure/vacuum when it shouldn't be, or a faulty sensor/circuit.
- EVAP Canister Purge Valve Solenoid Resistance — expected: Typically 15 - 30 Ohms. Failure: A reading far outside of the expected range indicates a damaged internal electrical circuit, requiring valve replacement.
Scan Tool Commands That Help
- Honda Diagnostic System (HDS): EVAP System Functional Test — This is a comprehensive, automated test the dealer uses to check the entire EVAP system's integrity and the function of its components.
- Honda Diagnostic System (HDS): Command EVAP Canister Vent Shut Valve to CLOSE — The vent valve is normally open. This command is essential for sealing the system to perform a smoke test or vacuum decay test to find a leak.
- Honda Diagnostic System (HDS): Command EVAP Bypass Solenoid (BPS) Valve ON — Used to isolate different sections of the EVAP system during advanced diagnostics to pinpoint the location of a leak, as described in Honda service bulletins.
Wiring & Ground Locations
- EVAP Canister Purge Valve — Located in the engine bay, at the rear of the engine, typically on the intake manifold.. This is a key solenoid. A poor connection or ground can prevent it from operating correctly, mimicking a failed part.
- EVAP Canister Vent Shut Valve — Located underneath the middle of the vehicle, near the charcoal canister, which is often positioned below the driver's side of the van.. Its exposed location makes its wiring and connectors susceptible to corrosion and damage from road debris.
- G101 — A primary engine ground, located on the engine itself (location varies slightly from front to rear of engine depending on exact year).. A poor connection at this ground point can cause issues for multiple engine bay components, including the EVAP Purge Valve.
- G603 — A rear body ground, located in the left rear of the vehicle, sometimes behind the interior trim panel.. This is a potential ground point for the EVAP canister assembly and vent solenoid. A corroded ground here could cause vent valve malfunction.
Real Owner Repair Stories
- YouTube user comment/video (2012 Honda Odyssey (newer gen, but same principle)) — P0455 - EVAP System Large Leak Detected.
❌ Tried (didn't work) Visual inspection of common parts.
✅ What actually fixed it A smoke test revealed a large leak from an EVAP line running on top of the gas tank. The damage appeared to be from a rodent chewing through the hose. The hose was repaired to fix the leak. - Reddit user waterboysh (2018 Honda Odyssey Touring) — P0455 - EVAP system leak detected - large leak.
❌ Tried (didn't work) Initial speculation about gas cap (vehicle is capless).
✅ What actually fixed it Took the vehicle to an independent shop. They performed a smoke test and confirmed the EVAP Canister Purge Valve was leaking and needed to be replaced. - NHTSA ODI #11488601 — An owner reported that after tightening the fuel tank cap per recommendations, the check engine light remained on with a P0455 EVAP Emission Control System Leak code.
"I Checked Everything" — The Actual Cause
- A smoke test may come back clean if the P0455 code is being triggered by a faulty Fuel Tank Pressure (FTP) sensor rather than a physical leak. According to a Honda service bulletin, if the FTP sensor gives an incorrect voltage reading at atmospheric pressure (e.g., with the gas cap off), the ECM can misinterpret this as a leak or pressure problem. In this case, there is no smoke to be found because the system is sealed; the fault is electronic, not physical.
OEM Part Supersession History
36162-RDM-A01→36162-RDV-J01— Standard part revision/update by Honda.36162-RDV-J01 (Acura TL Purge Valve)→36162-RJA-A01 (Honda Odyssey Purge Valve)— This is a known cross-compatible part. The Odyssey part is functionally identical but often significantly cheaper than the Acura-branded equivalent, which also fits the J-series V6 engine.
Heads up: A cost-saving substitution noted by mechanics and owners; the parts are interchangeable without modification.
Model Year Variations Within This Range
- 2005-2010: The EVAP system, its components, and common failure points for P0455 are highly consistent across the entire 3rd generation. The mid-cycle refresh in 2008 did not introduce significant changes to the diagnosis or repair of this code. Wiring diagrams show component locations (purge valve, vent solenoid, canister) remained stable.
Diagnostic Flowchart
Real Owner Stories
Aggregated from forums and TSBs cited above. Mileages and costs reflect what owners reported in those sources.
2007 Honda Odyssey
Symptoms: Received a P0455 code.
What fixed it: Checked and replaced the gas cap with an OEM part as the first step.
Source hint: odyclub.com: 'P0455 code'
Honda V6 (similar to Odyssey)
Symptoms: Received a 'check fuel cap' message followed by a P0455 code.
What fixed it: Replaced the purge valve on the intake manifold, which was intermittently sticking open.
Source hint: Reddit r/Honda: 'Check fuel cap turned out to be P0455, what now?'
2008 Honda Odyssey
Symptoms: Check engine light came on with both P0455 (large leak) and P0497 (low purge flow) codes.
What fixed it: Replaced the faulty purge valve, which was pinpointed by the combination of the two codes.
Source hint: odyclub.com: '2008 P0497 and P0455'
Related OBD-II Codes
Frequently Asked Questions
I have a 2005-2010 Odyssey and the 'CHECK FUEL CAP' message came on before the Check Engine Light. What does this mean?
What is the recommended replacement gas cap for the 2005-2010 Honda Odyssey?
I replaced the gas cap on my Odyssey but the P0455 code came back. What is the next most common failure?
Does TSB 09-042 apply to the P0455 code on my Odyssey?
Can I use the same purge valve from a Honda Pilot to fix my Odyssey?
Helpful Videos
Used OEM Parts in Stock
New Aftermarket Parts Available


The information in this article is provided for general reference and educational purposes only. Vehicle specifications, procedures, and part compatibility can vary by production date, trim level, and region. Always consult your vehicle's factory service manual and verify part numbers before purchasing or performing repairs. Safety-critical components such as airbags, seat belts, and braking systems should be installed by a qualified professional.
- Honda Odyssey:
- 🧭 Diagnostic Flowchart
- 🎬 Helpful Videos
- 🛍️ Shop This Part
- What's Unique About the 2005-2010 Honda Odyssey
- Symptoms You May Notice
- Most Likely Causes
- Rare But Worth Checking
- Diagnosis Steps
- Parts You'll Likely Need
- Related Codes That Often Appear With This One
- Technical Service Bulletins (TSBs) & Recalls
- Platform-Specific Known Issues
- Mechanic-Grade Diagnostic Values
- Scan Tool Commands That Help
- Wiring & Ground Locations
- Real Owner Repair Stories
- "I Checked Everything" — The Actual Cause
- OEM Part Supersession History
- Model Year Variations Within This Range
- Real Owner Stories
- 2007 Honda Odyssey
- Honda V6 (similar to Odyssey)
- 2008 Honda Odyssey
- Related OBD-II Codes
- Frequently Asked Questions
- 🎟️ Get 5% Off