
P1098 on 2008-2016 Audi A3 2.0T: Intake Manifold Runner Control Fault Causes and Fixes
On the Audi A3 2.0T TFSI/TSI, code P1098 almost always indicates a failure of the intake manifold assembly, not just the sensor. The most reliable fix is replacing the entire intake manifold with the latest revised part (OEM P/N 06J133201BH). Check with an Audi dealer first, as your vehicle may be covered by a 10-year/120,000-mile extended warranty for this specific part.
- P1098 on your Audi A3 2.0T almost certainly means the intake manifold has failed mechanically.
- Before paying for any repairs, call an Audi dealer with your VIN to check if you are covered by the 10-year/120,000-mile warranty extension for this part.
- The correct and most durable repair is to replace the entire intake manifold assembly with an updated part.
- While the manifold is off, it is a critical opportunity to have the intake valves cleaned of carbon buildup, a common maintenance need for this engine.
- After replacement, a 'Basic Setting' procedure must be performed with a proper scan tool for the new part to function correctly.
What's Unique About the 2008-2016 Audi A3
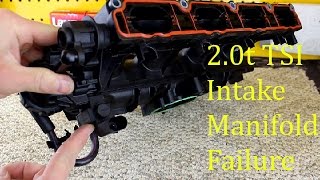
The 2.0T TSI engines (CCTA/CBFA) in this era are well-known for intake manifold failures. The issue is so common that Audi/VW extended the warranty on the part for many vehicles. The failure is rarely the sensor alone; it's typically a mechanical problem with the plastic manifold itself, such as a broken actuator arm, a worn internal stop, or flaps binding from carbon buildup. Because the sensor, actuator, and flaps are integrated, the entire manifold assembly 🎬 Watch: See exactly how these plastic intake manifolds fail. is usually replaced as a single unit.
Generation note: The 2008-2016 range covers the Audi A3 8P (2008-2013) and 8V (2014-2016) generations. The CCTA and CBFA engines are primarily found in the 8P generation, and the common issues described are specific to these transverse TSI engines and their platform mates.
Symptoms You May Notice
- Check Engine Light illuminated
- Reduced engine power, particularly at lower RPMs
- Rough or unstable idle
- Decreased fuel economy
- Audible hissing or whistling sound from the engine bay if a vacuum leak is created
- Engine stalls or nearly stalls when the oil cap is removed (indicates a large vacuum leak)
- Replacing only the position sensor, which is often not possible and usually doesn't fix the underlying mechanical problem.
- Replacing the intake runner motor (actuator) when the linkage or flaps are the actual point of failure.
- Ignoring the possibility of a large vacuum leak from the actuator arm popping off, leading to misdiagnosis of misfires or lean conditions as a separate issue.
Most Likely Causes
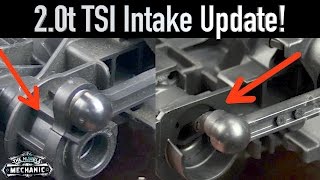
- Failed Intake Manifold Assembly 🔴 High Probability → Shop Engine Intake Manifold The original manifold design uses plastic components for the runner control linkage and flap stops that are susceptible to breaking or wearing out from heat cycles and vibration. This is a widely documented failure on this engine platform, leading to multiple part revisions by the manufacturer.
How to confirm: Visually inspect the driver's side of the intake manifold. Look for the black plastic actuator arm; check if it is disconnected, loose, or broken. With a scan tool (like VCDS), check measuring block 142. The specified 🎬 Watch: How to perform this flap test using VCDS. vs. actual positions (fields 1 and 2) should track each other as you manually move the actuator arm. If they don't, or the arm is broken, the manifold has failed.
Typical fix: Replace the entire intake manifold assembly with a new, updated OEM part (P/N: 06J133201BH). While replacing the manifold, it is highly recommended to perform a carbon cleaning of the intake ports and valves. 🎬 See this walkthrough on how to perform a carbon cleaning. New fuel injector seals must also be installed.
Est. part cost: $250-$500 - Carbon Buildup on Intake Runners 🟡 Medium Probability As a direct-injection engine, fuel does not wash over the intake valves. Oil vapor from the PCV system can bake onto the intake ports and runner flaps, causing them to bind and preventing movement, which can strain and break the plastic actuator mechanism.
How to confirm: This is difficult to confirm without removing the intake manifold. However, if the actuator arm is intact and the motor is working, but the flaps still won't move through their full range when tested, heavy carbon buildup is the likely cause.
Typical fix: Remove the intake manifold and manually clean the intake ports and valves. If the manifold itself is heavily contaminated and cannot be cleaned effectively, it should be replaced. This is almost always done in conjunction with a manifold replacement.
Est. part cost: $0 (if cleaning only) - $500 (if manifold is replaced) - Faulty Intake Runner Position Sensor (G336) ⚪ Low Probability While the sensor itself can fail electrically, it is far more common for the code to be triggered by a mechanical issue with the manifold linkage. However, there are rare documented cases of a brand new manifold being defective from the factory due to a bad sensor.
How to confirm: After confirming the linkage is intact and moves freely, test the sensor's wiring for continuity, shorts to power, or shorts to ground. Use a scan tool to monitor the sensor's output; an erratic or non-responsive signal points to a bad sensor.
Typical fix: The sensor is integrated into the manifold and not sold separately by VW/Audi. Therefore, the fix is to replace the entire intake manifold assembly.
Est. part cost: $250-$500
Rare But Worth Checking
- Wiring or Connector Damage: The wiring harness or connector for the position sensor can become damaged from heat, vibration, or improper routing during a previous repair, leading to an open or short circuit. This should be ruled out before replacing the manifold.
- Clogged or Cracked Vacuum Lines: The actuator for the runner flaps is vacuum-operated. A crack in the vacuum line leading to the actuator or a clog in one of the T-fittings can prevent the flaps from moving correctly, even if the manifold itself is mechanically sound.
Diagnosis Steps
- Check for Warranty: Before any diagnosis, call an Audi dealership with your Vehicle Identification Number (VIN). Ask if your vehicle is covered by the 'Intake Manifold Limited Warranty Extension'. This could result in a free diagnosis and repair.
- Check PZEV Warranty: If you live in a state that follows California emissions standards, check your under-hood Vehicle Emission Control Information Label. If it says 'PZEV' or 'ATPZEV', this component may be covered for up to 15 years or 150,000 miles.
- Scan for Fault Codes: Use an OBD-II scanner to confirm P1098 and note any other codes present, especially P2015.
- Visual Inspection: Remove the engine cover. On the driver's side of the intake manifold, inspect the black plastic actuator arm connecting the vacuum motor to the manifold. Check if it has popped off, is cracked, or feels loose.
- Functional Test (with Scan Tool): Using a VAG-compatible scan tool like VCDS, access Engine measuring block 142. Manually move the actuator arm and watch the 'Position (act.)' value change. It should move smoothly from near 0% to near 100% and closely follow the 'Position (spec.)' value. If it's stuck, jumps, or doesn't move, a failure is confirmed.
- Check Wiring: If the mechanical parts appear intact, inspect the electrical connector and wiring going to the position sensor for any visible damage, corrosion, or loose connections.
- Perform Basic Setting: After a repair, a 'Basic Setting' for the intake manifold runner control must be performed using a compatible scan tool to allow the ECM to relearn the flap end-stops.
Parts You'll Likely Need
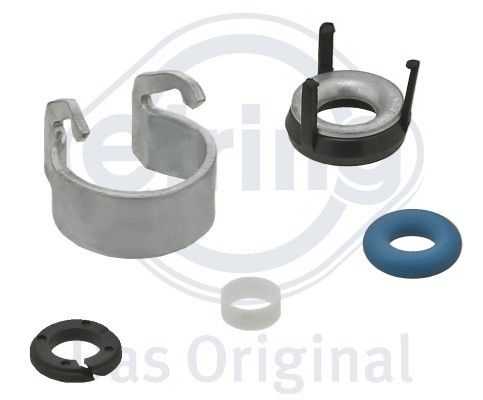
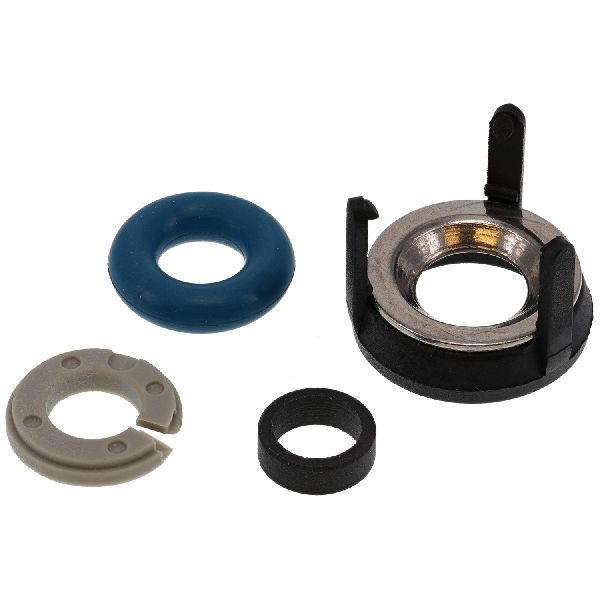
- Intake Manifold Assembly
(OEM #06J133201BH)— This is the most common and reliable fix, as it replaces all potential failure points including the flaps, linkage, and position sensor. The 'BH' revision is the latest updated design. It supersedes older part numbers like 06J133201AL, 06J133201AS, 06J133201BD, and 06J133201G.
Trusted brands: Audi/VW (OEM), Vaico, URO Parts
OEM price range: $400-$500
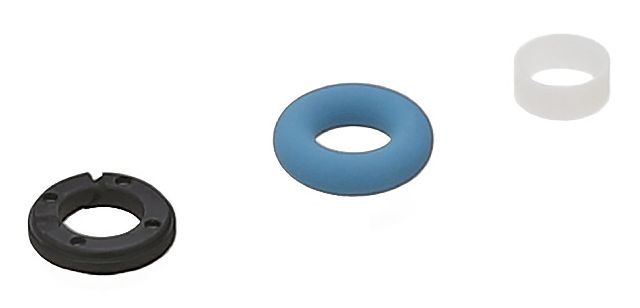
Aftermarket price range: $250-$350 - Fuel Injector Seal Kit
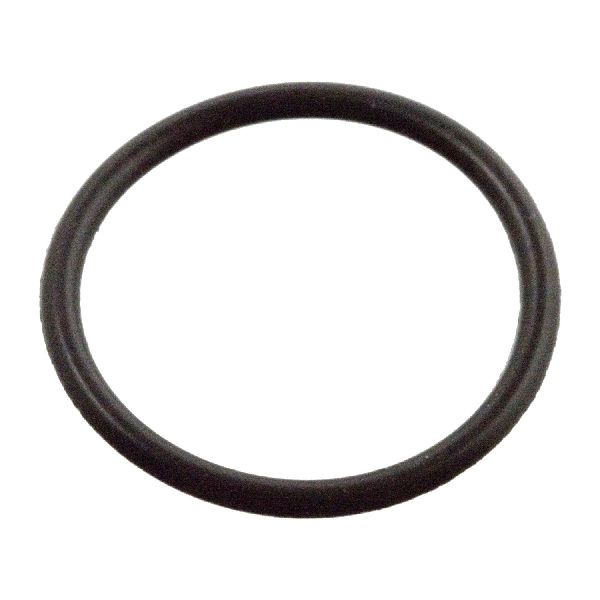
(OEM #06J998907D)— The fuel injectors must be removed to replace the intake manifold. The Teflon seals are one-time use and must be replaced to prevent fuel and pressure leaks.
Trusted brands: Bosch, Audi/VW (OEM)
OEM price range: $10-$20 per injector
Aftermarket price range: $5-$15 per injector
Related Codes That Often Appear With This One
- P2015 — P2015 ('Intake Manifold Runner Position Sensor/Switch Circuit Range/Performance') is the most common partner code, pointing to the exact same mechanical failure of the intake manifold assembly.
- P2004 — Indicates the intake manifold runner control is stuck open, which is another symptom of the same mechanical failure.
- P0300-P0304 — Misfire codes can occur if the manifold failure creates a significant vacuum leak, disrupting the air-fuel mixture.
- P2279 — 'Intake Air System Leak' can be triggered when the actuator arm physically pops off the manifold, creating a large unmetered air leak.
Technical Service Bulletins (TSBs) & Recalls
- Audi TSB (Number not specified, dated 08-21-2013): Details the extended emissions warranty for the intake manifold on 2008-2011 models with CCTA/CBFA engines to 10 years/120,000 miles.
- VW TSB VWP-20-03: A VW policy bulletin detailing the intake manifold warranty extension which is applicable to the same CCTA/CBFA engines found in many VW models.
- VW TSB 24 15 04 / 2038161: Notes that an 'Improved intake manifold design' is the production solution for P2015 faults and mandates replacement of fuel injector seals during the job.
Platform-Specific Known Issues
- Warranty Extension: Audi/VW extended the warranty for the intake manifold on many vehicles with the 2.0T TSI engine to 10 years or 120,000 miles. Owners should always check their VIN with a dealer for eligibility before paying for this repair.
- PZEV Warranty: In states that follow California's PZEV emissions standards (including NY and others), this component may be covered for up to 15 years or 150,000 miles. Check the emissions label under the hood.
- Aftermarket Repair Brackets: For the related P2015 code, some owners use a small metal bracket to limit the travel of the actuator arm, preventing it from going past the broken stop and triggering the code. This is a cheap, temporary fix but does not address the underlying electrical fault of P1098 and does not restore proper flap function.
Mechanic-Grade Diagnostic Values
- G336 Sensor Connector Voltage Supply — expected: Approximately 5.0V between Pin 1 (5V reference) and Pin 3 (sensor ground) on the harness-side connector with key on, engine off.. Failure: No voltage or significantly lower voltage indicates a wiring issue or a problem with the ECU's 5V reference circuit.
- G336 Sensor Signal Voltage (Backprobed) — expected: The signal voltage on Pin 2 should sweep smoothly as the actuator arm is moved. One user reported a good sensor should show around 4.5V when the flap is closed.. Failure: Voltage that is stuck, jumps erratically, or does not change indicates a faulty sensor.
- Wiring Harness Continuity — expected: Resistance should be 1.5 Ohms or less when checking continuity between the sensor connector pins and their corresponding terminals at the ECU connector.. Failure: High resistance (OL, open loop) indicates a broken wire in the harness.
- VCDS Measuring Block 142 - Position Actual — expected: The 'Position (act.)' percentage should closely mirror the 'Position (spec.)' percentage as the ECU commands movement during a basic setting or output test.. Failure: The actual value is stuck (e.g., at 99.9% or 0.0%), jumps, or does not follow the specified value, indicating a mechanical or sensor failure.
Hidden / Shadow Codes Worth Checking
- P1098 with status '001 - Open or Short to Plus': This is an enhanced fault description provided by VAG-specific scan tools like VCDS. It gives more specific direction than the generic P-code, pointing the technician toward an electrical fault (a break in the wire or a short to a power source) rather than a purely mechanical one. (see via VCDS (VAG-COM) or other professional VAG diagnostic tools.)
Scan Tool Commands That Help
- VCDS (VAG-COM): [Engine - 01] -> [Basic Settings - 04] -> Group 142 — This is the adaptation procedure that MUST be run after replacing the intake manifold. It allows the ECU to relearn the mechanical end-stops of the new runner flaps. Failure to perform this step will often cause the P1098 or P2015 code to return immediately.
- VCDS (VAG-COM): [Engine - 01] -> [Output Tests - 03] -> Intake Manifold Runner — This allows the technician to manually command the runner flaps to cycle open and closed. It is used to verify if the vacuum actuator, solenoid, and mechanical linkage are physically working, separating a mechanical problem from a sensor feedback issue.
Wiring & Ground Locations
- G336 Sensor Connector — A 3-pin black connector on the driver's side of the intake manifold, connected to the position sensor.. This is the primary connection point for testing power, ground, and signal for the sensor. Pin 1 is 5V reference, Pin 2 is signal, and Pin 3 is ground. A bad connection here is a common cause of electrical faults.
- Engine Bay Ground Studs — There are several key ground points in the engine bay. The most relevant for engine electronics are typically located on the left (driver's side) strut tower, near the battery, and in the plenum chamber under the windshield cowl.. The ECU and its sensors rely on clean, secure ground connections. A corroded or loose ground at one of these locations can cause erratic sensor readings and implausible signal faults like P1098.
Real Owner Repair Stories
- Ross-Tech Forums user (Volkswagen 2.0T TSI (CCTA)) — P2015 error code, which is functionally identical to P1098 for this issue.
❌ Tried (didn't work) Replacing the intake manifold with a brand new OEM part., Running the VCDS Basic Settings for Group 142, which repeatedly resulted in an 'ERROR' message despite seeing the actuator arm move.
✅ What actually fixed it The brand new intake manifold from a reputable supplier had a faulty, out-of-spec position sensor from the factory. The tell-tale sign was an incorrect voltage reading for the 'Runner Flap B1 Position Offset' value in VCDS at startup. Replacing the manifold again with another new unit resolved the issue. - BRISKODA forum user (Skoda with 2.0 TFSI engine) — P1098 and P3193 codes appeared after an intake manifold and valve cleaning.
❌ Tried (didn't work) The independent garage attempted to perform the basic settings adaptation using a Snap-on scan tool, but the codes kept returning.
✅ What actually fixed it The issue implies that some non-OEM scan tools may not be able to correctly perform the required 'Basic Setting' for the intake runner flaps. The resolution requires using a VAG-specific tool like VCDS to properly complete the adaptation.
"I Checked Everything" — The Actual Cause
- A common scenario is for the P1098 code to be triggered by a hairline crack in the small vacuum line that feeds the intake runner actuator. This leak can be so small that it doesn't show up on a smoke test and is only found by physically flexing the vacuum lines and watching for changes in engine idle or scan tool data. Replacing a small section of inexpensive vacuum hose can fix the problem without needing a full manifold replacement.
OEM Part Supersession History
06J133201G→06J133201AL -> 06J133201AS -> 06J133201BD -> 06J133201BH— Progressive design improvements to strengthen the plastic actuator linkage and flap mechanism to prevent premature failure.
Heads up: All previous part numbers are superseded by 06J133201BH. Always install the latest 'BH' revision for the most durable repair.
Model Year Variations Within This Range
- 2008-2016: The 2.0T engine came in two main variants: CCTA (Federal/49-state emissions) and CBFA (California/PZEV emissions). The CBFA includes a secondary air injection system for cleaner cold starts. While the intake manifold part and its failure mode are identical between them, a vehicle with a CBFA engine sold in a CARB state is more likely to have the manifold covered under the longer 15-year/150,000-mile PZEV component warranty.
Diagnostic Flowchart
Used vs. New Parts: Buying Guide for This Vehicle
When a used part is the smart pick: Almost never for the intake manifold assembly. This part has a well-documented design defect, and a used part from a salvage yard is highly likely to have the same wear and is at high risk of failing shortly after installation. A used part may only be considered for a wiring pigtail if the original connector is damaged.
What to inspect on the donor part:
- Not applicable as a used manifold is not recommended. It is impossible to visually inspect the internal components that are the primary point of failure.
OEM-only on this vehicle (don't cheap out):
- Intake Manifold Assembly (P/N: 06J133201BH)
Aftermarket brands forum-validated for this vehicle:
- Bosch (for fuel injector seal kits)
Brands owners have reported issues with on this vehicle:
- Dorman
- URO Parts
Related OBD-II Codes
Frequently Asked Questions
Is the intake manifold failure causing code P1098 covered by any warranty on my 2008-2016 Audi A3?
I live in a state that follows California emissions standards. Does that give me extra warranty coverage for the intake manifold?
My mechanic says the actuator arm on the manifold is broken. Can't they just replace the arm instead of the whole thing?
What is the part number for the corrected intake manifold I should buy?
What other services should be performed while the intake manifold is being replaced?
I saw a cheap metal bracket online that claims to fix this problem. Will that work for P1098?
How can I test the manifold's sensor and linkage at home to confirm the failure?
Helpful Videos

We Have This Part in Stock


The information in this article is provided for general reference and educational purposes only. Vehicle specifications, procedures, and part compatibility can vary by production date, trim level, and region. Always consult your vehicle's factory service manual and verify part numbers before purchasing or performing repairs. Safety-critical components such as airbags, seat belts, and braking systems should be installed by a qualified professional.
- Audi A3:
- 🧭 Diagnostic Flowchart
- 🎬 Helpful Videos
- 🛍️ Shop This Part
- What's Unique About the 2008-2016 Audi A3
- Symptoms You May Notice
- Most Likely Causes
- Rare But Worth Checking
- Diagnosis Steps
- Parts You'll Likely Need
- Related Codes That Often Appear With This One
- Technical Service Bulletins (TSBs) & Recalls
- Platform-Specific Known Issues
- Mechanic-Grade Diagnostic Values
- Hidden / Shadow Codes Worth Checking
- Scan Tool Commands That Help
- Wiring & Ground Locations
- Real Owner Repair Stories
- "I Checked Everything" — The Actual Cause
- OEM Part Supersession History
- Model Year Variations Within This Range
- Used vs. New Parts: Buying Guide for This Vehicle
- Related OBD-II Codes
- Frequently Asked Questions
- 🎟️ Get 5% Off