
Ford F-150 Headlight Dimmer Switch Guide (1975-1991)
If your headlights are flickering or won't switch from high to low beams, the floor-mounted dimmer switch is the likely culprit.
- The dimmer switch on a 1975-1991 F-150 is a button on the floor, not on the steering column.
- Failure is common due to corrosion from its floor-mounted location and can lead to a complete loss of headlights.
- Replacement is a very easy and cheap DIY job that takes less than 30 minutes.
- A quality aftermarket brand like Standard Ignition is a reliable and readily available choice for this repair.
Is Your Headlight Dimmer Switch Failing?
The headlight dimmer switch on a 1975-1991 F-150 is a common failure point, but it's also simple to diagnose. Because it's a mechanical switch located on the floor, it takes a lot of abuse from both your foot and the elements. Over time, the internal contacts wear out or corrode, leading to a variety of headlight problems.
Symptoms of a Bad Dimmer Switch
- Headlights won't switch: The most common symptom is the inability to switch between high and low beams when you press the floor button.
- Headlights flicker: Worn or dirty contacts inside the switch can cause the headlights to flicker or cut out intermittently.
- Headlights go out completely: A critical failure of the switch can cause you to lose all headlight function, as it interrupts the power to both high and low beams. This is a major safety hazard.
- Switch feels stuck or doesn't click: The mechanical part of the switch can fail, where it no longer clicks or feels mushy when pressed.
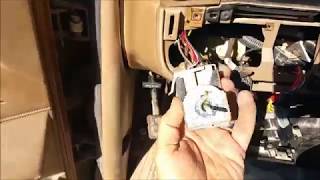
A Related Problem: The Main Headlight Switch
While the floor dimmer switch is a frequent issue, also be aware of the main headlight switch on the dashboard. The electrical connector on the back of this switch is known to get hot and melt over time, which can also cause flickering or dead headlights. If you replace your dimmer switch and still have issues, inspect the plug on the main switch.
🎬 Watch: How to remove and inspect the dashboard headlight switch.Choosing the Right Aftermarket Switch
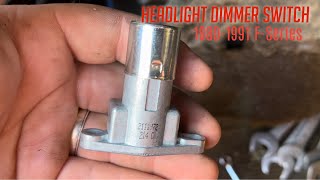
For a vehicle of this age, finding a New Old Stock (NOS) OEM part is nearly impossible and not cost-effective. The aftermarket is the go-to source for this part. Brands like Standard Ignition produce reliable, direct-fit replacements that meet or exceed the original specifications. These switches are made with modern materials and quality control, often featuring copper alloy conductors for good conductivity and are tested for performance. For a simple component like this, a quality aftermarket part from a reputable brand is a dependable and affordable solution.
DIY Replacement Guide
Replacing the floor dimmer switch is a straightforward job that most owners can do themselves in under 30 minutes with basic tools.
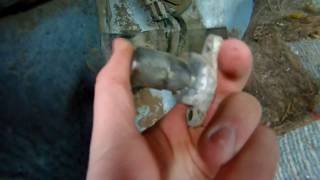
- Locate the Switch: Pull back the carpet or vinyl flooring in the driver's side footwell, in the upper-left corner near the firewall. 🎬 See this walkthrough for replacing the switch on 1970s models.
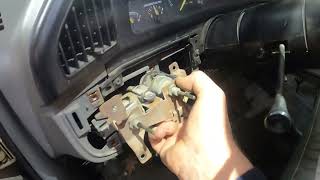
- Remove the Old Switch: The switch is held in place by two small bolts. Remove these bolts.
- Disconnect the Wiring: Unplug the electrical connector from the bottom of the switch. This may be tight due to age and dirt.
- Install the New Switch: Plug the wiring harness into the new switch. Applying a small amount of dielectric grease to the connector is highly recommended to prevent future corrosion.
- Mount the Switch: Bolt the new switch into the original location.
- Test: Turn on your headlights and test the new switch to ensure it correctly toggles between high and low beams. 🎬 Watch: Step-by-step dimmer switch replacement for 1980-1991 F-Series trucks. Replace the flooring.
| Part Type | Estimated Cost |
|---|---|
| New Aftermarket (Standard Ignition) | $23.02 |
| Shop Labor | $60 - $120 |
Frequently Asked Questions
Where is the headlight dimmer switch on my F-150?
For 1975-1991 models, it is a small, metal button located on the floor in the top-left of the driver's footwell, above where your left foot would rest.
Is it difficult to replace the dimmer switch?
No, it is considered an easy DIY repair. It involves removing two bolts and an electrical plug, typically taking less than 30 minutes with basic hand tools.
Why did my headlights stop working completely?
The dimmer switch is a single point of failure in the headlight circuit. If the internal contacts break or short out, it can cut power to both the high and low beams, causing a total loss of headlights.
Can a bad dimmer switch drain my battery?
It is unlikely. A failing dimmer switch typically creates an open circuit (no power flow), which is why the lights stop working. It does not usually create a parasitic draw when the vehicle is off.
Helpful Videos

Technical Specifications
OEM Part Numbers: C0TZ-13A024A
Floor-mounted push-button switch with a 3-terminal connector.
We Have This Part in Stock


The information in this article is provided for general reference and educational purposes only. Vehicle specifications, procedures, and part compatibility can vary by production date, trim level, and region. Always consult your vehicle's factory service manual and verify part numbers before purchasing or performing repairs. Safety-critical components such as airbags, seat belts, and braking systems should be installed by a qualified professional.