
Window Crank Handle Replacement Guide for 1979-1987 GMC K3500
Don't let a broken or stripped window crank handle ruin your classic truck's interior; replacement is a simple, 15-minute job.
- Replacement is a simple, 15-minute DIY job that doesn't require removing the door panel.
- A special tool is helpful but not necessary; a shop rag or hook tool can remove the retaining clip.
- If the window is hard to turn, the problem is likely the regulator or window channels, not the handle itself.
- Aftermarket handles from brands like Motormite offer an OE-style fix, while brands like Lokar provide a premium, billet aluminum upgrade.
Signs of a Failing Window Crank Handle
On a classic workhorse like the GMC K3500, interior parts see a lot of use. The window crank handle is no exception. Failure is almost always mechanical and easy to spot. Here’s what to look for:
- Handle Spins Freely: If the handle turns but the window doesn't move, the splines inside the handle have likely stripped out. This is a very common failure. The splines on the regulator shaft itself could also be worn down.
- Cracked or Broken Handle: The original handles, often made with plastic components, can become brittle over 30+ years and crack or break, especially at the knob.
- Handle is Loose or Falls Off: The handle is secured to the regulator shaft by a small metal C-clip. If this clip is missing or has been installed incorrectly, the handle will be loose and can easily fall off.
- Window is Hard to Crank: While this can be a symptom, it's often not the handle's fault. Difficulty cranking usually points to a problem with the window regulator mechanism inside the door or dried-out window channels that need lubrication. Blaming the handle for this is a common mistake; if your window is hard to move, inspect the regulator when you replace the handle.
Choosing the Right Aftermarket Handle
For a vehicle of this age, finding new old stock (NOS) OEM handles is difficult and often expensive. Used OEM handles are an option, but they may be just as brittle as the one you are replacing. Aftermarket handles are the most practical and popular choice, offering everything from basic replacements to high-end upgrades.
Aftermarket Brand Tiers
| Brand Tier | Description | Our Brands |
|---|---|---|
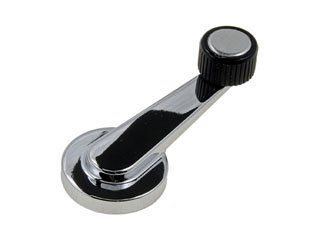
| Standard Replacement | These handles are designed to look and function just like the original factory part. They are typically made from die-cast metal with a plastic knob and provide a cost-effective way to restore original functionality and appearance. They are perfect for a daily driver or a factory-style restoration. | Motormite (Dorman) |
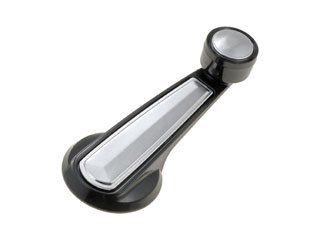
| Premium / Custom | For those looking to upgrade, brands like Lokar offer handles machined from solid billet aluminum. They are more durable than the original, offer a custom look, and often come with a lifetime warranty. These are a great choice for a restomod or anyone wanting a more robust and stylish handle. | Lokar |
Typical Replacement Costs
Replacing a window crank handle is one of the most affordable repairs you can make. The part itself is inexpensive, and the labor is minimal.
| Part or Service | Estimated Cost |
|---|---|
| New Aftermarket Handle (Standard) | $13 - $20 |
| New Aftermarket Handle (Premium Billet) | $50 - $100+ |
| Shop Labor | $25 - $50 (Likely the shop's minimum charge) |
Pro Tip: Since the job is so easy, this is a great DIY project. Doing it yourself can save you the labor cost, which is often more than the part itself.
Step-by-Step Installation Guide
Replacing the window crank handle is a very easy job that requires no special skills and, in many cases, no special tools.
- Remove the Old Handle: The handle is held on by a C-shaped clip located between the handle and the plastic washer against the door panel. You can push the door panel in slightly to see it.
- Pop the Clip: The "secret" to removing the clip is to use a hook tool, a bent paperclip, or even a shop rag. Slide the rag behind the handle and use a back-and-forth motion to snag the clip and pop it off. Be careful, as the clip can fly off and get lost. A special window crank removal tool is also available and makes the job very easy.
- Install the New Handle: To install the new handle, first place the retaining clip onto the new handle itself (it will sit in a groove). Then, simply align the handle on the splined shaft in your desired position and push it on firmly. It will click into place as the clip seats itself in the groove on the regulator shaft.
Frequently Asked Questions (FAQ)
Are there any recalls for the window crank handle on the 1979-1987 GMC K3500?
No, a search of the National Highway Traffic Safety Administration (NHTSA) database shows no recalls or safety investigations related to the window crank handles for this vehicle generation.
Do I need a special tool to replace my window crank handle?
A special tool exists and makes the job simple, but it is not required. Many owners successfully remove the retaining clip using a hook pick, a bent paperclip, or by sliding a shop rag or shoelace behind the handle to catch the clip and pull it off.
Is the driver's side handle the same as the passenger's side?
Yes, for the 1979-1987 GMC K3500, the window crank handles are typically interchangeable between the driver's and passenger's doors. They are not side-specific.
My new handle is installed, but the window is still very hard to roll up. What's wrong?
The problem is likely not the handle, but the window regulator (the cranking mechanism inside the door) or the window channels. The regulator may be worn out or the tracks the window slides in may be dry and dirty. Lubricating the window channels with a silicone spray can often help significantly. If that doesn't work, the regulator may need to be replaced.
Technical Specifications
Attaches to the window regulator via a splined shaft and is secured with a C-clip.
We Have This Part in Stock

The information in this article is provided for general reference and educational purposes only. Vehicle specifications, procedures, and part compatibility can vary by production date, trim level, and region. Always consult your vehicle's factory service manual and verify part numbers before purchasing or performing repairs. Safety-critical components such as airbags, seat belts, and braking systems should be installed by a qualified professional.