
Ford F-350 Headlight Switch Guide: 1987-2001 Problems and Solutions
Flickering lights or a burning smell from your dash? Your F-350's headlight switch is the likely cause.
- For 1987-1997 models, the primary cause of failure is overheating and melting due to the switch handling full headlight current.
- When replacing the switch on a 1987-1997 F-350, always inspect and likely replace the wiring connector (pigtail) as well.
- The best long-term fix for 1987-1997 trucks is to install a headlight relay harness to take the electrical load off the switch.
- Symptoms like flickering lights, a burning smell, or a hot switch are urgent warnings that require immediate attention to avoid a fire hazard.
Headlight Switch Failure Symptoms
A failing headlight switch can create dangerous situations. If you notice any of these signs, it's time to inspect the switch. Driving at night with a faulty switch is not recommended.
Critical Warning for 1987-1997 Owners
The most common and dangerous failure on these trucks is the switch and its electrical connector overheating and melting. This is because the switch carries the entire electrical load for the headlights. A smell of burning plastic from the dashboard area is a critical warning sign. If you smell this, stop driving the vehicle immediately as it indicates a serious fire hazard.
- Flickering Headlights or Dash Lights: Lights that flicker or cut out while driving are a classic symptom of a failing switch with worn internal contacts.
- Headlights or Parking Lights Won't Turn On/Off: You may find that only certain light functions work, or you have to jiggle the switch to get the lights to come on.
- Dash Lights Inoperative: The switch controls the instrument panel lights. Failure can result in no dash illumination, even if the headlights work.
- Hot Switch or Connector: The switch knob or the dash area around it may feel hot to the touch. The connector behind the switch is often found melted.
Generation Differences: 1987-1997 vs. 1999-2001
It's crucial to know which generation your truck belongs to, as the switch is different.
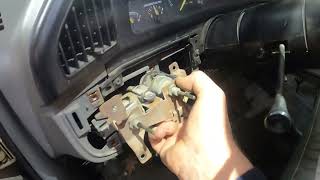
- 1987-1997 (OBS): These trucks use a pull-knob switch mounted directly in the dash. 🎬 Watch this step-by-step replacement for 1987-1997 OBS trucks. This is the generation known for severe overheating and melting issues. When replacing this switch, it is highly recommended to also replace the wiring connector (pigtail), as it is often damaged by heat.
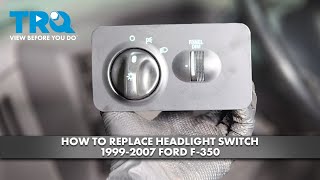
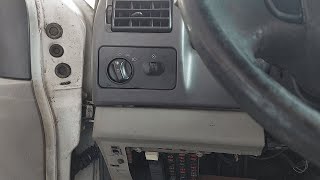
- 1999-2001 (Super Duty): These trucks use a rotary-style switch housed in a larger dash panel to the left of the steering wheel. While they still fail from normal wear, the widespread melting problem is much less common than on the earlier trucks. Replacement involves removing the entire switch module 🎬 See how to easily swap the switch on 1999-2007 models. from the dash.
Choosing the Right Aftermarket Headlight Switch
When shopping for a new switch, you'll find several brands. Quality matters, especially for the 1987-1997 models that put so much stress on this part.
| Brand Tier | Brands | Quality & Performance Assessment |
|---|---|---|
| Premium Aftermarket | Standard Ignition (Standard Motor Products) | Often considered a top-tier aftermarket choice. Standard Ignition parts are known for meeting or exceeding OEM specifications, using quality materials like copper alloy conductors to ensure good conductivity and manage heat. They are a reliable choice to restore original function. |
| Standard Aftermarket | Rostra Powertrain, Duralast | These brands offer a good balance of price and quality. Rostra is a known OE and aftermarket manufacturer that produces parts for brands like Duralast. They are engineered to be a direct fit and provide reliable performance for daily use. |
| Value / Economy | Replacement | This is often a generic or store-brand option that provides a functional, low-cost fix. While it will get your lights working, forum discussions suggest that for the high-stress 1987-1997 models, a cheaper switch may not last as long as a premium alternative. |
Pro Tip: The Permanent Fix for 1987-1997 Trucks
To prevent repeat failures of a melting switch, the best long-term solution is to install a headlight relay harness. This harness pulls power directly from the battery to the headlights, using the headlight switch only as a low-current trigger. This takes the heavy electrical load off the switch, preventing it from overheating and providing brighter headlights as a bonus.
🎬 Learn how to install a heavy duty relay harness fix.Frequently Asked Questions (FAQ)
Do I need to replace the wiring connector with the switch?
For 1987-1997 models, it is strongly recommended. The high heat that damages the switch almost always damages the plastic connector and wire terminals. Installing a new switch into a melted connector will cause the new switch to fail quickly. For 1999-2001 models, you should inspect the connectors for any signs of heat damage or brittleness and replace if necessary.
Why did my new aftermarket switch fail after a few months?
This is a common complaint, especially on 1987-1997 trucks. The root cause is the vehicle's design, which routes high current through the switch. If you didn't replace a damaged connector or, more importantly, didn't install a relay harness, the new switch is subjected to the same conditions that caused the original to fail.
Can I replace the headlight switch myself?
Yes, this is a very DIY-friendly job for both generations. For 1987-1997 models, it involves removing some dash trim panels to access the switch. For 1999-2001 models, the switch assembly can be carefully pried from the dashboard. The main tools required are basic screwdrivers and possibly a trim removal tool.
My high beams don't work. Is it the headlight switch?
It could be, but you should also check the dimmer switch. On older F-350s, the dimmer switch that selects high and low beams is a separate part, often located on the floor or steering column. Issues with high beams only could point to the dimmer switch instead of the main headlight switch.
Helpful Videos
Technical Specifications
OEM Part Numbers: 1L2Z11654AA 1L2Z11654AC 5C3Z-11654-FAA 5C3Z-11654-CAA 5C3Z-11654-AAA 5C3Z-11654-BAA
The primary design difference is between the pull-knob switch for 1987-1997 models and the rotary-style switch module for 1999-2001 Super Duty models. The earlier switch contains a rheostat for dimming and directly handles headlight current. The later switch is an integrated module that fits into a specific dash cutout.
We Have This Part in Stock


The information in this article is provided for general reference and educational purposes only. Vehicle specifications, procedures, and part compatibility can vary by production date, trim level, and region. Always consult your vehicle's factory service manual and verify part numbers before purchasing or performing repairs. Safety-critical components such as airbags, seat belts, and braking systems should be installed by a qualified professional.
- Ford F-350: