
2006-2010 Explorer & Mountaineer Rear Console: Latch, Hinge & Bucket Seat Guide
This guide covers the common failure points and critical compatibility checks for the second-row center console compartment in the 2006-2010 Ford Explorer and Mercury Mountaineer.
- This console ONLY fits models with second-row bucket seats, not a bench seat.
- The most common failures are a broken lid latch and broken hinges, both of which can be replaced with inexpensive aftermarket kits.
- The part is identical for the 2006-2010 Ford Explorer and Mercury Mountaineer; only the interior color needs to be matched.
- Replacement is a simple DIY task requiring only basic hand tools and about 30 minutes.
Is This the Right Console For Your Vehicle?
Compatibility Warning: This console assembly is ONLY for 2006-2010 Ford Explorer and Mercury Mountaineer models equipped with second-row bucket seats (also called captain's chairs). It will not fit models with a solid second-row bench seat, as the bench occupies the space where this console mounts.
Common Symptoms of Failure
Failures of this console are almost always mechanical and related to physical wear and tear from regular use. The most common issues are with the lid and its components.
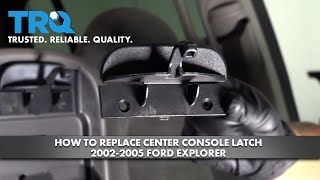
Broken Lid Latch
The most frequent problem is a broken lid latch. The small plastic latch that secures the armrest lid in the closed position becomes brittle over time and snaps. When this happens, the console lid will no longer stay closed and may rattle or fly open during acceleration and braking.
Cracked or Broken Hinge
The second most common failure is the hinge assembly for the lid. Repeated opening and closing, or placing heavy weight on the lid, can cause the plastic hinge points to crack or break entirely. This will make the lid feel loose and wobbly, or it may detach from the console base completely.
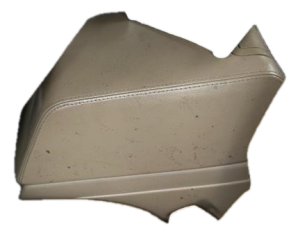
Worn or Damaged Upholstery
The vinyl or leather material on the armrest lid can crack, peel, or tear from sun exposure and use. The underlying foam padding can also compress or degrade, making the armrest uncomfortable.
Buying a Used Console Compartment: What to Inspect
Since new OEM consoles are often discontinued or prohibitively expensive, a quality used part is usually the best option. Here’s what to check before you buy.
Pro Tip: The Ford Explorer and Mercury Mountaineer are platform twins, meaning this console is identical between the two models from 2006-2010. Your focus should be on condition and color match, not the badge on the vehicle it came from.
1. Verify Compatibility
First and foremost, confirm the console came from a vehicle with second-row bucket seats. Ask the seller for a photo of the console's underside and mounting points to compare with your vehicle if you are unsure.
2. Test the Latch and Hinge
This is the most critical inspection. Open and close the lid several times. Ensure the latch clicks securely into place and requires firm pressure on the release button to open. Wiggle the lid from side to side to check for excessive play in the hinge. If you can inspect it in person, apply gentle pressure on the open lid to check for stress cracks around the hinge mounting points.
3. Inspect the Upholstery and Structure
Check the armrest material for rips, deep scratches, or sun fading. Note the interior color—common colors include Stone (gray), Camel (tan), and Charcoal Black. Ensure the color of the used console matches your vehicle's interior. Inspect the main plastic body of the console for any cracks, especially around the mounting bolt holes.
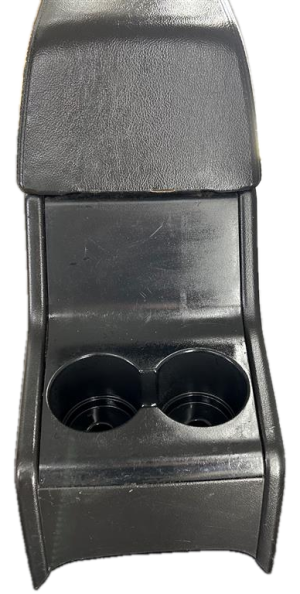
4. Check Cupholders and Power Outlets
If the console has integrated power outlets (12V cigarette lighter style), look inside the sockets for any signs of corrosion or foreign objects. Test the cupholder mechanisms to ensure they are not broken or jammed.
Replacement Overview
Replacing the entire console assembly is a straightforward DIY job that requires basic hand tools.
- Difficulty: 1 out of 5
- Estimated Time: 30 minutes
- Tools Needed: Ratchet with sockets (typically 8mm or 10mm), trim removal tool.
The general process involves removing the mounting bolts, which are usually located inside the main storage compartment and on the sides near the floor. After unbolting, you may need to disconnect a simple electrical connector for the power outlet before lifting the console out.
Cost Comparison
Prices can vary by location and condition, but this table provides a general estimate.
| Part Type | Estimated Cost |
|---|---|
| New OEM Assembly | $400+ (if available) |
| Used OEM Assembly | $150 - $250 |
| Aftermarket Lid Latch | $15 - $30 |
| Aftermarket Hinge Repair Kit | $30 - $45 |
| Shop Labor (for full swap) | $75 - $150 |
Known Issues, TSBs, and Recalls
There are no specific recalls or Technical Service Bulletins (TSBs) from Ford or the NHTSA that relate to the rear center console compartment itself. Any existing recalls for the 2006-2010 Ford Explorer and Mercury Mountaineer pertain to other systems of the vehicle, such as seat recliners or powertrain components.
Frequently Asked Questions (FAQ)
Will this console fit my Explorer with a second-row bench seat?
No. This console is designed to mount to the floor in the space between the two bucket seats. A vehicle with a factory bench seat does not have the space or the correct mounting points for this console.
Can I just replace the broken latch or hinge instead of the whole console?
Yes. The most common failure, the lid latch, is available as a cheap and easy-to-install aftermarket part. Hinge repair kits are also available from brands like Dorman. If only the latch or hinge is broken and the rest of your console is in good shape, this is the most cost-effective solution.
🎬 Watch: How to replace a broken center console latchHow do I match the interior color?
Ford and Mercury used specific names for their interior colors, such as Camel, Stone, and Charcoal Black. You can often find the interior trim code on the vehicle identification sticker located in the driver's side door jamb. Providing this code to a seller can help ensure an exact match.
What tools are needed to replace the console?
You will typically only need a basic socket set (8mm and 10mm are common sizes for Ford interior parts) and possibly a plastic trim removal tool to avoid scratching panels. The entire job can be done with simple hand tools.
Helpful Videos
Technical Specifications
OEM Part Numbers: 6L2Z-78045A36-AAC 6L2Z-78045A36-DC 6L2Z78045A36AAC
Designed for vehicles with second-row bucket seats. May contain one or more 12V power outlets.
We Have This Part in Stock

The information in this article is provided for general reference and educational purposes only. Vehicle specifications, procedures, and part compatibility can vary by production date, trim level, and region. Always consult your vehicle's factory service manual and verify part numbers before purchasing or performing repairs. Safety-critical components such as airbags, seat belts, and braking systems should be installed by a qualified professional.
- Ford Explorer:
- Mercury Mountaineer:
- 🎬 Helpful Videos
- 🛍️ Shop This Part
- Is This the Right Console For Your Vehicle?
- Common Symptoms of Failure
- Broken Lid Latch
- Cracked or Broken Hinge
- Worn or Damaged Upholstery
- Buying a Used Console Compartment: What to Inspect
- 1. Verify Compatibility
- 2. Test the Latch and Hinge
- 3. Inspect the Upholstery and Structure
- 4. Check Cupholders and Power Outlets
- Replacement Overview
- Cost Comparison
- Known Issues, TSBs, and Recalls
- Frequently Asked Questions (FAQ)
- 🎟️ Get 5% Off