
2020-2025 Kia Telluride Console Panel Guide: Center & Overhead Variations
This guide covers the common failure points, recalls, and critical compatibility differences for the various center and overhead console panels in the 2020-2025 Kia Telluride.
- Compatibility is critical. You must match the panel to your vehicle's exact options: heated/ventilated seats for the center console, and sunroof type (none, single, or panoramic) for the overhead console.
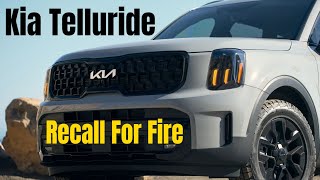
- A major safety recall (SC316) exists for a fire risk related to the power seat adjustment switch, which is located on the seat itself, not the console.
- Many sunroof operational issues can be fixed with a simple reset procedure, which should be attempted before replacing the overhead console.
- When buying used, carefully inspect all plastic mounting clips on the back of the panel, as even one broken clip can cause persistent rattles.
Understanding the Telluride's Console Panel Variations
Before diagnosing issues or buying a replacement part, it's critical to understand that 'console panel' for the 2020-2025 Kia Telluride is not a single part. It refers to two main areas with multiple variations based on trim level and options:
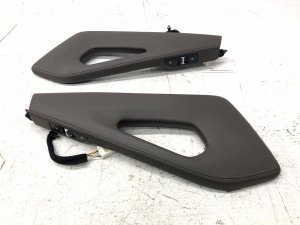
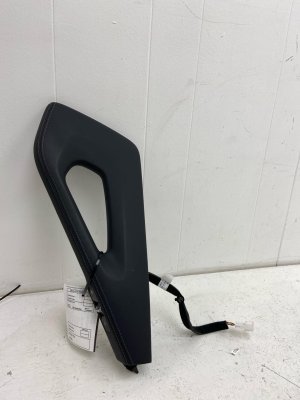
- Center Console Side Panels: These are the vertical trim pieces on the sides of the main center console, often called grab handles. The key variation is whether they contain the switches for both heated AND ventilated (cooled) front seats. Panels for vehicles with only heated seats or no seat climate functions have different (or no) switch cutouts and wiring. They also come in various interior colors like black, gray, terracotta, and light brown.
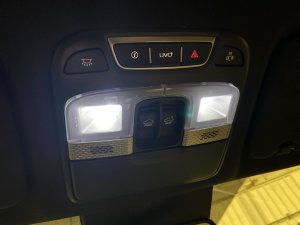
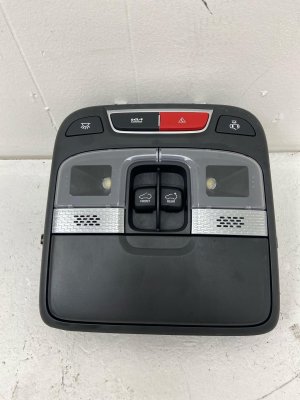
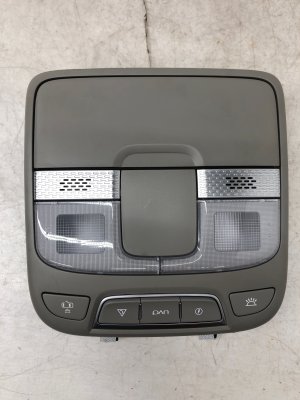
- Overhead Console: This unit is mounted on the ceiling. Its primary variations depend on the sunroof configuration. There are different overhead consoles for models with a single sunroof, a dual/panoramic sunroof, or no sunroof at all. Color is also a factor, typically matching the headliner.
Warning: Part numbers are extremely specific. A panel from a vehicle with a dual sunroof will not fit or function correctly in a vehicle with a single sunroof. Likewise, a center console handle with heated and cooled seat switches is not compatible with a vehicle that doesn't have those features from the factory.
Symptoms of Failure
Center Console Panels
- Inoperative Seat Functions: The most common failure is when the heated or ventilated seat switches stop working or work intermittently. This can be a faulty switch within the panel itself or a loose connection.
- Physical Damage: The plastic can become scratched, cracked, or the mounting clips can break, causing the panel to feel loose or rattle.
- Peeling Finish: While more common on exterior trim, the finish on interior panels can sometimes peel or wear, especially around high-contact areas like switches.
Overhead Console
- Sunroof Switch Failure: The sunroof may not open, close, or tilt, or may operate erratically. Sometimes this can be due to a faulty switch in the console. In some cases, the sunroof mechanism itself can jam or become misaligned, which is a separate issue from the switch.
- Inoperative Interior Lights: Dome or map lights may fail to turn on, which could be a bad switch, a loose connector, or a bulb issue. Some owners report the entire console losing power, indicating a loose main connector.
- Rattling Noises: A common complaint for many vehicles, the overhead console can develop rattles or buzzing sounds if clips become loose or if the sunglass holder mechanism wears out.
- UVO/SOS Button Malfunction: If the emergency or assistance buttons are located in the console, a failure of the unit can make these safety features unavailable.
Pro Tip: If your sunroof is behaving erratically after a battery disconnect or fuse replacement, try the sunroof reset procedure before replacing parts. This can often recalibrate the system and restore normal function.
Known Issues, TSBs, and Recalls
While the console panels themselves are not a frequent point of major failure, they are related to some important service bulletins and a major safety recall.
- Recall SC316 / NHTSA 24V-407 🎬 Watch: Important details on the Telluride power seat fire recall. (Power Seat Fire Risk): This is a critical recall affecting 2020-2024 Tellurides. An external impact can damage the power seat adjustment switch cover on the side of the seat (not the console switches), causing the seat motor to run continuously and overheat, posing a fire risk. The fix involves dealers installing a reinforcement bracket for the power seat switch covers. While this recall doesn't directly involve the console panels, it relates to the seat control system.
- TSB BOD314 (Overhead Console Sunglass Door-Latch Repair): Kia issued a technical service bulletin for repairing the sunglass door latch on the overhead console for a wide range of models, including the Telluride. This addresses issues where the compartment door won't stay closed.
- Sticking Center Console Latch: 🎬 See this quick video guide to fixing a sticking console latch. Some owners report that the main center console armrest latch is very difficult to open. This is typically an issue with the latch mechanism on the lid itself, not the side panels. A simple fix involves carefully trimming a small amount of plastic from the latch and catch with a razor blade to allow for smoother operation.
- Peeling Exterior Trim: Many Telluride owners have reported issues with exterior black trim peeling or becoming discolored. While this doesn't affect the interior console panels, it's a widely discussed quality issue for the vehicle.
Buying a Used Console Panel
Purchasing a used OEM console panel is an excellent way to save money, but careful verification is essential. Here’s what to check:
- Verify Compatibility by Feature: This is the most important step. Do not buy a panel based on looks alone. For a center console panel, confirm if your vehicle has both heated AND ventilated seats and match it to the donor vehicle. For an overhead console, you MUST match the sunroof type (none, single, or panoramic).
- Match the Part Number: The best way to ensure compatibility is to match the OEM part number from your original part to the used one. If you can't get your original part out first, use a dealership parts website with your VIN to find the correct number for your specific vehicle configuration.
- Inspect All Mounting Points: Carefully check the back of the panel for any broken plastic tabs or clips. These are crucial for a secure, rattle-free installation. Even one broken clip can cause problems.
- Check Switch Condition: Look at the graphics on the switches. Are they worn off? Do the buttons have a solid, tactile click, or do they feel mushy or stuck? Test the switches with a multimeter for continuity if possible.
- Examine for Scratches and Wear: Check the surface for deep scratches, gouges, or discoloration that won't come off with a simple cleaning. Pay close attention to the edges and corners where damage is most likely.
Cost Breakdown
Prices can vary significantly based on which specific panel you need. An overhead console for a panoramic sunroof will be much more expensive than a simple center console side trim piece.
| Part Type | New OEM Price | Used OEM Price |
|---|---|---|
| Center Console Side Panel (with switches) | $350 - $550 | $40 - $150 |
| Overhead Console (Single Sunroof) | $360 - $560 | $100 - $250 |
| Overhead Console (Dual/Panoramic Sunroof) | $450 - $700 | $150 - $350 |
Installation Guide
Replacement for both center and overhead console panels is generally straightforward for a DIYer with basic tools.
Difficulty: 2 out of 5
Estimated Time: 0.5 - 1 hour
Tools Needed:
- Non-marring plastic pry tools
- Phillips head screwdriver
- Small flathead screwdriver (for releasing clips)
General Steps:
- Disconnect the Battery: Before working with any electrical components, disconnect the negative terminal of your vehicle's battery to prevent short circuits.
- Use Pry Tools: These panels are held in by a combination of pressure clips and screws. Always start by gently prying at the edges with a plastic tool to avoid scratching the surrounding trim.
- Locate Screws: For the center console, there may be screws hidden under small covers or at the bottom of storage compartments. For the overhead console, screws are often located inside the sunglass holder or behind light lenses.
- Disconnect Wiring: Once the panel is loose, don't pull it away immediately. There will be one or more electrical connectors on the back for the switches and lights. Carefully depress the release tab on each connector and pull it straight out.
- Installation: Installation is the reverse of removal. Connect the wiring harnesses first, ensuring they click securely into place. Then, align all the clips and tabs and press the panel firmly into position until it snaps into place. Finally, reinstall any screws you removed.
Frequently Asked Questions
My heated/cooled seat switch lights up but then turns off. Is the console panel bad?
This is a common symptom. While it could be a faulty switch in the console panel, some owners have found that the issue was a loose electrical connection under the seat itself or a problem with the seat's internal wiring harness. It's worth checking the connections under the seat before replacing the console switch.
Can I add ventilated seat switches to my Telluride that only has heated seats?
No, this is not a simple swap. The ventilated seat system involves different seats with internal fans, a different wiring harness, and potentially different control modules. Simply installing a console panel with the extra switches will not add the function.
The lights on my overhead console don't work, but the sunroof does. What's the problem?
This suggests the console is receiving power but has an internal fault. It could be as simple as burnt-out bulbs, but it could also be a problem with the circuit board inside the console that controls the lighting. If all the lights went out at once, it's likely the board or a shared connector, not individual bulbs.
Why is a used OEM panel better than a new aftermarket one?
For interior components like these, used OEM (Original Equipment Manufacturer) parts are almost always superior. The fit, finish, color, and texture will perfectly match your vehicle's interior. Aftermarket panels often have slight color variations, use cheaper-feeling plastic, and may not have the same precise fit, which can lead to gaps or rattles.
Helpful Videos
Technical Specifications
OEM Part Numbers: 84690-S9400 84690-S9400CTT 84690S9400GYT 84690S9400LBR 84690S9400WK 84695S9400WK 92800-S9200GYT 92800-S9200WK 92800-S9700 92800-S9700GYD 92800-S9700WK 92800S9000GYT 92800S9100 92800S9100GYT 92800S9200 92800-S9600WK
Varies by vehicle options (heated/ventilated seats, sunroof type, interior color).
We Have This Part in Stock


The information in this article is provided for general reference and educational purposes only. Vehicle specifications, procedures, and part compatibility can vary by production date, trim level, and region. Always consult your vehicle's factory service manual and verify part numbers before purchasing or performing repairs. Safety-critical components such as airbags, seat belts, and braking systems should be installed by a qualified professional.
- Kia Telluride: