
2021-2025 Lexus IS & RC Console Panel: A Guide to Its Many Variations
This guide covers the complex variations of the center console panel for the 2021-2025 Lexus IS300, IS350, IS500, RC F, RC300, and RC350, focusing on common issues and how to find the correct used part.
- Compatibility is critical. You must visually match the button layout of the replacement panel to your vehicle's exact options (heated/ventilated seats, AWD, etc.).
- Failure is usually limited to individual switches or cosmetic issues like creaks and scratches, rather than a total panel failure.
- Replacement is a DIY-friendly task, requiring only basic trim removal tools and about an hour of time.
- Buying a used OEM panel can offer significant savings over a new part, but careful inspection and verification are essential.
Variant and Configuration Differences
The single most important factor when purchasing a replacement console panel for a 2021-2025 Lexus IS300, IS350, IS500, RC F, RC300, or RC350 is matching the exact configuration of your vehicle. Due to numerous optional features, several different versions of this panel exist. Ordering the wrong one will result in buttons that don't work or features you can't control.
Warning: Visually inspect the button layout of any potential replacement part and compare it to your original panel. Do not rely on part numbers alone, as they can be confusing and sometimes misapplied in listings for used parts.
Key Variations to Check:
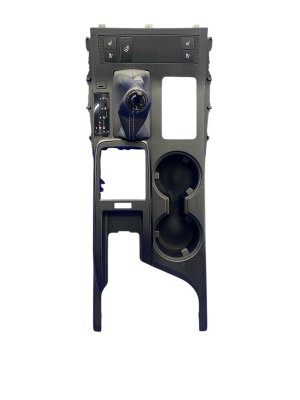
- Heated & Ventilated Seats: The most common variation. Base models may only have heated seats (or none), while higher trims feature both heating and ventilation. The control switches are different for each setup.
- Heated Steering Wheel: Some models have a dedicated button for the heated steering wheel on this panel.
- Drive Mode Selector: While all models have a drive mode selector, the specific modes (e.g., Eco, Normal, Sport, Sport S+) can vary, particularly on high-performance models like the IS500 and RC F.
- All-Wheel Drive (AWD) vs. Rear-Wheel Drive (RWD): AWD models often include a "Snow" mode button that is absent on RWD versions.
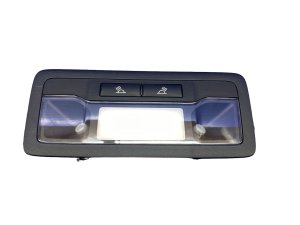
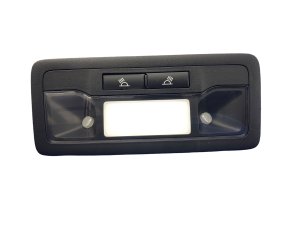
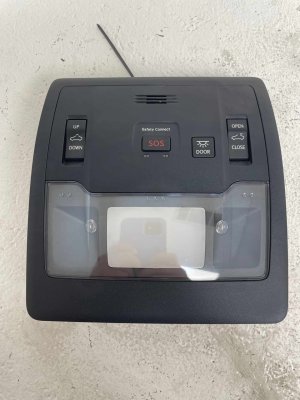
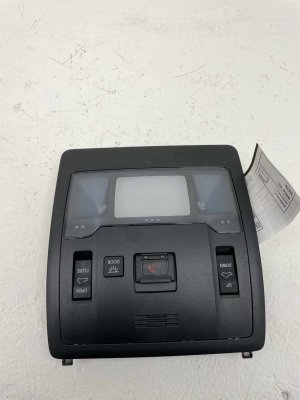
- Safety Connect (SOS Button): The overhead console panel, often considered part of the greater console system, may or may not have the 'SOS' button for the Lexus Safety Connect service. Ensure the replacement matches your vehicle's subscription status and hardware.
- Sunroof Controls: The overhead panel also houses the sunroof controls; verify this matches your vehicle's equipment.
Common Symptoms of Failure
Failure of the console panel is typically either cosmetic or related to the individual electronic switches it contains. The main panel itself is a passive piece of trim, but the integrated components can fail.
- Non-Functional Buttons: A specific button, like the seat heater or drive mode selector, may stop responding. This is often due to a failure within the switch itself or a loose electrical connection.
- Creaks and Rattles: Some owners have reported creaking noises from the plastic trim pieces of the center console, especially where different panels meet or where a driver's knee rests against the side. This is often caused by plastic clips rubbing together and can sometimes be resolved by applying felt tape to contact points during reinstallation.
- Cosmetic Wear: Scratches, peeling, or discoloration can occur from normal use, spills, or harsh cleaning chemicals.
- Safety Connect Malfunction Light: A red light near the SOS button can indicate a system malfunction that may require a dealer visit to diagnose. In some cases, issues with the communications module can be resolved by the dealer or by following a specific reset procedure.
Buying a Used Console Panel
Purchasing a used OEM console panel is an excellent way to save money, but careful verification is essential. Given the high cost of a new panel from the dealer, a quality recycled part offers significant value.
- Match Your Vehicle's EXACT Options: This is the most critical step. Before you buy, look at your car's current console. What buttons do you have? Do you have heated seats? Ventilated seats? A heated steering wheel button? An AWD 'Snow' button? Only purchase a used panel that has the exact same button layout.
- Inspect for Physical Damage: Look at high-resolution photos of the part. Check for deep scratches, cracks, or broken mounting tabs on the underside. Pay close attention to the condition of the silver trim and any soft-touch surfaces, as these are high-wear areas.
- Verify Button Condition: Ensure the graphics on the buttons are not worn off. If you can inspect the part in person, press each button to make sure it has a solid click and doesn't stick.
- Ask for the Donor Vehicle's Information: Knowing the year, model, and trim level of the vehicle the part came from can be a huge help in confirming compatibility.
Pro Tip: When removing your old panel, be gentle with the plastic trim tools to avoid marring the surrounding dashboard pieces. The clips holding the panel in place can be tight, but steady pressure is better than a sudden jerk.
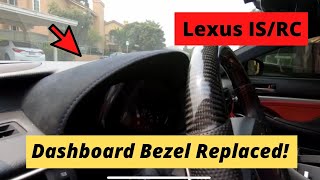
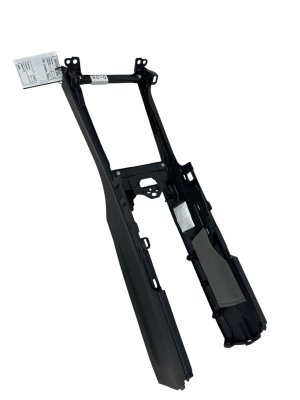
🎬 See a full interior teardown for a better look at clips.Replacement Difficulty
Difficulty Rating: 2 out of 5
Replacing the center console panel is generally straightforward and achievable for a DIY mechanic with basic tools. The process primarily involves carefully prying off trim pieces, disconnecting electrical connectors, and removing a few screws. No special programming or calibration is required.
- Disconnect the negative battery terminal.
- Using plastic trim removal tools, carefully pry up the side panels of the center console.
- Remove any screws holding the main console panel assembly in place.
- Gently lift the panel. Be aware of the multiple wire harnesses connected to the underside for the various switches.
- Carefully disconnect each electrical connector. They have small release tabs that must be pressed.
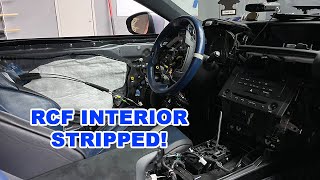
- Transfer any components not included with the replacement part (like the shift boot or specific modules). 🎬 Watch: How to swap leather trim and bezels between models.
- Installation is the reverse of removal. Connect all harnesses before seating the new panel, and test all buttons before snapping the final trim pieces back into place.
Cost Comparison
| Part Type | Estimated Cost |
|---|---|
| New OEM | $550 - $650 for the main panel and switches. |
| New Aftermarket | Not commonly available. |
| Used OEM | $150 - $400 depending on condition and configuration. |
| Shop Labor | $120 - $250 |
Known Issues, TSBs, and Recalls
As of early 2026, there are no specific recalls or widespread Technical Service Bulletins (TSBs) directly addressing the physical console panel or its standard switches for the 2021-2025 Lexus IS and RC models. Most issues are isolated incidents of switch failure or cosmetic complaints like creaking plastic. Some broader recalls for instrument panel software or rearview cameras have been issued for 2023-2025 Lexus models, but these do not pertain to the center console panel itself.
Frequently Asked Questions (FAQ)
Can I upgrade my console panel to add features like ventilated seats?
No, this is not a simple plug-and-play upgrade. The wiring harness, control modules, and the seats themselves are different in vehicles equipped with ventilated seats. Simply swapping the console panel will not add the functionality.
Why do some buttons on my used replacement panel not work?
This almost always means the replacement panel is from a vehicle with a different option package than yours. For example, if your car does not have a heated steering wheel, plugging in a console that has that button will do nothing, as the underlying wiring and control module are not present.
Is the console panel the same for the IS and RC models?
While they are visually very similar and share many components, there can be subtle differences in shape, mounting points, and part numbers. It is best to source a replacement from the same model (IS or RC) as your vehicle to ensure perfect fitment.
How do I fix a creaking noise from my center console?
Creaking is usually caused by two plastic panels rubbing together. The fix often involves removing the console panel and applying thin, self-adhesive felt tape to the contact points and clips where the panels meet. This provides a cushion and stops the noise.
Helpful Videos
Technical Specifications
OEM Part Numbers: 55620-24090 58986-24010 81208-53250 81208-53250-C0 84752-24040 84752-53080 84970-53110 84970-53120
This is a multi-piece assembly with numerous variations. Part numbers listed are examples and may refer to sub-components like switches or cup holders rather than the entire panel assembly. Visual confirmation of features is the most reliable method for ensuring compatibility.
We Have This Part in Stock

The information in this article is provided for general reference and educational purposes only. Vehicle specifications, procedures, and part compatibility can vary by production date, trim level, and region. Always consult your vehicle's factory service manual and verify part numbers before purchasing or performing repairs. Safety-critical components such as airbags, seat belts, and braking systems should be installed by a qualified professional.
- Lexus IS300:
- Lexus IS350:
- Lexus IS500:
- LEXUS RC F:
- LEXUS RC300:
- LEXUS RC350: