
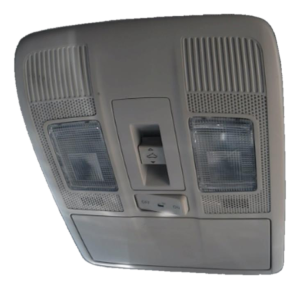
Mazda CX-5, Mazda3, Mazda6 & CX-3 Overhead Console: Why Sunroof & Light Switches Fail (2013-2023)
This guide covers common failures like broken sunroof switches and melted dome lights, and shows what to inspect on a used overhead console.
- The most common failure is the sunroof switch, which often breaks internally and physically jams, requiring replacement of the entire console.
- The whole console assembly must be replaced as individual switches are not sold separately.
- Before buying a used part, remove your old one and verify if it has two or three electrical connectors to ensure compatibility.
- Replacement is an easy DIY task, held in by only two screws inside the sunglasses holder and several clips.
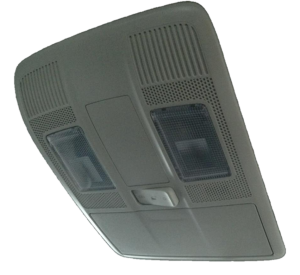
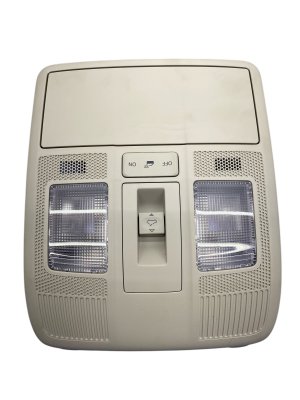
Symptoms of a Failing Overhead Console Panel

Failures in this console are almost always related to the mechanical or electrical components it houses. The plastic housing itself rarely fails unless it suffers physical damage. Watch for these common symptoms.
1. Sunroof Switch is Stuck or Inoperative
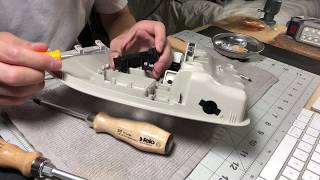
This is the most common failure point. The switch may feel physically stuck, refusing to slide into the 'open' or 'close' position. In many cases, a small piece of plastic inside the switch mechanism breaks off and jams the slider. You may find the sunroof will tilt but not slide, or it may not respond at all. Because the switch assembly is typically sealed or plastic-welded, it is not considered a repairable component; the entire console assembly must be replaced to fix it.
🎬 Watch this video to see a common moonroof switch failure.2. Dome or Map Lights Malfunction
The three-position switch that controls the main dome light (On / Door / Off) can fail internally. Over time, electrical arcing between the contacts can generate enough heat to melt the plastic switch housing. This can cause the switch to become welded into one position, preventing you from turning the lights on, off, or having them activate with the doors. You might also experience flickering lights before a complete failure.
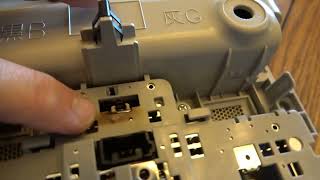
3. Broken Sunglasses Holder
The latching mechanism for the sunglasses holder is another frequent point of failure. The spring-loaded door may refuse to stay closed, or it may get stuck in the closed position and not open when pressed. While sometimes the holder itself can be replaced as a separate part, it is often easier and more cost-effective to replace the entire used console assembly.
🎬 See how a failing console behaves and how to fix it.4. Rattling or Buzzing Noises
A less common issue is the console assembly becoming loose in the headliner. This can cause rattling, buzzing, or creaking noises, especially when driving over rough roads. This is typically caused by loose mounting screws or worn retaining clips.
Known Issues, TSBs, and Recalls
While the failures of the overhead console switches are widely documented by owners in forums and videos, Mazda has not issued any specific recalls or Technical Service Bulletins (TSBs) for this part. The issues are generally considered to be the result of normal wear and tear on high-use components rather than a manufacturing defect affecting a specific production run.
Pro Tip: If your sunroof stops working, always check the fuse first before assuming the switch has failed. However, if the switch feels physically jammed, the problem is almost certainly within the console itself.
Buying a Used Overhead Console: What to Check
A used OEM console is an excellent, cost-effective solution for this repair. Since these parts are shared across the Mazda CX-5, Mazda3, Mazda6, and CX-3, they are widely available. Pay close attention to the following points before buying.
- Test the Switches: Physically actuate all the switches. The sunroof switch should slide smoothly through its range of motion without binding. The light switches should have a positive, tactile click. Avoid any console where the switches feel mushy, loose, or stuck.
- Inspect the Sunglasses Holder: Press the sunglasses holder to ensure it opens and closes correctly. Check that the latch engages firmly.
- Match Your Interior Color: These consoles come in different colors (black, gray, beige) to match the vehicle's headliner. Ensure the part you are buying is the correct color for your car.
- Check for Physical Damage: Inspect the plastic housing for any cracks, deep scratches, or broken mounting tabs, particularly around the screw holes inside the sunglasses holder area.
Warning: The most critical check is the number of electrical connectors. Some earlier models use a console with three wiring harness connection points, while later versions may only have two. Before ordering a replacement, remove your original console and count the number of connectors to ensure the used part is a direct match.
Installation Overview

Replacing the overhead console is a very simple DIY job that can be completed in under 15 minutes with basic tools.
Difficulty: 1 out of 5
Tools Required: Phillips head screwdriver, plastic trim removal tool (recommended).
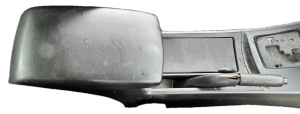
- Open the sunglasses holder to expose two Phillips head screws.
- Remove the two screws.
- Gently pull the front edge (windshield side) of the console downward. It is held in by clips. A plastic trim tool can help pry it loose without damaging the headliner.
- Once the front is loose, pull the console down and forward to release the rear clips.
- The console will now be hanging by its wiring harnesses. Carefully disconnect the electrical connectors by pressing their release tabs.
- Installation is the reverse of removal. Plug in the new console, insert the rear clips into the headliner first, then pivot the front up and press firmly until the clips engage. Reinstall the two screws.
Cost Comparison
Replacing a failed overhead console is relatively inexpensive, especially when choosing a used OEM part and performing the labor yourself.
| Part Type | Estimated Cost |
|---|---|
| New OEM | $150 - $275 |
| New Aftermarket | Not commonly available |
| Used OEM | $50 - $125 |
| Shop Labor | $75 - $125 |
Frequently Asked Questions (FAQ)
Can I just replace the broken sunroof switch instead of the whole console?
No, Mazda does not sell the individual switches separately. They are integrated into the console assembly, which must be replaced as a single unit.
Will a console from a Mazda6 fit my CX-5?
Yes, these vehicles share the same overhead console part. However, you must ensure it is for a model with a sunroof and that the interior color and number of electrical connectors match your original part.
My sunroof won't work, but the switch feels fine. What else could it be?
If the switch moves freely but the sunroof is unresponsive, the problem could be a blown fuse, a wiring issue, or a failed sunroof motor. Always check the fuse first, but a faulty switch is still the most common cause of an inoperative sunroof in these models.
Do I need to get the new console programmed to my vehicle?
No, the overhead console is a simple component with no programmable modules. It is a direct plug-and-play replacement.
Helpful Videos
Technical Specifications
OEM Part Numbers: GRF8-69971 GRF869971 KD45-69971 KD4569971 KD4769970C75 KD476998X KD45-69-970D-75
Plastic construction. Houses switches for sunroof and lighting, microphone for Bluetooth, and sunglasses storage. Available in various colors (black, beige, gray) to match interior trim. Designed for vehicles equipped with a sunroof.
We Have This Part in Stock


The information in this article is provided for general reference and educational purposes only. Vehicle specifications, procedures, and part compatibility can vary by production date, trim level, and region. Always consult your vehicle's factory service manual and verify part numbers before purchasing or performing repairs. Safety-critical components such as airbags, seat belts, and braking systems should be installed by a qualified professional.
- Mazda CX-5:
- Mazda Mazda3:
- Mazda Mazda6:
- Mazda CX-3:
- 🎬 Helpful Videos
- 🛍️ Shop This Part
- Symptoms of a Failing Overhead Console Panel
- 1. Sunroof Switch is Stuck or Inoperative
- 2. Dome or Map Lights Malfunction
- 3. Broken Sunglasses Holder
- 4. Rattling or Buzzing Noises
- Known Issues, TSBs, and Recalls
- Buying a Used Overhead Console: What to Check
- Installation Overview
- Cost Comparison
- Frequently Asked Questions (FAQ)
- 🎟️ Get 5% Off