
2007-2013 Mazda 3 Center Console Guide: Fixing the Broken Armrest Latch
This guide covers the most common failure point of the 2007-2013 Mazda 3 center console—the armrest latch—and provides detailed information for purchasing a used replacement.
- The most common failure is the armrest lid latch breaking; this can often be replaced separately without buying a whole new console.
- Verify compatibility before buying: this console is for Automatic Transmission models with a fixed (non-sliding) armrest.
- When buying a used console, the most critical inspection point is the integrity of the armrest latch mechanism and all plastic mounting tabs.
- Replacement is a simple DIY job for most owners, requiring only basic hand tools and about an hour of time.
Symptoms of a Failing Console Panel
Since the console panel is primarily a mechanical and cosmetic part, failures are typically visible or tactile rather than electronic. There are no diagnostic trouble codes associated with the console panel.
- Broken Armrest Latch: This is the most common point of failure. The small plastic tab on the latch mechanism becomes brittle over time and breaks, preventing the armrest lid from staying closed. The lid may pop open 🎬 Watch: How to diagnose and fix a latch that won't stay shut during driving, which can be a nuisance.
- Cracked or Damaged Plastic: The main body of the console can develop cracks, especially around high-stress areas like the mounting points or the shifter cutout. This is often due to physical impact or improper removal techniques.
- Worn or Peeling Armrest Surface: On models with a vinyl or leather-wrapped armrest, the surface can peel, crack, or become discolored from sun exposure and frequent contact with the driver's arm.
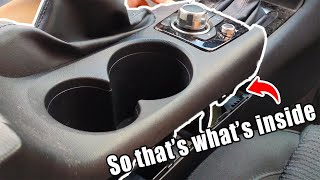
- Sticking or Broken Cup Holder Doors: If equipped with a sliding or flip-up cover for the cup holders, the mechanism can jam or the door itself can break.
Known Issues, TSBs, and Recalls
There are no recalls or Technical Service Bulletins (TSBs) issued by Mazda or the NHTSA that specifically address failures of the center console panel or its components for the 2007-2013 Mazda 3. Most issues, like the broken latch, are considered wear-and-tear items. A recall was issued for the 2004-2007 Mazda3 concerning the plastic emblem on the steering wheel airbag cover, but this does not pertain to the center console.
Compatibility Warning: This console is specifically for models with an Automatic Transmission and a fixed (non-sliding) armrest. Consoles from manual transmission vehicles have a different cutout for the shifter and will not fit. Be sure to verify the armrest type, as some higher trims may have featured a sliding armrest.
Buying a Used 2007-2013 Mazda 3 Console Panel
Purchasing a used OEM console is often the most cost-effective solution. Because the broken latch is so common, it's crucial to inspect a recycled part carefully before buying.
Inspection Checklist:
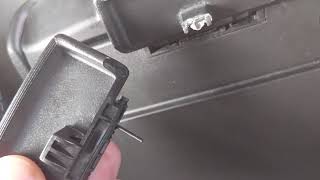
- Check the Latch Mechanism: This is the number one priority. Open and close the armrest lid multiple times. Ensure the latch button depresses smoothly and the plastic catch that secures the lid is fully intact and not cracked. If possible, buy from a seller who provides clear, close-up photos of the latch.
- Inspect All Mounting Points: Turn the console over and check every screw hole and plastic tab for cracks or stress marks. A console with broken mounting points will not sit securely and may rattle or shift after installation.
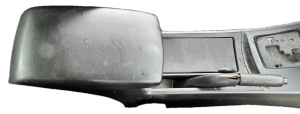
- Verify Armrest Type and Condition: Confirm it is the fixed, non-sliding armrest. Check the surface for any rips, peeling, or deep scratches.
- Match the Color and Trim: Consoles came in different colors (primarily black and beige) and textures to match the vehicle's interior. Verify the color against your original part.
- Check for Included Components: See if the console includes the rear trim pieces, the 12V power outlet, and the auxiliary input jack. Sometimes these are sold separately.
Cost Comparison
| Part Type | Estimated Cost |
|---|---|
| New OEM | $225 - $325 |
| New Aftermarket (Latch Only) | $15 - $30 |
| Used OEM (Full Assembly) | $75 - $150 |
| Shop Labor | $100 - $200 |
Installation Guide
Replacing the center console is a straightforward DIY project that requires basic hand tools.
Difficulty: 2 out of 5 (Easy to Moderate)
Estimated Time: 1 hour
Required Tools:
- Phillips head screwdriver
- Flathead screwdriver or plastic trim removal tool
- 8mm or 10mm socket and ratchet (depending on model year)
Step-by-Step Process:
- Remove the Shift Knob: For automatic transmissions, you may need to use a small flathead screwdriver to release a plastic tab or clip at the base of the knob before pulling it straight up.
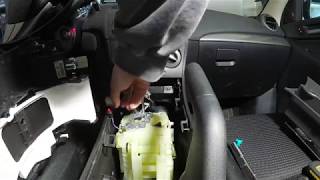
- Remove the Shifter Trim Panel: Gently pry up the trim piece surrounding the gear selector. It is held in by clips. Disconnect any electrical connectors for lights or switches underneath.
- Remove Mounting Screws: There are typically two screws located at the front of the console (often under the shifter trim you just removed) and two more inside the main storage compartment at the bottom.
- Lift the Console: Once all screws are removed, you can lift the console up and back. You may need to move the front seats forward and engage the parking brake to create enough clearance. Disconnect any remaining electrical connectors for the 12V outlet or AUX port as you lift it out.
- Installation: Installation is the reverse of removal. Be careful not to overtighten the screws in the plastic console.
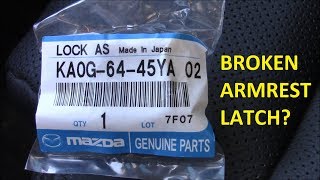
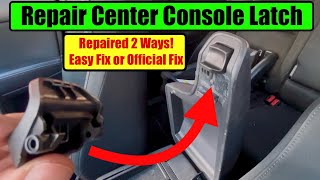
Pro Tip: If only your armrest latch is broken, you can often replace just the latch mechanism without removing the entire console. The latch itself is available as a separate part (OEM part number GS1E-64-45Y-02 for 2010-2013 models) and can be replaced by prying off the underside cover of the armrest lid.
🎬 Watch: Step-by-step guide to replacing just the armrest latchFrequently Asked Questions (FAQ)
Can I replace just the broken armrest latch?
Yes. For many 2010-2013 models, the latch is sold separately (part number GS1E-64-45Y-02). This is a much cheaper and faster repair than replacing the entire console assembly. The repair involves prying off the inner plastic panel of the armrest lid to access the pin and spring that hold the latch in place.
Will a console from a Mazdaspeed3 fit my standard Mazda 3?
No, a console from a Mazdaspeed3 will not fit. The Mazdaspeed3 was only available with a manual transmission, so the console has a different cutout for the shifter and boot.
How can I tell if I have a fixed or sliding armrest?
A fixed armrest is a single, stationary piece that only lifts up. A sliding armrest has a top portion that can slide forward and backward for better positioning before being lifted. Visually inspect your armrest; the sliding version will have a visible seam and a slightly different shape.
Is it difficult to disconnect the electrical connectors for the power outlet and AUX port?
No, it is not difficult. These connectors have a small release tab that you press with your thumb or a small screwdriver, which allows them to be pulled apart easily. Just be sure to disconnect them before fully removing the console from the vehicle to avoid damaging the wires.
🎬 See this walkthrough for removing the entire center console assemblyHelpful Videos
Technical Specifications
OEM Part Numbers: BAN664420A02 BAN66445002 BBM464420L02 BCN76445002 BP4N64332 GS1E-64-45Y-02 (Latch Only)
Material: Automotive-grade plastic, with vinyl or leather-wrapped armrest options.
We Have This Part in Stock


The information in this article is provided for general reference and educational purposes only. Vehicle specifications, procedures, and part compatibility can vary by production date, trim level, and region. Always consult your vehicle's factory service manual and verify part numbers before purchasing or performing repairs. Safety-critical components such as airbags, seat belts, and braking systems should be installed by a qualified professional.
- Mazda MAZDA3: