
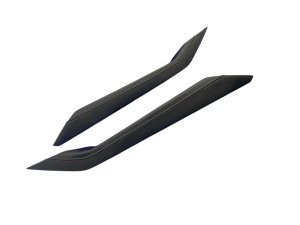
2020-2025 Mazda CX-30 Console Side Panel: A Guide to Fixing Rattles and Color Matching
This definitive guide covers the common causes of rattles, cosmetic damage, and fitment issues related to the center console side trim panels on the 2020-2025 Mazda CX-30.
- The most common issue is rattling, usually caused by broken mounting clips on the back of the panel.
- When buying a used panel, inspecting the back for intact mounting tabs is more important than minor scuffs on the front.
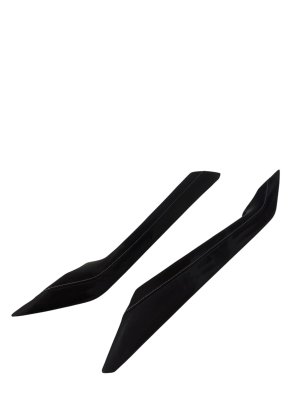
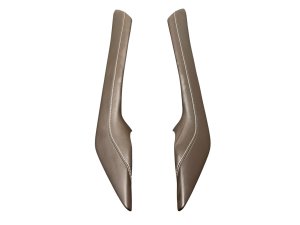
- Verify your interior color (e.g., brown, black, blue) with the seller, preferably using your VIN, as multiple color schemes exist.
- Replacement is an extremely easy DIY job that takes less than 10 minutes and only requires a trim removal tool.
Symptoms of a Failing Console Trim Panel
Failure of a console side panel is almost always related to physical damage or wear, resulting in cosmetic flaws and annoying noises. There are no electronic components in these panels, so they will not trigger any warning lights or diagnostic trouble codes.
1. Rattling, Buzzing, or Creaking Noises
This is the most common complaint from Mazda CX-30 owners regarding the interior. A rattling or buzzing sound may seem to come from the dashboard or center console area, especially while driving on uneven roads. While the source can be hard to pinpoint, it is often caused by a side trim panel that is not securely fastened. The plastic clips that hold the panel in place can become weak or break, allowing the panel to vibrate against the main console assembly.
2. Poor Fitment or Gaps
A visible gap between the side panel and the main center console is a clear sign of a problem. This is almost always caused by broken or missing mounting clips on the back of the panel. If the integrated tabs on the panel itself are cracked or broken, the panel will not sit flush, even with new clips. This not only looks bad but is also a guaranteed source of future rattles.
3. Cosmetic Damage
As a high-contact surface for knees and legs, these panels are susceptible to cosmetic wear. Look for:
- Scuffs and Scratches: Abrasions from getting in and out of the vehicle or from carried items.
- Stains or Discoloration: The material can be stained by spills or even by lotions and oils from skin.
- Tears or Punctures: Sharp objects can tear or puncture the soft leatherette material covering the panel.
Known Issues, TSBs, and Recalls
While the Mazda CX-30 is generally reliable, interior rattles are a frequent topic in owner forums.
- No Recalls: There have been no safety recalls issued by Mazda or the NHTSA for the center console trim panels. Recalls for the CX-30 have addressed other components like the power liftgate and airbag sensors.
- Related TSBs: While no TSB is specific to this panel, Mazda did issue a bulletin for a potential rattle noise coming from the passenger side airbag. This sound could be mistaken for a console rattle, so it's worth investigating if the source of a noise is difficult to locate. 🎬 Watch: How one owner tracked down and fixed a CX-30 rattle
Pro Tip: Before replacing a panel to solve a rattle, try applying small pieces of felt or foam tape to the contact points on the back of the panel. Sometimes, simply adding a bit of buffer material is enough to silence a vibration without needing a new part.
Buying a Used Console Trim Panel
Since aftermarket companies do not produce direct replacements for these specific panels, your only options are a new part from a Mazda dealer or a recycled OEM part. A used OEM panel offers a perfect match in color, texture, and fitment at a significant discount.
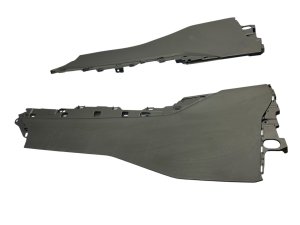
1. The Critical Inspection: Check the Back!
The condition of the front surface is important, but the condition of the back is critical. Before buying, carefully inspect photos of the back of the panel.
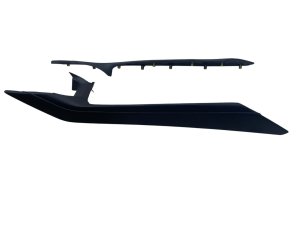
- Check All Mounting Tabs: Look for the molded plastic tabs where the clips attach. Ensure none of these are cracked, stressed, or broken off. A panel with a broken tab will never fit securely.
- Verify All Clips are Present: While clips can sometimes be replaced, it's best to get a panel with all of its original clips intact.
2. Verify Your Interior Color
The most important step is to confirm the panel matches your car's interior. The CX-30 was offered with several color schemes, including all-black, brown accents, and blue accents. The provided part numbers DGH9-64-914 (Passenger Side) and DGH9-64-924 (Driver Side) are for the black version. Do not rely on photos alone, as lighting can be deceptive. The best way to ensure a match is to provide the seller with your vehicle's VIN.
3. Why Used OEM is the Best Choice
For a cosmetic part like this, a used OEM panel is often the smartest buy. You get the exact same quality, fit, and material as the original part without the high cost of a new one. Aftermarket options are limited to stick-on covers or protective films, not the panel itself.
Replacement Difficulty: 1/5
Replacing a console side panel is one of the easiest interior repairs you can perform. It is a simple, straightforward job that requires no special skills and is highly feasible for a DIYer.
- Estimated Time: 5-10 minutes
- Tools Required: Plastic trim removal tool (recommended to prevent scratches) or a flat-head screwdriver wrapped in tape.
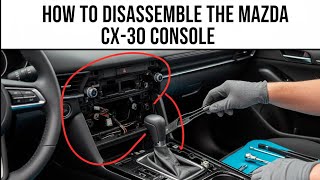
Step-by-Step Replacement Guide
- Find a seam at the edge of the panel, usually at the bottom or rear.
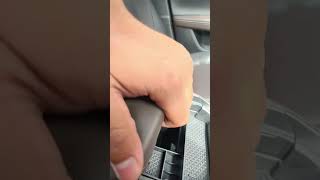
- Gently insert a plastic trim removal tool into the seam and pry outwards. The panel is held in only by clips.
- Work your way around the panel, releasing one clip at a time until the panel comes free. 🎬 See this video guide on disassembling the CX-30 console
- To install the new panel, align the clips with the corresponding holes in the center console.
- Press firmly and evenly around the perimeter of the panel until you hear and feel all the clips snap securely into place.
Cost of Console Side Panel Replacement
| Part Type | Estimated Cost (Per Side) |
|---|---|
| New OEM | $110 - $150 |
| Used OEM | $50 - $100 |
| New Aftermarket | Not Available |
| Shop Labor | $50 - $100 (Shop minimum) |
Pricing is an estimate and may vary based on location, supplier, and part condition.
Technical Specifications & Part Numbers
These part numbers are for the black interior trim. Always confirm with your VIN before ordering.
- Driver Side (LH): DGH9-64-924
- Passenger Side (RH): DGH9-64-914
- Other Potential Numbers: BDTS64231 (may be for non-US markets)
Frequently Asked Questions (FAQ)
My console rattles, but the side panels seem fine. What else could it be?
Rattles in the CX-30 can be tricky. Owners have reported noises from the armrest latch, items in the glovebox or console bin, 🎬 Watch: A quick overview of the CX-30 center console features the overhead console, or even the passenger airbag housing. Try to isolate the noise by pressing on different panels while driving (with a passenger's help) to see if the sound stops.
Do I need to replace both side panels at the same time?
No. You only need to replace the damaged or rattling panel. However, if one panel is faded or worn from sun exposure, replacing both may be necessary to ensure a perfect cosmetic match.
Can I just wrap the panel in vinyl or new fabric?
Yes, this is a possible DIY solution for purely cosmetic damage. However, removing the old material and applying a new one smoothly can be challenging. You would need to remove the panel from the car first. This will not solve any issues related to broken mounting clips or rattles.
What is the best way to clean these panels to prevent damage?
Use a pH-neutral interior cleaner designed for automotive use and a soft microfiber towel. Avoid harsh chemicals, abrasive cleaners, or solvents, as they can discolor or damage the leatherette material. A TSB notes that stains can be caused by skin lotions, so regular light cleaning is recommended.
Helpful Videos


Technical Specifications
OEM Part Numbers: DGH9-64-924 (Driver Side, Black) DGH9-64-914 (Passenger Side, Black)
Material: Plastic base with padded leatherette surface. Attachment: Plastic clips.
We Have This Part in Stock

The information in this article is provided for general reference and educational purposes only. Vehicle specifications, procedures, and part compatibility can vary by production date, trim level, and region. Always consult your vehicle's factory service manual and verify part numbers before purchasing or performing repairs. Safety-critical components such as airbags, seat belts, and braking systems should be installed by a qualified professional.
- Mazda CX-30:
- 🎬 Helpful Videos
- 🛍️ Shop This Part
- Symptoms of a Failing Console Trim Panel
- 1. Rattling, Buzzing, or Creaking Noises
- 2. Poor Fitment or Gaps
- 3. Cosmetic Damage
- Known Issues, TSBs, and Recalls
- Buying a Used Console Trim Panel
- 1. The Critical Inspection: Check the Back!
- 2. Verify Your Interior Color
- 3. Why Used OEM is the Best Choice
- Replacement Difficulty: 1/5
- Step-by-Step Replacement Guide
- Cost of Console Side Panel Replacement
- Technical Specifications & Part Numbers
- Frequently Asked Questions (FAQ)
- 🎟️ Get 5% Off