
2014-2016 Kia Sportage Door Panel: A Guide to Common Issues and Replacement
This guide covers the common failure points, replacement procedures, and what to look for when buying a used interior door trim panel for your 2014-2016 Kia Sportage.
- The most common failures are cosmetic, such as peeling material on the armrest, and functional, like broken mounting clips causing rattles.
- When buying a used panel, prioritize the integrity of the rear mounting tabs and switch mounts over minor surface scuffs.
- Part numbers are color-specific. Verify suffixes like 'WK' for black or 'GAH' for mocha to ensure a perfect match for your interior.
- Replacement is a simple DIY job requiring only a Phillips screwdriver and a plastic trim tool, typically taking less than an hour.
Symptoms of a Failing Door Interior Trim Panel

Since the door panel is a high-touch area, it's susceptible to wear and tear. Failure is typically related to physical damage rather than mechanical breakdown. Here are the most common symptoms:
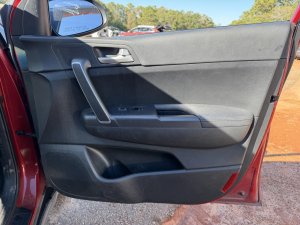
- Rattling or Buzzing Noises: This is often the first sign of a problem. Broken or loose plastic clips that hold the panel to the door frame can cause vibrations and annoying noises, especially when driving on rough roads or when the stereo is on.
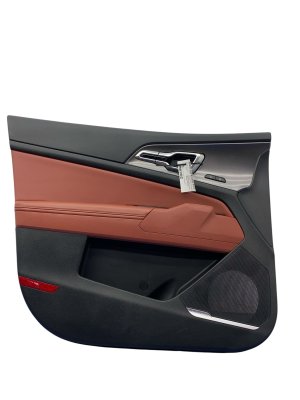
- Peeling or Bubbling Material: The vinyl or leatherette material on the armrest and upper sections of the panel can delaminate from the plastic base due to heat, sun exposure, and repeated use. This results in an unsightly appearance.
- Loose or Sunken Switches: The mounting points for the power window and lock switch assembly can break. This causes the switch panel to become loose, push into the door, or stop working reliably.
- Broken Door Pull Handle or Armrest: The plastic structure of the integrated door pull handle or the armrest itself can crack or break from the stress of closing the door or from passengers putting weight on it. 🎬 See how to replace a broken interior door handle.
- Visible Cracks or Damage: Accidental impacts from feet, cargo, or seat belts can cause the main plastic body of the panel to crack or become scuffed.
Buying a Used Door Interior Trim Panel: What to Check
A used OEM door panel is often a great value, offering the same fit and quality as a new part. However, a thorough inspection is key before purchasing.
Pro Tip: For this part, a used OEM panel is almost always a better choice than a new aftermarket one. Aftermarket panels often use inferior materials that don't match the vehicle's interior texture and color, and may have fitment issues.
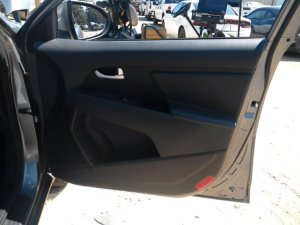
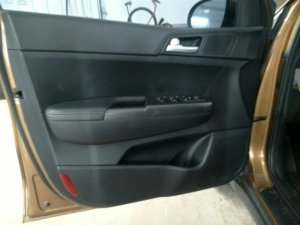
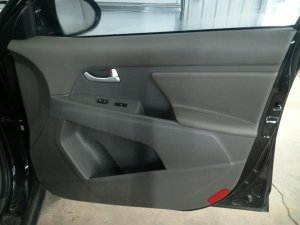
- Inspect All Mounting Points: This is the most critical check. Flip the panel over and carefully examine all the plastic tabs and slots where the retaining clips attach. These are easily broken during removal. A panel with multiple broken tabs will not sit flush and will likely rattle.
- Check Structural Integrity: Apply pressure to the armrest and the door pull handle area. Look for any signs of stress cracks or flexing in the plastic. This is a high-stress area and a common point of failure.
- Verify Switch Mounts: Look at the opening for the power window switch. The plastic bosses where the switch clips or screws in must be intact. If these are broken, your switch will not mount securely.
- Examine the Material Condition: Check for any peeling, bubbling, or deep scratches on the surface material. Pay close attention to the armrest area. While minor scuffs can be acceptable, delaminating material is difficult to repair properly.
- Confirm the Color and Trim: Kia offered different interior colors and trim levels. The part numbers are specific to these variations. For example, 823083w023wk is for a black leather trim panel, while 82308-3W023GAH is for a mocha leather trim. Always match the part number or verify the color from the donor vehicle's VIN to ensure it matches your interior.
Known Issues, TSBs, and Recalls

While there are no recalls or Technical Service Bulletins (TSBs) specifically for the door trim panel itself, the 2014-2016 Kia Sportage was subject to a significant recall that owners should be aware of.
- NHTSA Recall 22V-051 (Kia Campaign SC227): This recall addresses a fire risk originating from the Hydraulic Electronic Control Unit (HECU), which is part of the anti-lock brake system. An electrical short in the HECU could cause a fire in the engine compartment, even when the vehicle is parked and turned off. The remedy involves dealers installing a new, lower-capacity fuse to prevent an overcurrent condition. While this issue is unrelated to the door panel, it is a critical safety issue for all owners of this vehicle.
Replacement Overview

Replacing the door panel is a straightforward DIY job that can be completed with basic tools.
Tools Needed:
- Phillips head screwdriver
- Plastic trim removal tool (a flathead screwdriver wrapped in tape can work, but a dedicated tool is better to avoid scratches)
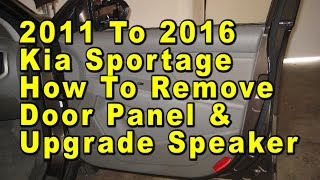
Step-by-Step Summary: 🎬 Watch this quick tutorial on removing the door panel.
- Remove Screws: There are typically three Phillips head screws holding the panel. One is behind a small plastic cover near the interior door handle, one is under a cover in the armrest's pull-cup, and another is in the corner near the side mirror (sail panel).
- Pry Off the Panel: Starting from the bottom, use a plastic trim removal tool to carefully pry the panel away from the door. This will release a series of plastic clips around the perimeter. Use firm, steady pressure.
- Lift and Disconnect: Once all the clips are free, lift the panel straight up to unhook it from the top of the door frame near the window.
- Disconnect Cables and Wires: The panel will still be attached by the door handle cable and electrical connectors for the switches and speaker. 🎬 Watch this guide for panel removal and speaker upgrade tips. Carefully disconnect the electrical plugs (they have small release tabs) and unclip the door handle cable from its linkage.
- Installation: Installation is the reverse of removal. Reconnect the cables and wires, hook the top of the panel onto the door frame, and then firmly press the panel into place to engage the clips. Reinstall the screws.
Cost Comparison
| Part Type | Estimated Cost |
|---|---|
| New OEM | $335 - $500 |
| New Aftermarket | Not commonly available |
| Used OEM | $100 - $200 |
| Shop Labor | $75 - $150 |
Frequently Asked Questions (FAQ)
Can I just glue the peeling armrest material back down?
While you can attempt to use spray adhesive, it is often a temporary fix. The foam underneath the material may have degraded, and the heat cycles inside the car can cause the glue to fail again quickly. For a long-term solution, replacing the panel is the best option.
Do I need to disconnect the battery to replace the door panel?
While not strictly required by most guides, it is always a good safety practice to disconnect the negative battery terminal before working with any electrical components on your vehicle, including the power window switches.
Will a door panel from a 2012 Sportage fit my 2015 Sportage?
Yes, the third-generation Kia Sportage (model years 2011-2016) uses the same basic door panel design. However, you must ensure the color, material (cloth vs. leather), and any options (like power folding mirrors) match your specific vehicle. Always match part numbers when possible.
What are the little plastic clips that hold the panel on called?
They are called door panel retaining clips or trim clips. It's very common for one or two to break during removal, even when being careful. It is a good idea to have a few replacements on hand before you start the job. They are inexpensive and widely available at auto parts stores.
Helpful Videos


Technical Specifications
OEM Part Numbers: 82308-3W023GAH 823083w023wk
Part number suffixes denote color and trim. For example, 'WK' corresponds to black leather trim, and 'GAH' corresponds to mocha leather trim. Panels are specific to models with power windows and power locks.
We Have This Part in Stock


The information in this article is provided for general reference and educational purposes only. Vehicle specifications, procedures, and part compatibility can vary by production date, trim level, and region. Always consult your vehicle's factory service manual and verify part numbers before purchasing or performing repairs. Safety-critical components such as airbags, seat belts, and braking systems should be installed by a qualified professional.
- Kia Sportage: