
2004-2009 Toyota Prius Door Panel: Rattles, Peeling Armrests, and Window Switch Issues
A complete guide to diagnosing common failures, buying a used panel, and understanding the critical power window switch recall for the second-generation Prius.
- A critical safety recall exists for the power window master switch due to a fire hazard; ensure this has been addressed before purchasing or using the vehicle.
- The most common failures are cosmetic, such as peeling armrests and rattles from broken clips.
- When buying a used panel, color matching (Gray vs. Bisque) and checking the integrity of the rear mounting points are the most important steps.
- Replacement is a simple DIY task requiring only basic tools, making a used OEM panel a very cost-effective repair.
Symptoms of a Failing Door Panel
Problems with the door panel on a second-generation Prius are usually easy to spot and fall into a few common categories: physical wear, annoying noises, or the failure of a component mounted to it.
Physical Damage and Wear
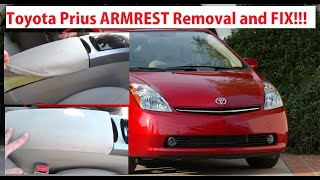
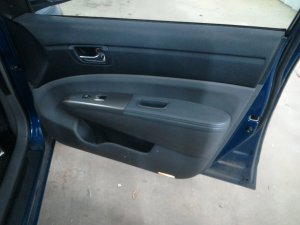
- Peeling or Bubbling Armrest: The fabric or vinyl on the armrest is known to separate from the foam backing over time, creating an unsightly bubble or peeling away completely. This is one of the most common cosmetic complaints.
- Cracked or Broken Plastic: The plastic can become brittle with age and sun exposure. Cracks often appear around the door pull handle, speaker grille, or along the top edge where it meets the window.
- Broken Interior Door Handle: The plastic interior release handle is a common failure point. It may feel loose or break off, making it impossible to open the door from the inside.
- Scuffs and Scratches: General wear and tear from seatbelts, shoes, and cargo can cause deep scratches and scuffs in the panel's plastic surface.
Noises
- Rattles and Buzzes: This is often the first sign of a problem. Rattles are typically caused by broken or loose plastic retaining clips on the back of the panel, which allows it to vibrate against the metal door frame. The noise is most noticeable when driving over bumps or when playing music with bass.
- Creaks and Pops: The panel itself is made of multiple pieces of plastic fused together. Over time, these joints can weaken and break, causing the sections to rub against each other and create creaking sounds.
Component Failure
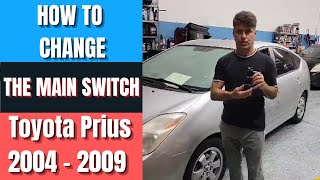
- Faulty Window/Lock Switch: The master window switch on the driver's door can fail, causing one or more windows or locks to become inoperative. A sticky or "notchy" feeling in the switch is a major warning sign related to a fire safety recall.
Safety Recall: Power Window Master Switch Fire Hazard
A critical safety recall (NHTSA Campaign ID: 12V537000, expanded under C0M) affects 2004-2009 Prius models. The driver's side power window master switch may not have been assembled with enough special grease. This can lead to a sticky or inconsistent feel. Owners attempting to fix this with commercially available lubricants can cause a short circuit, leading to the switch overheating, melting, and potentially causing a fire. Symptoms include a burning smell, smoke from the switch, or an inoperative switch. Toyota dealers will inspect the switch and either apply the correct fluorine grease or replace the circuit board at no charge. It is crucial to ensure this recall has been performed.
Buying a Used 2004-2009 Prius Door Panel: What to Check
A used OEM door panel is often the most cost-effective solution. Because new panels are extremely expensive, a high-quality used panel provides the best value. Here’s what to inspect before you buy.
1. Verify the Color
Prius interiors for this generation primarily came in two colors: Gray and Bisque (a light beige/tan). These colors do not interchange well and will look out of place if mismatched. The surest way to get the right color is to check the trim code on your vehicle's driver-side door jamb sticker. The code is usually listed as "TRIM".
2. Inspect the Armrest and Fabric
This is the most common area for wear. Run your hand over the armrest and any fabric inserts. Look for any signs of bubbling, peeling, or separation from the backing board. Avoid panels where the fabric is already lifting, as it will only get worse.
3. Check All Mounting Points (Critically Important)
Turn the panel over and inspect the back side. Look for small, round plastic clips and the larger plastic bosses where screws go. If any of the main screw bosses are cracked or broken, the panel will never fit tightly and will rattle. Check that all the smaller clip mounting points are intact. Missing or broken clips are the primary cause of rattles.
4. Examine the Window Switch (If Included)
🎬 See how to properly swap out the master window switch.If you are buying a panel with the master window switch, press each button. They should move smoothly. Be wary of any switch that feels sticky, gritty, or "notchy," as it may be subject to the fire hazard recall and has not been serviced.
5. Look for Hidden Cracks
Carefully inspect the areas around the speaker grille and the door pull cup. These are high-stress areas that can develop hairline cracks that are easy to miss at first glance. Flex the panel slightly to see if any hidden cracks open up.
Cost Comparison
| Part Type | Estimated Cost | Notes |
|---|---|---|
| New OEM | $780 - $955+ | Extremely expensive and may have limited availability. Price varies by color and specific part number. |
| New Aftermarket | $70 - $140 (Components Only) | Complete aftermarket panels are not common, but individual components like armrest covers, handles, and switches are available. |
| Used OEM | $100 - $250 | The most common and cost-effective option. Price depends heavily on condition, color, and whether the master switch is included. |
| Shop Labor | $100 - $200 | Typically 0.5 to 1.0 hour of labor. Replacement is straightforward for most shops. |
Installation Guide
Replacing the door panel is a beginner-friendly DIY job.
- Difficulty: 2 out of 5
- Time: 30-45 minutes
- Tools Needed: Phillips screwdriver, plastic trim removal tool, small flathead screwdriver.
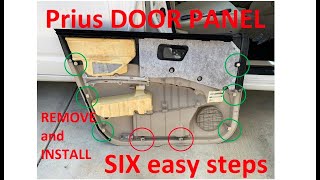
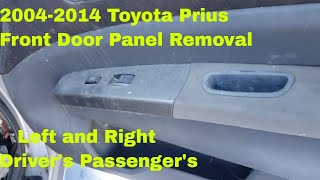
Step-by-Step Replacement
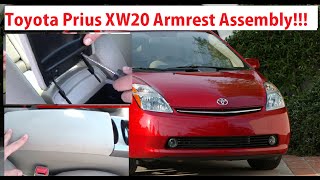
🎬 Watch this step-by-step guide to removing front door panels.- Remove Screws: Locate and remove the Phillips head screws. There is one inside the door pull cup and another behind a small plastic cover in the door release handle assembly.
- Remove Switch Panel: Using a plastic trim tool, carefully pry up the master window switch panel (on the driver's side) or the single switch panel. Disconnect the electrical connectors by pressing their release tabs.
- Pop the Clips: Starting at the bottom, use a trim removal tool to slide between the panel and the metal door. Pry outwards to pop the retaining clips. Work your way around the sides and bottom of the door.
- Lift Panel Off: Once all clips are free, lift the entire panel straight up to unhook it from the top of the window channel.
- Disconnect Cables/Lights: Before pulling the panel away, disconnect the cable for the door lock and handle, and the electrical connector for the courtesy light at the bottom of the door.
- Installation: Installation is the reverse of removal. Hang the panel on the top of the door frame first, then reconnect lights and cables. Align the clips with their holes and press firmly around the perimeter to snap the panel into place. Reinstall the screws and switch panel.
Pro Tip: When removing the old panel, some of the white or yellow plastic clips may stay in the metal door instead of coming off with the panel. Use your trim tool to carefully pry these clips out of the door and slide them back onto their mounting points on the new panel before installation. This ensures a tight, rattle-free fit.
Frequently Asked Questions (FAQ)
My door panel is rattling. What's the most likely cause?
The most common cause of rattles is broken or loose plastic retaining clips on the back of the panel. Over time, they become brittle and can break during removal or from vibration. Replacing these small clips is an inexpensive fix that usually solves the problem.
Can I just replace the peeling armrest fabric? 🎬 Watch a demonstration on how to fix unglued armrest fabric.
Yes, but it is an involved process. The armrest component must be separated from the main door panel, which involves breaking plastic welds that must then be reglued or epoxied. You would then need to scrape off the old material and adhesive, and use a strong spray adhesive and potentially staples to attach the new fabric. For most people, finding a good used panel is an easier solution.
Is the power window switch recall really a fire hazard?
Yes. Toyota and NHTSA have documented cases where the switch has overheated, produced smoke, and melted, with some reports of door trims burning. The risk increases significantly if a non-specified lubricant is used on the switch. It is a serious safety issue that should be addressed immediately.
Will a door panel from a 2008 Prius fit my 2005 Prius?
Yes, the door panels are interchangeable across the entire 2004-2009 model year range. However, you must ensure the color (Gray or Bisque) and position (e.g., front driver side) are an exact match for your vehicle.
Helpful Videos

Technical Specifications
OEM Part Numbers: 67610-47130-C1 67620-47160-B0 67620-47160-E0 67610-47081-D0
Fits 2004, 2005, 2006, 2007, 2008, 2009 Toyota Prius models. Available interior colors are primarily Gray and Bisque (Beige).
We Have This Part in Stock

The information in this article is provided for general reference and educational purposes only. Vehicle specifications, procedures, and part compatibility can vary by production date, trim level, and region. Always consult your vehicle's factory service manual and verify part numbers before purchasing or performing repairs. Safety-critical components such as airbags, seat belts, and braking systems should be installed by a qualified professional.
- Toyota Prius:
- 🎬 Helpful Videos
- 🛍️ Shop This Part
- Symptoms of a Failing Door Panel
- Physical Damage and Wear
- Noises
- Component Failure
- Buying a Used 2004-2009 Prius Door Panel: What to Check
- 1. Verify the Color
- 2. Inspect the Armrest and Fabric
- 3. Check All Mounting Points (Critically Important)
- 4. Examine the Window Switch (If Included)
- 5. Look for Hidden Cracks
- Cost Comparison
- Installation Guide
- Step-by-Step Replacement
- Frequently Asked Questions (FAQ)
- 🎟️ Get 5% Off