
Durango & Grand Cherokee: Solving the ECM vs. Exhaust Bracket Mix-Up (2014-2026)
Don't buy the wrong part—this guide clarifies the critical difference between the Engine Control Module bracket (68251949AD) and a common exhaust bracket (68166084AA) that share similar vehicle fitment.
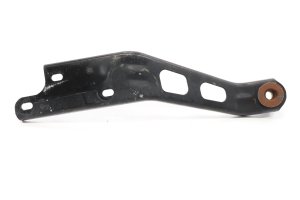
- Crucially verify the part number: 68251949AD is the ECM bracket, while 68166084AA is an exhaust bracket for the 3.6L engine.
- Symptoms of a bad bracket are actually symptoms of a loose ECM: stalling, no-start, and erratic electrical behavior.
- Replacement is DIY-friendly, requiring removal of the coolant reservoir for access on the passenger side of the engine bay.
- When buying used, check for collision damage (bends, cracks) and corrosion, as these are the primary reasons for failure.
The Critical Part Number Mix-Up: ECM Bracket vs. Exhaust Bracket
A significant point of confusion for owners of 2014-2026 Dodge Durango and 2014-2022 Jeep Grand Cherokee models is the mix-up between two similarly-fitting but completely different brackets. It is essential to verify the exact part number you need before ordering.
Warning: Part number 68166084AA is an EXHAUST BRACKET, not an engine computer bracket. It is used to support the exhaust system, typically on models with the 3.6L V6 engine. Part number 68251949AD is the correct part for the ENGINE CONTROL MODULE (ECM) BRACKET.
Mistaking these two parts is a common error because they appear in searches for the same vehicles. Ordering the wrong one will result in wasted time and a part that cannot be used for your repair. Always double-check the part number stamped on your existing bracket if possible, or confirm the function based on its location in the vehicle.
Part Identification Table
| Part Number | Part Name | Function & Fitment Notes |
|---|---|---|
| 68251949AD (supersedes 68251949AC, 68251949AB) | Engine Control Module (ECM) Bracket | Mounts the main engine computer in the engine bay. Fits a wide variety of engines including the 3.0L Diesel, 3.6L V6, 5.7L V8, and 6.4L V8. |
| 68166084AA | Left Exhaust Bracket | Supports the exhaust system. Primarily fits models with the 3.6L V6 engine. |
Symptoms of a Failed or Loose ECM Bracket
While the metal bracket itself is a simple component that rarely fails on its own, it can be damaged in a collision, weakened by corrosion, or installed improperly. The symptoms you'll experience are not from the bracket itself, but from the ECM being insecurely mounted.
- Engine Stalling or No-Start: If the ECM is loose, vibrations can cause its large electrical connectors to momentarily lose contact. This can cause the engine to stall while driving or fail to start at all. Wiggling the ECM or its connectors may cause the fuel pump relay to click or allow the vehicle to start, pointing to a connection issue.
- Check Engine Light and Various Error Codes: An insecure ECM can trigger a flood of seemingly unrelated diagnostic trouble codes (DTCs), often related to "lost communication" with other modules.
- Erratic Engine Performance: Symptoms can include engine stuttering, misfires, sudden loss of power, and poor fuel economy as the ECM's ability to control the engine is compromised.
- Poor Shifting: The ECM communicates with the Transmission Control Module (TCM). A loose connection can result in harsh, jerky, or unpredictable shifting.
- Visible Corrosion or Damage: A visual inspection may reveal that the bracket is bent, cracked, or heavily rusted, especially at its mounting points to the chassis. This corrosion can also create a poor ground connection for the ECM, leading to a variety of electrical gremlins.
Buying a Used Engine Control Module Bracket
A used OEM bracket is an excellent, cost-effective choice, as it's a simple metal part without complex electronics. However, careful inspection is key to ensure you're getting a good part.
- Verify the Part Number: This is the most critical step. Ensure you are buying part number 68251949AD or one of its predecessors (68251949AC/AB). Do not purchase 68166084AA unless you need an exhaust bracket.
- Inspect for Physical Damage: Check for any signs of bending, cracking, or stress marks. A bracket damaged in a collision may not hold the ECM securely or align correctly with the mounting holes.
- Check for Corrosion: Examine the entire bracket for rust, especially around the bolt holes and areas where it contacts the vehicle body. Heavy corrosion can compromise its structural integrity and grounding capability.
- Ensure Mounting Holes are Intact: Make sure the bolt holes are not stripped, enlarged, or deformed. Damaged holes can prevent you from properly torquing the bolts, leaving the ECM loose.
Replacement Overview and Difficulty
Replacing the ECM bracket requires removing the ECM itself. The process is straightforward for a DIYer with basic tools.
- Difficulty Rating: 2/5
- Estimated Time: 1 - 1.5 hours
- Tools Required: Ratchet with extension, 10mm socket, flathead screwdriver (for plastic clips).
Step-by-Step Summary
- Disconnect the Battery: Always disconnect the negative battery terminal before working on any part of the vehicle's electrical system. The battery is located under the front passenger seat.
- Access the ECM: The ECM is located in the engine bay on the passenger side, near the coolant reservoir and main fuse box.
- Remove the Coolant Reservoir: To gain access, you will likely need to unbolt the coolant reservoir and move it aside.
- Disconnect the ECM Connectors: Carefully release the locking tabs on the two large electrical connectors and pull them away from the ECM. These tabs can be fragile, so apply steady and even pressure.
- Unbolt the ECM and Bracket: Remove the three 10mm bolts that secure the ECM and its bracket to the vehicle's chassis. The entire assembly can then be lifted out.
- Swap the Bracket: Unbolt the old bracket from the ECM and install the new one.
- Reinstallation: Installation is the reverse of removal. Ensure the ECM connectors click securely into place and that all bolts are tightened properly. Reconnect the battery last.
Cost Comparison for ECM Bracket Replacement
| Item | Estimated Cost | Notes |
|---|---|---|
| New OEM Bracket (68251949AD) | $60 - $95 | Price from Mopar dealers and online retailers. |
| Used OEM Bracket | $25 - $50 | Price from salvage yards or online marketplaces like eBay. |
| New Aftermarket Bracket | Not Widely Available | This part is primarily available as an OEM component. Aftermarket options are rare. |
| Shop Labor | $125 - $250 | Based on 1-1.5 hours of labor at a typical shop rate of $125-$165/hour. |
Frequently Asked Questions (FAQ)
Can a bad ECM bracket make my car not start?
Yes. While the bracket itself doesn't have any electronics, if it is broken or loose, it can allow the ECM to vibrate and cause the main electrical connectors to lose contact. This interruption can prevent the engine from starting or cause it to stall unexpectedly.
Do I need to program my computer after replacing just the bracket?
No. You are only replacing the physical mounting hardware. The original ECM is being put back in place, so no programming or calibration is required. Programming is only necessary when the ECM itself is replaced.
Where is the ECM bracket located on my Durango or Grand Cherokee?
On both the Dodge Durango (2014-2026) and Jeep Grand Cherokee (2014-2022), the ECM and its bracket are found in the engine compartment on the passenger side, typically positioned near the coolant overflow tank and the main under-hood fuse box.
Why can't I find an aftermarket version of this bracket?
Simple, vehicle-specific hardware like this bracket is often not reproduced by aftermarket companies like Dorman unless there is a very high failure rate or a flaw in the original design. Since the OEM bracket is durable and failure is uncommon outside of collisions, the demand for an aftermarket version is low.
Technical Specifications
OEM Part Numbers: 68251949AD 68251949AC 68251949AB
Material: Stamped Steel. Location: Engine bay, passenger side.
We Have This Part in Stock


The information in this article is provided for general reference and educational purposes only. Vehicle specifications, procedures, and part compatibility can vary by production date, trim level, and region. Always consult your vehicle's factory service manual and verify part numbers before purchasing or performing repairs. Safety-critical components such as airbags, seat belts, and braking systems should be installed by a qualified professional.
- Dodge Durango:
- Jeep Grand Cherokee:
- 🛍️ Shop This Part
- The Critical Part Number Mix-Up: ECM Bracket vs. Exhaust Bracket
- Part Identification Table
- Symptoms of a Failed or Loose ECM Bracket
- Buying a Used Engine Control Module Bracket
- Replacement Overview and Difficulty
- Step-by-Step Summary
- Cost Comparison for ECM Bracket Replacement
- Frequently Asked Questions (FAQ)
- 🎟️ Get 5% Off