
2012-2014 Honda CR-V Engine Oil Pan: Leaks, Stripped Plugs, and Replacement
Diagnose common oil pan leaks and stripped drain plugs on your 2.4L CR-V and learn what to look for when buying a used replacement.
- The most common failure is not the pan itself, but stripped drain plug threads from over-tightening. Always use a torque wrench set to 29-30 ft-lbs.
- When buying a used pan, the condition of the drain plug threads is the most important factor to inspect.
- This pan uses liquid RTV sealant, not a solid gasket. A successful, leak-free replacement depends entirely on meticulous cleaning of the mating surfaces.
- This part (11200-RX0-A00 / 11200-R5A-000) is shared with the 2012-2015 Honda Civic Si, expanding the pool of available used parts.
Symptoms of a Failing Oil Pan
A failing oil pan almost always results in an oil leak. The severity can range from minor seepage to a catastrophic loss of engine oil. Ignoring the signs can lead to expensive engine damage.
- Oil Puddles Under the Car: This is the most obvious sign. Small drips or large puddles of dark brown or black fluid under the engine area point to a leak.
- Low Oil Level Warning Light: If the oil level drops significantly due to a leak, the oil pressure warning light on your dashboard may illuminate. This indicates a serious condition, and you should stop the engine as soon as it is safe to do so.
- Visible Damage: A physical inspection may reveal cracks, deep gouges, or dents in the pan from hitting road debris or a curb.
- Oil Seepage Around the Pan: A wet, grimy film of oil and dirt caked onto the pan or where it meets the engine block indicates a slow leak. This is often caused by a failing sealant.
- Leak from the Drain Plug: Oil dripping specifically from the drain plug is a common issue, often caused by a worn-out washer or, more seriously, stripped threads in the pan itself.
- Burning Oil Smell: If oil leaks onto hot exhaust components, it will burn off, creating a distinct and unpleasant acrid smell. 🎬 Watch: How to find and fix a Honda CR-V oil leak
Known Issues for the 2012-2014 Honda CR-V Oil Pan
While there are no specific recalls or widespread Technical Service Bulletins (TSBs) for the oil pan on the 2012-2014 CR-V, they are subject to common failures seen across many vehicles with similar cast aluminum pans.
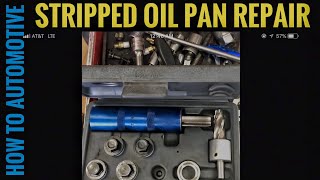
- Stripped Drain Plug Threads: This is the most frequent problem. The aluminum threads in the pan are much softer than the steel drain plug. Repeated over-tightening during oil changes can easily damage or strip the threads, preventing the plug from sealing properly. 🎬 See this guide on repairing stripped oil drain plug threads The correct torque for the drain plug is critical—only 29-30 ft-lbs (40 Nm).
- Impact Damage: As the lowest point of the engine assembly, the oil pan is vulnerable to being struck by road debris, running over curbs, or bottoming out on steep driveways, which can crack the cast aluminum.
- Sealant Leakage: This pan does not use a traditional pre-formed gasket. Instead, it is sealed to the engine block with a liquid RTV sealant (Hondabond is the OEM product). Over time, or if improperly applied during a previous repair, this sealant can degrade and cause leaks along the mating surface.
Compatibility Warning: This oil pan, part number 11200-RX0-A00 or 11200-R5A-000, is specific to the 2.4L (K24Z7) engine. It fits all trims of the 2012-2014 Honda CR-V. It is also the same part used on the 2012-2015 Honda Civic Si, which shares the same engine. It will NOT fit other CR-V generations or other Honda models.
Buying a Used Engine Oil Pan: What to Check
A used OEM oil pan is an excellent, cost-effective alternative to an expensive new dealer part, and often superior in quality to cheap aftermarket options. However, a thorough inspection is crucial before buying.
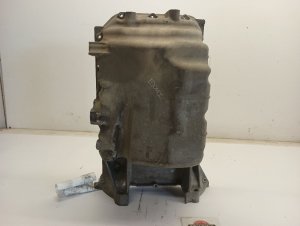
- Inspect the Drain Plug Threads: This is the most critical inspection point. Ask the seller for a clear, close-up photo of the drain plug hole. The threads should be clean, well-defined, and free of any damage. Avoid any pan with shiny, flattened, or visibly stripped threads. Also, look for signs of a previous repair, such as a Helicoil or Time-Sert insert. While these can be effective repairs, a pan with original, undamaged threads is always preferable.
- Check for Cracks and Welds: Carefully examine the entire pan, especially around the drain plug area and mounting bolt holes, for hairline cracks. Pay close attention to the corners. Also, look for any signs of TIG welding, which indicates a previous crack repair. A repaired pan is more likely to fail again.
- Examine for Dents and Gouges: Look for any significant dents. A deep dent can reduce oil capacity or, in a worst-case scenario, interfere with the oil pump pickup tube inside the engine, starving the engine of oil. Minor scrapes are cosmetic, but deep gouges are a red flag for severe impact.
- Verify the Mating Surface: The flat surface where the pan seals against the engine block must be perfectly clean and flat. Look for deep scratches or pry marks from careless removal, as these can compromise the seal and cause leaks.
- Interior Condition: The inside of the pan should be relatively clean. A thick layer of black, baked-on sludge can be a sign that the donor vehicle had a poor maintenance history.
Replacement Overview and Difficulty
Replacing the oil pan on a 2012-2014 CR-V is a moderately difficult job for a DIY mechanic. While not technically complex, it requires safely lifting the vehicle and can be messy.
- Installation Difficulty: 3 out of 5
- Estimated Time: 2-3 hours
- Key Steps:
- Safely raise and support the vehicle on jack stands.
- Drain the engine oil completely.
- On some models, parts of the exhaust or the front subframe may need to be loosened or removed to gain clearance. 🎬 Watch: Removing the oil pan without dropping the entire subframe
- Remove the numerous 10mm bolts holding the pan to the engine block.
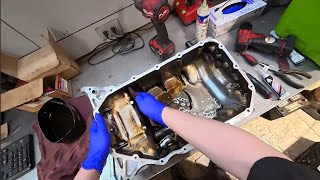
- Carefully pry the pan off. It is held on by strong RTV sealant.
- Thoroughly clean all old sealant from both the engine block and the new oil pan. This step is critical for a leak-free seal.
- Apply a new, continuous bead of oil-resistant RTV sealant (like Hondabond HT or Permatex Ultra Black) to the new pan.
- Install the pan and tighten the bolts in the correct sequence to a very low torque specification: 8.7 ft-lbs (12 Nm). Over-tightening will warp the pan and cause leaks.
- Wait at least 30 minutes before refilling with oil, and ideally 3 hours before starting the engine to allow the sealant to cure.
Pro Tip: Meticulous cleaning of the mating surfaces is the secret to a successful oil pan replacement. Use a plastic scraper and brake cleaner to avoid gouging the aluminum surfaces. Any leftover oil or old sealant will prevent the new RTV from curing properly, guaranteeing a leak.
Cost Comparison
Prices can vary by supplier and location, but this provides a general cost expectation.
| Part Type | Estimated Cost |
|---|---|
| New OEM | $250 - $415 |
| New Aftermarket | $40 - $140 |
| Used OEM | $75 - $150 |
| Shop Labor | $250 - $610 |
Frequently Asked Questions (FAQ)
Do I have to replace the whole pan for a stripped drain plug?
Not necessarily. There are thread repair kits like Helicoil or Time-Sert that can install new, stronger threads. Oversized, self-tapping drain plugs are also available as a temporary fix. However, for a permanent and reliable solution, replacing the pan is often the best long-term choice, especially if you can find a quality used OEM pan.
What sealant should I use for the oil pan?
The official Honda sealant is Hondabond HT (High Temp). However, a high-quality, oil-resistant RTV silicone sealant like Permatex Ultra Black or The Right Stuff is a widely used and effective alternative. The key is proper surface preparation and application.
Why is my new oil pan leaking?
The most common reasons for a leak after replacement are: 1) The mating surfaces on the engine block or pan were not perfectly clean and dry. 2) The RTV sealant was applied unevenly or in a broken bead. 3) The pan bolts were tightened incorrectly (wrong torque or sequence), causing the pan to warp. 4) You did not wait long enough for the sealant to cure before adding oil or starting the engine.
Is there a recall on the 2012-2014 CR-V for oil leaks?
No, there are no NHTSA recalls specifically for the engine oil pan on this vehicle. While some other Honda models and years have had TSBs related to excessive oil consumption from piston rings, this is a separate issue from an external oil pan leak.
Helpful Videos


Technical Specifications
OEM Part Numbers: 11200-RX0-A00 11200-R5A-000
Material: Cast Aluminum Sealant: Liquid Gasket (Hondabond HT or equivalent) Drain Plug Torque: 29-30 ft-lbs (40 Nm) Pan Bolt Torque: 8.7 ft-lbs (12 Nm)
We Have This Part in Stock

The information in this article is provided for general reference and educational purposes only. Vehicle specifications, procedures, and part compatibility can vary by production date, trim level, and region. Always consult your vehicle's factory service manual and verify part numbers before purchasing or performing repairs. Safety-critical components such as airbags, seat belts, and braking systems should be installed by a qualified professional.
- Honda CR-V: