
2014-2019 Corvette Fender Flare Fitment: Stingray vs. Z06 & Grand Sport
Don't buy the wrong part. This guide explains the critical differences between the standard (Stingray) and widebody (Z06, Grand Sport) C7 Corvette fender flares.
- The single most important factor is compatibility: Stingray models use 'narrow body' flares, while Z06 and Grand Sport models use 'wide body' flares that are not interchangeable.
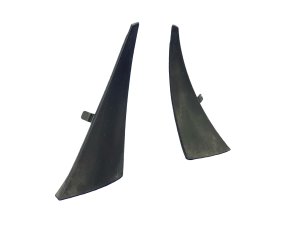
- When buying a used flare, the most critical inspection point is the back side; ensure all mounting tabs are intact and not cracked or broken.
- Replacement is a simple DIY task requiring basic tools like a T15 Torx driver and a 7mm socket, typically taking less than an hour per side.
- Expect to have any replacement flare (new or used) painted to match your vehicle's color, as they rarely come pre-painted in factory colors.
Compatibility Warning: Stingray vs. Z06/Grand Sport Models
CRITICAL: Chevrolet produced two different body styles for the C7 Corvette, and the fender flares are NOT interchangeable. Before purchasing, you must verify which style your vehicle requires.
- Stingray (Base Model): Uses a 'narrow body' and requires the standard, narrower fender flares.
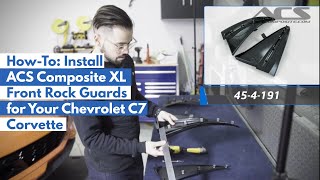
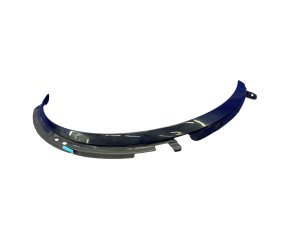
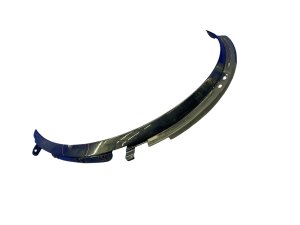
- Z06 & Grand Sport: Use a 'wide body' with wider fenders, wider tires, and require wider, model-specific fender flares to match. These models also feature rear brake cooling ducts integrated into the bodywork ahead of the rear wheels, which is a key visual difference. 🎬 Watch: A side-by-side comparison of Stingray and Z06 body differences.
Attempting to install a Z06/Grand Sport flare on a Stingray (or vice-versa) will result in improper fitment, large gaps, and potential damage. The underlying fender panels themselves are a different shape and width.
Symptoms of a Failing Fender Flare
Failure of a fender flare is always visual or physical, as it is a cosmetic and protective part with no electronic or mechanical function. Common symptoms are a result of damage or age.
1. Visible Cracks or Scuffing
The most common issue is physical damage. Look for cracks, deep scuffs, and chips. Cracks often form near the mounting points from impacts or stress, especially on lowered vehicles or those with wider aftermarket wheels where the tire may contact the flare lip under suspension compression. Heavy scuffing, or "road rash," from tire debris is also common and indicates the part is doing its job, but may be a cosmetic reason for replacement.
2. Separation or Poor Fitment
The flares are attached with a combination of screws, clips, and double-sided adhesive tape. Over time, especially in climates with extreme temperature swings, the adhesive can fail. This will cause the edge of the flare to lift away from the fender, creating a gap. If left unaddressed, a loose flare could vibrate or even detach from the vehicle at speed.
Buying a Used Fender Flare: What to Check
A used OEM fender flare is often a better choice than a cheap aftermarket alternative due to guaranteed fitment. However, inspect the part carefully before buying.
1. Verify the Correct Model (Stingray vs. Z06/GS)
This is the most important step. Since they look similar when off the car, the best way to ensure you have the right part is by the part number molded into the plastic on the back. If the part number is unreadable, you may need to compare it side-by-side with your existing flare. A Z06/Grand Sport flare is physically wider than a Stingray flare.
2. Inspect All Mounting Tabs
Turn the flare over and carefully inspect every mounting tab and clip location. These small plastic tabs are brittle and can easily break during removal from the donor vehicle. A flare with broken tabs will not sit flush against the fender and will likely vibrate or separate over time. This is the most common form of hidden damage.
3. Check for Hidden Cracks
Gently flex the part in your hands. This can reveal hairline stress cracks that are not obvious from a quick visual inspection. Pay close attention to the screw holes and the thin outer edge of the flare.
4. Paint Condition is Secondary
Do not worry about the color or minor surface scratches on a used flare. It is nearly impossible to find a used part that perfectly matches your car's paint. Plan on having the part professionally prepped and painted to match. The structural integrity and intact mounting points are far more important than the cosmetic finish.
Known Issues, TSBs, and Recalls
There are no official recalls or Technical Service Bulletins (TSBs) from Chevrolet related to the fender flares on the 2014-2019 Corvette. Any issues, such as cracking or adhesive separation, are considered cosmetic or the result of normal wear and tear or impact damage.
Replacement Overview & Difficulty
Replacing a front fender flare is a straightforward process that most DIYers can complete.
- Difficulty: 2 out of 5
- Estimated Time: 0.5 hours per side
- Tools Required: T15 Torx driver, 7mm socket and ratchet, plastic trim removal tools.
General Steps:
- Turn the steering wheel to gain access to the wheel well liner.
- Remove the T15 Torx and 7mm screws that secure the front of the fender liner and the bottom of the flare.
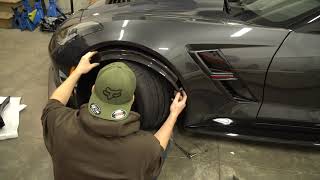
- Carefully use a plastic trim tool to pry the flare away from the fender. It is held on by clips and double-sided tape. Work slowly to avoid damaging the paint on the fender. 🎬 See this walkthrough for removing and replacing your fender flares.
- Once the old flare is removed, thoroughly clean the fender surface to remove all old adhesive residue. Isopropyl alcohol can help.
- The new flare typically snaps into place. If it includes new double-sided tape, peel the backing and press it firmly onto the clean fender.
- Reinstall the screws removed in the first step.
Pro Tip: When installing a new flare, some owners add extra strips of high-quality 3M automotive double-sided tape along the channels on the back of the part for a more secure, long-lasting fit.
Cost Comparison (Per Flare)
| Part Type | Estimated Cost |
|---|---|
| New OEM | $120 - $175 |
| New Aftermarket | $75 - $300+ (Varies by material, e.g., plastic vs. carbon fiber) |
| Used OEM | $50 - $100 |
| Shop Labor (Install Only) | $75 - $150 |
Note: Costs are estimates and do not include painting, which can add $100-$200 per part.
OEM Part Numbers
Part numbers are crucial for ensuring you get the correct flare. The front flares are specific to the driver (Left Hand) or passenger (Right Hand) side. The rear design is different between models.
| Model | Position | Part Number | Notes |
|---|---|---|---|
| Stingray ('Narrow Body') | Front Left (Driver) | 23315197 | Supersedes 23236764, 23272790 |
| Stingray ('Narrow Body') | Front Right (Passenger) | 23315196 | Supersedes 23236763, 23272789 |
| Stingray ('Narrow Body') | Rear Left/Right | Not Applicable | The flare is integrated into the rear quarter panel on Stingray models. |
| Z06 / Grand Sport ('Wide Body') | Front Left/Right | Varies | Uses a wider flare. Part numbers differ from Stingray. Verify with a dealer using your VIN. |
| Z06 / Grand Sport ('Wide Body') | Rear Left/Right | Varies | These models have a separate rear flare/extension piece, unlike the Stingray. Verify with a dealer using your VIN. |
Frequently Asked Questions (FAQ)
Can I install Z06 fender flares on my Stingray for a wider look?
No, not directly. The Z06 flares are designed for the wider Z06 fenders and will not fit properly on a standard Stingray fender. Achieving the 'wide body' look requires a full conversion, including replacing the front fenders, rear quarter panels, and bumper covers.
Do new fender flares come painted?
New OEM fender flares typically come unpainted or in a basic black plastic or primered finish. Aftermarket flares may be offered in finishes like Carbon Flash Metallic, hydro-dipped carbon fiber, or unpainted. In almost all cases, you should expect to have the part painted to match your car's specific color code.
What is the difference between a fender flare and a spat?
For the C7 Corvette, the terms 'fender flare,' 'spat,' and 'wheel opening molding' are often used interchangeably to describe the same part. 'Spat' is a common slang term used by owners.
How can I protect my fender flares from getting damaged?
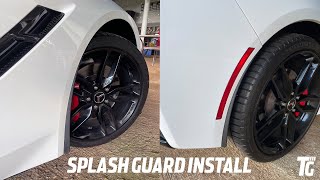
The best way to protect your fender flares and surrounding paint is to install Paint Protection Film (PPF). This is a clear, durable film that adheres to the surface and absorbs impacts from small rocks and debris. Installing wider splash guards behind the front wheels can also help reduce the amount of debris that hits the side of the car.
🎬 Watch: How to install splash guards to protect your flares.Helpful Videos


Technical Specifications
OEM Part Numbers: 23315197 23315196 23236764 23272790 23236763 23272789
Material: ABS Plastic. Attachment Method: Screws, clips, and double-sided adhesive tape.
We Have This Part in Stock

The information in this article is provided for general reference and educational purposes only. Vehicle specifications, procedures, and part compatibility can vary by production date, trim level, and region. Always consult your vehicle's factory service manual and verify part numbers before purchasing or performing repairs. Safety-critical components such as airbags, seat belts, and braking systems should be installed by a qualified professional.
- Chevrolet Corvette:
- 🎬 Helpful Videos
- 🛍️ Shop This Part
- Compatibility Warning: Stingray vs. Z06/Grand Sport Models
- Symptoms of a Failing Fender Flare
- 1. Visible Cracks or Scuffing
- 2. Separation or Poor Fitment
- Buying a Used Fender Flare: What to Check
- 1. Verify the Correct Model (Stingray vs. Z06/GS)
- 2. Inspect All Mounting Tabs
- 3. Check for Hidden Cracks
- 4. Paint Condition is Secondary
- Known Issues, TSBs, and Recalls
- Replacement Overview & Difficulty
- Cost Comparison (Per Flare)
- OEM Part Numbers
- Frequently Asked Questions (FAQ)
- 🎟️ Get 5% Off