
1999-2001 Honda Prelude Fuel Pump: Diagnosing Stalling and No-Start Issues
This guide covers how to diagnose a failing fuel pump in your 5th generation Prelude, what to check before buying a used one, and how to avoid replacing the wrong part.
- Before replacing the fuel pump, always check the PGM-FI Main Relay first; its failure causes identical symptoms and is a more common problem on older Hondas.
- A failing pump often causes engine hesitation, a whining noise from the trunk, stalling, or a no-start condition.
- The replacement part is the pump unit only (17040-S30-A50), which must be installed into your car's original sending unit assembly.
- Replacement is DIY-friendly as the pump is accessible through a panel in the trunk, eliminating the need to drop the fuel tank.
Symptoms of a Failing Fuel Pump
A failing fuel pump in a 1999-2001 Honda Prelude will cause noticeable issues. The symptoms often start subtly and worsen over time until the car won't start at all. Look for these common warning signs:
- Engine Hesitation or Sputtering: The car may jerk or sputter when you accelerate, especially when climbing a hill or under heavy load. This happens because the weak pump can't supply the extra fuel the engine demands.
- Whining Noise from the Trunk: A distinct, high-pitched whining or humming sound coming from the area of the fuel tank is a classic sign of a struggling fuel pump motor. You'll typically hear it when you first turn the key to the 'ON' position.
- Difficulty Starting or No-Start: The engine may crank for a long time before it starts, or it may not start at all. This occurs when the pump can't build enough pressure to prime the fuel system.
- Engine Stalls Unexpectedly: The engine may run fine for a while and then suddenly stall, sometimes after the car has warmed up. It might restart after it has cooled down for a period.
- Loss of Power: The car may feel sluggish and lack its usual acceleration. This is due to insufficient fuel delivery under power.
Crucial First Step: Check the PGM-FI Main Relay! Before you condemn the fuel pump, you MUST check the PGM-FI (Programmed Fuel Injection) Main Relay. On older Hondas, this relay is a far more common failure point than the fuel pump itself. It develops cracked solder joints from heat and age, causing identical symptoms: intermittent stalling, a no-start condition (especially when the car's interior is hot), and no priming sound from the fuel pump. The relay is typically a small grey or black box located under the driver's side dashboard. Wiggling the relay or its connector while trying to start the car can sometimes temporarily restore connection. Many fuel pumps are replaced unnecessarily when this inexpensive relay is the actual culprit.
Diagnosing the Fuel Pump
If you've ruled out the PGM-FI Main Relay, you can confirm the fuel pump is bad with these tests:
- The "Key-On" Test: Sit inside the car with the doors closed and everything quiet. Turn the ignition key to the "ON" (II) position, but do not crank the engine. You should hear a faint, 2-second buzz or hum from the rear of the car as the pump primes the system. If you hear nothing, and you've already checked the main relay and fuses, the pump is likely dead.
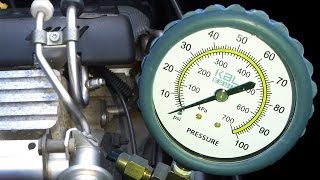
- Fuel Pressure Test: This is the definitive test. 🎬 See this walkthrough on how to perform a fuel pressure test You will need a fuel pressure gauge. The service port is on the fuel rail on top of the engine. The correct fuel pressure for a 1999-2001 Prelude is 47-54 psi with the engine idling and the vacuum hose to the fuel pressure regulator disconnected and pinched. If the pressure is below this range, the pump is weak. If it's zero, the pump is not running at all.
Buying a Used 1999-2001 Prelude Fuel Pump
A low-mileage used OEM fuel pump can be a reliable and cost-effective alternative to expensive new parts or lower-quality aftermarket options. Here’s what to look for:
- Why Choose Used OEM?: The original Honda fuel pump (part number 17040-S30-A50) was built to high standards. A used OEM pump from a low-mileage vehicle is often more durable than a brand-new, budget aftermarket pump. Given that new OEM pumps are becoming discontinued, a quality recycled part is an excellent choice.
- Confirm Compatibility: You are buying the fuel pump unit only. This part fits inside the larger plastic fuel pump sending unit assembly, which also holds the fuel level sending unit (the float that tells your gas gauge how full the tank is). You MUST reuse your original sending unit assembly and fuel level sensor. The part number to look for is 17040-S30-A50.
- Physical Inspection:
- Electrical Connector: Check the connector pins on top of the pump. They should be clean, straight, and free of any melting, charring, or corrosion.
- Plastic Housing: Inspect the white plastic body of the pump for any cracks or significant damage.
- Inlet Port: Look at the inlet where the fuel strainer attaches. Ensure it's not broken or clogged with debris.
- Ask About the Donor Vehicle: Whenever possible, ask the seller for the mileage of the car the pump came from. A pump from a car with under 100,000 miles is preferable.
Pro Tip: Always install a new fuel strainer (also called a "sock") with any replacement pump, whether it's new or used. A dirty strainer from the old pump will restrict flow and shorten the life of your replacement pump. Most replacement pumps come with a new one.
Replacement Guide (Difficulty: 3/5)
Replacing the fuel pump on a 5th generation Prelude is a manageable DIY job for someone with basic tools. The fuel tank does not need to be removed, as there is an access panel in the trunk.
Warning: You will be working with raw gasoline. Work in a well-ventilated area, disconnect the battery, and have a fire extinguisher nearby. Do not smoke or create any sparks.
- Relieve Fuel Pressure: Start the car. Locate the fuse box and remove the fuel pump fuse. The engine will run for a few seconds and then stall. Crank it a few more times to ensure all pressure is gone.
- Disconnect the Battery: Disconnect the negative terminal from your car's battery.
- Access the Pump: The access panel is located in the trunk, under the floor mat, toward the front. Remove the metal cover plate.
- Disconnect Lines: Unplug the electrical connectors. Squeeze the tabs on the fuel line connectors to release them. Have a rag ready to catch a small amount of residual fuel.
- Remove the Assembly: Unscrew the several 10mm nuts holding the sending unit assembly to the fuel tank. Carefully lift the entire assembly straight up and out of the tank. Be mindful not to bend the fuel level float arm.
- Swap the Pump: On a clean workbench, carefully disassemble the sending unit to swap the old pump for the new one. This typically involves removing a clip, disconnecting a small hose and electrical plug, and sliding the pump out of its rubber isolator. Remember to transfer the rubber isolator to the new pump if it doesn't come with one.
- Reassemble and Install: Install the new fuel strainer on the new pump. Place the new pump back into the sending unit assembly. Install a new rubber gasket/seal on the fuel tank opening before carefully lowering the assembly back into place. Tighten the nuts, reconnect the fuel lines and electrical connectors, and reinstall the access cover.
- Final Steps: Reconnect the battery. Turn the key to the "ON" position a few times for 2-3 seconds each to allow the new pump to prime the system. Check for any leaks before starting the engine.
Known Issues, Recalls, and TSBs
- Recalls: There are no active NHTSA safety recalls for the fuel pump on 1999-2001 Honda Preludes. Large-scale Honda fuel pump recalls from recent years apply to much newer models (2017 and newer).
- Technical Service Bulletins (TSBs): No major TSBs are widely reported for this specific fuel pump.
- Common Related Failure: As mentioned, the PGM-FI Main Relay is the most common related failure. Its symptoms of intermittent stalling and no-starts, especially when hot, are almost identical to a failing fuel pump. Always investigate the main relay before committing to a fuel pump replacement.
Cost Comparison
| Part Type | Estimated Cost |
|---|---|
| New OEM (Genuine Honda) | $350 - $500+ (Largely discontinued) |
| New Aftermarket | $45 - $195 |
| Used OEM (Recycled) | $50 - $75 |
| Shop Labor Cost | $180 - $350 |
Frequently Asked Questions (FAQ)
My Prelude won't start when it's hot outside. Is it the fuel pump?
While it could be the fuel pump, it is far more likely to be the PGM-FI Main Relay. This is the classic symptom of the relay's internal solder joints failing when they heat up and expand. Let the car cool down completely and see if it starts. If it does, the main relay is the prime suspect.
Do I have to drop the fuel tank to replace the pump?
No. The 1999-2001 Honda Prelude has a convenient access panel in the trunk, directly above the fuel pump assembly, so you do not need to lower the fuel tank for this job.
Do I need to replace the whole sending unit assembly?
No, you do not need to replace the entire assembly if only the pump motor has failed. You can purchase just the pump itself and install it into your existing plastic sending unit housing, reusing your fuel level float and arm.
Should I replace the fuel filter at the same time as the fuel pump?
Yes, it is highly recommended. A clogged fuel filter can restrict flow, putting extra strain on the new fuel pump and potentially causing it to fail prematurely. Replacing both at the same time ensures the entire delivery system is healthy.
Helpful Videos
Technical Specifications
OEM Part Numbers: 17040-S30-A50
Operating Fuel Pressure: 47-54 psi (with regulator vacuum hose disconnected and pinched)
We Have This Part in Stock


The information in this article is provided for general reference and educational purposes only. Vehicle specifications, procedures, and part compatibility can vary by production date, trim level, and region. Always consult your vehicle's factory service manual and verify part numbers before purchasing or performing repairs. Safety-critical components such as airbags, seat belts, and braking systems should be installed by a qualified professional.
- Honda Prelude: