
2009-2010 Toyota Corolla Grille: Avoiding Trim Mismatches and Broken Tabs
This guide covers the critical differences between trim level grilles, how to inspect a used part, and a straightforward replacement process for your 2009-2010 Corolla.
- Verify your trim level before buying: Base/LE/XLE models use a horizontal slat grille, while S/XRS models use a sport mesh grille.
- When buying a used grille, the most critical inspection is for intact mounting tabs; a broken tab can ruin the fit.
- Check your VIN to see if your car was built in North America (starts with 1, 2, 4, or 5) or Japan (starts with J) to help select the correct OEM part number.
- Replacement is a simple DIY task requiring only basic hand tools and about 20 minutes.
Variant and Trim Level Differences
The most significant challenge when replacing the grille on a 2009-2010 Toyota Corolla is ensuring you purchase the correct style for your vehicle's trim level and place of manufacture. Mismatched parts are a common and frustrating mistake.
Standard vs. Sport Grilles
The 2009-2010 Corolla was available in several trims, including Base, LE, XLE, S, and XRS. These trims used two distinct upper grille styles:
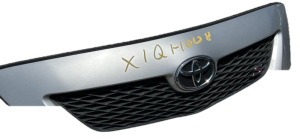
- Standard Grille (Base, LE, XLE, CE): This grille features simple horizontal slats and has a plain, textured black finish.
- Sport Grille (S, XRS): This grille has a black mesh pattern, giving the car a more aggressive, performance-oriented look.
Warning: While the grilles are physically interchangeable and will fit in the same opening, installing a sport grille on a standard model (or vice-versa) will look out of place and can negatively affect resale value.
North American vs. Japan-Built Models
Toyota produced this generation of Corolla in different locations, which can affect part compatibility. The two primary OEM part numbers for the standard black textured grille reflect this:
- 5311102450: Typically for Corollas built in North America.
- 5311112B30: Typically for Corollas built in Japan.
To determine where your vehicle was made, check the first character of your Vehicle Identification Number (VIN). A 'J' indicates it was built in Japan, while a '1', '2', '4', or '5' indicates North American production.
Symptoms of a Failing Grille
As a static plastic component, a grille doesn't "fail" electronically or mechanically. Its failure is purely physical and visual.
- Cracks and Holes: The most common symptom is visible damage from impacts with road debris, animals, or minor parking lot bumps.
- Loose Fit or Rattling: Over time, the plastic mounting tabs that hold the grille to the bumper and radiator support can become brittle and break. This will cause the grille to fit loosely and may produce a rattling or buzzing sound while driving.
- Fading and Discoloration: Constant exposure to UV rays from the sun can cause the black textured plastic to fade to a dull gray, making the vehicle look older than it is.
Buying a Used 2009-2010 Corolla Grille: What to Check
Purchasing a used OEM grille is an excellent way to save money while ensuring a perfect fit. However, a careful inspection is crucial.
1. Verify the Style
First and foremost, confirm you are buying the correct style (horizontal slat or sport mesh) for your Corolla's trim level.
2. Inspect All Mounting Points
Critical: This is the most important inspection step. A grille with even one broken main mounting tab may not install securely. Carefully check the top, bottom, and side tabs for any signs of stress cracks or complete breaks. A used grille with all tabs intact is a far better value than a pristine-looking one with a broken tab.
3. Check for Plastic Health
Examine the plastic for excessive fading or a chalky appearance. Gently flex a small, inconspicuous edge of the grille. If it feels overly stiff or brittle, it may be more susceptible to cracking during installation or from a future minor impact. Healthy plastic will have a slight amount of give.
4. Used OEM vs. New Aftermarket
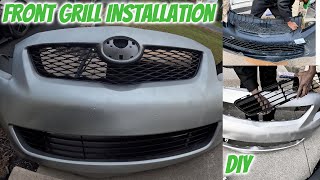
While inexpensive new aftermarket grilles are widely available, they often present challenges. Fitment can be poor, with gaps between the grille and the bumper or hood. The mounting tabs may not align perfectly, making installation difficult. 🎬 See how an aftermarket grille is installed on this Corolla. A used Original Equipment Manufacturer (OEM) part, even with minor cosmetic blemishes, was made to Toyota's exact specifications and will fit correctly.
Installation Guide
Replacing the grille on a 2009-2010 Corolla is a straightforward job suitable for a DIYer with basic tools.
🎬 Watch this quick walkthrough of the grille replacement process.- Difficulty: 1 out of 5
- Estimated Time: 20 minutes
- Tools Required: 10mm socket and wrench, flathead screwdriver or trim removal tool.
Steps:
- Open the hood to access the top of the grille.
- Remove the plastic radiator cover panel if present. This is typically held on by several plastic push-clips. Use a trim tool or flathead screwdriver to pry up the center of the clips, then pull them out.
- Locate and remove the bolts (usually 10mm) and any remaining clips securing the top edge of the grille to the radiator support.
- Carefully pull the top of the grille forward. The bottom is held in by clips that disengage as you pull. Be firm but gentle to avoid breaking the tabs.
- Position the new grille, ensuring the bottom tabs align with the slots in the bumper cover.
- Push the grille into place until the bottom clips snap in securely.
- Reinstall the top bolts and push-clips. Do not overtighten the bolts, as you are fastening into plastic.
- Reinstall the radiator cover.
Cost Comparison
Prices can vary based on supplier and condition.
| Part Type | Estimated Cost |
|---|---|
| New OEM | $115 - $175 |
| New Aftermarket | $30 - $85 |
| Used OEM | $40 - $75 |
| Shop Labor | $50 - $100 |
Known Issues, Recalls, and Service Bulletins
There are no recalls or Technical Service Bulletins (TSBs) from the NHTSA specifically related to the grille of the 2009-2010 Toyota Corolla. While this model year was subject to major recalls for issues like unintended acceleration and airbags, none of these pertained to the grille itself.
Frequently Asked Questions (FAQ)
Will a grille from a Corolla S fit on my LE model?
Yes, it will physically fit in the opening. However, it is a different style (mesh vs. horizontal slats) and will not match the original appearance of your LE trim.
How do I know if I need the USA-built or Japan-built grille?
Check the first digit of your car's VIN. A 'J' means it was made in Japan, while numbers like '1', '2', '4', or '5' indicate North American manufacturing. This can help you select the correct OEM part number.
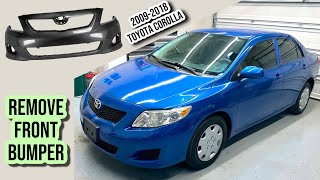
Is it safe to drive with a cracked grille?
Generally, yes. A small crack is a cosmetic issue. However, if the grille is severely damaged with large, loose pieces, it could detach while driving and become a hazard to other vehicles. 🎬 Watch: How to remove the front bumper for deeper repairs. In that case, it should be replaced or secured promptly.
Does the grille come with the Toyota emblem?
Typically, no. New and used grilles are almost always sold as the grille shell only. You will need to carefully remove the emblem from your old grille and transfer it to the new one.
Helpful Videos

Technical Specifications
OEM Part Numbers: 5311102450 5311112B30
Material: Plastic. Finish: Textured Black (Standard models) or Painted Black Mesh (S/XRS models).
We Have This Part in Stock

The information in this article is provided for general reference and educational purposes only. Vehicle specifications, procedures, and part compatibility can vary by production date, trim level, and region. Always consult your vehicle's factory service manual and verify part numbers before purchasing or performing repairs. Safety-critical components such as airbags, seat belts, and braking systems should be installed by a qualified professional.
- Toyota Corolla:
- 🎬 Helpful Videos
- 🛍️ Shop This Part
- Variant and Trim Level Differences
- Standard vs. Sport Grilles
- North American vs. Japan-Built Models
- Symptoms of a Failing Grille
- Buying a Used 2009-2010 Corolla Grille: What to Check
- 1. Verify the Style
- 2. Inspect All Mounting Points
- 3. Check for Plastic Health
- 4. Used OEM vs. New Aftermarket
- Installation Guide
- Steps:
- Cost Comparison
- Known Issues, Recalls, and Service Bulletins
- Frequently Asked Questions (FAQ)
- 🎟️ Get 5% Off