
2009-2020 Dodge Journey Headlight: Chrome vs. Black, Moisture Issues, and Replacement Guide
This guide covers common failure symptoms, replacement costs, and how to choose the right used halogen headlight assembly for your 2009-2020 Dodge Journey.
- All 2009-2020 Dodge Journeys use halogen headlights; the only variation is a chrome or black inner bezel, which must be matched for appearance.
- A safety recall (NHTSA 22V723000) was issued for 2017-2018 models for dim side reflectors, requiring a full assembly replacement.
- Moisture and condensation inside the lens are common failure points, indicating a bad seal that necessitates replacing the entire assembly.
- Replacement requires removing the front bumper cover, and the new assembly must be properly aimed to ensure safety.
Headlight Variants: It's All About the Bezel
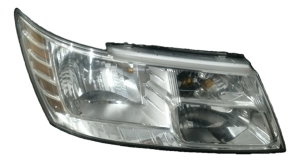
For the entire 2009-2020 production run, the Dodge Journey used a halogen-type headlight assembly. There were no HID/Xenon or LED options from the factory. The primary difference between assemblies is the color of the inner housing, also known as the bezel.
- Chrome Bezel: This version has a bright, reflective chrome inner housing, giving it a classic look.
- Black Bezel: This version features a black or dark gray inner housing for a sportier, more modern appearance. This is sometimes referred to as having a black trim.
Warning: The two bezel types are functionally identical and interchangeable, but for a consistent appearance, it is crucial to match the new assembly to the one on the other side of your vehicle.
Symptoms of a Failing Headlight Assembly
Problems with the headlight assembly go beyond a simple burnt-out bulb. The entire housing can fail, leading to a range of symptoms.
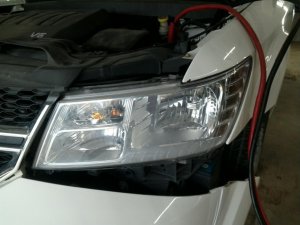
- Moisture or Condensation Inside the Lens: You may see fogging, water droplets, or a hazy appearance inside the headlight. This is a common issue and indicates a failed seal, which can lead to corrosion of internal wiring and premature bulb failure.
- Dim or Flickering Light: Light output that is weaker than normal or flickers can be a sign of a failing bulb, a poor electrical connection, or corroded wiring inside the assembly.
- Yellowed or Hazy Lens: Over time, the outer plastic lens can become oxidized from UV exposure, which significantly reduces light output and makes the vehicle look older.
- Frequent Blown Fuses or Bulbs: If you find yourself replacing the same headlight bulb or fuse repeatedly, it could point to a short circuit or other wiring issue within the assembly itself.
- One Headlight Not Working: While often just a burnt-out bulb, if a new bulb doesn't fix the issue, the problem could be the socket, wiring within the assembly, or a faulty relay.
Known Issues, Recalls, and Technical Service Bulletins (TSBs)
While there are many owner complaints about moisture inside the headlight housings, there is one major safety recall to be aware of.
- NHTSA Recall 22V723000 (FCA US Recall Z99): This recall affects certain 2017-2018 Dodge Journey vehicles. The amber side reflex reflector within the headlamp assembly may not be bright enough to meet Federal Motor Vehicle Safety Standard number 108. This can reduce the vehicle's visibility to other drivers, increasing the risk of a crash. The remedy is for dealers to replace both headlamp assemblies free of charge.
- Mopar Aftermarket Headlamp Recall (NHTSA 22E-083): This recall applies to specific Mopar aftermarket headlamp assemblies sold for 2008-2019 Dodge Journey vehicles. These parts also suffer from the same amber side reflex reflector defect. FCA will exchange or replace these affected assemblies.
- TSB for Condensation: Dodge has issued general technical service bulletins regarding condensation in exterior lamps. The TSB explains that minor fogging can be normal under certain atmospheric conditions and should clear after running the headlights for about 20 minutes. However, if large water droplets are present or the moisture never clears, the headlamp has a bad seal and should be replaced.
Buying a Used 2009-2020 Dodge Journey Headlight Assembly
A used OEM headlight is often a better choice than a cheap aftermarket alternative, which can suffer from poor fitment, bad beam patterns, and a tendency to leak. Here’s what to inspect on a used unit:
- Check All Mounting Tabs: The plastic mounting tabs are the most vulnerable part of the assembly. Carefully inspect every tab for cracks, stress marks, or signs of repair. A broken tab will prevent the headlight from being secured properly, leading to vibration and an unstable beam.
- Inspect the Lens for Damage: Look for deep scratches, rock chips, and cracks. Pay close attention to the edges and corners. Also, check for hazing or yellowing from UV damage. While minor hazing can be polished out, heavy oxidation may require professional restoration or replacement.
- Look for Signs of Moisture: Check the inside of the lens for a "water line" or mineral deposits left behind by standing water. This is a clear sign of a bad seal, and the unit should be avoided.
- Examine the Wiring and Connectors: Inspect the wiring harness on the back of the assembly. The plastic connectors should be intact with no broken clips. Look for any signs of corrosion on the metal pins or melted plastic, which indicates an electrical problem.
- Verify the Bezel Color: Double-check whether you need the chrome or black bezel version to match your other headlight.
Replacement Overview and Headlight Aiming
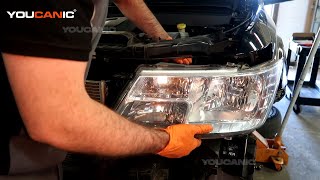
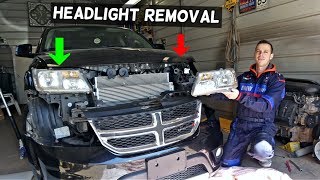
Replacing the headlight assembly on a Dodge Journey is a moderately difficult job because it requires the removal of the front bumper cover.
🎬 Watch this step-by-step guide on removing the bumper and headlights.- The process involves removing numerous push clips and screws from the top of the grille, inside the wheel wells, and underneath the front of the vehicle.
- Once the bumper cover is unclipped and pulled away, you will have access to the three bolts that secure the headlight assembly to the vehicle. 🎬 See a mechanic demonstrate how to unbolt and swap the assembly.
- After unbolting the assembly, carefully pull it forward and disconnect the electrical connectors for the bulbs.
- Installation is the reverse of removal.
Pro Tip: After installing a new headlight assembly, you must aim it properly. Misaligned headlights can blind other drivers or fail to illuminate the road adequately. The adjustment is typically done via screws on the back of the housing that control vertical and horizontal aim. Park the vehicle on a level surface facing a wall 25 feet away to perform the alignment.
🎬 Watch this helpful video on how to aim and align headlights.Cost Comparison
| Part Type | Estimated Price Range |
|---|---|
| New OEM (Mopar) | $325 - $520 |
| New Aftermarket | $105 - $260 |
| Used OEM | $40 - $150 |
| Shop Labor for Replacement | $120 - $250 |
Frequently Asked Questions (FAQ)
Is this a halogen, LED, or HID headlight?
The 2009-2020 Dodge Journey came from the factory with halogen headlights only. They use separate bulbs for the high and low beams. No factory LED or HID/Xenon options were offered.
Can I upgrade my halogen headlights to an aftermarket LED or HID kit?
While you can replace the halogen bulbs with LED or HID bulbs, it is often not recommended. Placing these brighter bulbs in a housing designed for halogen light can create a dangerous glare for other drivers due to an improper beam pattern. A full assembly designed specifically for LED or HID technology is a better, though more complex and expensive, option.
Do I need to replace the whole assembly if my lens is just cloudy?
Not always. If the lens is just yellowed or hazy from oxidation, you can often restore its clarity using a headlight restoration kit. However, if the cloudiness is on the inside, or if there is moisture present, the assembly's seal has failed and the entire unit should be replaced to prevent future electrical issues.
How do I aim my new headlight?
Headlight aiming is done using adjustment screws on the back of the assembly, which can be accessed from the engine bay. One screw typically adjusts the vertical (up/down) aim, and another may adjust the horizontal (left/right) aim. The correct procedure involves parking the car on a level surface in front of a wall and adjusting the beam's cutoff line to a specific height.
Helpful Videos


Technical Specifications
OEM Part Numbers: 5116288AA 5116288AB 5116288AC 5116288AD 5116289AA 5116289AB 68200084AB 68200085AB
Bulb Type: Halogen Low Beam Bulb: 9006 High Beam Bulb: 9005 Turn Signal Bulb: 3157NA
We Have This Part in Stock

The information in this article is provided for general reference and educational purposes only. Vehicle specifications, procedures, and part compatibility can vary by production date, trim level, and region. Always consult your vehicle's factory service manual and verify part numbers before purchasing or performing repairs. Safety-critical components such as airbags, seat belts, and braking systems should be installed by a qualified professional.
- Dodge Journey:
- 🎬 Helpful Videos
- 🛍️ Shop This Part
- Headlight Variants: It's All About the Bezel
- Symptoms of a Failing Headlight Assembly
- Known Issues, Recalls, and Technical Service Bulletins (TSBs)
- Buying a Used 2009-2020 Dodge Journey Headlight Assembly
- Replacement Overview and Headlight Aiming
- Cost Comparison
- Frequently Asked Questions (FAQ)
- 🎟️ Get 5% Off