
Ford E-Series Van Headlight Guide (1997-2025): Sealed Beam vs. Composite Explained
This guide covers the crucial differences between sealed beam and composite headlights for Ford E-Series vans to ensure you get the right part and install it correctly.
- Crucially, you must first identify if your van has 'Sealed Beam' (glass, one-piece) or 'Composite' (plastic, separate bulb) headlights, as they are not interchangeable.
- This part is a sealed beam halogen unit; the bulb cannot be replaced separately. When it burns out, the entire assembly is replaced.
- Replacement is a simple DIY task, but you MUST properly aim the new headlight afterward for safety and legality.
- If both headlights fail at once, suspect the Lighting Control Module (LCM) before replacing the headlight assemblies.
Is This The Right Headlight For Your Van? Sealed Beam vs. Composite

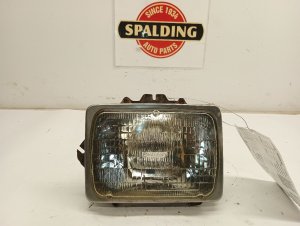
Critical Compatibility Warning: These Ford E-Series vans were available with two completely different types of headlights: Sealed Beam and Composite (Aero). They are NOT interchangeable without significant modification. This guide covers the Left (Driver Side) Sealed Beam style assembly.
Before purchasing, you must identify which type your van has:
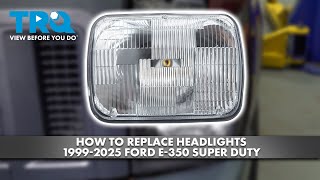
- Sealed Beam Headlights: These have a glass lens with visible fluting (lines) and the bulb number (e.g., H6054) printed directly on the glass. The entire unit is a single, sealed piece. When the bulb fails, the whole assembly is replaced. They are typically held in by a metal retaining ring with several screws.
- Composite Headlights: These have a smoother, clear plastic (polycarbonate) lens and a more modern, aerodynamic appearance. The bulb is replaceable from the back of the housing. If your van has these, this sealed beam assembly will not fit.
Visually inspect your current headlights. If they are glass and the entire unit comes out for replacement, you have sealed beams. If they are plastic and you can twist a bulb out from the back, you have composite headlights.
Vehicles This Part Fits
This Left (Driver Side) sealed beam headlight assembly is correct for the following Ford vehicles that were originally equipped with sealed beam lights:
- 1997-2014 Ford E-150
- 1997-2002 Ford E-150 Econoline
- 1997-2014 Ford E-250
- 1997-2002 Ford E-250 Econoline
- 1997-2002 Ford E-350 Econoline
- 1999-2017 Ford E-350 Super Duty
- 1997-2025 Ford E-450 Super Duty
- 2002-2003 Ford E-550 Super Duty
Note: The E-350, E-450, and E-550 cutaway and chassis cab models often retained the sealed beam design for many years, even when passenger van versions switched to composite styles. Always verify by looking at your specific vehicle.
Symptoms of a Failing Headlight Assembly

Failure isn't always a simple burnt-out bulb. Here are common symptoms:
- Dim Light Output: The most common symptom. Over time, the halogen filament degrades, producing less light and making night driving difficult.
- Burnt-Out Bulb: The headlight does not turn on at all. Since this is a sealed unit, the entire assembly must be replaced.
- Flickering or Intermittent Operation: This can be caused by a failing filament in the bulb or a poor electrical connection at the plug on the back of the assembly. Check the connector for corrosion or damage.
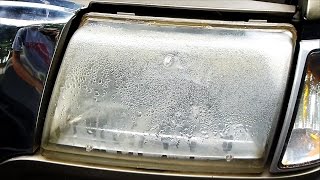
- Moisture or Condensation Inside: While a fine mist can be normal in certain weather conditions, large droplets or puddles of water indicate a failed seal. 🎬 See how to fix headlights with moisture or water inside. This moisture can cause the bulb to fail prematurely and corrode the reflective surfaces.
- Cracked or Damaged Lens: Physical damage from road debris or minor impacts can break the glass lens, immediately exposing the bulb and reflector to the elements and requiring replacement.
- Blown Fuses: A short circuit within the sealed beam unit can repeatedly blow the headlight fuse.
Known Issues, TSBs, and Recalls

While there are no widespread recalls specifically for the sealed beam headlight assembly itself, some related issues exist for the broader E-Series family:
- Lighting Control Module (LCM) Failure: Some Ford vehicles, including E-Series vans, were subject to recalls (like NHTSA #15V861) for faulty Lighting Control Modules. A failing LCM can cause the headlights to stop working unexpectedly while driving, even if the headlight assemblies themselves are perfectly fine. Symptoms include sudden loss of headlights that may return after the vehicle is turned off and on. If both your headlights fail simultaneously, the LCM is a likely suspect.
- Wiring and Connectors: Due to age, the wiring harness connector that plugs into the back of the headlight can become brittle, corroded, or loose, leading to intermittent power. Always inspect the connector when replacing the headlight.
Buying a Used Headlight Assembly: What to Look For

A used OEM headlight assembly can be a great value, often offering better quality and fit than cheap aftermarket alternatives. Here’s what to inspect:
- Lens Condition: Check the glass lens for any cracks, chips, or deep scratches. Unlike plastic composite lenses, these glass units do not get hazy or yellow from UV damage, but they can be pitted by road debris over time.
- Seal Integrity: Look for any signs that the seal between the glass lens and the rear housing has been compromised. Evidence of prior moisture, like a water line or discoloration on the reflector, is a major red flag.
- Reflector Condition: The internal chrome reflector should be bright and shiny. A dull, cloudy, or corroded reflector will significantly reduce light output, even with a good bulb.
- Mounting and Adjuster Points: The assembly is held and aimed by a mounting bracket with adjuster screws. Ensure the points on the headlight housing where these screws interact are intact and not broken. These can become brittle with age.
- Electrical Connector: The three prongs on the back of the assembly should be clean, straight, and free of corrosion.
Headlight Technology: Halogen Sealed Beam
This assembly is a Sealed Beam Halogen unit (bulb type H6054). This is an older, very reliable technology.
- How it Works: A tungsten filament is housed inside a glass capsule filled with halogen gas. The entire lens, reflector, and bulb are one piece.
- Interchangeability: This unit is NOT interchangeable with composite, HID (Xenon), or LED assemblies without modification. It does not require a ballast, igniter, or LED driver module.
- Upgrades: While you cannot simply put an LED or HID bulb into this housing, many companies sell complete 5x7" LED sealed-beam-style replacement units that are designed to be a direct swap. These can offer significantly brighter light but require ensuring the wiring is correct, as the pin layout on the new unit may differ.
Replacement and Aiming Guide
Replacing this headlight is a straightforward job suitable for a DIY mechanic.
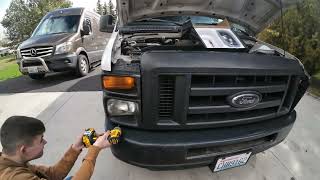
Pro Tip: You will typically need a Phillips head screwdriver and a 7mm socket. Some model years may use slightly different fastener sizes.
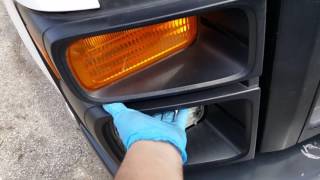
- Access the Headlight: Open the hood. You will see a trim piece or bezel around the headlight. This is typically held on by two 7mm screws on the bottom and may have a clip or another screw at the top.
- Remove the Retaining Ring: Once the outer trim is off, you will see a metal ring holding the sealed beam unit in place. This ring is secured by four Phillips head screws. Do NOT touch the larger adjuster screws that are typically at the top and side of the main bracket.
- Swap the Assembly: With the retaining ring removed, the headlight assembly can be pulled forward. Disconnect the electrical plug from the back. Plug in the new assembly, place it into the bucket, and reinstall the retaining ring and screws. 🎬 Watch: Step-by-step headlight replacement for E-Series Super Duty vans.
- Aim the Headlight: This step is mandatory. A new headlight will not be properly aimed. Park the van on level ground about 25 feet from a flat wall. Turn on the low beams. Locate the two adjuster screws on the headlight bracket—one for vertical (up/down) aim and one for horizontal (left/right) aim. Use a Phillips screwdriver or a 5/32" hex bit (depending on the year) to turn the adjusters until the beam's cutoff is at the correct height and position, ensuring it doesn't blind oncoming drivers.
| Part Type | Estimated Cost |
|---|---|
| New OEM | $90 - $150 |
| New Aftermarket | $30 - $60 |
| Used OEM | $25 - $50 |
| Shop Labor | $50 - $100 |
Frequently Asked Questions
Can I upgrade my sealed beam headlights to brighter LEDs?
Yes, but you cannot just replace the bulb. You must buy a complete 5x7 inch LED sealed beam replacement unit. These are designed to fit in place of the original glass assembly and connect to the factory wiring harness, sometimes with an included adapter. Be sure to aim them properly after installation, as they are often much brighter than the original halogen units.
Why did my new headlight stop working after a few weeks?
If the new assembly has failed, the most likely causes are either excessive moisture getting inside from a bad seal on the unit, or an electrical issue. Check the wiring connector for a loose fit or corrosion. In rare cases, voltage spikes from a faulty alternator or Lighting Control Module (LCM) could damage the bulb's filament.
Is it difficult to replace this headlight myself?
No, this is considered an easy DIY job. Basic hand tools are all that's required, and the process typically takes less than 30 minutes per side. The most important part of the job is properly aiming the headlight after it's installed.
Why are my headlights aimed at the ground after replacement?
Headlights must be aimed after installation. The mounting bracket has adjuster screws for vertical and horizontal alignment. Failure to perform the aiming procedure will result in poor visibility and can be dangerous for you and other drivers.
Helpful Videos

Technical Specifications
OEM Part Numbers: 6C2Z-13008-BA AC2Z-13008-DCP
Bulb Type: H6054 Sealed Beam Halogen Dimensions: Rectangular, approximately 5x7 inches
We Have This Part in Stock

The information in this article is provided for general reference and educational purposes only. Vehicle specifications, procedures, and part compatibility can vary by production date, trim level, and region. Always consult your vehicle's factory service manual and verify part numbers before purchasing or performing repairs. Safety-critical components such as airbags, seat belts, and braking systems should be installed by a qualified professional.
- Ford E-150:
- Ford E-150 Econoline:
- Ford E-250:
- Ford E-250 Econoline:
- Ford E-350 Econoline:
- Ford E-350 Super Duty:
- Ford E-450 Super Duty:
- Ford E-550 Super Duty:
- 🎬 Helpful Videos
- 🛍️ Shop This Part
- Is This The Right Headlight For Your Van? Sealed Beam vs. Composite
- Vehicles This Part Fits
- Symptoms of a Failing Headlight Assembly
- Known Issues, TSBs, and Recalls
- Buying a Used Headlight Assembly: What to Look For
- Headlight Technology: Halogen Sealed Beam
- Replacement and Aiming Guide
- Frequently Asked Questions
- 🎟️ Get 5% Off