
Ford E-Series Van Sealed Beam Headlight Guide (2008-2019)
This guide covers the specific sealed beam headlight assemblies used on 2008-2014 E-150 & E-250, and 2008-2019 E-350 & E-450 Super Duty vans, focusing on common issues and replacement.
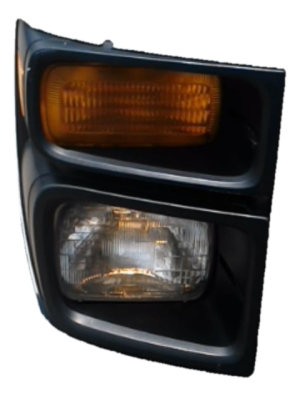
- These vans use H6054 sealed beam headlights, where the bulb and lens are one piece. They are NOT interchangeable with composite 'aero' style headlights.
- When buying a used assembly, the condition of the adjustment screws is more important than the included sealed beam bulb, which is a cheap consumable part.
- Direct-fit LED upgrades that replace the entire H6054 unit are a popular and effective way to improve lighting performance.
- Aiming the headlights after replacement is a required safety step and can be done with basic tools.
Headlight Assembly Overview for Ford E-Series Vans
This guide applies to the following Ford van models equipped with sealed beam headlights:
- 2008-2014 Ford E-150
- 2008-2014 Ford E-250
- 2008-2019 Ford E-350 Super Duty
- 2008-2019 Ford E-450 Super Duty
- 2008-2017 Ford E-350 Econoline
Important: These vehicles were available with two different types of headlights: sealed beam and composite (or "aero" style). The parts are not interchangeable. This guide exclusively covers the sealed beam type. Visually confirm which type your van has before purchasing parts.
Sealed Beam vs. Composite: What's the Difference?
It is critical to identify which headlight system your van uses. They mount differently and use completely different components.
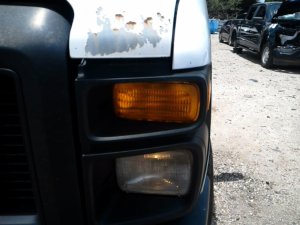
- Sealed Beam Headlights: These have a glass lens with visible fluting (lines) and the entire unit is the bulb. They are typically held in place by a metal retaining ring with several screws. The bulb type is H6054. When the light burns out, you replace the entire glass unit.
- Composite Headlights: These have a smoother, clearer plastic lens and a separate, replaceable halogen bulb (like a 9007) that twists into the back of the housing. The entire assembly is often a single plastic piece held in by retaining pins or bolts.
Symptoms of a Failing Headlight Assembly
Failures can be related to the sealed beam unit itself or the assembly that holds it.
- Dim or Yellow Light: The filament in the sealed beam is aging and losing its brightness.
- Burned-Out Headlight: The filament has broken. This requires replacing the entire H6054 sealed beam unit.
- Flickering Light: This can be caused by a poor connection at the electrical plug, a failing sealed beam, or an issue with the vehicle's lighting control module.
- Moisture/Condensation: While the beam unit itself is sealed, water can get trapped in the mounting assembly behind it, accelerating rust on the adjustment screws and housing.
- Headlight Beam Won't Adjust: The plastic or metal adjustment screws on the assembly are stripped or rusted solid, preventing proper aiming.
- Loose or Vibrating Headlight: The mounting points of the assembly are broken, or the retaining ring is loose.
Known Issues, Recalls, and TSBs
While no major recalls specifically target the headlight assemblies on these E-Series vans, some broader Ford recalls for other models mention issues with the Lighting Control Module (LCM). A failing LCM could cause intermittent headlight operation. However, for the E-Series, the most common problems are physical deterioration of the assembly components rather than electronic failures.
Buying a Used Headlight Assembly: What to Inspect
When buying a used headlight assembly for these vans, you are primarily buying the mounting bucket, adjustment screws, and wiring pigtail. The sealed beam unit itself is a cheap and easily replaceable wear item.
- Check the Mounting Bucket: This is the plastic or metal part that holds the sealed beam. Look for cracks, especially around the mounting points and where the adjustment screws are seated.
- Test the Adjustment Screws: These are the most critical part of a used assembly. Try to turn both the vertical and horizontal adjustment screws. If they are rusted solid, stripped, or free-spinning, the assembly is useless for proper aiming.
- Inspect the Retaining Ring: This metal ring holds the sealed beam in place. Ensure it's not bent and that the screw holes aren't stripped or rusted out.
- Examine the Wiring Connector: Check the 3-prong plug for corrosion, melted plastic, or brittle wires. A bad connection here is a common point of failure.
Pro Tip: Even if the used assembly comes with a sealed beam unit, it's wise to install a new one. A new H6054 sealed beam is inexpensive and ensures you start with maximum brightness and longevity.
Replacement and Installation Guide
Replacing the headlight assembly or just the sealed beam unit is a straightforward job on these vans.
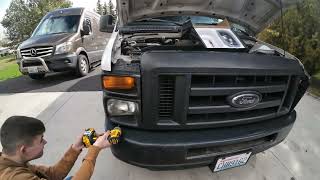
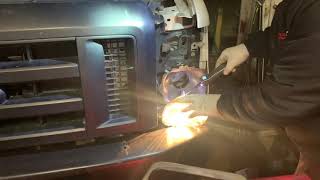
- Remove the Headlight Bezel: This is the trim piece surrounding the headlight. It's typically held on by two bolts on top and two on the bottom, often requiring a 10mm socket.
- Remove the Retaining Ring: Using a Phillips head screwdriver, remove the four screws that hold the metal retaining ring in place. Be careful, as these screws are often rusty.
- Unplug and Remove the Headlight: The sealed beam unit can now be pulled forward. Unplug the electrical connector from the three prongs on the back.
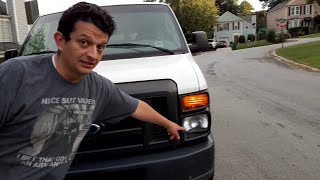
- Installation: Installation is the reverse of removal. Plug the new sealed beam into the harness, place it in the bucket, and secure it with the retaining ring and bezel. 🎬 Watch: Step-by-step guide to replacing your sealed beam headlight. Do not overtighten the retaining ring screws.
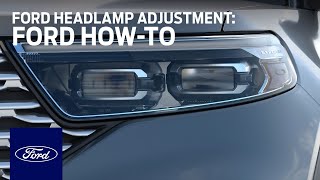
Required Headlight Aiming
Any time you replace a headlight, you MUST aim it correctly. Improperly aimed headlights can be dangerous for you and other drivers.
The general procedure is as follows:
- Park the van on a level surface, 25 feet away from a flat, vertical wall.
- Measure the height from the ground to the center of the headlight. Mark this height on the wall with a horizontal line of tape.
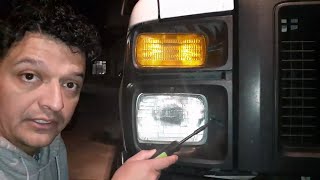
- Turn on the low beams. The top edge of the bright part of the beam pattern should sit just at or slightly below the tape line on the wall.
- Use a Phillips screwdriver or a small Torx driver to turn the adjustment screws. One screw controls vertical (up/down) aim, and the other controls horizontal (left/right) aim. Make small, quarter-turn adjustments at a time. 🎬 Watch: How to properly adjust your E-Series headlight aim.
Cost Comparison
| Part | Estimated Cost |
|---|---|
| New OEM Assembly (Ford) | $100 - $120 per side |
| New Aftermarket Assembly | $40 - $70 per side |
| Used OEM Assembly | $50 - $80 per side |
| New H6054 Sealed Beam Bulb | $15 - $25 each |
| Shop Labor (Replacement) | $75 - $150 |
Frequently Asked Questions (FAQ)
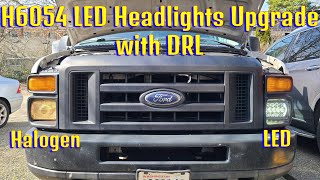
Can I upgrade my sealed beam headlights to LED?
Yes. You can replace the H6054 sealed beam unit with a direct-fit H6054-style LED unit. These are designed to be plug-and-play, connecting to the factory 3-prong harness. This is a popular upgrade for significantly improved visibility.
🎬 See how to upgrade your van with LED headlights.Is the left (driver side) assembly the same as the right (passenger side)?
No, they are not interchangeable. They have different part numbers and are shaped as mirror images to fit the specific side of the vehicle. The right-side OEM part number is 8C2Z-13200-B.
My new headlight doesn't work. What should I check?
First, confirm the plug is seated securely on the back of the sealed beam unit. Second, check the headlight fuse in the vehicle's fuse box. Third, try plugging the old headlight back in to see if it works; if it does, the new unit may be faulty. If neither works, there may be an issue with the wiring harness or the headlight switch/module.
What's the difference between OEM part numbers 8C2Z-13200-A and 8C2Z-13200-B?
Part number 8C2Z-13200-B is a later version that replaces 8C2Z-13200-A. They are interchangeable, but 8C2Z-13200-B is the current part supplied by Ford for the right-hand (passenger) side assembly.
Helpful Videos

Technical Specifications
OEM Part Numbers: 8C2Z-13200-A 8C2Z-13200-B
Headlight Type: Sealed Beam Bulb/Unit Type: H6054 (7x6 inch rectangular)
We Have This Part in Stock

The information in this article is provided for general reference and educational purposes only. Vehicle specifications, procedures, and part compatibility can vary by production date, trim level, and region. Always consult your vehicle's factory service manual and verify part numbers before purchasing or performing repairs. Safety-critical components such as airbags, seat belts, and braking systems should be installed by a qualified professional.
- Ford E-150:
- Ford E-250:
- Ford E-350 Super Duty:
- Ford E-450 Super Duty:
- Ford E-350 Econoline:
- 🎬 Helpful Videos
- 🛍️ Shop This Part
- Headlight Assembly Overview for Ford E-Series Vans
- Sealed Beam vs. Composite: What's the Difference?
- Symptoms of a Failing Headlight Assembly
- Known Issues, Recalls, and TSBs
- Buying a Used Headlight Assembly: What to Inspect
- Replacement and Installation Guide
- Required Headlight Aiming
- Cost Comparison
- Frequently Asked Questions (FAQ)
- 🎟️ Get 5% Off