
2013-2022 Range Rover L405 Headlight: Navigating Xenon, LED, and Adaptive Options
This guide explains the critical differences between the various headlight technologies used on the 2013-2022 Range Rover L405 and how to choose the correct used replacement.
- Compatibility is critical: Xenon, Adaptive Xenon, and various LED types are NOT interchangeable. You must match the part number from your original unit.
- Moisture is the enemy: Persistent condensation indicates a leak that will destroy the expensive electronic modules at the bottom of the housing.
- Replacement requires bumper removal: This is not a simple task and adds significant labor time and cost to the repair.
- Adaptive headlights may require calibration: After replacement, the AFS system often needs to be reset with a diagnostic tool to function correctly and clear warning lights.
Key Compatibility Warnings: Read Before Buying
Choosing the correct headlight assembly for a 2013-2022 Range Rover L405 is complex due to multiple technology updates throughout its production. Installing the wrong type of headlight will result in function failure and fault codes. Always match the part number from your original headlight to the replacement part.
Critical Warning: Headlight technologies are NOT interchangeable without significant, complex, and expensive modifications to vehicle wiring and computer programming. You must replace your headlight with one of the exact same type.
Headlight Technology Types (2013-2017)
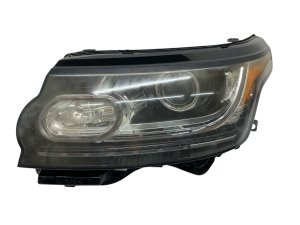
- Bi-Xenon (HID): Used on earlier models, these headlights use a high-intensity discharge bulb (type D3S) that requires a ballast and igniter to operate. They were available in two main versions:
- Standard Xenon: Provides powerful, fixed forward illumination.
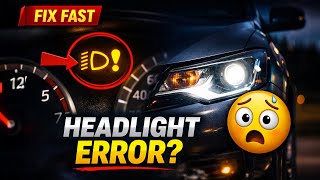
- Adaptive Xenon (AFS): The headlight beam swivels left and right with the steering wheel to better illuminate turns. A fault in this system will trigger a flashing warning light on the dashboard. 🎬 Watch: How to quickly diagnose an adaptive headlight warning light.
Headlight Technology Types (2018-2022 Facelift)
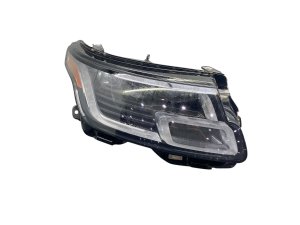
Starting in 2018, the Range Rover received a facelift and moved to all-LED lighting with several tiers:
- Premium LED: The new standard headlight, featuring 24 LEDs.
- Pixel LED: An upgraded option with 142 individually controllable LEDs that can shape the beam to avoid dazzling oncoming drivers.
- Pixel-Laser LED: The top-tier option, adding laser high beams for even greater range.
Upgrading from a 2013-2017 model to the 2018+ facelift style requires not only the headlights but also a new front bumper, grille, and other parts.
Model Year 2022 Specifics
2022 Model Year Alert: For the 2022 model year, Land Rover sold both the outgoing L405 body style (often called 'Classic') and the all-new L460 body style. The parts in this guide ONLY fit the L405 'Classic' style. The L405 can be identified by a 'G' as the 4th digit of the VIN.
Symptoms of a Failing Headlight Assembly
- Dim or Flickering Light: On Xenon models, this often points to a failing D3S bulb or, more commonly, a bad ballast. On LED models, it indicates a failing LED element or control module.
- Moisture or Condensation Inside Lens: This is a very common issue. While Land Rover sometimes considers minor fogging normal, persistent moisture, water droplets, or puddles indicate a failed seal, a crack in the housing, or a blocked vent cap. This moisture will eventually corrode and destroy the electronic modules located at the bottom of the headlight.
- 'Adaptive Headlight Fault' Warning: A flashing headlight icon on the instrument cluster indicates a problem with the AFS system. This could be a failed swivel motor inside the assembly, a bad sensor on the vehicle's suspension, or a software issue.
- Headlight Completely Inoperative: Could be a bulb, ballast/module, fuse, or wiring issue. A missing rear cover cap often leads to water damage and complete failure.
- Yellowed or Hazy Lens: UV damage and oxidation can degrade the polycarbonate lens, reducing light output and creating a poor appearance.
- LED Daytime Running Lights (DRL) Failure: If a section or the entire DRL strip fails, the entire headlight assembly typically needs to be replaced as the LEDs are not serviced separately.
Known Issues, TSBs, and Recalls
- Condensation/Moisture Ingress: The most prevalent complaint. Forum users and even some dealer documents acknowledge that condensation is common. It's often caused by failing seals between the lens and housing or blocked vent caps. If left unaddressed, the water will damage the expensive control modules.
- Recall N556 (FMVSS 108): Issued for some 2018-2020 models, this recall addressed a software issue where the Auto High Beam (AHB) system did not display the high beam indicator on the dash when active. The fix was a software update.
- Adaptive Headlight Malfunctions: Failures of the AFS system are frequently reported, often triggering a dashboard warning. Causes range from internal motor failure to problems with the vehicle's ride height sensors that provide position data to the lights.
Buying a Used Headlight Assembly: What to Inspect
Given the high cost of new OEM units, a quality used headlight is an excellent value. However, careful inspection is critical to avoid buying a faulty part.
- Confirm the Part Number: This is the most important step. Locate the sticker on the top or back of the headlight housing and match the part number (e.g., CK52-13W029-FD) exactly to your old unit.
- Inspect for Moisture Damage: Look for any signs of a past water leak, such as a dried water line, mineral deposits, or corrosion on any visible electronics or connectors. A headlight with a history of water inside is a major red flag.
- Check All Mounting Tabs: The plastic mounting tabs are brittle and often break in minor impacts or during removal. Inspect every tab for cracks or signs of repair (e.g., epoxy or plastic welding). A broken tab can cause the headlight to vibrate or be misaligned.
- Examine the Lens Condition: Look for deep scratches, rock chips, and stress cracks. Check for hazing or yellowing from UV damage. While minor hazing can be polished, heavy damage may require professional restoration.
- Inspect the Rear Housing: Check the black plastic housing for any cracks or holes, which can be a source of water entry. Ensure all rear caps and covers for the bulb access ports are present and seal tightly.
- Verify Included Components: A complete assembly should include the Xenon bulb, ballast, and any adaptive or LED control modules. These are often located on the bottom or back of the housing. Many used parts are sold as bare housings. Confirm with the seller exactly what is included. A bare housing will require you to transfer all of your old components, which may not be possible if they are damaged.
Cost of Replacement
The cost for a single headlight assembly can vary dramatically based on the technology and source.
| Part Source | Estimated Price (per side) | Notes |
|---|---|---|
| New OEM | $2,100 - $3,100+ | Highest cost, but guaranteed fit and function. Prices from dealer sites for a single Xenon assembly can exceed $3,000. |
| New Aftermarket | $500 - $1,200 | Quality and fit can be inconsistent. May lack advanced features or trigger warning lights. Facelift conversion kits are available but require other body parts. |
| Used OEM | $400 - $1,500 | Excellent value. Price depends heavily on condition, technology (LED/Pixel is more expensive), and included components. |
| Shop Labor | $300 - $500 | Replacement requires removing the front bumper cover, which typically takes 2-3 hours of labor. |
Headlight Replacement Overview
Pro Tip: Replacing the headlight assembly on an L405 Range Rover requires removing the front bumper cover. 🎬 See this step-by-step guide for removing the L405 front bumper. This is a complex job that involves disconnecting parking sensors and potentially headlight washers. While some videos for the Range Rover Sport show a method to avoid full bumper removal, it is generally required 🎬 Watch: A potential shortcut for removing headlights without pulling the bumper. for the full-size L405.
- Difficulty: 4 out of 5
- Estimated Time: 2.5 - 4 hours
- Procedure: The general process involves removing the front grille, undoing numerous screws and clips in both wheel wells, removing fasteners under the bumper, and carefully pulling the bumper cover off. Once the bumper is off, the headlight is held by several bolts.
- Aiming and Calibration: After installation, the headlights must be aimed correctly to ensure proper visibility and avoid glaring other drivers. This is done using adjustment screws on the back of the assembly. For vehicles with adaptive headlights (AFS), a diagnostic tool may be needed to perform a calibration or reset of the lighting control module to ensure the swivel function works correctly.
Frequently Asked Questions (FAQ)
Can I upgrade my 2014 Xenon headlights to 2018-style LEDs?
This is a popular but very involved conversion. It requires more than just the headlights; you will also need the 2018+ front bumper, grille, and potentially other brackets and wiring harnesses. It is not a simple plug-and-play swap.
My headlight has condensation inside. Do I need to replace the whole thing?
Not always. If it's minor fogging that clears up, it may be normal. If it's heavy moisture or water pooling, you have a leak. The first step is to find the source. It could be a bad seal, a crack in the housing, or a blocked vent. If the internal electronics are not yet damaged, you may be able to dry out the headlight and reseal it. However, if the ballast or control modules are corroded, replacement is often the only reliable fix.
What is the difference between a bad Xenon bulb and a bad ballast?
A failing bulb may flicker, change color (often to a pinkish hue), or be dim. A failing ballast can cause flickering, immediate shut-off, or prevent the bulb from igniting at all. A common diagnostic trick is to swap the bulb from the working side to the non-working side. If the bulb now works, the problem is likely your ballast. If the bulb still doesn't work, the bulb itself is bad.
Does a replacement adaptive headlight need to be programmed?
Often, yes. After installing a new adaptive headlight or replacing a related sensor, the system may need to be calibrated using a compatible diagnostic tool. This procedure resets the 'zero' position and ensures the lights swivel correctly with the steering. Failure to do so can leave the 'Adaptive Headlight Fault' warning light on.
Helpful Videos


Technical Specifications
OEM Part Numbers: CK52-13W029-FD CK52-13W029-LE CK52-13W030-LE JK52-13005-AF JK52-13006-AF JK52-13W029-CD JK52-13W030-CD JK5213005AB JK5213006AB LR033966 LR033967 LR046923 LR046928 LR067205 LR067206
Xenon Bulb Type: D3S
We Have This Part in Stock


The information in this article is provided for general reference and educational purposes only. Vehicle specifications, procedures, and part compatibility can vary by production date, trim level, and region. Always consult your vehicle's factory service manual and verify part numbers before purchasing or performing repairs. Safety-critical components such as airbags, seat belts, and braking systems should be installed by a qualified professional.
- Land Rover Range Rover:
- 🎬 Helpful Videos
- 🛍️ Shop This Part
- Key Compatibility Warnings: Read Before Buying
- Headlight Technology Types (2013-2017)
- Headlight Technology Types (2018-2022 Facelift)
- Model Year 2022 Specifics
- Symptoms of a Failing Headlight Assembly
- Known Issues, TSBs, and Recalls
- Buying a Used Headlight Assembly: What to Inspect
- Cost of Replacement
- Headlight Replacement Overview
- Frequently Asked Questions (FAQ)
- 🎟️ Get 5% Off