
Mazda 6, MX-5, CX-7, Mazda5 & MPV Fog Light Guide: Fixing Condensation, Aiming & Replacement
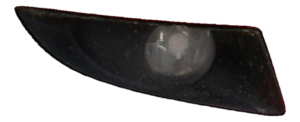
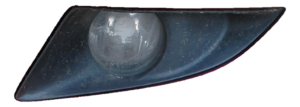
This guide covers the widely shared front fog light assembly used on the 2006-2008 Mazda 6, 2006-2012 MX-5 Miata, 2006-2010 Mazda 5, 2007-2009 CX-7, and 2004-2006 MPV.
- This is a halogen fog light assembly using a replaceable H11 bulb, not a headlight.
- The most common failure is moisture/condensation inside the lens due to a bad seal.
- Replacement is DIY-friendly, with access gained by peeling back the fender liner.
- When buying used, check for intact mounting tabs and signs of internal water damage.
Symptoms of a Failing Fog Light Assembly
When a fog light begins to fail, it can present several distinct symptoms. Understanding these signs can help you decide whether you need a simple bulb replacement or a complete new assembly.
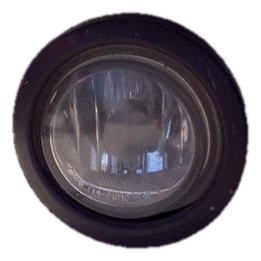
Moisture or Condensation Inside the Lens
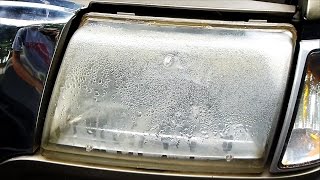
This is the most common issue for these fog lights. You may notice a light fog, small water droplets, or significant water pooling inside the housing. While Mazda has issued a Technical Service Bulletin (TSB) stating that minor fogging from temperature changes is normal and should clear on its own, persistent moisture or visible water indicates a failed seal. 🎬 Watch: How to fix moisture inside your light housing A bad seal allows water to enter, which can short out the bulb, corrode the electrical connector, and damage the reflective chrome finish inside the housing.
Dim or Completely Dead Light
If the fog light doesn't turn on, the cause can range from simple to complex. The most common reason is a burnt-out H11 halogen bulb. If a new bulb doesn't solve the problem, the issue could be electrical. A blown fuse, a faulty relay, a bad switch on the control stalk, or corroded wiring can all prevent the light from working. If both fog lights stop working simultaneously, the fuse or relay is the most likely culprit.
Cracked, Yellowed, or Hazy Lens
Located low on the bumper, these fog lights are vulnerable to impacts from road debris, which can cause cracks in the plastic lens. Over time, UV radiation from the sun can also degrade the plastic, causing it to become yellow, hazy, or cloudy. This oxidation not only looks bad but also significantly reduces the light output, making the fog lights less effective.
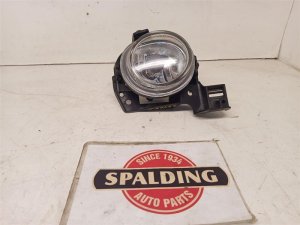
Buying a Used Fog Light Assembly: What to Inspect
A used OEM fog light is often the best value, offering a perfect fit at a lower cost than a new dealer part. However, careful inspection is crucial to ensure you get a good part. Here’s what to look for:
- Mounting Tab Integrity: This is the most critical inspection point. The assembly is held in place by several plastic tabs. These are brittle and often break during vehicle collisions or careless removal. Ensure all tabs and screw holes are present and free of cracks. A light with a broken tab will not mount securely.
- Lens Condition: Check the lens for cracks, even fine hairline fractures. While minor surface scratches or light pitting is acceptable, any crack will allow moisture to enter. Avoid lenses that are heavily yellowed or hazed, unless you are prepared to restore them yourself with a polishing kit.
- Check for Internal Water Damage: Look for a 'water line' or mineral deposits on the inside of the lens or on the chrome reflector. This is a clear sign the assembly had a bad seal and was filled with water at some point. This moisture damages the reflective surface, reducing performance.
- Connector and Wiring: Inspect the electrical connector on the back of the housing for any signs of green or white corrosion, which indicates water damage. Ensure the short pigtail wire isn't cut or frayed.
Pro Tip: When replacing one fog light, consider that its lens will likely be much clearer than the old one on the other side. For a matching appearance, either buy a pair of used lights or use a headlight restoration kit on your remaining old light to remove yellowing and haze.
Vehicle Fitment and Known Issues
This single fog light assembly was used across a wide range of Mazda platforms, making it a common and readily available part. While the part is the same, there are minor vehicle-specific details to be aware of.
| Vehicle | Years | Specific Notes |
|---|---|---|
| Mazda 6 | 2006-2008 | Direct fit. Access is through the front wheel well liner. |
| Mazda MX-5 Miata | 2006-2012 | Direct fit for the 'NC' generation. Replacement involves removing clips in the fender liner to reach the housing. |
| Mazda 5 | 2006-2010 | Direct fit. Uses an H11 bulb. |
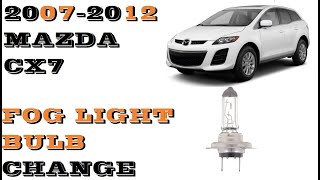
| Mazda CX-7 | 2007-2009 | Direct fit. Access is gained by removing a plastic pin and peeling back the fender liner. | 🎬 See this step-by-step Mazda CX-7 replacement video
| Mazda MPV | 2004-2006 | Fits models equipped with a bar-style front grille. |
Compatibility Warning: This is a halogen fog light assembly that uses a replaceable H11 bulb. It is not interchangeable with any factory LED fog lights found on newer Mazda models without significant wiring modifications.
Replacement and Aiming Guide
Replacing the fog light assembly is a straightforward DIY task for most home mechanics. The process is very similar across all listed models.
- Access the Assembly: Turn the steering wheel to one side to create space in the wheel well. Using a flathead screwdriver or trim removal tool, remove the plastic clips holding the fender liner to the bumper.
- Peel Back the Liner: Gently pull the fender liner back to expose the rear of the fog light assembly.
- Disconnect and Remove: Squeeze the tab on the electrical connector to unplug it. Remove the screws (typically two or three Phillips head screws) holding the assembly in place. The old unit will then come out from the front of the bumper.
- Install the New Unit: Position the new assembly and secure it with the screws. Reconnect the electrical plug and test the light before re-installing the fender liner.
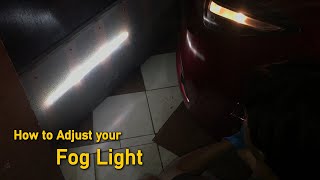
How to Aim Your Fog Lights
Many owners find the factory aim is too low to be effective. After installing a new assembly, you should check and adjust the aim.
On the back of the fog light housing, there is a plastic adjustment screw or knob, often white or yellowish. Using a Phillips screwdriver, you can turn this adjuster to raise or lower the beam. To aim them correctly, park the car on a level surface about 25 feet from a wall. The top of the fog light beam's cutoff should be about 4 inches below the centerline of the fog light itself.
🎬 Watch: How to adjust and aim Mazda fog lightsCost of Replacement
The cost to replace a fog light assembly can vary significantly based on the type of part you choose.
| Part Source | Estimated Price (Per Side) | Notes |
|---|---|---|
| New OEM | $200 - $280 | Highest cost, but guarantees perfect fitment and quality. |
| New Aftermarket | $25 - $70 | Most affordable option, but fit and seal quality can be inconsistent. |
| Used OEM | $50 - $90 | Excellent balance of cost and quality. Inspect carefully before buying. |
| Shop Labor | $75 - $150 | An independent shop will typically charge for about an hour of labor to replace the assembly. |
Frequently Asked Questions (FAQ)
Can I just replace the bulb?
Yes. If the lens and housing are in good condition, you can simply replace the bulb. These assemblies use a standard H11 halogen bulb, which is widely available at any auto parts store.
Can I upgrade to LED bulbs in my original housing?
Yes, you can replace the H11 halogen bulb with an H11-sized LED bulb. This is a popular plug-and-play upgrade that provides brighter, whiter light. Look for reputable brands that design their LED bulbs to mimic the filament location of a halogen bulb to ensure a proper beam pattern.
Is condensation inside the fog light normal?
A small amount of light fogging that appears and disappears with weather changes can be normal. However, if you see large water droplets, pooling water, or the condensation never goes away, the seal has failed and the assembly should be replaced to prevent electrical problems.
Do I need to get an alignment after replacing a fog light?
No, a wheel alignment is not necessary. However, you should check and adjust the aim of the new fog light to ensure it is pointed correctly and doesn't cause glare for other drivers.
Helpful Videos
Technical Specifications
OEM Part Numbers: EH44-51-690C LE46-51-690 LE46-51-690A LE46-51-690B LE46-51-690C TK21-51-690A GEG1-51-690B
Bulb Type: H11 Halogen
We Have This Part in Stock

The information in this article is provided for general reference and educational purposes only. Vehicle specifications, procedures, and part compatibility can vary by production date, trim level, and region. Always consult your vehicle's factory service manual and verify part numbers before purchasing or performing repairs. Safety-critical components such as airbags, seat belts, and braking systems should be installed by a qualified professional.
- Mazda 6:
- Mazda MX-5 Miata:
- Mazda 5:
- Mazda CX-7:
- Mazda MPV:
- 🎬 Helpful Videos
- 🛍️ Shop This Part
- Symptoms of a Failing Fog Light Assembly
- Moisture or Condensation Inside the Lens
- Dim or Completely Dead Light
- Cracked, Yellowed, or Hazy Lens
- Buying a Used Fog Light Assembly: What to Inspect
- Vehicle Fitment and Known Issues
- Replacement and Aiming Guide
- How to Aim Your Fog Lights
- Cost of Replacement
- Frequently Asked Questions (FAQ)
- 🎟️ Get 5% Off