
Tesla Model 3 & Y Headlight Guide (2017-2026): Reflector vs. Matrix and Software Reinstall Steps
This guide covers the critical differences between headlight types for the 2017-2026 Tesla Model 3 and 2020-2026 Model Y, and the required software steps after replacement.
- Visually verify your headlight type before buying: 'Reflector' (early Model 3) vs. 'Projector/Matrix' (later Model 3/Y). They are not interchangeable without software changes and replacing in pairs.
- Replacement is not plug-and-play. A 'Software Reinstall' via the car's Service Mode is mandatory for the new headlight to be recognized and function.
- Replacement requires removing the entire front bumper cover, making it a moderately difficult DIY job.
- A used OEM headlight is a much safer purchase than a new aftermarket one due to complex software integration that can cause errors with non-genuine parts.
Headlight Versions: A Critical Compatibility Check
Before purchasing a replacement headlight for a 2017-2026 Tesla Model 3 or 2020-2026 Tesla Model Y, you must visually identify which version your vehicle has. There are two primary, non-interchangeable types for these models, plus a third version for the newest Model 3 that does not fit earlier cars.
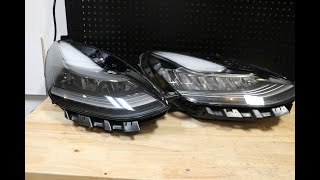
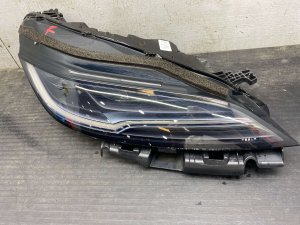
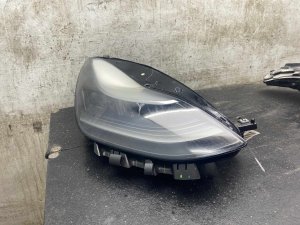
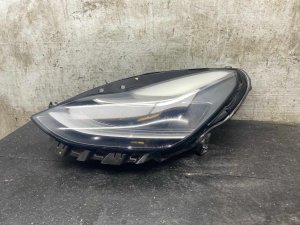
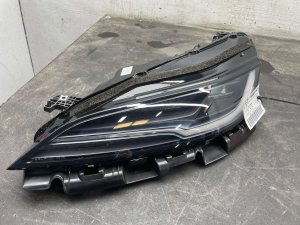
- LED Reflector (2017-2020 Model 3): These are the original headlights. You can identify them by their multiple, distinct chrome reflector bowls visible behind the main lens. They do not have a large, circular glass projector lens on the outer side of the housing.
- LED Projector / 'Matrix' (2021+ Model 3, 2020+ Model Y): Starting in late 2020, Tesla switched to a projector-style headlight. This version is easily identified by the large, circular glass projector lens on the outer side of the main beam. These are sometimes referred to as 'Global' headlights. 🎬 Watch: Compare the physical differences between these headlight styles
Warning: The Reflector and Projector/Matrix headlights are not directly interchangeable. While they may physically bolt into the same space, the vehicle's software is configured for a specific type. Installing the wrong type can cause error messages, loss of features like adaptive high beams, or the light may not turn on at all. If you are replacing a damaged Reflector (SAE) headlight, Tesla's official procedure is to replace both headlights with the newer Projector (Global) type and update the vehicle's software configuration.
Note: The refreshed 2024+ Tesla Model 3, known as 'Highland', uses a completely new, slimmer headlight design that is not compatible with any previous Model 3 or Model Y.
Symptoms of a Failing Headlight Assembly
Since these are sealed LED units, you won't be replacing a simple bulb. Failure typically involves the entire assembly or its internal electronics.
- One or more beams not working: The low beam, high beam, or the signature Daytime Running Light (DRL) strip may go out completely.
- Flickering light: The light may flicker intermittently, which can be caused by a failing internal LED driver module or a software issue.
- Condensation or water inside the lens: While minor fogging that clears on its own can be normal, any visible water droplets or pooling water inside the housing indicates a failed seal. This moisture will eventually destroy the internal electronics.
- Yellowing or dim DRL strip: The white daytime running light can degrade over time from heat and moisture, causing it to turn a dim yellow color.
- Headlight-related error messages: The center display may show an error indicating a headlight fault.
- Physical damage: Cracks in the lens or housing from road debris are a common reason for replacement.
Known Issues and Recalls
While there are no widespread NHTSA recalls specifically for headlight failure on the Model 3 and Model Y, there are related service bulletins and common complaints. There have been recalls for taillights failing to illuminate and for software issues causing flickering on other models like the Model X.
A key service policy to be aware of is that Tesla may require replacing headlights in pairs. If your vehicle has the older Reflector-style headlights and one fails or is damaged, the official service procedure is to replace both with the newer Projector/Matrix style and update the car's software configuration. This can significantly increase the repair cost if you go through official channels.
Buying a Used Headlight Assembly: What to Look For
A used OEM headlight is often the best value, but careful inspection is crucial.
- Confirm the Type: This is the most important step. Does it have the projector orb lens or not? Match it exactly to your car's existing headlights.
- Inspect All Mounting Tabs: The plastic mounting tabs are fragile and often break when a headlight is removed from a donor vehicle. Inspect photos carefully for any broken or repaired tabs. While some minor tabs can be repaired, the main structural mounting points must be intact for proper and secure fitment.
- Check the Lens Condition: Look for deep scratches, rock chips, and 'hazing' or yellowing from UV damage. Minor surface scratches can be polished, but a heavily damaged lens cannot be replaced separately.
- Look for Signs of Moisture: Check for a 'water line' or dried mineral deposits on the inside of the lens. This indicates the seal has failed previously and the internal electronics could be compromised.
- Verify the Part Number: If possible, check the sticker on the headlight housing. Part numbers beginning with `1077372` are typically the older Reflector style, while those starting with `1514952` or `1514953` are the newer Projector/Matrix style.
Pro Tip: Avoid cheap new aftermarket headlights. While tempting, they are notorious for causing software compatibility issues, error codes, and disabling advanced features like adaptive high beams. A quality used OEM unit is a much safer and more reliable choice.
Replacement and Programming Guide
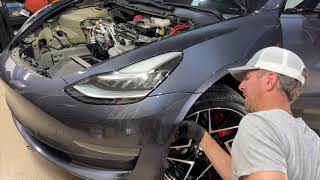
Replacing a headlight on a Model 3 or Y is a moderately difficult job, primarily because it requires removing the front bumper cover.
Step 1: Front Bumper Removal
The front bumper cover must be carefully unclipped and removed to access the bolts that hold the headlight assembly in place. This involves removing numerous clips, screws in the wheel wells, and bolts in the frunk area. It is highly recommended to watch a detailed video guide before attempting this, as it's easy to break clips or scratch paint.
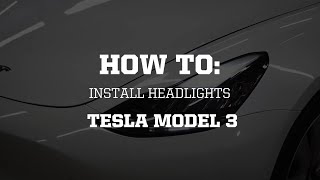
🎬 See this step-by-step bumper removal and headlight installation guideStep 2: Headlight Installation
Once the bumper is off, the headlight is held by just a few 10mm bolts. After unbolting the old unit and disconnecting its single electrical connector, the new one can be bolted in. Connect the new headlight before fully reinstalling the bumper to test its function.
Step 3: Software Reinstall (Mandatory)
A new or used replacement headlight will not work until the vehicle's computer recognizes its internal module. You must perform a software reinstall.
- On the center touchscreen, tap the car icon, then tap 'Software'.
- Press and hold on the vehicle's model name (e.g., 'Model Y') for a few seconds until a password prompt appears.
- Type the word service and press OK to enter Service Mode.
- In the Service Mode menu, find and initiate the 'Software Reinstall' function.
- The process can take several minutes. You may hear various clicks and sounds as the car's modules reset. Once complete, the new headlight should be recognized and function correctly.
Warning: Do not skip the software reinstall. The new headlight will appear dead or have limited function until this step is completed. This procedure allows the car to pair with the new headlight's unique electronic module.
Step 4: Headlight Aiming
After installation, you must check and adjust the headlight aim to ensure you have proper visibility without blinding other drivers. This is done entirely through the touchscreen.
- Park the car on a level surface, 25 feet away from a flat wall.
- On the touchscreen, navigate to Controls > Service > Adjust Headlights.
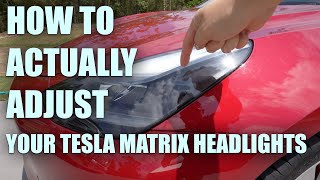
- Select the left or right headlight. Use the left scroll wheel on the steering wheel to adjust the beam's height and angle until it meets the proper specification. 🎬 Watch: How to adjust and aim your Tesla headlights
| Item | Estimated Cost |
|---|---|
| New OEM Headlight (from Tesla) | $1,000 - $1,800+ (per side) |
| New Aftermarket Headlight | $350 - $700 (per side) |
| Used OEM Headlight | $300 - $800 (per side) |
| Shop Labor for Replacement | $250 - $500 |
Frequently Asked Questions (FAQ)
Can I upgrade my old Reflector headlights to the new Matrix ones?
Yes, but it requires replacing both headlights as a pair and changing the vehicle's software configuration. It is not a simple plug-and-play swap. Tesla's own service policy dictates this upgrade if one reflector light fails and needs replacement.
Why is the 'Software Reinstall' necessary after replacing a headlight?
Each Tesla headlight contains a unique electronic control module. The 'Software Reinstall' process forces the car's main computer to recognize and 'pair' with this new module. Without this step, the car will not communicate with the new headlight, and it will not function.
Do I need to replace my headlights in pairs?
If you are replacing a headlight with the exact same type (e.g., Matrix for Matrix), you can replace just the one. However, if you have the older Reflector style and one fails, Tesla's official procedure is to replace both with the newer Matrix style. Also, replacing in pairs ensures that both lights have the same brightness and lens clarity.
Is some condensation inside the headlight normal?
Minor, temporary fogging that appears in certain weather conditions and then disappears is generally considered normal for modern LED headlights. However, if you see large water droplets, pooling water, or persistent condensation that never clears, the headlight's seal has failed and the entire assembly should be replaced to prevent electrical failure.
OEM Part Numbers
Part numbers are often found on a sticker on the top or back of the headlight housing. The last letter in the part number is a revision code and may change. The core number is most important.
| Type | Part Numbers (Examples) | Vehicle Fitment |
|---|---|---|
| Reflector LED | 1077372-xx-x, 1077371-xx-x | 2017-2020 Model 3 |
| Projector / Matrix LED | 1514952-xx-x, 1514953-xx-x | 2021+ Model 3, 2020+ Model Y |
| 'Highland' LED (Not compatible) | 1694086-xx-x, 1694087-xx-x | 2024+ Model 3 Only |
Helpful Videos
Technical Specifications
OEM Part Numbers: 1077372-00-K 1077372-00-L 1514952-00-A 1514952-00-B 1514952-00-C 1514952-00-D 1514952-00-E 1514953-00-A 1514953-00-C 1514953-00-D 1514953-00-E 1694086-00-F
Lighting Technology: Full LED. Voltage: 12V. Control: Vehicle software integration for aiming and features.
We Have This Part in Stock


The information in this article is provided for general reference and educational purposes only. Vehicle specifications, procedures, and part compatibility can vary by production date, trim level, and region. Always consult your vehicle's factory service manual and verify part numbers before purchasing or performing repairs. Safety-critical components such as airbags, seat belts, and braking systems should be installed by a qualified professional.
- Tesla 3:
- Tesla Y:
- 🎬 Helpful Videos
- 🛍️ Shop This Part
- Headlight Versions: A Critical Compatibility Check
- Symptoms of a Failing Headlight Assembly
- Known Issues and Recalls
- Buying a Used Headlight Assembly: What to Look For
- Replacement and Programming Guide
- Step 1: Front Bumper Removal
- Step 2: Headlight Installation
- Step 3: Software Reinstall (Mandatory)
- Step 4: Headlight Aiming
- Frequently Asked Questions (FAQ)
- OEM Part Numbers
- 🎟️ Get 5% Off