
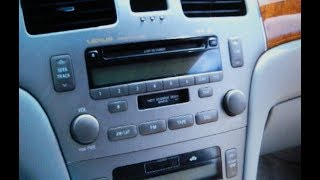
2002-2006 Lexus ES300 & ES330 Instrument Panel Bezel: Fixing Cracks and Scratches
This guide covers the common cosmetic issues, replacement, and buying tips for the instrument panel surround bezel on the 2002-2003 ES300 and 2004-2006 ES330.
- Failure is purely cosmetic (cracks, scratches) or physical (broken clips), and does not affect vehicle operation.
- Verify the color before buying; bezels came in standard gray and woodgrain, with different shades of gray used in different years.
- When buying used, the most important check is for intact mounting tabs on the back of the part.
- Replacement is a simple DIY job requiring only basic tools, with a difficulty of 2 out of 5.
Symptoms of Failure
Since the instrument panel bezel is a cosmetic trim piece, it doesn't 'fail' in a way that affects the vehicle's operation. Instead, failure is related to its physical and aesthetic condition. Over time, the plastic can become brittle and prone to damage.
Cosmetic Damage
The most common issues are purely cosmetic. Prolonged exposure to sunlight and heat can cause the plastic to degrade. The UV rays break down the chemical components of the plastic, causing it to become brittle and eventually crack. You might also see the color fade or notice a powdery texture on the surface, which is a sign of the material breaking down. Scratches from normal wear and tear, or from previous repair attempts, are also very common.
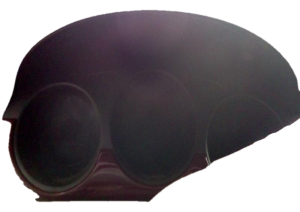
Broken Mounting Tabs
A more significant problem is when the mounting tabs on the back of the bezel break. These clips are what hold the bezel securely to the dashboard. If they break during removal for another repair (like replacing the radio or instrument cluster 🎬 Watch: How to remove the instrument cluster and speedometer), the bezel may not sit flush or could rattle when you drive. This is a common risk when working on older vehicles where the plastic has become less flexible.
Known Issues, TSBs, and Recalls
For the 2002-2006 Lexus ES models, there are no specific recalls or Technical Service Bulletins (TSBs) directly targeting the instrument panel bezel itself. However, there was a well-known warranty enhancement program for cracking dashboards on many Lexus models from this era due to sun and heat exposure. While the instrument bezel was not the primary focus of this program, the materials are similar and subject to the same environmental stresses.
No recalls found for the instrument panel bezel. Searches for the 2002-2003 ES300 and 2004-2006 ES330 on the NHTSA database show recalls for other issues like crankshaft pulleys and seat belt components, but none for interior trim pieces like the bezel.
Variant Differences: Gray vs. Woodgrain
It's crucial to know that these vehicles came with different interior trim finishes. The standard finish for the instrument panel bezel is a gray plastic. However, many vehicles were equipped with a woodgrain trim package. Forum discussions indicate that the 2002-2004 models often used a darker gray bezel with a dark cherry or burled walnut wood trim, while the 2005-2006 models sometimes used a lighter, silver-gray bezel to match a lighter blonde wood trim. When buying a replacement, it is essential to match the color and finish to your vehicle's existing trim to maintain a consistent look.
Pro Tip: Some owners use vinyl wraps to change the color of their trim or cover up scratches. This can be a good alternative if you can't find a used part in the exact finish you need.
Buying a Used Instrument Panel Bezel
Buying a used OEM bezel is often the best choice, as new OEM parts can be expensive and aftermarket options are rare for this specific piece. Here’s what to look for:
- Inspect All Mounting Tabs: This is the most critical check. Carefully examine the back of the bezel. Ensure all the plastic clips and screw holes are intact and free of cracks. A bezel with even one broken tab might not fit securely and could cause rattles.
- Check for Hidden Cracks: Look closely at the front and back, especially around the thin sections and corners. What looks like a small scratch on the front could be a crack that goes all the way through. Flex the part gently to see if any cracks appear.
- Verify the Color and Finish: As mentioned, there are different shades of gray and woodgrain available. Compare photos of the used part to your car's interior in good lighting. Ask the seller for the part number or the VIN of the vehicle it came from to help confirm the color.
- Assess Scratches and Wear: Expect some minor wear on a used part. Decide what level of cosmetic imperfection you're willing to accept. Minor scratches can sometimes be polished out, but deep gouges are permanent.
Cost Comparison
| Part Type | Estimated Cost |
|---|---|
| New OEM | $210 - $550+ |
| New Aftermarket | Not commonly available |
| Used OEM | $25 - $75 |
| Shop Labor | $75 - $150 |
Replacement Guide
Replacing the instrument panel bezel is a relatively straightforward job that most DIY mechanics can handle. The process mainly involves carefully prying plastic panels and removing a few screws.
Tools Needed:
- Plastic trim removal tools (to avoid scratching panels)
- Phillips head screwdriver
Step-by-Step Process (General):
- Lower the Steering Column: Adjust the steering wheel to its lowest and most extended position to give you more room to work.
- Remove Surrounding Trim: The exact steps can vary slightly between the ES300 and ES330. Often, you need to remove the trim piece below the steering column and sometimes the radio/climate control surround first. 🎬 See this guide for removing the radio and heater controls These pieces are typically held in by clips and can be gently pried off with a trim tool.
- Unscrew the Bezel: There are usually two Phillips head screws at the bottom of the instrument bezel and sometimes two at the top, accessible once the surrounding trim is out of the way.
- Pop Out the Bezel: With the screws removed, the bezel is held in only by clips. Carefully pull the bezel straight out towards you. Start from one corner and work your way around, using a trim tool to help release the clips 🎬 Watch: A quick walkthrough of the stereo and bezel removal if needed. Do not force it, as the old plastic can be brittle.
- Installation: Installation is the reverse of removal. Line up the clips on the new bezel, press it firmly into place until the clips engage, and then replace the screws and any other trim pieces.
Warning: Be careful when prying off trim pieces. The plastic clips can become brittle with age and break easily. Using proper plastic trim removal tools instead of a screwdriver is highly recommended to prevent damage.
Frequently Asked Questions
Can a cracked instrument bezel cause any warning lights or electrical problems?
No. The bezel is a purely cosmetic piece of plastic. It has no wiring or sensors connected to it. Cracks, scratches, or even its complete absence will not affect the vehicle's function in any way.
Is the instrument bezel the same for the ES300 and ES330?
Yes, the physical shape and fitment of the bezel are the same for all 2002-2003 Lexus ES300 and 2004-2006 Lexus ES330 models. However, the color and finish may be different. The 2002-2004 models often had a darker gray bezel, while some 2005-2006 models used a lighter gray/silver color. Always verify the color before purchasing.
Why is my woodgrain trim peeling? Can it be repaired?
The peeling is the clear coat on top of the wood veneer failing, usually due to age and sun exposure. Some owners have had success carefully sanding and refinishing the wood trim, but it is a delicate process. For the instrument panel bezel, it's often easier and more cost-effective to find a good used replacement. In some cases, what appears to be peeling factory woodgrain is actually a failing aftermarket applique that a previous owner installed.
Do I need to disconnect the battery to replace the instrument panel bezel?
While not strictly necessary since you are only removing a trim piece, it is always a good safety practice to disconnect the negative battery terminal when working around the dashboard and steering column, especially near airbag components.
Helpful Videos


Technical Specifications
OEM Part Numbers: 55404-33030 55404-33081 55404-33100 55421-33020
Material: Plastic. Finishes: Gray (multiple shades), Woodgrain.
We Have This Part in Stock

The information in this article is provided for general reference and educational purposes only. Vehicle specifications, procedures, and part compatibility can vary by production date, trim level, and region. Always consult your vehicle's factory service manual and verify part numbers before purchasing or performing repairs. Safety-critical components such as airbags, seat belts, and braking systems should be installed by a qualified professional.
- Lexus ES300:
- Lexus ES330: