
Toyota Camry, Highlander, RAV4 & More Interior Door Handle Failure: 2008-2024 Guide
This guide covers the common failures, replacement costs, and buying advice for the shared interior door handle on many 2008-2024 Toyota and Scion vehicles.
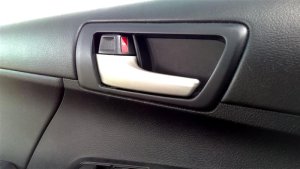
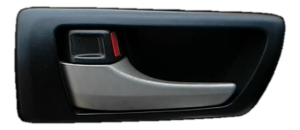
- This handle is side-specific (Left vs. Right) but fits both front and rear doors on the same side.
- Failure is almost always mechanical, with the plastic pivot point cracking or snapping from use.
- A used OEM handle is a better choice than a new, cheap aftermarket part due to superior material quality and durability.
- Replacement is a simple DIY job that requires removing the interior door panel, with a difficulty of 2 out of 5.
Symptoms of a Failing Interior Door Handle
When an interior door handle begins to fail, the signs are almost always physical and easy to detect. Because it's a purely mechanical part, you won't see any warning lights or diagnostic trouble codes. Instead, pay attention to how the handle feels and operates.
- Loose or Wobbly Handle: The most common early symptom is a handle that feels loose or has excessive play. When you pull it, it may feel flimsy or wiggle in its housing before it begins to engage the latch.
- Increased Effort to Open: You may find yourself having to pull the handle harder than usual to get the door to open. This indicates a problem with the handle's leverage point or a stretching/binding cable, often preceding a complete break.
- Handle Doesn't Spring Back: After pulling the handle, it should snap back to its resting position. If it stays extended or returns slowly, the internal spring mechanism is likely worn out or broken.
- Complete Failure: The most obvious symptom is pulling the handle and nothing happens, or the handle itself snaps off in your hand. This usually happens at the pivot point where the plastic is under the most stress.
Known Issues, TSBs, and Recalls
While there are no widespread official recalls from the NHTSA for this specific mechanical interior door handle failure on the listed Toyota and Scion models, Lexus (Toyota's luxury division) did issue a Special Service Campaign (SSC 20LC02) for a similar issue on some of its vehicles. The campaign noted that the inside door handles could break where the latch release cable attaches, making the handle inoperative. This suggests a potential weak point in the design that can also affect these Toyota models.
Pro Tip: The most common point of failure is the plastic pivot for the handle lever. Repeated use, especially with force if the latch is sticky, can cause the plastic to fatigue and crack.
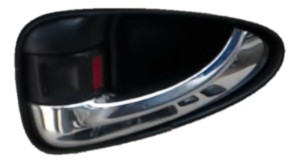
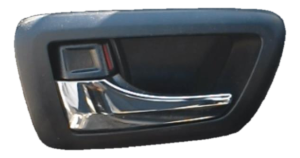
Buying a Used Interior Door Handle: What to Check
A used OEM (Original Equipment Manufacturer) interior door handle is often a smarter purchase than a new aftermarket part. OEM parts are made from higher-quality materials and are designed for a perfect fit, whereas many cheap aftermarket handles are known to be flimsy, operate poorly, and fail quickly. Here’s what to inspect before buying a used one:
- Check the Pivot Point: This is the most critical area. Hold the handle and look at the base of the lever where it pivots inside the housing. Bend the plastic slightly and look for any white stress marks or hairline cracks. This is a sign of fatigue and impending failure.
- Inspect the Cable Connection Point: Look at the small plastic clip or hook where the end of the door latch cable attaches. Ensure it is not cracked, broken, or excessively worn. This is the second most common failure point.
- Examine the Chrome Finish: While cosmetic, peeling or bubbling chrome can have sharp edges. Run your finger over the handle to ensure it's smooth.
- Verify the Side: Handles are side-specific. A driver's side (Left) handle will not work on the passenger side (Right), and vice-versa. The part numbers will be different. Ensure you are buying the correct one for your needs.
- Confirm Interchangeability: For these specific vehicles, the handle for the front door and the rear door on the same side are interchangeable. This can make finding a suitable used part much easier.
Cost Comparison
The cost to replace an interior door handle can vary significantly depending on the route you take. A DIY repair with a used OEM part is by far the most economical option.
| Part/Service | Estimated Cost | Notes |
|---|---|---|
| New OEM Handle | $41 - $60 | Purchased from a Toyota dealership parts department. |
| New Aftermarket Handle | $15 - $35 | Widely available online and in auto parts stores. Quality can be inconsistent. |
| Used OEM Handle | $20 - $50 | A cost-effective way to get original quality. Prices vary by seller and condition. |
| Shop Labor | $85 - $170 | Typically 0.75 to 1.5 hours of labor for a professional technician. |
| Total Professional Repair (New OEM Part) | $125 - $230 | Includes new OEM part and labor at an independent repair shop. |
Replacement Overview & Difficulty
Replacing an interior door handle is a straightforward job for a DIYer with basic tools. The main task is removing the interior door panel to access the back of the handle.
- Difficulty Rating: 2 out of 5
- Estimated Time: 45-60 minutes
- Tools Needed: Phillips screwdriver, flathead screwdriver, plastic trim removal tool.
Warning: Using a metal screwdriver to pry on plastic panels can easily cause scratches or damage. A set of plastic trim removal tools is highly recommended and inexpensive.
General Replacement Steps:
- Remove Screws: Locate and remove the Phillips head screws holding the door panel. Common locations are behind a small plastic cover on the door handle itself and inside the armrest/pull cup area.
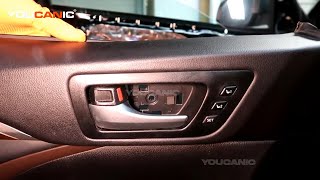
- Remove Trim and Switch Panel: Use a plastic trim tool to gently pry off the trim piece around the door handle. Next, pry up the power window switch panel. Disconnect the electrical connectors from the back of the switch panel.
- Release Door Panel Clips: Starting from the bottom, use your trim tool to pop the plastic clips that hold the perimeter of the door panel to the door frame. You will hear them pop as they release.
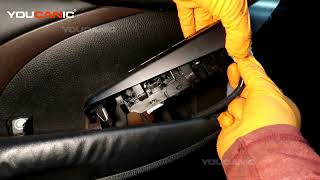
- Remove the Door Panel: Once all the clips are free, lift the door panel straight up and off the window sill.
- Disconnect Cables: From the back of the panel, you will see the two cables connected to the handle assembly (one for the lock, one for the latch). Unclip the plastic cable housings and then unhook the small metal balls at the end of the cables.
- Swap the Handle: The handle is typically held to the door panel with a few more Phillips screws. Remove them, install the new handle, and re-secure it.
- Reassembly: Reconnect the latch and lock cables to the new handle, hang the door panel back on the window sill, reconnect the window switch, press the clips back into place 🎬 See how to remove the door panel in under five minutes., and reinstall all screws and trim pieces.
Vehicle-Specific Notes
While the handle itself is the same across these models, the procedure for removing the door panel can have minor differences:
- Toyota Highlander (2008-2024): Newer models may have an additional screw behind the window switch panel or under a small cover near the front of the door. 🎬 Watch a detailed walkthrough for 2014-2019 Highlander handle replacement.
- Toyota Camry (2012-2024): The process is very standard. Look for screws behind the handle bezel and in the bottom of the door pull recess.
- Toyota Prius (2010-2015): The door pull may have a silver trim piece that needs to be pried off to access screws.
- Toyota Avalon (2013-2022): Similar to the Camry, but some trim pieces may be larger. The door grip itself may be a separate piece held on by several screws from the back.
Frequently Asked Questions
Is the driver's side handle the same as the passenger's side?
No. The handles are side-specific and are not interchangeable. You must order a Left (Driver Side) or Right (Passenger Side) handle for your specific need.
Can I use a front door handle on a rear door?
Yes. For this specific part, the front and rear handles on the same side of the vehicle are identical and interchangeable. A Left/Driver side handle will fit either the front-left or rear-left door.
Why should I buy a used OEM handle instead of a cheap new one online?
Used OEM handles retain the original manufacturer's quality standards for material durability, fit, and finish. Many new, non-OEM (aftermarket) handles are made with cheaper, thinner plastic that can break easily, leading you to do the same repair again in a short time.
Do I need to lubricate the new handle or latch?
While the handle itself doesn't require lubrication, it's a good practice to spray a little white lithium grease or silicone lubricant into the door latch mechanism inside the door while you have the panel off. A sticky latch is a common reason people pull too hard on the handle, causing it to break.
Helpful Videos


Technical Specifications
OEM Part Numbers: 69205-06120-C0 69205-0K090-C1 69205-0R030-C0 69205-28120-C0 69205-28130-C2 69205-33140-C0 692050K110 69206-06160-C0 69206-0R030-C0 69206-28120-C0 69206-28130-C2 69206-04030-C0
Material: Plastic with chrome-plated lever. Type: Mechanical, cable-actuated.
We Have This Part in Stock


The information in this article is provided for general reference and educational purposes only. Vehicle specifications, procedures, and part compatibility can vary by production date, trim level, and region. Always consult your vehicle's factory service manual and verify part numbers before purchasing or performing repairs. Safety-critical components such as airbags, seat belts, and braking systems should be installed by a qualified professional.
- Toyota Highlander:
- Toyota RAV4:
- Toyota Avalon:
- Toyota Camry:
- Scion tC:
- Toyota Prius:
- Toyota Tacoma:
- 🎬 Helpful Videos
- 🛍️ Shop This Part
- Symptoms of a Failing Interior Door Handle
- Known Issues, TSBs, and Recalls
- Buying a Used Interior Door Handle: What to Check
- Cost Comparison
- Replacement Overview & Difficulty
- General Replacement Steps:
- Vehicle-Specific Notes
- Frequently Asked Questions
- 🎟️ Get 5% Off