
2004-2026 Chrysler Pacifica & Voyager Roof Rack: Noise, Leaks, and Replacement Guide
This guide covers common issues with the OEM roof rack on the Chrysler Pacifica and Voyager, including the Stow 'n Place system, focusing on symptoms, used parts inspection, and installation.
- The most common failures are water leaks from bad seals, wind noise, and stripped plastic thumb screws on the 'Stow 'n Place' system.
- When buying used, ensure all parts are included (side rails, crossbars, bolts, caps) and check for cracks, especially at the mounting points.
- Installation is DIY-friendly, but using silicone sealant on the mounting bolts is highly recommended to prevent future water leaks.
- Not all Pacifica/Voyager trims came with a roof rack, but the mounting points are usually present under the roof trim, allowing for an OEM rack to be added.
Generational Differences

It is crucial to identify your vehicle's generation, as the roof rack systems are not interchangeable.
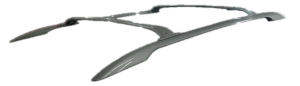
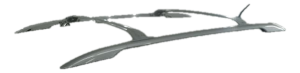
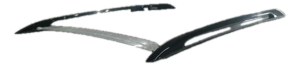
- 2004-2008 Chrysler Pacifica (CS): This first-generation model was a crossover SUV. Its roof rack consists of traditional raised side rails with separate, removable crossbars. Aftermarket options are widely available for this generation.
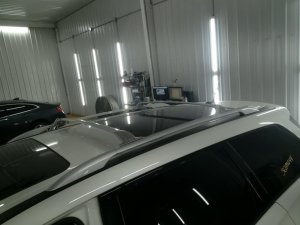
- 2017-2026 Chrysler Pacifica (RU) & 2020-2026 Chrysler Voyager (RU): These minivans often come equipped with the 'Stow 'n Place' integrated roof rack system. On these models, the crossbars can be unlatched, pivoted, and stored inside the side rails. 🎬 Watch: How to operate the Stow 'n Place roof rack system Not all trim levels came with this system from the factory; some have only plastic trim strips covering the mounting points in the roof.
Symptoms of a Failing Luggage Rack Assembly

1. Excessive Wind Noise or Whistling
One of the most common complaints is unusual noise from the roof at highway speeds. This can happen if crossbars are left in the deployed position, but it can also indicate a problem. A damaged or warped crossbar, a failing seal, or a loose mounting point can disrupt airflow and create a whistling or humming sound. On Stow 'n Place systems, if the crossbars don't sit perfectly flush in their stowed position, they can also generate noise.
2. Water Leaks into the Cabin
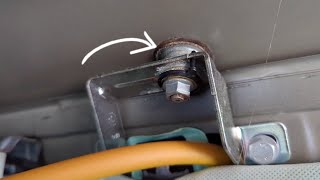
Water stains on the headliner, especially near the A-pillars or grab handles, are a serious sign of a failed roof rack seal. The rack is bolted through the vehicle's roof, and each mounting point has a gasket or seal to prevent water intrusion. Over time, these seals can dry out, crack, or become compressed, allowing water to seep into the vehicle's interior. This can lead to mold, mildew, and damage to sensitive electronics.
3. Loose or Rattling Components
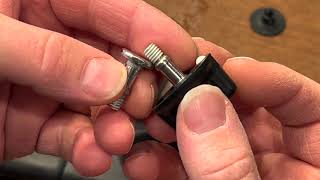
Any rattling or clunking sounds from the roof are a major red flag. This indicates that a mounting bolt has loosened or a component of the rack itself is broken. On the Stow 'n Place system, the plastic thumb screws used to secure the crossbars can strip or break, preventing the bars from being properly tightened. A loose rack is a significant safety hazard, as it could detach from the vehicle while driving.
4. Visible Damage or Corrosion
Physical inspection can reveal cracks in the plastic components (like the end caps or mounting feet), peeling paint, or corrosion on metal parts. UV exposure and weather can make the plastic brittle over time. Dents or bends in the aluminum crossbars, often from impacts or overloading, can compromise their structural integrity.
Pro Tip: The maximum load capacity for the factory roof rack on the Pacifica and Voyager is typically 150 lbs (68 kg), distributed evenly. Exceeding this limit can damage the rack and the vehicle's roof.
Known Issues, TSBs, and Recalls

While there are no widespread recalls specifically for the roof rack assembly on these vehicles, some common issues are reported by owners.
- Stripped Thumb Screws: On the 2017+ Pacifica/Voyager Stow 'n Place system, the plastic thumb screws that hold the crossbars in place are a known weak point. They can easily strip, making it impossible to fully tighten or loosen the crossbars. Some owners replace them with more durable stainless steel bolts. 🎬 See how to replace broken or stripped crossbar thumb screws
- Water Leaks: Leaks through the roof rack mounting points are a recurring complaint. This is often due to aging seals and may require removing the rack and applying new sealant. In some cases, leaks attributed to the roof rack were actually from clogged sunroof drains. 🎬 Watch: Troubleshooting water leaks from roof racks and sunroof seals
- Recalls for Other Issues: The Pacifica and Voyager have had recalls for other safety systems, such as curtain airbags (NHTSA 24V-793, 25V302), but none are directly related to the luggage rack itself.
Buying a Used Luggage Rack Assembly: What to Check

Purchasing a used OEM roof rack can be a cost-effective option, but a thorough inspection is essential to ensure you're getting a safe and complete part.
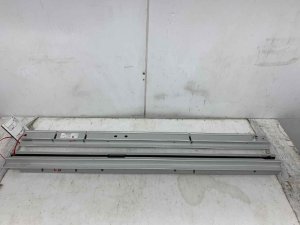
- Check for Completeness: Verify you are getting all the necessary components. Is it just the side rails? Does it include the crossbars? Are all mounting bolts, end caps, and trim pieces present? For a Stow 'n Place system, ensure both crossbars are included and stow correctly.
- Inspect All Mounting Points: Look closely at the areas where the rack bolts to the vehicle. Check for cracks in the plastic feet and ensure the bolt holes are not stripped or elongated. The rubber gaskets or seals at the base should be pliable and free of cracks.
- Examine the Crossbars: For Stow 'n Place systems, deploy and stow the crossbars. Ensure the pivot mechanism works smoothly and the thumb screws tighten properly without stripping. Check the aluminum bars for any bends, dents, or deep scratches that could weaken them.
- Look for UV Damage and Corrosion: Inspect all plastic components for chalky discoloration or brittleness, which indicates significant sun damage. Check any metal parts, especially steel bolts, for signs of rust or corrosion.
- Verify Compatibility: Ensure the rack came from the same generation of vehicle. A rack from a 2004-2008 Pacifica crossover will not fit a 2017+ Pacifica minivan. Confirm the part numbers if possible.
Warning: Be cautious of cheap, no-name aftermarket roof racks. They often use inferior materials, fit poorly, and have a higher failure rate. An OEM used part is often a safer and more reliable choice than a new, low-quality knockoff.
Installation Guide
Installation difficulty is generally low, but it requires care to prevent water leaks.
- Difficulty: 2 out of 5
- Estimated Time: 1-2 hours
- Tools Needed: Torx bit socket set, ratchet, torque wrench, plastic trim removal tools, silicone sealant (optional but recommended).
Steps for 2017+ Pacifica/Voyager:
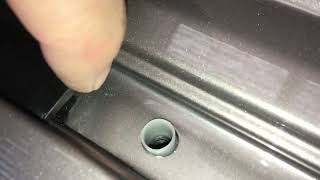
- Remove Existing Trim: If your van does not have a factory rack, there will be long plastic trim pieces in the roof channels. Carefully pry these up using a plastic trim tool to expose the threaded mounting points underneath.
- Clean the Surface: Thoroughly clean the mounting surfaces on the roof to ensure a good seal.
- Position the New Rack: Place the side rails onto the roof, aligning the mounting holes. Ensure the gaskets are seated correctly.
- Apply Sealant (Recommended): For extra protection against leaks, apply a small bead of automotive-grade silicone sealant around the bolt holes before installing the bolts.
- Install and Torque Bolts: Hand-tighten all the Torx bolts first. Then, use a torque wrench to tighten them to the manufacturer's specification. This is critical for a secure and water-tight fit.
- Install Crossbars: If you have the Stow 'n Place system, deploy the crossbars and ensure they lock into place securely.
Cost Comparison
| Part Type | Estimated Cost |
|---|---|
| New OEM (Mopar Kit) | $420 - $550 |
| New Aftermarket (Thule/Yakima) | $500 - $800+ |
| Used OEM | $150 - $300 |
| Shop Labor for Installation | $100 - $250 |
Frequently Asked Questions
Can I add a factory roof rack to a Pacifica or Voyager that didn't come with one?
Yes, on the 2017+ models, the mounting points are typically present under the plastic roof trim strips. You can purchase an OEM Mopar kit (Part No. 82214552) and install it yourself in about an hour.
What is the difference between side rails and crossbars?
Side rails run along the length of the roof on both sides. Crossbars run across the width of the vehicle, connecting to the side rails. You need both to mount most cargo carriers, bike racks, or other accessories.
How do I fix the whistling noise from my roof rack?
First, if you have the Stow 'n Place system, make sure the crossbars are properly stowed in the side rails when not in use, as this is the most common cause of noise. If the noise persists, check that all bolts are tight and that there is no visible damage. Some aftermarket wind deflectors can also help reduce noise.
My Stow 'n Place thumb screw is stripped. What can I do?
This is a common problem. You may need to use pliers to carefully remove the old thumb screw. You can order a replacement from a Chrysler dealer, or some owners have found that a standard M6 stainless steel bolt with a knob can be a more durable substitute.
Helpful Videos
Technical Specifications
OEM Part Numbers: 68227986AG 68227986AH 68227987AG 68227987AI 68322321AA 68322321AB 68322321AC 82214552
Typical Maximum Load: 150 lbs (68 kg)
We Have This Part in Stock


The information in this article is provided for general reference and educational purposes only. Vehicle specifications, procedures, and part compatibility can vary by production date, trim level, and region. Always consult your vehicle's factory service manual and verify part numbers before purchasing or performing repairs. Safety-critical components such as airbags, seat belts, and braking systems should be installed by a qualified professional.
- Chrysler Pacifica:
- Chrysler Voyager:
- Audi Q5:
- Honda Odyssey:
- Hyundai Santa Fe:
- Kia Sorento:
- Volvo XC90:
- Acura MDX:
- Acura RDX:
- BMW X5:
- Cadillac SRX:
- Ford Edge:
- Honda CR-V:
- Honda Pilot:
- Jeep Grand Cherokee:
- Land Rover Discovery Sport:
- Land Rover Freelander 2:
- Land Rover Range Rover Evoque:
- Lexus RX350:
- Mazda CX-7:
- Volvo XC60:
- 🎬 Helpful Videos
- 🛍️ Shop This Part
- Generational Differences
- Symptoms of a Failing Luggage Rack Assembly
- 1. Excessive Wind Noise or Whistling
- 2. Water Leaks into the Cabin
- 3. Loose or Rattling Components
- 4. Visible Damage or Corrosion
- Known Issues, TSBs, and Recalls
- Buying a Used Luggage Rack Assembly: What to Check
- Installation Guide
- Steps for 2017+ Pacifica/Voyager:
- Cost Comparison
- Frequently Asked Questions
- 🎟️ Get 5% Off