
2003-2006 Expedition & Navigator Luggage Rack: Fixing Leaks and Swapping Parts
This guide covers the common water leak issue originating from the roof rack on the 2003-2006 Ford Expedition and Lincoln Navigator, and how to inspect, replace, or reseal the assembly.
- The most common failure is water leaking into the cabin due to dried-out gaskets under the mounting feet.
- Luggage racks from 2003-2006 Ford Expeditions and Lincoln Navigators are directly interchangeable, bolt-for-bolt.
- When replacing or resealing, it is critical to apply RTV silicone sealant to the mounting surface or Teflon tape to the bolt threads to prevent future leaks.
- New OEM side rails are discontinued, making used OEM parts the primary replacement option.
Symptoms of a Failing Luggage Rack Assembly
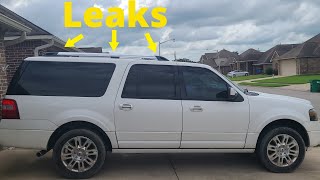
The most common and frustrating symptom of a failing luggage rack on the 2003-2006 Ford Expedition and Lincoln Navigator is not related to its ability to carry cargo, but to water leaking into the vehicle's interior.
1. Water Leaks Inside the Cabin
This is the number one issue with these roof racks. Over time, the rubber gaskets under the rack's mounting feet dry out, crack, and fail. Water seeps past the failed seal and follows the mounting bolts into the vehicle. From there, it travels along the inside of the roof and drips from the headliner in various places, including:
- The A-pillar grab handles (the handles near the windshield).
- Overhead A/C vents.
- The overhead console or dome lights.
- The corners of the headliner, often staining the fabric.
Pro Tip: Water leaks can also be caused by clogged sunroof drains. Before blaming the roof rack, open your sunroof and pour a small amount of water into the drain channels at the corners. If the water doesn't quickly drain out onto the ground behind the front wheels, your drains are clogged and should be cleared first.
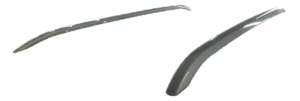
2. Visible Cracks and UV Damage
Years of sun exposure can make the plastic components of the rack, especially the end caps and mounting feet, brittle and cracked. This is more than a cosmetic issue; a cracked mounting foot can compromise the rack's strength and is a primary entry point for water.
3. Loose Rails or Wind Noise
If the mounting bolts have loosened over time, you might notice the side rails are physically loose to the touch. This can cause rattling or a noticeable increase in wind noise, especially at highway speeds. This is a serious safety concern if you plan to carry any load on the rack.
4. Peeling Chrome (Lincoln Navigator)
The Lincoln Navigator version of the rack often features chrome-plated plastic. It's common for this chrome finish to bubble, peel, or flake off over time, which is a cosmetic issue but can indicate the underlying plastic is aging.
Buying a Used Luggage Rack Assembly
Since Ford has discontinued the new OEM side rails for these models, a used part is your most likely option. Here’s what to inspect carefully before buying:
- Check the Mounting Feet Gaskets: Flip the rail over and inspect the rubber gaskets on the bottom of each mounting foot. This is the most critical component. The rubber should be soft and pliable, not hard, flat, or cracked. If the gaskets look questionable, you MUST apply a sealant like RTV silicone during installation.
- Inspect for Cracks: Closely examine all plastic areas, paying special attention to the mounting feet where the bolts pass through. Flex the part slightly to reveal any hairline cracks. Do not buy a rack with cracked mounting feet.
- Look for UV Damage: Check for a chalky, faded appearance on the black plastic parts. While some fading is normal, extreme brittleness is a red flag.
- Verify Straightness: Lay the rail on a flat surface to ensure it hasn't been bent or twisted from an accident or improper loading.
- Confirm All Parts are Included: Ensure the sale includes the side rails, all plastic end caps, and ideally, the original mounting bolts. Finding these small pieces separately can be difficult.
Compatibility Warning: The luggage racks from the 2003-2006 Ford Expedition and 2003-2006 Lincoln Navigator are directly interchangeable. They share the same mounting points. The primary difference is cosmetic, with the Navigator version often featuring chrome accents. This is great news for buyers, as it doubles the number of potential donor vehicles at a salvage yard.
Replacement and Leak Repair Procedure
Whether you are replacing a damaged rack or simply fixing a leak, the process is the same. This is a very DIY-friendly job.
Installation Difficulty: 2 out of 5
Estimated Time: 1 hour
Tools Needed:
- Torx Bit Set (T40 is common, but have others like T25/T27 on hand)
- Ratchet
- Plastic Trim Removal Tool or Flathead Screwdriver (use with caution)
- Torque Wrench (lb-ft or Nm)
- RTV Silicone Sealant or Teflon Tape
- Cleaning supplies (rubbing alcohol, rags)
Step-by-Step Guide:
- Remove End Caps: Using a plastic trim tool, carefully pry off the plastic covers at the front and rear of the side rails to expose the mounting bolts.
- Remove Mounting Bolts: Use a Torx bit (likely a T40) to remove the bolts securing the rail to the roof. There will be several along the length of each rail.
- Remove the Rail: Once all bolts are out, the side rail should lift straight off the vehicle.
- Clean the Area: Thoroughly clean the roof surface around the mounting holes. Remove all old gasket material, dirt, and wax. Use rubbing alcohol for a final wipe-down to ensure a clean surface for the new seal.
- Prepare for Sealing (CRITICAL STEP): This is the key to preventing future leaks. You have two options:
- RTV Silicone: Apply a small, continuous bead of clear or black automotive RTV silicone sealant around each mounting hole on the roof.
- Teflon Tape: Wrap the threads of each mounting bolt with 2-3 layers of Teflon tape.
- Install the New/Used Rail: Place the replacement rail onto the roof, aligning the mounting feet with the holes.
- Install and Torque Bolts: Hand-thread all bolts first to avoid cross-threading. Snug them down, then use a torque wrench to tighten them to spec. A common torque value for these bolts is 16 Nm (11.8 lb-ft). Do not overtighten, as you can damage the threaded inserts in the roof.
- Reinstall End Caps: Snap the plastic end caps back into place.
Cost Comparison
The side rails are the primary component that fails; crossbars are often sold separately.
| Part Source | Estimated Cost (per side rail) |
|---|---|
| New OEM | Discontinued / Not Available |
| New Aftermarket | Not Widely Available for Side Rails |
| Used OEM | $75 - $200 |
| Shop Labor (Replacement) | $100 - $200 |
| Shop Labor (Reseal Only) | $75 - $150 |
Frequently Asked Questions (FAQ)
Can I just use silicone to fix the leak without removing the rack?
No. Applying sealant around the outside of the mounting feet is a temporary fix at best and will likely fail. The leak occurs where the bolt passes through the roof. To create a durable, long-lasting seal, you must remove the rail and apply sealant directly to the mounting surface and/or bolt threads.
Do I have to remove the headliner to replace the roof rack?
No, you do not need to remove the headliner to unbolt and replace the roof rack itself. The bolts are accessed from the exterior of the roof. You would only need to partially drop the headliner if you are diagnosing the path of a severe water leak or drying out the insulation.
Will a luggage rack from a Lincoln Navigator fit my Ford Expedition?
Yes. For model years 2003 through 2006, the roof racks from the Ford Expedition and Lincoln Navigator are a direct, bolt-on swap. The only difference is cosmetic, with the Navigator version often having chrome trim. This makes finding a used replacement much easier.
What are the OEM part numbers?
For 2003-2004 models, the part numbers are typically 2L1Z-7855114-AAA (Passenger) and 2L1Z-7855115-AAA (Driver). For 2005-2006 models, they are 5L1Z-7855114-AAA (Passenger) and 5L1Z-7855115-AAA (Driver). All are interchangeable for these model years.
Helpful Videos
Technical Specifications
OEM Part Numbers: 5L1Z-7855114-AAA 5L1Z-7855115-AAA 2L1Z-7855114-AAA 2L1Z-7855115-AAA
Mounting Bolt Torque: 16 Nm (11.8 lb-ft). Required Tool: T40 Torx Bit (verify, may also be T25 or T27).
We Have This Part in Stock


The information in this article is provided for general reference and educational purposes only. Vehicle specifications, procedures, and part compatibility can vary by production date, trim level, and region. Always consult your vehicle's factory service manual and verify part numbers before purchasing or performing repairs. Safety-critical components such as airbags, seat belts, and braking systems should be installed by a qualified professional.
- Ford Expedition:
- Lincoln Navigator:
- 🎬 Helpful Videos
- 🛍️ Shop This Part
- Symptoms of a Failing Luggage Rack Assembly
- 1. Water Leaks Inside the Cabin
- 2. Visible Cracks and UV Damage
- 3. Loose Rails or Wind Noise
- 4. Peeling Chrome (Lincoln Navigator)
- Buying a Used Luggage Rack Assembly
- Replacement and Leak Repair Procedure
- Step-by-Step Guide:
- Cost Comparison
- Frequently Asked Questions (FAQ)
- 🎟️ Get 5% Off