
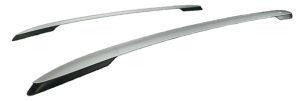
2013-2018 Toyota RAV4 Luggage Rack Side Rails: Leaks, Damage, and Replacement Guide
This guide covers the common failure points, inspection tips for used parts, and installation advice for the fourth-generation RAV4's roof rack side rails.
- The most critical failure is water leakage into the cabin due to degraded seals under the mounting feet; this can cause serious electrical damage.
- These parts are the side rails only (front-to-back); the side-to-side cross bars are a separate purchase (part PT278-42151).
- When buying used, inspect the mounting feet for cracks, as this is the primary structural failure point.
- When installing new or used rails, always apply new automotive RTV silicone sealant around the mounting holes to prevent future leaks.
Symptoms of a Failing or Damaged Luggage Rack Assembly
Because this is a structural and cosmetic part, "failure" typically relates to physical damage, leaks, or noise rather than mechanical breakdown.
Water Leaking Into the Cabin
This is the most significant and potentially damaging issue. Water staining on the headliner, wet A-pillar trim, or unexplained moisture on the floorboards can be caused by failed seals under the roof rail mounting points. Over time, the original foam gaskets can degrade, allowing water to seep through the bolt holes directly into the vehicle's interior. This can lead to mold growth, rust, and catastrophic damage to sensitive electronics housed in the dashboard and pillars.
Visible Physical Damage
Impacts from garage doors, low-hanging branches, or automatic car washes can cause cracks, deep gouges, or breaks in the plastic or metal components of the side rails. Pay close attention to the mounting feet, as stress fractures here can compromise the entire rack's load-bearing capacity.
Wind Noise or Rattling
A loose side rail can create excessive wind noise or a rattling sound at highway speeds. This is often caused by mounting bolts that have loosened over time or by damage to the rail's mounting feet. Improper installation is a frequent cause of these noises.
Fading and Discoloration
The finish on the luggage rack rails, whether black or silver, is susceptible to UV damage over time. This can cause a chalky, faded, or discolored appearance. While this is primarily a cosmetic issue, it can indicate the age and sun exposure of the part.
Warning: A class-action lawsuit was filed concerning roof rail leaks on 2019-2021 RAV4 models, alleging that thin, degrading gaskets allowed water to damage airbags and electrical systems. While this lawsuit specifically targets the 5th generation, the failure mechanism (degrading seals at roof mounting points) is a known issue on many vehicles, including reports from 4th generation owners.
Buying a Used 2013-2018 RAV4 Luggage Rack Assembly
A used OEM luggage rack can be a great value, offering factory fit and quality at a lower price. However, a thorough inspection is crucial before purchasing.
What to Check Before You Buy
- Inspect Mounting Points: This is the most critical check. Carefully examine the plastic or composite feet where the rail bolts to the roof. Look for hairline cracks, stress marks, or any signs of breakage. A compromised mounting point makes the entire rack unsafe.
- Check for Straightness: Lay the rail on a flat surface to ensure it is not bent or warped. A bent rail will not sit flush on the roof, leading to installation problems, wind noise, and potential leaks.
- Verify All Hardware is Included: A complete used assembly should include the rails, all mounting leg covers, and the original bolts. Sourcing missing covers or specific bolts separately can be difficult and expensive.
- Assess Cosmetic Condition: Distinguish between minor scuffs and deep gouges. Fading is common and purely cosmetic, but deep scratches that penetrate the finish could lead to corrosion on metal components.
- Confirm Part Numbers: The primary OEM part numbers for the side rail kits are PT278-42131 (accessory kit) and 61213-42030 (individual rail component). Always verify fitment for your specific vehicle year.
Pro Tip: When installing a used rack, ALWAYS discard the old foam seals or gaskets. Clean the mounting surfaces on the roof and the rail feet with rubbing alcohol and apply a fresh, continuous bead of automotive-grade RTV silicone sealant around each mounting hole to create a new, waterproof seal. This small step is the best prevention against future leaks.
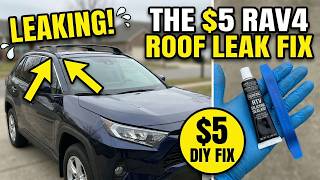
🎬 Watch: This $5 fix can prevent or repair roof leaks.Known Issues, Recalls, and TSBs
While there are no specific recalls for the luggage rack assembly itself, there are related issues and a major vehicle recall for this generation RAV4.
Vehicle Recalls
- NHTSA Recall 23V-734 (Safety Recall 23TA13): This major recall affects all 2013-2018 RAV4s. It addresses an issue where certain replacement 12-volt batteries may have smaller top dimensions. If the hold-down clamp is not tightened correctly, the battery can move during forceful turns, causing the positive terminal to short against the clamp, increasing the risk of fire. This is unrelated to the roof rack but is a critical safety issue for all owners of this generation.
Technical Service Bulletins (TSBs)
No major TSBs were found specifically for luggage rack failure on the 2013-2018 RAV4. However, TSBs for other models and years often address issues like wind noise or water leaks, which are common problems. For example, T-SB-0083-20 was issued for newer Tacomas to address crossbar interference with the roof antenna, showing a history of Toyota addressing rack-related issues.
Installation Guide and Difficulty
Installing the roof rack side rails is generally a straightforward process, but it requires care to prevent leaks.
- Difficulty Rating: 2 out of 5
- Estimated Time: 1 - 1.5 hours
- Tools Needed: Plastic pry tool, socket set, torque wrench, rubbing alcohol, RTV silicone sealant.
Basic Installation Steps (for vehicles with factory provisions)
- Using a plastic pry tool, carefully remove the four access covers in the roof ditch moldings.
- Underneath the covers, you will find factory bolts and brackets. Remove and discard these.
- Thoroughly clean the roof surface around the mounting holes.
- Apply a bead of RTV silicone sealant around each mounting hole on the roof.
- Carefully position the new or used side rail onto the roof, aligning the holes.
- Install the new mounting bolts and torque them to the manufacturer's specification. Do not overtighten.
- Snap the side rail leg covers into place.
- Allow the silicone to cure for at least 24 hours before exposing it to rain or car washes.
Important: Some models without factory roof rails may require dropping the headliner to access and secure the mounting nuts from inside the vehicle. This significantly increases the complexity of the installation. Always check for factory mounting points in the roof channels first.
Cost Comparison
Prices can vary based on supplier and condition. The following is an estimated breakdown:
| Part Type | Estimated Cost |
|---|---|
| New OEM (Kit PT278-42131) | $300 - $445 |
| New OEM (Single Rail 61213-42030) | $143 - $210 |
| New Aftermarket (Side Rails) | $150 - $250 |
| Used OEM (Pair) | $140 - $350 |
| Shop Labor for Installation | $150 - $300 |
Frequently Asked Questions (FAQ)
Do these side rails include the cross bars?
No. This assembly is for the side rails that run front-to-back only. The cross bars, which run side-to-side, are a separate part (OEM Part Number PT278-42151) and must be purchased separately.
What is the weight limit for the factory roof rack?
When equipped with genuine Toyota cross bars, the roof rack system has a maximum capacity of 100 lbs, which must be evenly distributed across both bars. Always check your owner's manual for specific limitations.
Can I install these rails on my RAV4 if it didn't come with a roof rack?
Yes, in most cases. RAV4 models from this generation typically have the necessary mounting points pre-drilled in the roof channels, hidden under plastic ditch molding covers. The installation involves removing the covers, bolting on the rails, and sealing the mounts. It does not typically require drilling, but on some base models, the headliner may need to be partially dropped to secure the nuts.
My headliner is wet near the front pillar. Could the roof rack be the cause?
Yes, this is a classic symptom of a roof rack leak. The seals under the front mounting feet of the side rails have likely failed. Water enters through the bolt hole, runs down the inside of the A-pillar, and soaks the headliner and potentially the floor. This should be repaired immediately to prevent electrical damage.
Helpful Videos
Technical Specifications
OEM Part Numbers: PT278-42131 61213-42030 PT278-42130 63498-42020 63492-42040-B1
Load capacity with genuine cross bars: 100 lbs (45 kg) evenly distributed.
We Have This Part in Stock


The information in this article is provided for general reference and educational purposes only. Vehicle specifications, procedures, and part compatibility can vary by production date, trim level, and region. Always consult your vehicle's factory service manual and verify part numbers before purchasing or performing repairs. Safety-critical components such as airbags, seat belts, and braking systems should be installed by a qualified professional.
- Toyota RAV4:
- 🎬 Helpful Videos
- 🛍️ Shop This Part
- Symptoms of a Failing or Damaged Luggage Rack Assembly
- Water Leaking Into the Cabin
- Visible Physical Damage
- Wind Noise or Rattling
- Fading and Discoloration
- Buying a Used 2013-2018 RAV4 Luggage Rack Assembly
- What to Check Before You Buy
- Known Issues, Recalls, and TSBs
- Vehicle Recalls
- Technical Service Bulletins (TSBs)
- Installation Guide and Difficulty
- Basic Installation Steps (for vehicles with factory provisions)
- Cost Comparison
- Frequently Asked Questions (FAQ)
- 🎟️ Get 5% Off