
B0033 on 2007-2014 Cadillac Escalade: Airbag Light Causes and Fixes
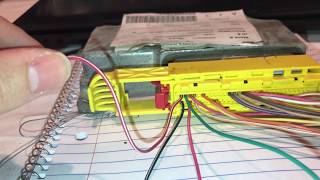
On a 2007-2014 Escalade, code B0033 almost always points to a wiring or connector issue under the front passenger seat. A common fix is inspecting and securing the yellow airbag connector and its position retainer, as detailed in a GM Technical Service Bulletin.
- B0033 on your Escalade means the passenger seat's side airbag is disabled.
- Before buying any parts, disconnect the battery and thoroughly inspect the yellow connector under the front passenger seat. A loose connection is the most common cause.
- Reference GM TSB #08-09-41-002H, which specifically identifies a faulty connector retainer (CPA) as a known issue for this code.
- Do not use a multimeter to test airbag circuits; this is extremely dangerous and should only be diagnosed by a professional with the correct tools.
- If the connection is secure, the problem is likely damaged wiring under the seat or a failed airbag module within the seat itself.
What's Unique About the 2007-2014 Cadillac ESCALADE
For this generation of GM trucks and SUVs (GMT900), including the Escalade, a very common cause for a wide range of airbag codes is a poor connection at the main airbag harness connectors under the front seats. GM released a specific Technical Service Bulletin (TSB #08-09-41-002H) that points to the Connector Position Assurance (CPA) retainer as a frequent culprit. The CPA is a small plastic lock that ensures the connector is fully seated and also isolates the internal shorting bars, allowing the circuit to function. This makes checking these simple plastic retainers and connectors a critical first step before considering the replacement of expensive airbag modules.
Diagnostic Flowchart
Tap your situation to follow the diagnostic path that matches what you're seeing on this vehicle.
Symptoms You May Notice
- Airbag or SRS warning light illuminated on the instrument cluster.
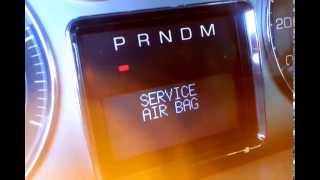
- "Service Air Bag" message displayed on the Driver Information Center (DIC).
- Replacing the seat side airbag module when the actual fault is a simple loose connector or a damaged wire under the seat.
- Replacing the main SDM (airbag computer) when the fault lies within the seat's deployment loop circuit.
- Clearing the code without fixing the underlying connection issue, leading to the light returning.
Most Likely Causes
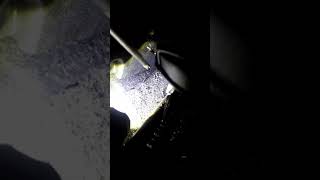
- Poor Connection Under Passenger Seat 🔴 High Probability As cited in TSB #08-09-41-002H, the Connector Position Assurance (CPA) retainers on the airbag harness connectors can become loose, damaged, or go missing. Items stored under the seat or movement from rear passengers' feet can also disturb the wiring and large yellow connector block. 🎬 See this video for a walkthrough of the under-seat connector repair.
How to confirm: Visually inspect the yellow airbag connector under the front passenger seat. Ensure it is fully seated and that the CPA retainer (a small, often yellow or black, plastic clip) is securely locked in place. A professional would use a scan tool to check resistance before and after reseating the connector.
Typical fix: Disconnect the battery, wait for the system to discharge (15+ minutes), then carefully disconnect, inspect, and securely reconnect the airbag connector and CPA. Replace the CPA retainer if it is broken or missing. The TSB also recommends applying dielectric grease (GM P/N 12345579) to the connector pins.
Est. part cost: $5-$20 - Damaged Wiring Under Passenger Seat 🟡 Medium Probability The wiring harness is routed under the seat and is susceptible to being pinched, stretched, or chafed by the seat's movement, seat track, or by objects stored underneath it.
How to confirm: With the system safely de-energized, carefully inspect the entire length of the wiring harness going to the seat airbag for any signs of physical damage, such as cuts, exposed wires, or sharp bends. Pay close attention to where the harness flexes with seat movement.
Typical fix: Repair the damaged section of wire using appropriate solder and heat-shrink methods. GM specifies using the J-38125 SIR Terminal Repair Kit for any terminal repairs due to special plating. If damage is near the connector, replacing the pigtail is recommended.
Est. part cost: $15-$50 for a pigtail/repair kit. - Faulty Right Front Seat Side Airbag Module ⚪ Low Probability → Shop Air Bag While less common than wiring issues, the airbag inflator module itself can fail internally, causing an out-of-spec resistance reading. This is a solid-state component and failure is not typically related to vehicle use.
How to confirm: After confirming the wiring and connectors are perfect, a technician can use a special SRS load tool (like the J-38715-A Driver and Passenger SIR Load Tool) or an airbag simulator resistor (typically 2-3 ohms) to substitute the airbag module in the circuit. If the code disappears with the load tool connected, the airbag module is faulty.
Est. part cost: $250-$500
Rare But Worth Checking
- Faulty Sensing and Diagnostic Module (SDM): → Shop Air Bag Control Module The main airbag control module is a rare failure point. This should only be considered after all other possibilities (wiring, connectors, and the airbag module itself) have been exhaustively ruled out by a qualified technician. 🎬 Watch: Troubleshooting more complex GMT-900 airbag communication and module issues. If the SDM is replaced, it will require programming to the vehicle.
Diagnosis Steps
- SAFETY FIRST: Disconnect the negative battery terminal and wait at least 15 minutes for the SRS system's backup power to discharge before touching any airbag components.
- Visually inspect the area under the front passenger seat. Remove any debris or stored items that could be pressing on wires.
- Locate the primary yellow airbag system connector under the seat.
- Carefully inspect the connector. Check if it is fully seated and if the Connector Position Assurance (CPA) clip is in place and secure, as per TSB #08-09-41-002H. The CPA must make an audible/tactile click.
- If the connector or CPA appears loose, disconnect the battery and wait. Then, unclip the CPA, disconnect the main connector, inspect the pins for any corrosion or damage, and then reconnect it firmly, ensuring both the connector and the CPA make an audible click. Per the TSB, applying dielectric grease is recommended.
- Trace the wiring harness from the connector as far as possible, looking for any signs of pinching, chafing, or cuts, especially where the harness moves with the seat.
- If no visible issues are found, the next step requires a professional scan tool that can read SRS codes and live resistance data from the deployment loop.
- NEVER use a standard multimeter to test resistance on airbag circuits, as it can supply enough current to deploy the airbag.
- If wiring and connectors are confirmed to be good, the fault is likely the seat airbag module itself, which should be confirmed by a professional using a designated SRS load tool (airbag simulator) before replacement.
Parts You'll Likely Need
- Connector Position Assurance (CPA) Retainer
(OEM #88988974)— This small plastic clip is the specific part called out in TSB #08-09-41-002H as a common cause of poor connections in the airbag system. It is frequently lost or broken during service.
Trusted brands: ACDelco, Dorman
OEM price range: $5-$15
Aftermarket price range: $5-$10 - Right Front Seat Side Airbag Module
(OEM #20997498)— If the wiring and connectors are confirmed to be good, the airbag module itself is the next most likely point of failure. This part number fits 2010-2011 models and may have superseded earlier numbers. Always verify with VIN.
Trusted brands: ACDelco (GM Genuine)
OEM price range: $250-$500
Aftermarket price range: N/A
Related Codes That Often Appear With This One
- B0034 — This code relates to the same airbag module (Right Front Seat Side Airbag). Multiple codes for the same component can appear depending on the specific nature of the electrical fault (e.g., open circuit vs. short to ground).
- B0012, B0013, B0015, B0016, B0019, B0020, B0022, B0023, B0026, B0040, B0042, B0044 — The TSB #08-09-41-002H lists this wide range of airbag codes that can be caused by the same connector issue. Finding B0033 alongside these other codes strongly points to the under-seat connector as the root cause.
Technical Service Bulletins (TSBs) & Recalls
- 08-09-41-002H: Addresses intermittent AIR BAG Indicator illumination with various DTCs, including B0033, by instructing technicians to inspect and replace the Connector Position Assurance (CPA) Retainer. It also advises applying dielectric grease.
Platform-Specific Known Issues
- TSB for CPA Retainer: A known issue documented in TSB #08-09-41-002H involves intermittent airbag lights caused by faulty Connector Position Assurance (CPA) retainers on various airbag system connectors, including those under the front seats. This TSB applies to a very wide range of GM vehicles from 2005-2014.
Mechanic-Grade Diagnostic Values
- Airbag Deployment Loop Resistance — expected: 1.74 – 3.41 ohms. Failure: A reading less than ~1.1-1.3 ohms indicates a short. A reading greater than ~3.9-4.8 ohms indicates an open or high resistance. The specific thresholds can vary slightly by model year and SDM calibration.
- Airbag Squib/Inflator Module Resistance (disconnected) — expected: ~1 to 3 ohms. Failure: An infinite reading (open) or near-zero reading (short) indicates a faulty airbag module.
Hidden / Shadow Codes Worth Checking
- B0033 01: Deployment Loop Short to Battery (see via Dealer-level scan tool like a GM Tech2 or GDS2.)
- B0033 02: Deployment Loop Short to Ground (see via Dealer-level scan tool like a GM Tech2 or GDS2.)
- B0033 04: Deployment Loop Open Circuit (see via Dealer-level scan tool like a GM Tech2 or GDS2.)
- B0033 0D: Deployment Loop Resistance Above Threshold (see via Dealer-level scan tool like a GM Tech2 or GDS2.)
- B0033 0E: Deployment Loop Resistance Below Threshold (see via Dealer-level scan tool like a GM Tech2 or GDS2.)
Scan Tool Commands That Help
- Tech2 / GDS2: Module Diagnostics > K36 Restraints Control Module > Data Display > Deployment Loop Resistance Data — To monitor the live resistance of the specific airbag deployment loop in ohms. This is critical for diagnosing intermittent open/short circuits by wiggling harnesses while observing the data.
- Tech2: Restraints > SIR > Module Setup > Passenger Presence System — This function is used to re-zero the Passenger Presence System (PPS) after seat replacement or service. While not directly for code B0033, it is a critical related procedure if the seat is removed or the PPS module is disturbed during diagnosis.
Wiring & Ground Locations
- G302 — Under the right side of the front passenger's seat, on the floor pan.. This is a primary ground point for several components under the passenger seat, including potentially the Inflatable Restraint Passenger Presence System (PPS) module. A loose or corroded G302 can cause erratic behavior and fault codes for under-seat electronics.
- G303 — Near the base of the left 'B' pillar, behind the trim panel.. While on the driver's side, this ground point is part of the main body harness grounding scheme. On GMT900 trucks, poor grounds are a known source of bizarre electrical issues, and checking all major cabin grounds (G302, G303, etc.) is a valid diagnostic step for stubborn electrical faults.
- Inflatable Restraint Sensing & Diagnostic Module (SDM) — Under the left front seat (driver's seat), bolted to the floor.. This is the airbag control module. All wiring for the passenger seat airbag deployment loop originates here and runs across the transmission tunnel to the passenger side. Damage to the harness is possible anywhere along this path.
- Object Alarm Module / Rear Heated Seat Module — Under the right front seat (Object Alarm) or left rear seat (Heated Seat).. The presence of other modules and their associated wiring under the seats increases the chance of wires being disturbed, pinched, or misrouted during service, which can lead to damage to the adjacent yellow airbag harness.
Helpful Videos

The information in this article is provided for general reference and educational purposes only. Vehicle specifications, procedures, and part compatibility can vary by production date, trim level, and region. Always consult your vehicle's factory service manual and verify part numbers before purchasing or performing repairs. Safety-critical components such as airbags, seat belts, and braking systems should be installed by a qualified professional.
- Cadillac ESCALADE:
- 🧭 Diagnostic Flowchart
- 🎬 Helpful Videos
- What's Unique About the 2007-2014 Cadillac ESCALADE
- Symptoms You May Notice
- Most Likely Causes
- Rare But Worth Checking
- Diagnosis Steps
- Parts You'll Likely Need
- Related Codes That Often Appear With This One
- Technical Service Bulletins (TSBs) & Recalls
- Platform-Specific Known Issues
- Mechanic-Grade Diagnostic Values
- Hidden / Shadow Codes Worth Checking
- Scan Tool Commands That Help
- Wiring & Ground Locations
- 🎟️ Get 5% Off