
OBD-II Code B1227: Outside Air Temperature Sensor Circuit Failure
The Ultimate 2026 Guide to Diagnosing and Fixing B1227
- Code B1227 indicates a broken outside air temperature sensor circuit, which immediately disables the A/C compressor to prevent evaporator freezing.
- Damaged wiring or a corroded connector behind the front bumper causes 80% of B1227 faults, not a failed sensor.
- Verify the fault by checking for a 5V reference and a ground reading below 0.1V at the sensor connector before buying replacement parts.
- Driving with B1227 is safe, but the disabled A/C compressor reduces windshield defroster effectiveness by failing to dehumidify cabin air.
- Honda and Acura vehicles from 2008-2023 experience this code most frequently due to exposed lower-grille sensor placement.
What Does B1227 Mean?
The B1227 code means the Body Control Module (BCM) or Climate Control Module (CCM) detects a completely broken ('open') electrical circuit for the outside air temperature sensor. This sensor provides critical data for regulating cabin temperature. When this signal drops, the system enters a fail-safe mode that disables the A/C compressor.
Technical definition: SAE/OBD-II defines B1227 as an "Open in the Outside Air Temperature Sensor Circuit." The control module receives infinite resistance instead of a valid voltage signal, indicating a severed wire, an unplugged connector, or an internally shattered sensor.
🎬 Watch: A complete diagnosis and fix for code B1227.Can I Drive With B1227?
Yes, But With Caution. Yes, you can drive with a B1227 code. The engine and safety systems remain unaffected. However, the automatic climate control and air conditioning fail to function. The defroster system also loses effectiveness at clearing the windshield, reducing visibility in cold or humid conditions.
Common Causes
- Damaged or Broken Wiring (Very Common) — The sensor sits in the front bumper, making its wires highly vulnerable to road debris, parking curbs, and rodents. This is the most frequent cause of an open circuit.
- Corroded or Loose Connector (Common) — Water and road salt corrode the sensor's electrical connector pins. This corrosion interrupts the electrical signal, creating an open circuit or an intermittent connection.
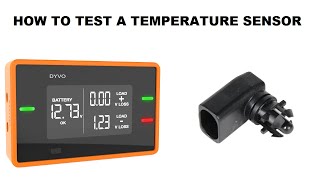
- Faulty Outside Air Temperature Sensor (Common) — The thermistor sensor fails internally from age, thermal stress, or physical impact. 🎬 See how to test and replace the ambient temperature sensor. This creates infinite resistance, which the module reads as an open circuit.
- Blown Fuse or Faulty Relay (Less Common) — A blown climate control circuit fuse cuts power to the sensor. Always check the fuse box before replacing expensive components.
- Use of Incorrect/Faulty Aftermarket Sensor (Less Common) — Installing a low-quality aftermarket sensor triggers the code if it lacks the exact OEM resistance specifications.
- Faulty Climate Control Module (CCM/BCM) (Rare) — An internal module failure prevents it from processing the sensor's signal. Consider this only after verifying the wiring harness and sensor.
Symptoms
- A/C Not Blowing Cold Air — Vehicles disable the A/C compressor as a fail-safe to protect the evaporator core from freezing.
- Incorrect Outside Temperature Display — The dashboard displays a default low number (like -40°F/-40°C) or dashes (---).
- Automatic Climate Control Disabled — The 'Auto' function defaults to full heat, full cool, or a fixed fan speed because it lacks an outside temperature reference.
- Ineffective Windshield Defrosting — The disabled A/C compressor prevents the defrost function from dehumidifying the air, leaving condensation on the windshield.
- Check Engine or A/C Warning Light — The fault illuminates a dedicated A/C system warning light or a message on the instrument cluster.
Diagnostic Flowchart
Tap your situation to follow the diagnostic path that matches what you're seeing on this code.
Common Fixes & Costs
- Repair Damaged Wiring — Parts: $5-$25, Labor: $150-$450, ~1.0 hr book time (Intermediate)
- Clean or Replace Sensor Connector / Pigtail — Parts: $15-$40, Labor: $75-$150, ~0.8 hr book time (DIY)
- Replace Outside Air Temperature Sensor — Parts: $25-$110, Labor: $90-$180, ~0.5 hr book time (DIY)
- Replace Blown Fuse — Parts: $1-$10, Labor: $0-$75, ~0.1 hr book time (DIY)
- Replace Climate Control Module — Parts: $250-$1000+, Labor: $150-$350, ~1.5 hr book time (Professional)
Used vs. New Parts: Buying Guide
When a used part is worth it: A used OEM part from a reputable salvage yard is a reasonable option for older vehicles if the cost of a new OEM part is high.
Donor-vehicle mileage cap: roughly under 100000 miles for the part to have meaningful remaining life.
Donor quality checklist:
- Ensure the part number matches exactly.
- Visually inspect the used sensor for physical damage or corrosion on the electrical pins.
- Prefer donors from regions without heavy road salt use.
Decision logic:
- If The cost of a new OEM sensor is under $75. → Buy a new OEM or high-quality aftermarket (e.g., Denso, Bosch) part for reliability and warranty.
- If The vehicle is over 10 years old and budget is a primary concern. → A used OEM sensor is a viable, cost-effective option.
- If The only options are a used OEM part or a new, very cheap, no-name aftermarket part. → The used OEM part is generally the more reliable choice.
Warranty tradeoff: Used parts typically have a 30-90 day warranty. New aftermarket parts offer a 1-year to limited lifetime warranty. New OEM parts carry a 1-year warranty.
Worst-case if a used part fails: $90-$180 if a used part fails and you pay for labor again.
What Happens If You Wait — Timeline
- Immediately: Code B1227 sets. The A/C compressor disables, and the 'Auto' climate function stops working. The outside temperature display shows -40°F. (MPG impact: 0%% · Added cost: $0)
- First cold or humid day: The windshield defroster fails to clear interior fog, as the disabled A/C compressor cannot dehumidify the air, creating a safety issue. (MPG impact: 0%% · Added cost: $0)
- 6-12+ months: Prolonged disuse of the A/C system causes the rubber seals within the compressor to dry out and shrink due to lack of circulating oil. (MPG impact: 0%% · Added cost: $0)
- 12+ months / When A/C is needed again: When the B1227 is fixed and the A/C reactivates, the dried-out seals fail to hold pressure, causing refrigerant to leak out. (MPG impact: 0%% · Added cost: $200 - $1500+ (for A/C leak diagnosis, recharge, or compressor replacement))
Cost of Not Fixing It
- Short-Term (0-3 months): No air conditioning and incorrect automatic climate control function. Reduced defroster effectiveness creates a safety issue in humid or cold weather. (Added cost: Negligible)
- Medium-Term (3-12 months): Continued lack of A/C and defrost functionality. Prolonged disuse dries out compressor seals. (Added cost: Negligible)
- Long-Term (1+ years): A physically broken and dangling sensor potentially contacts and damages the A/C condenser, leading to a much more expensive mechanical repair. (Added cost: $0 - $800+ (if condenser damage occurs))
Diagnosis Steps
- Read Codes and Live Data
Use an OBD-II scanner capable of reading Body (B) codes to confirm B1227. Navigate to the live data stream for the Climate Control Module and observe the PID for 'Outside Air Temperature'. An open circuit shows a default value like -40°F/-40°C.
Tools: OBD-II Scanner (with Body code and Live Data support) (Beginner) - Perform a Thorough Visual Inspection
Locate the sensor behind the front grille or on the lower radiator support. Inspect for a dangling sensor, severed wires, green/white corrosion on the connector, or physical impact damage.
Tools: Flashlight (Beginner) - Check the Connector and Perform a 'Wiggle Test'
[Pro Tip] Unplug the sensor and inspect pins for corrosion. Clean with electrical contact cleaner. Reconnect firmly. With the scanner displaying live data, wiggle the connector and nearby wiring. A flickering temperature reading confirms an intermittent connection.
Tools: Electrical contact cleaner, small brush, OBD-II Scanner (Beginner) - Check for 5V Reference and Ground at the Connector
Turn the ignition on (engine off). Unplug the sensor and test the harness connector with a multimeter set to DC Volts. One pin must have a 5V reference voltage, and the other must be a ground (near 0V). No voltage points to a blown fuse or broken upstream wire.
Tools: Multimeter (Intermediate) - Test the Sensor's Resistance vs. Temperature
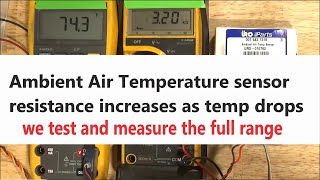
[Pro Tip] Measure resistance across the unplugged sensor's pins using a multimeter set to Ohms (Ω). Infinite resistance (OL) confirms a failed sensor. A good sensor reads 2.0-3.0 kΩ at 68°F (20°C), rising as it gets colder and dropping as it gets hotter.
Tools: Multimeter, vehicle-specific repair manual/chart (Intermediate) - Perform a Circuit Continuity Test
If the sensor tests good but lacks voltage, disconnect the battery and check continuity between the sensor connector and the Climate Control Module pins. An 'OL' reading confirms a broken wire requiring repair.
Tools: Multimeter, vehicle-specific wiring diagram (Advanced) - Perform Voltage Drop Tests on Power and Ground Circuits
[Pro Tip] To confirm wire integrity under load, set the multimeter to DC Volts. Back-probe the ground pin with the sensor plugged in and ignition on. A reading above 0.1V indicates excessive ground resistance. Repeat for the 5V power wire; a drop greater than 0.2V indicates high resistance in the feed wire.
Tools: Multimeter, back-probe pins (Advanced)
When This Code Triggers (Freeze-Frame Conditions)
- Engine Coolant Temp: 180-200°F (82-93°C) (The code sets after the engine reaches full operating temperature.)
- Vehicle Speed: 0 mph or 35-55 mph (The fault triggers at key-on/engine-off, or during steady-state driving when the module expects a stable reading.)
- RPM: 0 or 1500-2500 (Corresponds with vehicle speed; the code sets with the engine off (ignition on) or during light-load cruising.)
- Outside Air Temperature: -40°F (-40°C) (This is the default floor value the module logs when it detects infinite resistance.)
Related Codes
- P0073 — This is the generic Powertrain (P) code for 'Ambient Air Temperature Sensor Circuit High Input.' B1227 is a Body (B) code, while P0073 is set by the Engine Control Module (ECM). They point to the same sensor.
- P0072 — The counterpart to P0073, indicating a short circuit (Low Input). Diagnosed using the same methods, looking for continuity to ground instead of an open.
- B1229 — A Honda-specific code for an 'Open in the Sunlight Sensor Circuit.' Both affect the 'Auto' climate function but have different root causes.
- B1000-B10FF Range — These codes relate to the Body Control Module (BCM). If B1227 appears with one of these, it points toward a faulty control module rather than just the sensor circuit.
- U-Series Codes (e.g., U0164) — Network codes like U0164 (Lost Communication With HVAC) cause false sensor codes. Diagnose U-codes first.
Climate & Environmental Factors
- Cold Climates / Road Salt: Road salt and de-icing brines eat through wiring insulation and connector pins at the front of the vehicle, causing an open circuit.
- High Humidity / Heavy Rain: Constant exposure to moisture leads to water intrusion into the sensor or its connector, causing corrosion and a loss of electrical contact.
- Extreme Heat: Prolonged exposure to high ambient temperatures causes the plastic sensor housing to become brittle and crack.
How to Talk to a Mechanic About This Code
Say this: "I have a B1227 code, and my A/C isn't working. I'd like to schedule a diagnostic appointment. Please start with a visual inspection of the ambient temperature sensor and its wiring at the front of the car, and then test the sensor circuit for power, ground, and continuity before recommending any parts."
This directs the technician to perform a proper diagnosis instead of just replacing the most obvious part, saving you money on unnecessary parts and labor.
Avoid saying:
- My A/C is broken, can you fix it?
- My check engine light is on, I don't know why.
- Just replace the outside temperature sensor.
Questions to ask before authorizing the repair:
- Can you show me the damaged wire or corroded connector?
- What was the resistance reading of the old sensor?
- Did you get a 5-volt reference and a good ground at the sensor connector?
- Will you be using heat-shrink connectors for the wire repair?
- Is there a warranty on the parts and the labor for this repair?
Where to Take It: Dealer vs Independent vs Chain
- Dealer:
Recommended only if the vehicle is under warranty or if other shops have failed. They are often the most expensive option for this common and simple fault.
Best for: Vehicles still under the basic or extended warranty., Complex electrical issues where a Technical Service Bulletin (TSB) might exist., When a previous repair at an independent shop has failed to fix the issue.
Downsides: Typically higher labor rates and parts costs., May be quicker to replace a module than to diagnose a simple wiring fault. (Typical cost: +40% vs. baseline) - Independent Shop:
Best fit. A reputable independent shop is perfectly equipped to handle a B1227 code. The fault requires basic electrical diagnostic skills rather than expensive, dealer-only tools.
Best for: Most out-of-warranty vehicles., Diagnosing and repairing common electrical faults., Building a long-term relationship with a trusted mechanic.
Downsides: Quality and diagnostic capabilities vary widely; look for ASE certifications and good reviews., May not have access to the very latest manufacturer-specific software for brand new models. (Typical cost: +0% vs. baseline) - Chain Shop:
Use with caution. Acceptable if you are certain the sensor itself has failed and just need it replaced. AVOID for initial diagnosis.
Best for: Simple, clear-cut part replacement when you have already diagnosed the issue yourself.
Downsides: Technician skill varies dramatically., High pressure to upsell services., Often lack the in-depth electrical diagnostic expertise for anything beyond replacing the sensor itself. (Typical cost: -10% vs. baseline)
When to Walk Away From the Repair
If the total estimated repair cost for the B1227 and any related issues exceeds 40-50% of your car's private-party value, you should pause and consider your options.
- Car worth $5000, fix is $450: Fix it. This is a relatively minor repair cost compared to the vehicle's value and is well below the threshold.
- Car worth $3000, fix is $1800: Walk away. The diagnosis revealed a faulty Body Control Module plus other needed work. The cost is over 50% of the car's value.
- Car worth $8000, fix is $800: Borderline - consider carefully. This implies the sensor damage was part of a larger issue. Get a second opinion before authorizing the full repair.
What Scan Tool You Need for This Code
Minimum: A scanner that reads Body (B) codes and displays live data from the climate control or body control module. A basic engine-only (P-code) reader will not see B1227.
A cheap, generic OBD-II code reader only checks for engine and emissions codes (P-codes). It cannot communicate with the Body Control Module (BCM), so it reports 'No Codes Found' even when B1227 is active.
Budget: BlueDriver Pro Scan Tool (~$100) — Connects to a smartphone app via Bluetooth. It reads B-codes from the BCM, confirms the B1227 fault, and displays live data for the outside air temperature.
Mid-range: Foxwell NT510 Elite (~$180) — A handheld scanner offering full system access. It reads and clears B1227, graphs live data to spot intermittent issues during a wiggle test, and offers bidirectional controls.
Professional: Autel MaxiCOM MK808 / Innova 5610 (~$450-600) — Professional-grade tools providing full-system diagnostics, extensive live data graphing, and bidirectional capabilities to command modules directly.
How to Clear the Code After You Fix It
- Use an OBD-II scan tool to clear the B1227 code from the climate control module.
- Turn the ignition completely off, then restart the vehicle to allow the system to re-initialize.
- Perform a self-test of the climate control system to confirm the code does not immediately return.
- Complete a drive cycle to ensure all related systems function correctly.
Drive cycle (~20 minutes): A 15-20 minute drive that includes a mix of city and highway speeds allows the climate control module to verify the repair. The goal is to reach full operating temperature and activate the A/C system.
Readiness monitors affected: B1227 does not directly affect emissions readiness monitors. However, if the battery was disconnected during the repair, all readiness monitors reset.
Before emissions retest: drive at least 50 miles to fully set monitors.
Watch out for:
- Clearing the code without fixing the underlying open circuit results in the code returning immediately.
- If the battery was disconnected, you must complete a full OBD-II drive cycle (50-100 miles) to set the emissions readiness monitors before a state inspection.
Will This Fail Emissions / State Inspection?
No — by itself this code doesn't fail OBD inspection (but it can keep readiness monitors from setting, which causes a separate fail).
- General: As a Body (B) code, B1227 does not cause a failure of an OBD-II emissions inspection, which primarily looks for Powertrain (P) codes.
- California: A B1227 code will not fail the smog check. However, if the repair involved disconnecting the battery, all readiness monitors reset, causing a failure until a drive cycle is completed.
- New York: The NYS inspection checks for the illumination of the Check Engine Light. Since B1227 is a body code and doesn't trigger the MIL, it passes.
Most Commonly Affected Vehicles
- Honda Accord (2008-2023) — Extremely common. Diagnostics often involve checking for an open in the TAM (Temperature Acquisition Module) line specifically.
- Honda Civic (2011-2022) — Frequently reported. The service manual has a specific diagnostic flow for checking continuity between the sensor and the 32-pin climate control unit connector.
- Honda CR-V (2017-2022) — Wiring and sensor failures are common causes. Diagnostics focus on the TAM line and sensor ground.
- Honda Odyssey (2011-2017) — Prone to this code from wiring damage or sensor failure due to the sensor's exposed location.
- Acura RDX (2007-2012) — A damaged or loose sensor physically contacts and damages the A/C condenser, leading to a much more expensive repair.
- Ford Focus (2012-2018) — Owners report this issue, often leading to incorrect temperature displays and A/C problems.
- Hyundai Elantra (2011-2020) — Typically caused by sensor failure or wiring damage near the front of the vehicle.
- BMW 3 Series (2006-2018) — Presents with the classic -40°F temperature reading when the sensor circuit fails.
Manufacturer-Specific Notes
- Honda/Acura: The climate control module disables the A/C compressor clutch when B1227 is present. Many models have a built-in self-diagnostic function accessed by pressing buttons on the climate control panel to display codes on the screen.
- Nissan: Nissan vehicles disable the A/C compressor when the ambient air temperature sensor signal drops, making this code a common reason for A/C failure.
- Ford: Ford vehicles with electronic climate control have a self-test mode activated by pressing a combination of buttons (e.g., OFF and DEFROST simultaneously, then AUTO) to retrieve codes without a scanner.
Real Owner Stories
2015 Honda Civic, mileage unknown
The A/C stopped working and the dashboard temperature display showed -40°F. The B1227 code was present.
What they tried:
- Replaced the ambient air temperature sensor with one from a parts vehicle, which did not fix the issue.
- Inspected the wiring for rodent damage, finding none.
Outcome: The owner diagnosed a faulty Climate Control Module. After replacing the module behind the glove box, the temperature display and A/C function returned to normal.
Lesson: Do not assume the sensor is the problem. Testing the circuit is crucial before replacing expensive modules.
2022 Honda Accord, low mileage
A mechanic noticed a B1227 code for an open in the outside air temperature circuit during routine service.
What they tried:
- A visual inspection of the front bumper area where the sensor is located.
Outcome: The mechanic found the wire to the sensor snapped. Repairing the broken wire immediately cleared the B1227 code.
Lesson: Always start with a thorough visual inspection. The sensor's exposed location makes wiring damage the most common cause.
2007 Acura RDX, mileage unknown
The A/C stopped working and a B1227 code was stored.
What they tried:
- The owner tested the sensor with a multimeter and it seemed good.
- The dealership found that the sensor bracket had broken, allowing the sensor to physically hit and damage the A/C condenser.
Outcome: The repair required a new A/C condenser in addition to fixing the sensor circuit.
Lesson: Secure a dangling sensor immediately to prevent it from puncturing the A/C condenser.
BMW 3 Series, mileage unknown
The A/C stopped working and the dash displayed -40°F.
What they tried:
- Replaced the outside air temperature sensor.
Outcome: The problem persisted until the owner discovered the sensor's electrical connector was not fully plugged in. Securely latching the connector resolved the issue.
Lesson: Check the simplest things first. A loose connection is electrically identical to a broken wire.
How to Prevent This Code From Triggering
- Apply Dielectric Grease to the Connector Seal (Once, or whenever the connector is disconnected.) — Dielectric grease seals out moisture and oxygen, preventing the pins and wires from corroding due to road salt and water.
- Perform Regular Underbody Washes in Winter (Monthly during winter in salt-belt regions.) — Regularly washing the undercarriage and front-end components removes corrosive road salt before it eats through wire insulation.
- Visually Inspect Sensor and Wiring During Oil Changes (Every 5,000-7,500 miles.) — Catching a dangling sensor early prevents it from being destroyed or puncturing the A/C condenser.
- Install Protective Wire Loom (Once, as a proactive upgrade.) — Adding a plastic split-loom conduit provides an extra layer of physical protection against road debris and rodent damage.
- Run the A/C Periodically in Winter (For 10 minutes every few weeks.) — Running the A/C circulates oil and keeps compressor seals lubricated, preventing refrigerant leaks caused by the system being disabled by B1227.
Frequently Asked Questions
Can I fix a B1227 code myself?
Yes, this is a DIY-friendly repair. Replacing the sensor requires basic hand tools, and repairing a broken wire requires standard crimping tools. Diagnose the circuit with a multimeter before buying parts to ensure success.
Why did my A/C stop working when I got this code?
The climate system requires outside temperature data to prevent the A/C evaporator from freezing. When the module loses the sensor signal, it shuts down the A/C compressor as a safety precaution.
Why does my dashboard display show -40°F?
An 'open' circuit has infinite resistance. The vehicle's software interprets this impossible resistance as the lowest temperature in its programmed range. This default floor is typically -40°F.
What are common mistakes when diagnosing B1227?
The most common mistake is replacing the sensor without testing the circuit. The actual problem is frequently a broken wire or corroded connector. Perform a visual inspection and use a multimeter to confirm the failure point first.
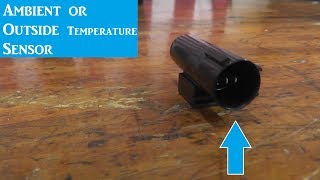
Where is the outside air temperature sensor located?
The sensor mounts at the very front of the car, typically clipped into the front bumper cover, radiator support, or behind the grille. This exposed position makes its wiring highly susceptible to impact and weather damage.
Will clearing the code fix the problem?
No, clearing the code does not fix the physical break in the circuit. The code returns immediately as soon as the climate control module runs its self-test.
Is the ambient air temp sensor the same as the intake air temp sensor?
No, they are different sensors. The Ambient Air Temperature (AAT) sensor measures outside air for the climate control system. The Intake Air Temperature (IAT) sensor sits in the engine's air intake to measure air entering the engine for fuel calculations.
Can a bad battery cause a B1227 code?
Highly unlikely. B1227 isolates to a single circuit, making a specific wiring fault much more probable than a systemic voltage drop. Always ensure your battery is healthy, but focus diagnosis on the sensor harness.
Key Takeaways
- Code B1227 indicates a broken outside air temperature sensor circuit, which immediately disables the A/C compressor to prevent evaporator freezing.
- Damaged wiring or a corroded connector behind the front bumper causes 80% of B1227 faults, not a failed sensor.
- Verify the fault by checking for a 5V reference and a ground reading below 0.1V at the sensor connector before buying replacement parts.
- Driving with B1227 is safe, but the disabled A/C compressor reduces windshield defroster effectiveness by failing to dehumidify cabin air.
- Honda and Acura vehicles from 2008-2023 experience this code most frequently due to exposed lower-grille sensor placement.
Helpful Videos


Shop the Parts Behind B1227
Below are the parts most often responsible for code B1227, ranked by how frequently each one is the actual culprit (per the diagnosis above). Tap any to see what we have for your vehicle.


The information in this article is provided for general reference and educational purposes only. Vehicle specifications, procedures, and part compatibility can vary by production date, trim level, and region. Always consult your vehicle's factory service manual and verify part numbers before purchasing or performing repairs. Safety-critical components such as airbags, seat belts, and braking systems should be installed by a qualified professional.
- 🧭 Diagnostic Flowchart
- 🎬 Helpful Videos
- 🛍️ Shop This Part
- What Does B1227 Mean?
- Can I Drive With B1227?
- Common Causes
- Symptoms
- Common Fixes & Costs
- Used vs. New Parts: Buying Guide
- What Happens If You Wait — Timeline
- Cost of Not Fixing It
- Diagnosis Steps
- When This Code Triggers (Freeze-Frame Conditions)
- Related Codes
- Climate & Environmental Factors
- How to Talk to a Mechanic About This Code
- Where to Take It: Dealer vs Independent vs Chain
- When to Walk Away From the Repair
- What Scan Tool You Need for This Code
- How to Clear the Code After You Fix It
- Will This Fail Emissions / State Inspection?
- Most Commonly Affected Vehicles
- Manufacturer-Specific Notes
- Real Owner Stories
- 2015 Honda Civic, mileage unknown
- 2022 Honda Accord, low mileage
- 2007 Acura RDX, mileage unknown
- BMW 3 Series, mileage unknown
- How to Prevent This Code From Triggering
- Frequently Asked Questions
- Can I fix a B1227 code myself?
- Why did my A/C stop working when I got this code?
- Why does my dashboard display show -40°F?
- What are common mistakes when diagnosing B1227?
- Where is the outside air temperature sensor located?
- Will clearing the code fix the problem?
- Is the ambient air temp sensor the same as the intake air temp sensor?
- Can a bad battery cause a B1227 code?
- Key Takeaways
- 🎟️ Get 5% Off