
Ultimate Guide to OBD-II Code B1274: Diagnosis & Repair
The definitive guide to diagnosing and fixing B1274 on Ford, GM, Toyota, and Dodge vehicles.
- B1274 is a manufacturer-specific code with 4 distinct meanings: a GM seat sensor, a Ford A/C sensor, a Toyota/Honda HVAC servo, or a Dodge fuel sender.
- On GM vehicles, B1274 disables the airbag system entirely, meaning airbags will not deploy in a crash until the repair is completed.
- Inspect the under-seat wiring and the $10 plastic Connector Position Assurance (CPA) clip on GM vehicles before replacing the $200 seat position sensor.
- Use a multimeter to test the specific sensor's resistance; for example, a functional Ford in-car temperature sensor reads 2,500-3,000 Ohms at 77°F.
What Does B1274 Mean?
B1274 is a manufacturer-specific Body Control Module (BCM) code, meaning its definition changes depending on your vehicle. It signals a fault in a body-related electrical circuit. For Ford, it points to the climate control's in-car temperature sensor. For General Motors (GM), it indicates a problem with the driver's power seat track position sensor. For Toyota, Honda, and Nissan, it signals a fault within an HVAC servo motor's position sensor. For Dodge and Chrysler, it indicates a high voltage condition in the fuel gauge sending unit circuit.
Technical definition: The SAE J2012 definition for code B1274 is manufacturer-specific. The four most common assignments are: * **General Motors (Chevrolet, GMC, Cadillac):** Seat Track Position Sensor Circuit * **Ford (Ford, Lincoln, Mercury):** A/C In-Car Temperature Sensor Circuit Open * **Toyota, Honda, Nissan:** Servo Motor Potentiometer Vent Circuit Short to Battery * **Dodge / Chrysler:** Fuel Level Sensor / Fuel Gauge Sending Unit Circuit High Voltage
Can I Drive With B1274?
Yes, But With Caution. Mechanically, your car is safe to drive because this code affects comfort features, not the powertrain. However, on GM vehicles, this code disables the airbag system. If the airbag warning light is on, the airbags will NOT deploy in a crash. Get the issue diagnosed immediately. Driving with an active airbag light is an automatic state inspection failure in many jurisdictions.
Common Causes
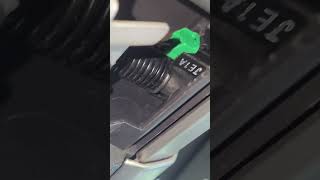
- Broken Connector Position Assurance (CPA) Clip (GM) (Very Common) — On millions of GM vehicles, a small plastic locking clip (CPA) on an under-seat airbag connector breaks or comes loose. This allows the connector to back out slightly, creating a poor connection for the seat position sensor circuit and triggering code B1274. This is documented in GM TSB #08-09-41-002H.
- Damaged Wiring or Connectors (Very Common) — The electrical wiring or connector for the affected component is frayed, corroded, loose, shorted, or broken. This is extremely common for wiring under power seats, which is susceptible to being kicked or snagged by stored items.
- Faulty Sensor, Potentiometer, or Actuator (Common) — The component measuring position, temperature, or level has failed internally. This includes the GM seat track position sensor, the Ford in-car temperature sensor, or the integrated potentiometer inside a Toyota/Honda HVAC servo motor.
- Corroded Fuel Level Sending Unit (Dodge) (Less Common) — On Dodge vehicles, the variable resistor strip on the fuel sending unit becomes corroded or gummed up with fuel contaminants, causing it to send an incorrect high voltage signal.
- Blown Fuse or Circuit Breaker (Less Common) — A blown fuse or tripped circuit breaker cuts power to the power seat, HVAC, or instrument cluster circuit, disabling the sensor.
- Faulty Control Module (BCM/HVAC/SRS) (Rare) — The specific computer controlling the system (HVAC module, Seat Control Module, or main Body Control Module) has an internal fault. This is rare and usually accompanied by multiple U-prefix communication codes.
Symptoms
- Airbag warning light is on (GM) — The airbag system uses the driver's seat position to calculate deployment force. If the sensor signal is lost, the system disables the airbags as a failsafe and illuminates the warning light. 🎬 Watch: How to reset the airbag light on a Chevy Silverado
- A/C blows incorrect temperature (Ford, Toyota, Honda, Nissan) — The automatic climate control cannot maintain the set temperature or direct air as requested. It blows hot when set to cold, gets stuck on defrost, or fails to switch vent modes.
- Power seat adjustment fails (GM) — The power seat controls are inoperative, preventing forward, backward, or recline adjustments. Memory seat recall buttons also fail.
- Inaccurate or erratic fuel gauge (Dodge) — The fuel gauge fluctuates wildly, reads empty when full, or reads full when empty. This is often accompanied by a Check Engine Light.
- Blinking A/C light (Toyota/Honda) — A fault in the HVAC system causes the A/C indicator light to blink, signaling a stored diagnostic trouble code.
Diagnostic Flowchart
Tap your situation to follow the diagnostic path that matches what you're seeing on this code.
Common Fixes & Costs
- Replace Connector Position Assurance (CPA) Clip (GM) — Parts: $5-$15, Labor: $50-$100, ~0.5 hr book time (DIY)
- Repair Damaged Wiring or Connector — Parts: $5-$30, Labor: $125-$350, ~2 hr book time (Intermediate)
- Replace In-Car Temperature Sensor (Ford) — Parts: $25-$50, Labor: $95-$150, ~1 hr book time (DIY)
- Replace Seat Track Position Sensor (GM) — Parts: $150-$250, Labor: $100-$200, ~1.5 hr book time (Intermediate)
- Replace HVAC Servo Motor (Toyota/Honda/Nissan) — Parts: $130-$190, Labor: $150-$400, ~2.5 hr book time (Advanced)
- Replace Fuel Level Sending Unit (Dodge) — Parts: $150-$300, Labor: $400-$700, ~2.5 hr book time (Advanced)
Used vs. New Parts: Buying Guide
When a used part is worth it: Used electronic components are generally not recommended due to unknown history. A used part is only viable for a high-cost component on an older vehicle where budget is the primary concern.
Donor-vehicle mileage cap: roughly under 60000 miles for the part to have meaningful remaining life.
Donor quality checklist:
- Verify the donor vehicle's mileage is low.
- Avoid parts from vehicles in rust-belt states due to potential corrosion.
- Match the part number exactly.
- Prefer sellers offering at least a 90-day warranty.
Decision logic:
- If Part is a sensor or electronic module AND vehicle is less than 10 years old → Buy new (OEM or reputable aftermarket) for reliability and warranty.
- If Vehicle is > 150K miles AND new part cost exceeds 20% of vehicle value → A low-mileage used part is a reasonable budget option.
- If The repair requires extensive labor (e.g., dropping fuel tank, removing dashboard) → Strongly favor a new part to avoid the high cost of repeating the labor.
Warranty tradeoff: Used parts typically offer a 30-90 day warranty on the part only. New aftermarket parts carry a 1-year to limited lifetime warranty. New OEM parts offer a 1-2 year warranty.
Worst-case if a used part fails: $400-$1500
What Happens If You Wait — Timeline
- Immediate: For GM vehicles, the airbag warning light illuminates and the Supplemental Restraint System (SRS) is immediately disabled as a failsafe. (MPG impact: 0%% · Added cost: $0 (but safety is critically compromised))
- 0-1 month: For GM: The airbag remains disabled. For other makes: The symptom (incorrect A/C, erratic fuel gauge) becomes a persistent annoyance. For Dodge, risk of running out of fuel increases. (MPG impact: 0-1%% · Added cost: $0-$50 (in wasted fuel or inconvenience))
- 1-6 months: An intermittent open/short becomes permanent. For Dodge, running the tank empty stresses and prematurely wears out the fuel pump. (MPG impact: 0-2%% · Added cost: $50-$300 (potential for added fuel pump damage))
- 6+ months: Ignoring the light normalizes a dangerous vehicle state, leading to an accident with no airbag deployment in GM vehicles. (MPG impact: 0%% · Added cost: $50,000+ (in potential medical costs from an accident where airbags failed to deploy))
Cost of Not Fixing It
- Immediate: On GM vehicles, the airbag system is disabled. The airbags will NOT deploy in a crash, drastically increasing the risk of serious injury or death. (Added cost: $50000-$1000000+)
- 0-3 months: For non-airbag faults: Inconvenience such as an inoperable power seat, incorrect A/C performance, or an unreliable fuel gauge. (Added cost: $50-$200)
- 3+ months: Continued operation with a faulty fuel sending unit risks running out of fuel, which stresses and prematurely wears out the fuel pump. (Added cost: $200-$900)
Diagnosis Steps
- Confirm Code Definition for Your Vehicle
Confirm what B1274 means for your specific make and model. If you have a GM, focus on the driver's seat. For a Ford, check the dash A/C sensor. For Toyota/Honda/Nissan, look at HVAC servos. For a Dodge, it is the fuel sender.
Tools: Professional OBD-II scanner or online repair database (Beginner) - Perform Detailed Visual Inspection
For GM vehicles, look under the driver's seat for damaged wires or loose yellow airbag connectors. Look for broken or missing red/pink CPA locking clips. For Ford, inspect the small grille on the dash for the in-car temp sensor. For HVAC servo issues, look under the dash for disconnected actuator arms.
Tools: Flashlight, inspection mirror (Beginner) - Check Fuses
Locate the fuse box using your owner's manual and inspect the fuses for the Power Seats, HVAC, BCM, and Instrument Cluster. Replace any blown fuses with one of the exact same amperage.
Tools: Owner's manual, fuse puller (Beginner) - Scan Live Data PIDs
Use a bi-directional scanner to view live data from the relevant module. Look for 'Seat Position Sensor Voltage', 'In-Car Temperature', or 'Fuel Level Sensor Voltage'. A value that is stuck, erratic, or reads 'fault' while manipulating the component confirms a circuit issue.
Tools: Bi-directional OBD-II Scanner (Advanced) - Test the Sensor Circuit for Power and Ground
Disconnect the sensor connector. Use a multimeter to verify circuit integrity. One pin must have a 5-volt reference (or 12V power), and another must have a solid ground (less than 0.1 volts). If either is missing, the problem is in the wiring or control module.
Tools: Multimeter, vehicle-specific wiring diagram (Intermediate) - Test GM Seat Position Sensor
With the connector plugged in and ignition on, back-probe the signal wire. Voltage must change smoothly as you move the seat along its track (typically 0.5V to 4.5V). If the voltage is stuck at 0V or 5V, the sensor has failed.
Tools: Multimeter with back-probe pins (Advanced) - Test Ford In-Car Temperature Sensor
Disconnect the sensor and measure resistance. A functional sensor at 77°F (25°C) reads approximately 2,500-3,000 Ohms. A reading of infinity (OL) indicates an open circuit, confirming the sensor has failed.
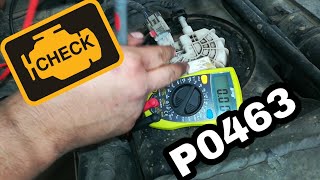
Tools: Multimeter (Intermediate) - Test Dodge Fuel Level Sensor
Disconnect the fuel pump module and measure resistance across the two sender pins. A good sensor reads approximately 20-40 ohms at 'full' and 200-225 ohms at 'empty'. A reading of infinity (OL) or erratic sweeping indicates a failed sender.
Tools: Multimeter, wiring diagram (Advanced) - Test HVAC Servo / Potentiometer
Disconnect the component and measure resistance between the 5V reference and ground pins (usually a fixed 5kΩ). Then, measure from the signal pin to ground while manually moving the actuator arm. Resistance must sweep smoothly. An 'OL' reading means it is bad.
Tools: Multimeter, wiring diagram (Advanced) - Clear Codes and Verify Repair
After replacing a part or repairing a wire, clear the B1274 code. Operate the affected system through its full range of motion, cycle the ignition, and re-scan to ensure the code does not return.
Tools: OBD-II scanner (Beginner)
When This Code Triggers (Freeze-Frame Conditions)
- Battery Voltage: 11.8-14.5V (Code sets with key on/engine off or while running.)
- Odometer: Varies (Indicates vehicle mileage when the fault was first logged.)
- Fault Frequency Counter: 1+ (Shows how many times the fault has occurred during driving cycles.)
- Ignition Status: On (The ignition must be on for the Body Control Module to log faults.)
Related Codes
- B0081 — Commonly seen with B1274 on GM vehicles. B1274 refers to the driver's seat position sensor, while B0081 refers to the passenger seat's occupant classification sensor.
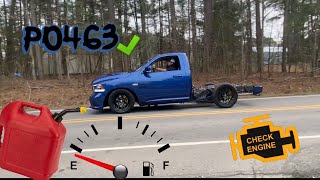
- P0463 — On Dodge/Chrysler vehicles, this code for 'Fuel Level Sensor Circuit High Input' is often seen with B1274, pointing to a faulty fuel sending unit.
- B1275 — The sister code to B1274, indicating a 'Circuit Short to Ground' for the same sensor. B1274 usually means 'Circuit Open' or 'Short to Battery'.
- U0140 — Means 'Lost Communication With Body Control Module'. If seen with B1274, the BCM itself is likely failing rather than the individual sensor.
Climate & Environmental Factors
- Extreme Temperature Cycles: Repeated hot-to-cold cycles accelerate the aging process of plastic components, making them brittle. This contributes to the failure of GM CPA clips.
- High Humidity / Salt: Moisture promotes fretting corrosion on electrical connector pins, causing high resistance faults. It also accelerates the failure of the resistor strip on Dodge fuel sending units.
How to Talk to a Mechanic About This Code
Say this: "I have a B1274 code on my [Make/Model] and need a diagnostic. For a GM with an airbag light, say: 'Please inspect the driver's under-seat wiring, especially the yellow connector's CPA clip, before quoting a new seat sensor.' For a Ford with A/C issues, say: 'Please test the resistance of the in-cabin A/C sensor to confirm it's open.' For a Toyota/Honda, say: 'Can you test the individual HVAC servos to see which one has failed?' For a Dodge with a bad fuel gauge, say: 'I suspect the fuel sending unit; can I get a quote to replace it?'"
This signals you've done research specific to your vehicle. It directs the technician to the most common failure points first, preventing them from immediately quoting an expensive, unnecessary part replacement.
Avoid saying:
- 'My airbag light is on, just fix it.' (Too vague, invites expensive guesses)
- 'The car is acting weird, can you check it out?' (Does not provide a starting point)
- 'Just do whatever you think is best.' (Surrenders all control over the cost and scope of the repair)
Questions to ask before authorizing the repair:
- Can you show me the damaged part or the failed electrical test reading?
- For a GM, did you check the TSB for the CPA clip (08-09-41-002H)?
- For a Dodge, what is the cost difference between replacing just the sender versus the whole fuel pump module?
- Will you provide a written estimate with a full cost breakdown?
- What is the warranty on this specific repair, for both parts and labor?
Where to Take It: Dealer vs Independent vs Chain
- Dealer:
Best for: Vehicles under warranty, Complex electrical or airbag-related issues where manufacturer-specific tools are a major advantage., Performing recall-related work or TSBs.
Downsides: Significantly higher labor rates and parts costs., Defaults to replacing an entire assembly rather than a smaller failed component. (Typical cost: +50% vs. baseline) - Independent Shop:
Best overall fit. A reputable independent shop handles all common variations of B1274 at a much lower cost than the dealer.
Best for: Out-of-warranty vehicles where cost is a factor., Common, well-documented problems like the Ford A/C sensor or GM CPA clip., Building a long-term relationship with a trusted mechanic.
Downsides: Quality and expertise vary widely; vetting through reviews is crucial., May lack the latest manufacturer-specific diagnostic tools for very new models. (Typical cost: +0% vs. baseline) - Chain Shop:
AVOID. The risk of misdiagnosis or improper repair is too high for airbag-related issues or labor-intensive dashboard/fuel tank work.
Best for: Simple, quick jobs like oil changes or tire rotations.
Downsides: Technician skill varies dramatically., High pressure to upsell services and parts., Lacks the in-depth diagnostic capability for complex body electrical codes. (Typical cost: -10% vs. baseline)
When to Walk Away From the Repair
If the estimated repair cost exceeds 40-50% of the car's current private-party value, consider selling or trading in the vehicle instead of repairing it.
- Car worth $6000, fix is $350: Fix it. This is a minor repair cost relative to the vehicle's value.
- Car worth $8000, fix is $1200: Borderline, but likely worth fixing. Get a second opinion to confirm the diagnosis and cost before proceeding.
- Car worth $3500, fix is $1200: Walk away. The repair cost is approaching half the car's value.
What Scan Tool You Need for This Code
Minimum: A scanner that reads manufacturer-specific Body ('B') codes and displays live data from the relevant module (SRS, BCM, HVAC).
A basic $20 code reader will not see 'B' codes at all. It cannot read the live sensor data needed to confirm the diagnosis, leading you to guess and replace the wrong parts.
Budget: BlueDriver Pro or KINGBOLEN Ediag Elite (~$90) — These Bluetooth dongles read manufacturer-specific B-codes and display live data streams to see sensor voltage/resistance changes.
Mid-range: Innova 5610 or Foxwell NT510 Elite (~$300) — These handheld scanners offer bidirectional controls, crucial for commanding Toyota/Honda HVAC servos individually to pinpoint the failed part.
Professional: Autel MaxiCOM MK808S or XTOOL D7 (~$450-600) — Provides full bidirectional control, OE-level diagnostics, and advanced functions like the HVAC recalibration procedure required after servo replacement.
How to Clear the Code After You Fix It
- Ensure the component is correctly installed and all connectors are secure.
- Reconnect the vehicle's battery if it was disconnected.
- Use an OBD-II scan tool to select the 'Clear/Erase Codes' function.
- Cycle the ignition off, then on, and operate the affected system to confirm the fix.
Drive cycle (~10 minutes): A specific drive cycle is not required for a B-code. After clearing the code, operate the affected component through its full range of motion.
Readiness monitors affected: None
Before emissions retest: drive at least 100 miles to fully set monitors.
Watch out for:
- Clearing the code without performing a repair results in the code returning immediately.
- Disconnecting the battery resets emissions readiness monitors, requiring 50-100 miles of driving before passing a state emissions test.
Will This Fail Emissions / State Inspection?
No — by itself this code doesn't fail OBD inspection (but it can keep readiness monitors from setting, which causes a separate fail).
- California: A B-code or an airbag light will NOT cause a failure on a standard biennial smog check. It causes a failure on the Vehicle Safety Systems Inspection (VSSI) for salvaged vehicles.
- New York: An illuminated airbag warning light is noted as an advisory during the safety inspection but is NOT a cause for rejection.
- Texas: The airbag system is not a required inspection item. A vehicle with an airbag light on will pass the state safety inspection.
- Virginia: An illuminated airbag light causes an automatic failure of the state's annual safety inspection.
Most Commonly Affected Vehicles
- Chevrolet Silverado (2003-2018) — Extremely common for seat track position sensor failure or under-seat wiring damage. Part number 15780680 is a common replacement for 2011-2013 models.
- GMC Sierra (2003-2018) — Prone to B1274 from a faulty seat position sensor, broken CPA clip on the yellow connector under the seat, or damaged wiring.
- Ford F-150 (2004-2014) — Typically logs B1274 for an open circuit in the in-dash cabin A/C temperature sensor.
- Chevrolet Tahoe / Suburban (2003-2014) — Seat position sensor failure is a frequent cause, often leading to an airbag warning light.
- Ford Explorer (2002-2015) — Often experiences B1274 due to the in-car temperature sensor.
- Toyota Corolla (2009-2019) — B1274 commonly points to a fault in an HVAC servo motor potentiometer circuit.
- Honda Civic (2006-2015) — Frequently associated with a Servo Motor Potentiometer Vent Circuit failure, leading to incorrect air distribution.
- Nissan Altima (2007-2018) — Logs B1274 for issues within the HVAC system, specifically related to a blend or mode door actuator's internal position sensor.
- Dodge Ram 1500 (2009-2018) — B1274 relates to the fuel level sending unit circuit, causing an inaccurate fuel gauge and often accompanied by code P0463.
Manufacturer-Specific Notes
- General Motors: A fault in the seat track position sensor disables the airbags. The issue is frequently not the sensor itself but the brittle CPA clip on the under-seat connector, detailed in TSB #08-09-41-002H.
- Ford: B1274 almost always means 'A/C In-Car Temperature Sensor Circuit is Open'. Its failure leads to the automatic climate control blowing air that is too hot or too cold.
- Toyota / Honda / Nissan: B1274 points to an HVAC Servo Motor Potentiometer Circuit fault. A diagnostic scan tool that commands each servo individually is the fastest way to identify the failed unit.
- Dodge / Chrysler: B1274 indicates 'Fuel Level Sensor Circuit High Voltage'. The repair is costly because it requires dropping the fuel tank to replace the sending unit.
Real Owner Stories
2011 GMC Sierra 1500 at 130K miles
Airbag light came on intermittently, then stayed on. Code B1274 was present. Power seat controls still worked.
What they tried:
- Checked under the seat and found nothing obviously wrong.
- Took it to a mechanic who diagnosed a faulty seat position sensor.
- Replaced the seat position sensor ($200 part, $150 labor).
Outcome: The airbag light went off. The owner later found a forum post about the broken CPA clip (TSB #08-09-41-002H) and realized the sensor may not have been the actual problem, but the repair worked regardless.
Lesson: On GM trucks, always suspect the under-seat wiring and the small red CPA clip on the yellow connector first. A $10 clip and 30 minutes of work saves a $350 repair bill.
2015 Dodge Ram 1500 at 70K miles
Check engine light came on, fuel gauge became erratic. Codes B1274 and P0463 were stored.
What they tried:
- Initially ignored the issue as the truck ran fine.
- Cleared the codes, but they returned whenever the tank was less than half full.
Outcome: The dealer quoted $500 to replace the fuel level sending unit. The owner opted to have an independent shop replace the entire fuel pump module for around $490, reasoning it was better to get a new pump for the same labor cost.
Lesson: On Dodge trucks, B1274 and P0463 mean a faulty fuel level sender. Since dropping the fuel tank is labor-intensive, consider replacing the entire fuel pump assembly at the same time.
2010 Toyota Corolla at 115K miles
A/C started blowing warm air on the driver's side but cold on the passenger side. The A/C light started blinking. A scan revealed code B1274.
What they tried:
- Tried an HVAC system reset by disconnecting the battery for 30 minutes; the problem returned immediately.
- Visually inspected under the dash but couldn't easily see the servo motors.
Outcome: An independent shop diagnosed a failed driver's side air mix servo motor. The part was $150 and labor was $200 due to the difficult location. The repair solved the problem.
Lesson: For Toyota/Honda HVAC issues with B1274, a system reset rarely works permanently. The failure is almost always a servo motor, requiring a bi-directional scanner to diagnose properly.
2013 Ford F-150 with EcoBoost
Automatic climate control would only blow hot air. Code B1274 was found.
What they tried:
- Located the sensor behind the small grille on the dash near the steering wheel.
- Removed the sensor and tested its resistance with a multimeter, which read 'OL' (open circuit), confirming the failure.
Outcome: Purchased a new Motorcraft sensor (DY1160) for $35. Replacement took 20 minutes using a trim removal tool. Cleared the code, and the climate control worked perfectly.
Lesson: On Fords, B1274 is a specific code for the in-cabin A/C temperature sensor. It is an easy DIY fix confirmed with a simple multimeter test.
How to Prevent This Code From Triggering
- Keep the area under the front seats completely clear (Always) — Prevents objects from snagging or disconnecting the delicate wiring for the GM seat position sensor and airbag connectors.
- Apply dielectric grease to at-risk connectors (During any related repair) — Applying dielectric grease prevents moisture intrusion and fretting corrosion, ensuring a reliable connection.
- Use the HVAC system regularly (Weekly) — Regularly cycling the temperature and vent modes moves the HVAC servo motors through their full range, preventing internal gears from seizing.
- Protect exposed wiring with split-loom tubing (As needed) — Covering exposed wiring under the seat or dash with abrasive-resistant split-loom tubing prevents chafing and shorts.
Frequently Asked Questions
What is the biggest misdiagnosis for B1274?
Replacing an expensive component without checking fuses and wiring first. A broken $10 plastic CPA clip on a GM vehicle causes the same code as a $200 failed sensor. Always inspect the physical connections before buying parts.
Why does the B1274 code have so many different meanings?
B1274 is a manufacturer-specific 'B' (Body) code. Automakers assign it to different body-related electronic systems, making it crucial to diagnose based on your specific vehicle make.
My airbag light is on with B1274. Will my airbags still work?
No. When the Supplemental Restraint System (SRS) detects a fault like a lost seat position signal, it disables the system. The airbags will not deploy in a collision until repaired.
Can a bad Body Control Module (BCM) cause only the B1274 code?
It is highly unlikely. A failing BCM causes a cascade of unrelated electrical problems and sets multiple communication (U-prefix) codes. If B1274 is the only code, the fault is the specific sensor or circuit.
What does 'Circuit Open' or 'Short to Battery' actually mean?
A 'Circuit Open' means a physical break in the wire, such as a cut wire or unplugged connector. 'Short to Battery' means the signal wire is touching a power wire, sending constant full voltage to the module.
Can I fix the broken red/pink clip on my GM seat connector myself?
Yes, this is a common DIY repair. Disconnect the battery for 15 minutes, remove the broken clip, ensure the main connector is fully seated, and snap the new clip (GM P/N 88988974) into place.
Where is the sensor for B1274 located?
On GM, it is under the driver's seat on the track. On Ford, it is behind a small dashboard grille. On Toyota/Honda, the servos are under the dash, and on Dodge, the sending unit is inside the fuel tank.
Key Takeaways
- B1274 is a manufacturer-specific code with 4 distinct meanings: a GM seat sensor, a Ford A/C sensor, a Toyota/Honda HVAC servo, or a Dodge fuel sender.
- On GM vehicles, B1274 disables the airbag system entirely, meaning airbags will not deploy in a crash until the repair is completed.
- Inspect the under-seat wiring and the $10 plastic Connector Position Assurance (CPA) clip on GM vehicles before replacing the $200 seat position sensor.
- Use a multimeter to test the specific sensor's resistance; for example, a functional Ford in-car temperature sensor reads 2,500-3,000 Ohms at 77°F.
Helpful Videos


Shop the Parts Behind B1274
Below are the parts most often responsible for code B1274, ranked by how frequently each one is the actual culprit (per the diagnosis above). Tap any to see what we have for your vehicle.


The information in this article is provided for general reference and educational purposes only. Vehicle specifications, procedures, and part compatibility can vary by production date, trim level, and region. Always consult your vehicle's factory service manual and verify part numbers before purchasing or performing repairs. Safety-critical components such as airbags, seat belts, and braking systems should be installed by a qualified professional.
- 🧭 Diagnostic Flowchart
- 🎬 Helpful Videos
- 🛍️ Shop This Part
- What Does B1274 Mean?
- Can I Drive With B1274?
- Common Causes
- Symptoms
- Common Fixes & Costs
- Used vs. New Parts: Buying Guide
- What Happens If You Wait — Timeline
- Cost of Not Fixing It
- Diagnosis Steps
- When This Code Triggers (Freeze-Frame Conditions)
- Related Codes
- Climate & Environmental Factors
- How to Talk to a Mechanic About This Code
- Where to Take It: Dealer vs Independent vs Chain
- When to Walk Away From the Repair
- What Scan Tool You Need for This Code
- How to Clear the Code After You Fix It
- Will This Fail Emissions / State Inspection?
- Most Commonly Affected Vehicles
- Manufacturer-Specific Notes
- Real Owner Stories
- 2011 GMC Sierra 1500 at 130K miles
- 2015 Dodge Ram 1500 at 70K miles
- 2010 Toyota Corolla at 115K miles
- 2013 Ford F-150 with EcoBoost
- How to Prevent This Code From Triggering
- Frequently Asked Questions
- What is the biggest misdiagnosis for B1274?
- Why does the B1274 code have so many different meanings?
- My airbag light is on with B1274. Will my airbags still work?
- Can a bad Body Control Module (BCM) cause only the B1274 code?
- What does 'Circuit Open' or 'Short to Battery' actually mean?
- Can I fix the broken red/pink clip on my GM seat connector myself?
- Where is the sensor for B1274 located?
- Key Takeaways
- 🎟️ Get 5% Off