
B1325 on 2013-2016 Cadillac CTS: Low Voltage Causes for Audio and Chime Loss
On a 2013-2016 Cadillac CTS, code B1325 with a loss of audio and chimes is almost always caused by a weak or aging battery, or a poor battery cable connection. Start by load-testing the battery and cleaning all main power and ground terminals before suspecting more complex module failures.
- B1325 on your CTS almost always means there is a power supply problem, not a failed radio.
- Always start your diagnosis by getting the battery load-tested, not just checking its voltage.
- The loss of turn signal clicks and warning chimes is a key symptom pointing to this code, as those sounds are produced by the audio system amplifier.
- Check and clean your battery terminals and main ground connections before spending money on parts.
- If you replace the amplifier, it must be programmed to your car's VIN to work.
What's Unique About the 2013-2016 Cadillac CTS
The 2013-2016 CTS, particularly the third-generation (2014-2016) models, relies heavily on the Cadillac User Experience (CUE) infotainment system. This system and its related modules are highly sensitive to voltage stability. While many cars can function with a slightly weak battery, the CTS will often manifest issues like the loss of audio and chimes as a first symptom of a failing battery or poor connection, triggering the B1325 code. 🎬 Watch: Understanding the B1325 code and how to fix it. The turn signal clicks, safety chimes, and even Active Noise Cancellation (ANC) are all processed and generated through the audio amplifier (RPO UQA or UQS). When the amplifier loses power due to low voltage, all of these sounds disappear at once.
Diagnostic Flowchart
Tap your situation to follow the diagnostic path that matches what you're seeing on this vehicle.
Generation note: This range covers two CTS generations. The 2013 model is the end of the second generation (Sigma II), while 2014-2016 models are the third generation (Alpha). The symptoms are most commonly documented in the third-generation models, which feature the more complex CUE system that is highly sensitive to voltage. The provided TSB PIE0348 specifically lists the 2014-2016 CTS and the related 2013-2016 ATS.
Symptoms You May Notice
- Complete loss of audio from the radio/infotainment system.
- No 'click-clack' sound when using turn signals.
- Absence of system chimes (e.g., seatbelt reminder, key-in-ignition warning).
- CUE infotainment screen may be black or unresponsive.
- Slow engine cranking on startup, especially after the car has sat for a day or more.
- Flickering interior or exterior lights.
- A 'clicking' sound from the rear of the car (amplifier relay) when the issue occurs.
- Replacing the CUE touchscreen. While CUE screens are known to fail by cracking or delaminating, a screen that is black or unresponsive due to a B1325 code is often a symptom of the low voltage problem, not the cause. Fix the power supply issue first.
- Replacing the radio/head unit. Similar to the screen, the entire head unit is often blamed when the issue is simply a lack of stable power from the battery or a failed amplifier downstream.
Most Likely Causes
- Weak or Failing Battery 🔴 High Probability → Shop Vehicle Battery The numerous electronic modules in the CTS, especially the CUE system and amplifier, are sensitive and require stable voltage above 9.5V to operate. An aging AGM battery may not provide consistent power during engine crank or high load, even if it can still start the engine, triggering the B1325 shutdown.
How to confirm: Take the vehicle to an auto parts store for a free digital load test. A simple multimeter check showing 12.6V at rest is insufficient. The battery must be tested under load to verify its health and cold cranking amp capacity.
Typical fix: Replace the vehicle's 12V AGM battery. The battery is located in the trunk. 🎬 See this step-by-step guide for replacing the trunk-mounted battery.
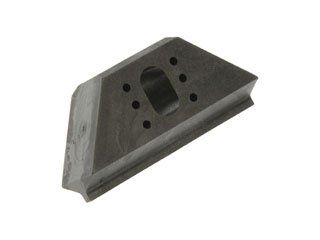
Est. part cost: $180-$350 - Poor Battery Connections or Ground Straps 🟡 Medium Probability → Shop Engine Ground Strap Corrosion on battery terminals or loosening of the main ground straps (battery to chassis, engine block to frame) can create high resistance, causing a significant voltage drop under load. Some GM negative battery cables have an integrated current sensor that can also fail, causing similar issues.
How to confirm: Visually inspect battery terminals in the trunk for corrosion. Locate and inspect the main engine-to-frame ground strap, which is a common failure point for causing widespread electrical issues. Perform a voltage drop test across the main power and ground cables while an assistant cranks the engine; a reading above 0.2-0.5 volts indicates a resistance problem.
Typical fix: Disconnect, thoroughly clean, and securely retighten the battery terminals and main ground connections. Replace corroded cable ends or the entire negative cable assembly if the integrated sensor is suspect.
Est. part cost: $5-$150 - Failing Alternator ⚪ Low Probability → Shop Alternator If the alternator is not adequately recharging the battery, system voltage will drop while driving, eventually leading to a low battery state and triggering the B1325 code.
How to confirm: With the engine running, measure the voltage at the battery terminals in the trunk. It should be between approximately 13.5 and 14.8 volts. If it's near 12V or lower, the alternator is likely not charging.
Typical fix: Replace the alternator.
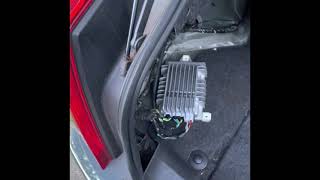
Est. part cost: $250-$600 - Failed Audio Amplifier ⚪ Low Probability → Shop Audio Amplifier TSB PIE0348 specifically targets vehicles with premium audio (RPO UQA or UQS), as the amplifier is the module that generates all chimes and turn signal sounds. The amplifier itself, located in the passenger side of the trunk behind the liner, can fail internally and either report a false low voltage condition or simply cease to function.
How to confirm: After confirming the battery and connections are flawless, check the large 'AMP' fuse in the rear fuse block. A professional scan tool is needed to check for communication with the 'Radio' or 'Digital Radio Receiver' module. If the module is not communicating despite good power and ground, it has likely failed.
Typical fix: Replace the audio amplifier. The replacement will require VIN programming by a dealer or qualified shop with GM's Tech2win or similar software to function.
Est. part cost: $150-$400 (used), $500+ (new)
Rare But Worth Checking
- Failed HMI Module: The Human-Machine Interface (HMI) module is the brain of the CUE system. While less common than a battery issue, its failure can cause a black screen and other electrical codes. A low voltage condition is a known cause of HMI failure or temporary malfunction.
- Parasitic Battery Drain: → Shop Vehicle Battery A module or component that fails to shut down after the car is turned off can drain the battery overnight, causing a B1325 code on the next startup. Diagnosing this requires a systematic fuse-pulling process with an ammeter to isolate the draining circuit.
Diagnosis Steps
- Read all codes from all modules using a capable OBD-II scanner. Note if B1325 is present in the Radio (listed as Digital Radio Receiver), HVAC, or BCM modules.
- Have the 12V AGM battery professionally load-tested. This is the most common cause and the first step before any other diagnosis.
- If the battery is good, turn the vehicle off and disconnect the negative battery terminal in the trunk.
- Thoroughly inspect and clean the positive and negative battery terminals, cable ends, and the main chassis ground strap. Also, locate and check the engine-to-frame ground strap for corrosion or looseness.
- Reconnect the battery and start the vehicle to see if symptoms are resolved.
- If the problem persists, use a multimeter to check the alternator's output voltage with the engine running (measure at the trunk battery terminals). It should be above 13.5V.
- Check fuses related to the audio system. The main amplifier fuse is a large cartridge fuse in the rear fuse block (trunk). Fuses labeled 'RADIO', 'RDO', or 'HMI' in the interior/underhood fuse boxes should also be checked.
- Locate the amplifier. On the 2014-2016 CTS, it is mounted vertically behind the trunk liner on the passenger side. 🎬 Watch: How to access and replace the audio amplifier. Ensure all connectors are secure.
- If all of the above check out, the issue likely lies with a faulty module (amplifier or HMI). This requires advanced diagnostics with a professional scan tool to check for module communication and is best left to a qualified technician.
Parts You'll Likely Need
- AGM Battery — This is the most frequent cause of low voltage conditions and the B1325 code on modern, electronically-dense Cadillac models.
Trusted brands: ACDelco, DieHard, Duralast
OEM price range: $250-$350
Aftermarket price range: $180-$280 - Audio Amplifier (Bose UQA/UQS)
(OEM #20960717, 20942618, 25869048, 20915908)— If the battery and wiring are good, the amplifier is the next most likely failure point, as it controls all chimes and sounds. Part numbers can supersede; confirm with VIN. Note: Requires dealer/shop programming after installation.
Trusted brands: ACDelco (OEM)
OEM price range: $500+
Aftermarket price range: $150-$400 (Used/Remanufactured) - Battery Cable Terminal Ends / Ground Straps — Corrosion at the terminals or a frayed engine ground strap creates high resistance and is a common, inexpensive fix for voltage drop issues.
Trusted brands: Dorman, Standard Motor Products, ACDelco
OEM price range: $20-$50
Aftermarket price range: $10-$30
Related Codes That Often Appear With This One
- U0180 — Stands for 'Lost Communication With Radio'. This code is cited in the exact same TSB (PIE0348) as B1325 and indicates the same root problem: the main computer can no longer talk to the radio/audio module, often because it has shut down from low voltage.
Technical Service Bulletins (TSBs) & Recalls
- Bulletin #PIE0348A (March 17, 2016): This was a "Preliminary Information Engineering" bulletin where GM concluded its investigation into the loss of audio, chimes, and turn signal sounds accompanied by DTC U0180 or B1325 sym03. It covered the 2013-2016 ATS and 2014-2016 CTS. Its closure implies GM gathered enough data from dealers to understand the root cause, which points towards the common electrical issues (battery, grounds) rather than a widespread component defect requiring a special service campaign.
- Bulletin #PIE0348 (October 14, 2015): The initial version of the bulletin requesting information and data from dealers encountering this specific issue.
Platform-Specific Known Issues
- Owner Experience: The Battery is the Culprit: → Shop Vehicle Battery Multiple owners on forums and YouTube share their experience of having the B1325 code and complete audio loss. After spending time checking fuses and considering replacing the expensive amplifier or CUE unit, the problem was resolved with a new AGM battery. This highlights the sensitivity of the CTS's electronics to battery health.
Mechanic-Grade Diagnostic Values
- System Voltage at Control Module — expected: 12.6V - 15.0V with engine running.. Failure: Voltage drops below 9.0V for 5 seconds, which sets code B1325 03.
- Voltage Drop Test (Module vs. Battery) — expected: Less than 2.0V difference.. Failure: A difference greater than 2.0V between the voltage read at the battery terminals and the voltage read by the scan tool from the module indicates high resistance in the power or ground circuit.
- Alternator Output Voltage — expected: 13.5V - 14.8V with engine running, measured at the battery.. Failure: Voltage near or below 12.6V while the engine is running indicates a faulty alternator.
Hidden / Shadow Codes Worth Checking
- B1325 sym03 / B1325 03: This is the specific variant of the code cited in GM Technical Service Bulletins for the loss of audio and chimes. The '03' symptom byte specifies 'Device Power Circuit Voltage Below Threshold'. Seeing this specific byte confirms the issue is low voltage, not high voltage or another fault. (see via A professional-grade scan tool like GM's GDS2 or other capable bidirectional scanners that can read symptom bytes (sym) from all vehicle modules. Basic OBD-II readers may only show 'B1325'.)
Scan Tool Commands That Help
- GDS2 (GM Global Diagnostic System 2): Module Diagnostics -> Radio -> Configuration/Reset Functions — Used after replacing the audio amplifier or HMI module. The new module must be configured and programmed to the vehicle's VIN to function correctly.
- Techline Connect / SPS (Service Programming System): A11 Radio – Programming or A11 Radio – USB File Transfer — This is the official GM software suite used to load the correct firmware onto a new or existing radio/amplifier module. This may be required to fix software glitches or to enable a replacement part.
- GDS2: Clear All DTCs — After a repair or programming event, it is critical to clear all codes from all modules to ensure the fault does not immediately return and to confirm the fix was successful.
Wiring & Ground Locations
- G402 — Behind the left side of the rear seat. GM's '400' series grounds are located from the rear seat area to the back of the vehicle.. This is the primary chassis ground for the audio amplifier. A loose or corroded G402 can cause a voltage drop directly at the amplifier, triggering a B1325 code even if the battery and main power feeds are perfect.
- Amplifier Connector X335 (2014+) — On the factory amplifier, located in the passenger side of the trunk, behind the liner.. This is where power, ground, and signal wires connect. For testing, you can probe specific pins. For example, when adding a subwoofer, the factory subwoofer signal wires are Pin 1 (Blue/Gray) and Pin 5 (Green/Black) on the 8-pin plug.
- G110 — In the engine compartment, on the front of the vehicle.. While not directly for the amplifier, a GM TechLink article noted that this ground point is sometimes improperly used to mount aftermarket Cold Air Intakes on CTS-V models, causing a poor ground connection that leads to widespread low voltage DTCs. This is a key check if a CAI is installed.
Real Owner Repair Stories
- Chevrolet HHR forum user (2006 Chevrolet HHR 2.4L (different vehicle, but identical B1325-03 code and electrical behavior)) — Intermittent no-start, communication errors, and B1325-03 code.
❌ Tried (didn't work) A previous load test on the battery had passed, confusing the diagnosis.
✅ What actually fixed it The user diagnosed a severe parasitic draw. With the car off, the battery measured only 8.07V. Immediately upon disconnecting the battery cables, the voltage jumped to 10.80V and slowly climbed. This indicated a component was actively draining the battery. While the final faulty component wasn't named in the thread, this diagnostic story confirms that a parasitic draw can be the root cause, draining a good battery and triggering B1325 on the next startup attempt.
OEM Part Supersession History
15278537, 25869049→20960717— Standard part updates and revisions by the manufacturer.
Heads up: These part numbers are generally interchangeable for the 2008-2013 CTS *sedan* with the Bose UQA audio system.
Model Year Variations Within This Range
- 2013: The audio amplifier for the 2013 CTS sedan is not compatible with the coupe or wagon models of the same generation, even if they have the same RPO code. Part numbers must be verified carefully for the specific body style.
- 2014-2016: The third-generation (2014+) CTS uses a different electrical architecture and connectors compared to the second-generation (2013). Wiring diagrams and pinouts from 2013 or earlier models should not be trusted for diagnosing 2014-2016 vehicles.
Helpful Videos
We Have This Part in Stock


The information in this article is provided for general reference and educational purposes only. Vehicle specifications, procedures, and part compatibility can vary by production date, trim level, and region. Always consult your vehicle's factory service manual and verify part numbers before purchasing or performing repairs. Safety-critical components such as airbags, seat belts, and braking systems should be installed by a qualified professional.
- Cadillac CTS:
- 🧭 Diagnostic Flowchart
- 🎬 Helpful Videos
- 🛍️ Shop This Part
- What's Unique About the 2013-2016 Cadillac CTS
- Symptoms You May Notice
- Most Likely Causes
- Rare But Worth Checking
- Diagnosis Steps
- Parts You'll Likely Need
- Related Codes That Often Appear With This One
- Technical Service Bulletins (TSBs) & Recalls
- Platform-Specific Known Issues
- Mechanic-Grade Diagnostic Values
- Hidden / Shadow Codes Worth Checking
- Scan Tool Commands That Help
- Wiring & Ground Locations
- Real Owner Repair Stories
- OEM Part Supersession History
- Model Year Variations Within This Range
- 🎟️ Get 5% Off