
OBD-II Code B1404: Driver Side Airbag Deployment Control Circuit Fault
The Ultimate 2026 Guide to Meaning, Causes, and Fixes
- Code B1404 on 2015+ Ford and Lincoln vehicles indicates a critical fault in the driver's side seat airbag circuit, disabling the airbag and creating an immediate safety risk.
- The most common cause for F-150, Explorer, and Aviator models is a broken purple wire or contaminated yellow connector under the driver's seat, which costs $150 to $350 to repair at an independent shop.
- On 2019-2021 Ford Transit vans, B1404 is almost always caused by a failed driver's seat suspension mat that requires a $350 to $650 replacement kit (Part LK4Z-61632A22-C).
- Never attempt to measure the resistance of the airbag module itself with a multimeter, as the tool's electrical current triggers accidental deployment and causes severe injury.
What Does B1404 Mean?

B1404 means the Restraint Control Module (RCM) detects an electrical problem in the driver's side airbag circuit. The RCM constantly monitors this circuit for a specific resistance value (typically 2.0 to 3.5 ohms). When it detects a broken wire, short circuit, or high resistance, it illuminates the airbag warning light and disables the affected airbag to prevent accidental deployment.
Technical definition: The formal definition for B1404 is 'Driver Side Airbag Deployment Control Circuit Fault.' It is often accompanied by a two-digit suffix specifying the exact fault: :13 for 'Circuit Open', :12 for 'Circuit Short to Battery', :1A for 'Circuit Resistance Below Threshold', or :11 for 'Circuit Short to Ground'. An SRS-capable scanner is required to read these suffixes.
Can I Drive With B1404?
No — Do Not Drive. The vehicle drives, but it is unsafe. The driver's side airbag is disabled and will not deploy in a collision. A single component fault disables the entire Supplemental Restraint System (SRS) on many vehicles. This critical safety failure requires immediate professional repair to prevent severe injury during an accident.
Common Causes

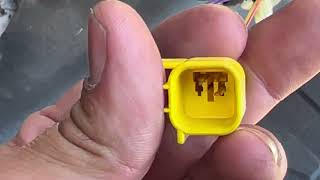
- Broken Wire at Driver's Seat Airbag Connector (Very Common) — On Ford, Lincoln, and Mercury vehicles (especially the F-150), side airbag wires fatigue and break at the yellow under-seat connector due to seat movement. The purple wire in the pigtail is the most frequent failure point. 🎬 Watch: This 15-minute video shows how to fix the F-150 pigtail.
- Faulty Under-Seat Wiring Connector (Fretting/Contamination) (Very Common) — Micro-vibrations cause connector pins to rub, creating 'fretting corrosion' and high resistance. Ford TSB 22-2190 documents this exact contamination issue on the Explorer, Aviator, and Bronco.
- Damaged Driver's Seat Suspension Mat (Ford Transit) (Very Common) — On 2019-2021 Ford Transits, internal seat springs break, causing the seat to sag and sever integrated sensor wiring. 🎬 See how to replace the Ford Transit seat springs and cushion. This is covered by TSBs 24-2053, 24-2394, and 25-2182.
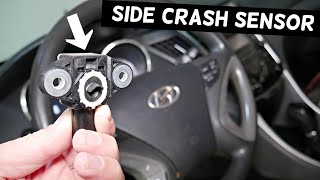
- Faulty Side Impact Sensor (SIS) - Hyundai/Kia (Common) — On Hyundai and Kia models, B1404 indicates a 'Side Impact Sensor Front-Passenger Circuit Short to Ground'. The fault is the impact sensor in the passenger-side B-pillar, not the driver's seat.
- Chafed Wiring Inside Seat Back (Less Common) — The wiring harness running inside the seat back to the airbag module chafes or pinches against the metal frame, causing an open circuit or short to ground.
- Faulty Driver's Side Airbag Module (Less Common) — The airbag unit mounted in the driver's seat fails internally. Ford TSB 22-2190 recommends replacing the airbag module alongside the faulty connector pigtail to prevent comebacks.
- Faulty Restraint Control Module (RCM) (Rare) — The main computer controlling the airbag system fails. Exhaustively rule out all wiring, connectors, and sensors before condemning the RCM.
Symptoms

- Airbag Warning Light On — The primary symptom. The dashboard light illuminates and stays on as long as the fault is present.
- Sagging Driver's Seat — On 2019-2021 Ford Transit vans, this code is accompanied by a noticeably sagging driver's seat cushion as the internal suspension mat fails.
- FordPass App Notification — Newer Ford vehicles push a 'Restraint System Fault Detected' notification to the owner's smartphone app.
- Audible Clicking from Seat Area — On some F-150s, pressing the lumbar area produces a clicking noise corresponding with resistance fluctuations on a scan tool, indicating internal wire chafing.
- Stored DTC B1404 in RCM (scan-tool only — no driver-felt sign) — An SRS-capable scan tool shows B1404, often with a suffix like :13 (Open Circuit), stored in the Restraint Control Module.
Diagnostic Flowchart
Tap your situation to follow the diagnostic path that matches what you're seeing on this code.
Common Fixes & Costs
- Replacing Airbag Connector Pigtail — Parts: $35-$60, Labor: $150-$350, ~1.5 hr book time (Professional)
- Depinning and Soldering Broken Wire — Parts: <$5, Labor: $150-$300, ~1.2 hr book time (Professional)
- Replacing Driver's Side Seat Airbag Module — Parts: $300-$600, Labor: $150-$300, ~1.5 hr book time (Professional)
- Replacing Seat Suspension Mat (Ford Transit) — Parts: $70-$160, Labor: $250-$500, ~2.5 hr book time (Professional)
- Replacing the Restraint Control Module (RCM) — Parts: $200-$600, Labor: $150-$300, ~1.0 hr book time (Professional)
Used vs. New Parts: Buying Guide
When a used part is worth it: For the airbag module, a non-deployed OEM part from a Certified Automotive Recycler (CAR) is a cost-effective alternative to a dealer part. Never use a deployed airbag or uncertified parts due to extreme safety risks. Always buy new connector pigtails.
Donor-vehicle mileage cap: roughly under 100000 miles for the part to have meaningful remaining life.
Donor quality checklist:
- Verify the seller is an ARA-certified recycler.
- Ensure the part is a non-deployed, genuine OEM component.
- Match the part number exactly. Used modules require professional VIN programming.
- Avoid flood-damaged parts; moisture corrodes internal electronics.
Decision logic:
- If The required part is a wiring pigtail or connector → Always buy new. The cost is low and ensures a perfect connection.
- If The required part is the airbag module and budget is a primary concern → Buy a used OEM module from a certified recycler, factoring in professional installation and VIN programming costs.
- If The vehicle is newer or safety is the absolute top priority → Buy a new OEM airbag module from a dealership to guarantee integrity.
Warranty tradeoff: Used recycler parts carry a 30-90 day warranty. New OEM dealer parts are covered for 1-2 years. Aftermarket pigtails carry manufacturer warranties.
Worst-case if a used part fails: $500-$1500 if a used module is faulty or improperly programmed, requiring repeat labor and parts.
What Happens If You Wait — Timeline
- 0 days: Fault is detected during a key-on self-test. The airbag warning light illuminates, and the RCM disables the driver's side airbag. (MPG impact: 0%% · Added cost: $0)
- 0 days - 1 year: The vehicle operates with a critical safety system disabled. It fails mandatory safety inspections in strict states, preventing registration renewal. (MPG impact: 0%% · Added cost: $50-$200 in potential fines and failed inspection fees.)
- Ongoing: If the fault is intermittent due to corrosion, moisture spreads to other pins in the main seat connector, triggering more SRS codes. (MPG impact: 0%% · Added cost: $0, but diagnostic complexity increases.)
- In case of an accident: The disabled driver's side airbag fails to deploy in a collision. The risk of severe or fatal head and chest injury increases dramatically. (MPG impact: 0%% · Added cost: $10,000+ (medical bills, legal liability, loss of vehicle value).)
Cost of Not Fixing It
- Immediate (0+ days): The driver's side airbag is disabled and will NOT deploy in a collision, representing a critical safety risk. (Added cost: N/A)
- Ongoing: The vehicle fails mandatory safety inspections in strict states, preventing legal registration renewal. (Added cost: $50-$200 (inspection fees, fines))
- In case of accident: Failure of the airbag to deploy causes severe or fatal injuries that are otherwise preventable, creating massive legal and insurance liability. (Added cost: $10,000+ (medical bills, legal liability, loss of vehicle value))
Diagnosis Steps
- Read the Fault Codes
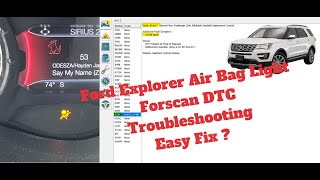
Use an SRS-capable OBD-II scanner to confirm B1404. Note any suffixes (e.g., :13 for open circuit) to identify the exact electrical fault. Standard engine readers cannot see this code.
Tools: SRS-capable OBD-II Scanner (Beginner) - Depower the SRS System (Critical Safety Step)
Disconnect the negative battery terminal and wait 15-30 minutes. This mandatory step allows the airbag backup power supply to discharge, preventing accidental deployment and severe injury.
Tools: Wrench set (10mm) (Intermediate) - Visually Inspect Under the Driver's Seat
Locate the yellow airbag wiring harness under the driver's seat. Check for pinched wires, unplugged connectors, or debris stressing the harness.
Tools: Flashlight (Beginner) - Inspect the Airbag Connector and Wire Entry
Disconnect the yellow airbag connector. Inspect the pigtail wires where they enter the connector back. Look for broken wires (especially the purple wire on Fords), pushed-out pins, or corrosion.
Tools: Detail brush, electronic contact cleaner (Intermediate) - Wiggle Test with Live Data
Using a bidirectional scanner, monitor the 'Driver Side Airbag Deployment Loop Resistance' PID. With the system powered, gently wiggle the under-seat connector. A healthy circuit shows 2.0-3.5 ohms. A jump to 'Open' confirms an intermittent fault location.
Tools: SRS-capable OBD-II Scanner with Live Data (Advanced) - Isolate the Fault with a Test Resistor
Plug a 2.2 to 3.3 ohm test resistor into the harness-side connector (replacing the seat assembly). Reconnect the battery and clear codes. If the code stays away, the fault is in the seat/airbag. If it returns, the fault is in the vehicle wiring or RCM.
Tools: Airbag system diagnostic resistor set (2.2Ω - 3.3Ω) (Professional) - Measure Circuit Resistance (Harness Side)
With the SRS depowered, measure resistance from the connector back to the RCM. It should be under 1.0 ohm. Infinite reading (O.L.) means a broken wire. WARNING: Never measure the resistance of the airbag module itself; the multimeter current triggers deployment.
Tools: Multimeter, Service Manual (Advanced) - Test for Shorts to Power or Ground
With SRS depowered and modules unplugged, test for continuity between circuit wires and chassis ground (should be O.L.). To test for shorts to power, reconnect the battery and probe wires for DC voltage (should be 0V).
Tools: Multimeter, Service Manual (Advanced) - Inspect the Side Impact Sensor (Hyundai/Kia)
On Hyundai/Kia vehicles, ignore the seat wiring. Depower the system, remove the passenger-side B-pillar trim, and inspect the impact sensor and connector for corrosion or damage.
Tools: Trim removal tools, socket set (Intermediate)
When This Code Triggers (Freeze-Frame Conditions)
- Ignition Status: ON (The SRS module performs a self-test every time the ignition is turned on.)
- Time Since Start: 0-7 seconds (The fault is detected during the initial system self-check immediately after starting the vehicle.)
- System Voltage: 11.5V - 14.5V (The fault logs under normal battery voltage. Low voltage triggers unrelated SRS codes.)
- Fault Type: Open Circuit / High Resistance (Freeze frame data confirms the specific electrical fault type, such as 'Circuit Open' for code B1404:13.)
Related Codes
- B1407 — The identical fault ('Passenger Side Airbag Deployment Control') for the passenger seat. Ford TSB 22-2190 notes B1404 and B1407 appear together.
- B1404:13 — The most common variant, indicating a 'Circuit Open' condition. Confirms a break in the wiring or a high-resistance connection at the under-seat connector.
- B1401 — Indicates 'Driver Front Airbag Circuit Failure'. B1401 points to the steering wheel airbag (clock spring), while B1404 points to the seat airbag.
- B0010 — On Ford Transits, this code for 'Driver Side Front Seat Side Air Bag Deployment Control' appears alongside B1404 due to the failing seat suspension mat.
Climate & Environmental Factors
- High Humidity / Moisture: Moisture causes corrosion on the pins of the under-seat connector. This increases electrical resistance, triggering the B1404 code.
- Extreme Cold: Cold temperatures make plastic wiring insulation brittle and cause metal connector pins to contract, leading to loose connections and intermittent open circuits.
How to Talk to a Mechanic About This Code
Say this: "I have an airbag warning light on, and a scan showed code B1404, which on my [Ford/Lincoln] is for the driver's side seat airbag. I'd like to schedule a diagnostic to confirm if the issue is the common under-seat connector or wiring before authorizing any major parts replacement."
Signals you know the most likely cause (a cheap wiring fix) and prevents an immediate upsell to an expensive airbag module replacement.
Avoid saying:
- 'My airbag light is on, can you fix it?'
- 'Just replace whatever is needed.'
- 'I think I need a new airbag.'
Questions to ask before authorizing the repair:
- Did you perform a 'wiggle test' on the under-seat connector to confirm an open circuit?
- Is the fault a broken wire/bad pigtail, or is the airbag module itself faulty?
- Can the wire be repaired or does the pigtail need to be replaced? Will you be soldering the connection?
- If the airbag module needs replacement, is that based on a TSB or did you isolate the fault to the module itself?
- What is the warranty on this specific repair, both parts and labor?
Where to Take It: Dealer vs Independent vs Chain
- Dealer:
Recommended only if the vehicle is under warranty or if an independent shop confirms the RCM or airbag module needs replacement.
Best for: Vehicles still under the original bumper-to-bumper warranty., Complex cases where a TSB requires module replacement and programming., When you want guaranteed OEM parts and a manufacturer-backed warranty.
Downsides: Highest labor rates and part costs., Defaults to the most expensive fix (replacing the entire airbag module) instead of attempting a simpler wire repair. (Typical cost: +50% vs. baseline) - Independent Shop:
Best for: Out-of-warranty vehicles, especially common models like the Ford F-150 or Explorer., Cost-conscious owners, as they attempt wire or pigtail repairs before replacing expensive modules.
Downsides: Quality varies; look for shops with ASE certifications and good reviews on electrical or SRS repairs., May lack manufacturer-specific software for programming new modules. (Typical cost: +0% vs. baseline) - Chain Shop:
AVOID. This critical safety system repair requires specialized knowledge beyond what typical chain shops offer.
Best for: Not recommended for airbag system diagnostics or repair.
Downsides: Technicians lack specialized training for SRS systems., High pressure to upsell and misdiagnose issues., Many chains refuse airbag repairs due to liability. (Typical cost: -10% vs. baseline)
When to Walk Away From the Repair
If the estimated repair cost exceeds 40-50% of the car's private-party value, seriously consider selling the car as-is.
- Car worth $5000, fix is $400: Fix it. This low-cost repair restores a critical safety feature and makes the car sellable.
- Car worth $15000, fix is $1800: Fix it. The repair cost is well below the 50% threshold and adds significant value and safety.
- Car worth $3000, fix is $1800: Walk away. The repair cost is over 50% of the car's value.
What Scan Tool You Need for This Code

Minimum: A scanner that reads and clears Supplemental Restraint System (SRS) / Airbag codes. A standard engine-only code reader will NOT work.
A basic $20 OBD-II reader only sees 'P' (Powertrain) codes. Airbag codes are 'B' (Body) codes stored in the RCM. You need an SRS-capable tool to see B1404.
Budget: Autel AutoLink AL619 (~$70) — Reads and clears engine, ABS, and SRS codes. Confirms the B1404 code and clears it after physical repair.
Mid-range: BlueDriver Pro / Foxwell NT510 Elite (~$120) — Offers SRS code reading/clearing plus live data streaming. Crucial for graphing 'Driver Side Airbag Deployment Loop Resistance' during a wiggle test to pinpoint intermittent faults.
Professional: Autel MaxiCOM MK808 / Launch CRP919E (~$500-800) — Provides full bidirectional control, advanced live data graphing, and programming functions needed if replacing the RCM.
Rent vs buy: Most auto parts stores do NOT rent SRS-capable scanners. Buying a budget-level SRS scanner is necessary and cheaper than a single diagnostic hour at a shop.
How to Clear the Code After You Fix It
- Perform the physical repair of the wiring, connector, or component.
- Reconnect the negative battery terminal.
- Use an SRS-capable OBD-II scan tool to access the Restraint Control Module (RCM) and clear the fault codes.
- Cycle the ignition off and then on. Observe the airbag warning light; it should illuminate for 6-7 seconds and turn off.
Drive cycle (~1 minutes): No specific drive cycle is required. The SRS system performs a self-test at the next key-on. If the light stays off after the initial bulb check, the repair is successful.
Watch out for:
- Clearing the code without physical repair causes the code to return immediately on the next self-test.
- Using a standard engine code reader fails to communicate with the RCM and cannot clear the code.
- Failing to disconnect the battery before working on airbag components causes accidental deployment and serious injury.
Will This Fail Emissions / State Inspection?
No — by itself this code doesn't fail OBD inspection (but it can keep readiness monitors from setting, which causes a separate fail).
- California: Will NOT fail a smog check. California evaluates emissions systems only; airbags are exempt.
- Texas: Will NOT fail a safety inspection. The airbag warning light is not checked on the Texas vehicle inspection report.
- New York: Will NOT fail a safety inspection. The NY DMV considers an illuminated airbag light an advisory item only.
- Virginia / Pennsylvania / Massachusetts: WILL FAIL a safety inspection. These states enforce strict safety standards; an illuminated airbag light is an automatic failure.
Most Commonly Affected Vehicles
- Ford F-150 (2015-2020) — Extremely common issue. The purple wire in the driver's side seat airbag connector breaks from fatigue.
- Ford Explorer (2020-2022) — Prone to a faulty side airbag wiring connector due to fretting corrosion. Documented in Ford TSB 22-2190.
- Lincoln Aviator (2020-2022) — Shares the Explorer platform and connector issue (TSB 22-2190).
- Ford Transit (2019-2021) — Linked to a failed driver's seat suspension mat assembly per TSBs 24-2053, 24-2394, & 25-2182.
- Ford Bronco (2021-2022) — The under-seat airbag connector issue is prevalent and included in Ford TSB 22-2190.
- Ford Mustang (2015-2023) — Experiences open circuits in the driver's side airbag connector. Diagnosis focuses on under-seat wiring.
- Hyundai Santa Fe (2001-2011) — B1404 indicates a 'Side Impact Sensor Front-Passenger Circuit Short to Ground' located in the passenger-side B-pillar.
- Kia Sorento (2003-2015) — B1404 points to a 'Right-hand Side Crash Sensor Short To Ground', not a driver's seat airbag issue.
- Nissan Altima (2013-2018) — Triggered by a dirty or loose connector under the driver's seat, often fixed by cleaning and reconnecting.
Manufacturer-Specific Notes
- Ford / Lincoln / Mercury: On 2015+ vehicles, B1404 exclusively refers to the driver's side seat airbag circuit. Ford issued multiple TSBs for this wiring fault. Repairs are typically covered only under the original bumper-to-bumper warranty.
- Hyundai: On models like the Santa Fe, B1404 means 'Side Impact Sensor Front-Passenger Circuit Short to Ground', referring to the B-pillar impact sensor on the opposite side of the vehicle.
- Kia: B1404 translates to 'Right-hand Side Crash Sensor Short To Ground'. Diagnosis focuses on the passenger side impact sensor.
- Mazda: B1404 indicates a fault in the 'Driver's Side Pretensioner Seat Belt' circuit. Diagnosis focuses on the seat belt buckle wiring, not the seat airbag.
Real Owner Stories
2017 Ford F-150 - The Classic Broken Wire Fix
Airbag light came on for code B1404-13 (Driver Side Airbag Deployment Control, Circuit Open). The seat had never been tampered with.
What they tried:
- Removed the driver's seat and inspected the yellow airbag connector underneath.
Outcome: Found the purple wire completely broken at the connector due to fatigue. The owner soldered the wire, used heat shrink, and cleared the code. The light stayed off.
Lesson: On modern Ford trucks, B1404:13 is almost always a broken wire in the under-seat connector. Soldering is the correct repair method; crimp connectors alter resistance and cause the code to return.
2020 Ford Explorer - Intermittent Light Misdiagnosis
Intermittent airbag light appeared. FordPass app reported a battery voltage issue. Dealer replaced the battery, but the B1404 code remained.
What they tried:
- Owner suspected a loose connection after noticing the light appeared after seat adjustment.
Outcome: The root cause is documented in TSB 22-2190: 'contamination and relative movement' in the under-seat connector. The official fix replaces the connector pigtail (BU2Z-14S411-BMB) and the airbag module.
Lesson: An intermittent airbag light is a classic sign of a bad connection. Referencing TSB 22-2190 prevents misdiagnosis (like replacing a good battery) and points directly to the proven fix.
2019 Ford Transit - The Sagging Seat Anomaly
Airbag light came on with code B1404. The driver's seat cushion was noticeably sagging.
What they tried:
- Checked for TSBs specific to the model and year.
Outcome: The cause was a failed driver's seat suspension mat assembly, covered by TSB 25-2182. The fix requires disassembling the seat to install a repair kit (LK4Z-61632A22-C) with reinforcement straps.
Lesson: Always connect physical symptoms to the trouble code. For a Ford Transit with B1404, a sagging driver's seat guarantees a failed suspension mat, not a simple wiring problem.
How to Prevent This Code From Triggering
- Keep the area under the front seats completely clear (Always) — Objects stored under the seat shift and snag the delicate airbag wiring harness, causing an open circuit.
- Apply a small amount of dielectric grease to the connector pins (During under-seat service) — Dielectric grease seals out moisture, preventing pin corrosion that causes high resistance faults.
- Secure the harness with additional clips or spiral loom (Once, during inspection or repair) — Adding protective wire loom reduces stress and abrasion on the wires at the connector, the most common failure point.
- Be gentle when cleaning or vacuuming under the seats (Every cleaning) — Aggressively shoving a vacuum nozzle under the seat snags the connector and stresses the wires.
- Restrain pets when they are in the vehicle (Every trip) — Pets chew on or pull at under-seat wiring, causing significant damage.
Frequently Asked Questions
Is it safe to drive my car with code B1404 and the airbag light on?
No. The airbag light indicates the driver's side airbag is disabled and will not deploy in an accident, significantly increasing injury risk. It requires immediate repair.
What does the :13 mean in code B1404:13?
The ':13' suffix means 'Circuit Open'. It tells the technician the RCM detects a break in the electrical circuit, most often caused by a broken wire or disconnected connector.
Can I fix the B1404 code myself?
It is strongly recommended not to. Airbag systems deploy accidentally from static electricity or improper handling, causing serious injury. Diagnosis and repair require specialized tools and belong in a professional shop.
My dealer quoted thousands to fix B1404. Is this reasonable?
It can be, but get a second opinion. While official TSBs sometimes require expensive airbag module replacement, the root cause is often a broken wire or dirty connector. A skilled independent mechanic frequently repairs the wiring for $150-$350 instead of replacing the entire module.
Does B1404 refer to the airbag in my steering wheel?
No. On most modern Ford, Lincoln, and Nissan vehicles, B1404 refers to the side airbag module located in the driver's seat bolster.
The airbag light for B1404 is intermittent. What does that mean?
An intermittent light is a classic symptom of a poor electrical connection. As the seat shifts, a loose pin or frayed wire causes the circuit's resistance to fluctuate, triggering the fault. The light returns until the physical connection is permanently fixed.
My mechanic just cleared the code and the light went off. Is it fixed?
No. If the underlying electrical fault is not physically repaired, the RCM detects the fault again on the next self-test and the airbag light returns immediately.
Is code B1404 covered under a recall?
Generally, no. While this is a known issue with multiple Technical Service Bulletins (TSBs), a TSB is a repair guide for dealers, not a mandatory recall. Repairs are typically only covered if the vehicle is still under its original factory warranty.
Key Takeaways
- Code B1404 on 2015+ Ford and Lincoln vehicles indicates a critical fault in the driver's side seat airbag circuit, disabling the airbag and creating an immediate safety risk.
- The most common cause for F-150, Explorer, and Aviator models is a broken purple wire or contaminated yellow connector under the driver's seat, which costs $150 to $350 to repair at an independent shop.
- On 2019-2021 Ford Transit vans, B1404 is almost always caused by a failed driver's seat suspension mat that requires a $350 to $650 replacement kit (Part LK4Z-61632A22-C).
- Never attempt to measure the resistance of the airbag module itself with a multimeter, as the tool's electrical current triggers accidental deployment and causes severe injury.
Helpful Videos


Shop the Parts Behind B1404
Below are the parts most often responsible for code B1404, ranked by how frequently each one is the actual culprit (per the diagnosis above). Tap any to see what we have for your vehicle.


The information in this article is provided for general reference and educational purposes only. Vehicle specifications, procedures, and part compatibility can vary by production date, trim level, and region. Always consult your vehicle's factory service manual and verify part numbers before purchasing or performing repairs. Safety-critical components such as airbags, seat belts, and braking systems should be installed by a qualified professional.
- 🧭 Diagnostic Flowchart
- 🎬 Helpful Videos
- 🛍️ Shop This Part
- What Does B1404 Mean?
- Can I Drive With B1404?
- Common Causes
- Symptoms
- Common Fixes & Costs
- Used vs. New Parts: Buying Guide
- What Happens If You Wait — Timeline
- Cost of Not Fixing It
- Diagnosis Steps
- When This Code Triggers (Freeze-Frame Conditions)
- Related Codes
- Climate & Environmental Factors
- How to Talk to a Mechanic About This Code
- Where to Take It: Dealer vs Independent vs Chain
- When to Walk Away From the Repair
- What Scan Tool You Need for This Code
- How to Clear the Code After You Fix It
- Will This Fail Emissions / State Inspection?
- Most Commonly Affected Vehicles
- Manufacturer-Specific Notes
- Real Owner Stories
- 2017 Ford F-150 - The Classic Broken Wire Fix
- 2020 Ford Explorer - Intermittent Light Misdiagnosis
- 2019 Ford Transit - The Sagging Seat Anomaly
- How to Prevent This Code From Triggering
- Frequently Asked Questions
- Is it safe to drive my car with code B1404 and the airbag light on?
- What does the :13 mean in code B1404:13?
- Can I fix the B1404 code myself?
- My dealer quoted thousands to fix B1404. Is this reasonable?
- Does B1404 refer to the airbag in my steering wheel?
- The airbag light for B1404 is intermittent. What does that mean?
- My mechanic just cleared the code and the light went off. Is it fixed?
- Is code B1404 covered under a recall?
- Key Takeaways
- 🎟️ Get 5% Off