
OBD-II Code B1423: A/C Refrigerant Pressure Sensor Circuit Malfunction
The Ultimate 2026 Guide to Meaning, Diagnosis, and Repair
- Code B1423 disables your A/C compressor to prevent catastrophic damage when refrigerant pressure drops below 28 PSI or exceeds 455 PSI.
- Over 80% of B1423 codes stem from a physical refrigerant leak or a failed A/C pressure sensor (OEM part 88719-33020 on many Toyotas).
- Compare live scan tool data to manual A/C gauge readings; a 0 PSI scan tool reading alongside an 80 PSI manual gauge reading confirms an electrical fault.
- Never replace the $500+ A/C Amplifier without first testing the $80 pressure sensor, as official diagnostic flowcharts frequently misdiagnose this specific code.
What Does B1423 Mean?

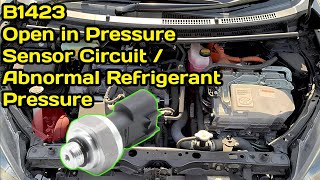
Code B1423 means the A/C Amplifier (climate control module) detects a critical fault in the A/C pressure sensor circuit. The system registers dangerously high/low refrigerant pressure or an illogical sensor signal. To prevent catastrophic compressor failure, the module cuts power to the compressor clutch, immediately stopping cold air production.
Technical definition: Primarily used by Toyota and Lexus, B1423 translates to 'Open in Pressure Sensor Circuit / Abnormal Refrigerant Pressure.' 🎬 Watch: How to fix the B1423 code on Toyota and Lexus models. It triggers when the A/C amplifier detects an electrical open/short, or when refrigerant pressure drops below 28 PSI (196 kPa) or spikes above 455 PSI (3140 kPa).
Can I Drive With B1423?
Yes, But With Caution. Yes, but leave the A/C turned off. The code disables the A/C compressor to protect it from running dry. Continuously attempting to force the A/C on with low refrigerant starves the compressor of lubricating oil, turning a $200 leak repair into a $2,000 compressor replacement.
Common Causes

- Low refrigerant level from a leak (Very Common) — Seals, O-rings, hoses, or the condenser develop leaks, allowing refrigerant to escape. When pressure drops below 28 PSI, the sensor triggers B1423 and shuts down the system.
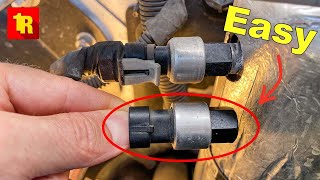
- Faulty A/C pressure sensor (Common) — The sensor fails internally, sending erratic or zero voltage to the computer 🎬 Watch this quick walkthrough on replacing a faulty A/C pressure switch. even when refrigerant pressure is perfect.
- Damaged wiring or electrical connector (Common) — Engine heat, vibration, or rodents damage the sensor's wiring harness. Broken wires or corroded connector pins create an open circuit.
- Malfunctioning Condenser Fan (Less Common) — The condenser fan dissipates heat from high-pressure refrigerant. If it fails, high-side pressure skyrockets above 455 PSI when stationary, triggering the code.
- Overcharged A/C system (Less Common) — Improper servicing adds too much refrigerant, pushing system pressure past the maximum safe threshold.
- Clogged Expansion Valve or Orifice Tube (Rare) — Debris or moisture clogs this restriction point, causing abnormally high pressure on one side and low pressure on the other.
- Internal A/C Compressor Failure (Rare) — A seizing compressor fails to build pressure correctly, resulting in abnormal readings.
- Faulty A/C Control Module (Amplifier) (Very Rare) — Extremely rare. Technicians frequently misdiagnose this when the actual fault lies in the sensor or wiring.
Symptoms

- A/C blows warm or hot air — The primary symptom. The control module disables the compressor, halting refrigerant circulation.
- A/C compressor does not engage — The compressor clutch 'click' is absent, and the center of the compressor pulley remains stationary.
- Flashing A/C light — On Toyota/Lexus models, the A/C button indicator light flashes once per second to signal a system fault.
- A/C works intermittently — The A/C functions briefly but cuts out in stop-and-go traffic or extreme heat due to borderline pressure or a failing condenser fan.
- Unusual noises from the A/C system — A failing pressure switch causes the compressor clutch to rapidly cycle on and off, creating a clicking or buzzing sound.
Diagnostic Flowchart

Tap your situation to follow the diagnostic path that matches what you're seeing on this code.
Common Fixes & Costs
- Repair Leak and Recharge A/C System — Parts: $20-$600, Labor: $200-$800, ~2.5 hr book time (Professional)
- Replace A/C Pressure Sensor — Parts: $50-$150, Labor: $200-$400, ~2.0 hr book time (Intermediate)
- Repair Damaged Wiring or Connector — Parts: $15-$50, Labor: $150-$300, ~1.5 hr book time (Intermediate)
- Replace Condenser and Fan Assembly — Parts: $250-$600, Labor: $250-$500, ~3.5 hr book time (Professional)
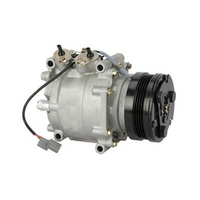
- Replace A/C Compressor — Parts: $400-$1000, Labor: $400-$800, ~5.0 hr book time (Professional)
Used vs. New Parts: Buying Guide
When a used part is worth it: Never. The labor cost of evacuating and recharging the A/C system far outweighs the savings of a $30 used sensor.
Donor-vehicle mileage cap: roughly under 50000 miles for the part to have meaningful remaining life.
Donor quality checklist:
- Exact OEM part number match.
- No front-end collision damage.
- Pristine connector pins.
Decision logic:
- If New OEM is under $150 → Buy new. The reliability is mandatory.
- If Vehicle is >15 years old → A used part from a verified donor is acceptable only if you are doing the labor yourself.
- If Sensor is integrated into an A/C line → Buy a new assembly to avoid inheriting someone else's leak.
Warranty tradeoff: Used parts typically offer a 30-90 day part-only warranty, which does not cover labor costs for re-installation. New aftermarket parts often have a 1-year to limited lifetime warranty, while new OEM parts carry a 12-month warranty.
Worst-case if a used part fails: $250-$400 (The cost of a second A/C service if the used sensor fails after the warranty period).
What Happens If You Wait — Timeline
- 0-1 Month (from initial fault): A/C disabled. Warm air. (MPG impact: 0%% · Added cost: $0)
- 1-6 Months: Erratic clutch cycling causes minor wear. (MPG impact: 0-1%% · Added cost: $50)
- 6-12 Months: Oil starvation accelerates internal compressor wear. (MPG impact: 0%% · Added cost: $800)
- 12+ Months: Compressor seizes, sending metal shrapnel through the system. (MPG impact: 0%% · Added cost: $3000)
Cost of Not Fixing It
- 0-3 Months: No A/C. The compressor is disabled, preventing immediate damage. (Added cost: 0)
- 3-12 Months: Forcing the A/C to run with low refrigerant starves the compressor of lubricating oil, accelerating internal wear. (Added cost: $400-$800)
- 12+ Months: The compressor seizes and sends metal shrapnel throughout the entire A/C system, requiring a complete system replacement. (Added cost: $2000-$4000)
Diagnosis Steps
- Read and Verify the Code
Use an OBD-II scanner with Body (B) code support to confirm B1423. Note accompanying codes like P0530-P0533 or B1479.
Tools: OBD-II Scan Tool (with Body code support) (Beginner) - Visually Inspect the A/C System
Check the pressure sensor and connector for broken wires. Look for oily residue on A/C lines, fittings, and the condenser, which confirms a refrigerant leak.
Tools: Flashlight, Inspection Mirror (Beginner) - Check Static and Dynamic Pressure
Connect an A/C manifold gauge set. With the engine off, static pressure (PSI) should roughly match ambient temperature (Fahrenheit). Readings below 30 PSI confirm a major leak.
Tools: A/C manifold gauge set (Intermediate) - PRO TIP: Compare Live Data to Manual Gauges
View 'A/C Pressure Sensor' live data on a scan tool. If the manual gauge shows 80 PSI but the scan tool reads 0 PSI, the sensor or wiring is dead.
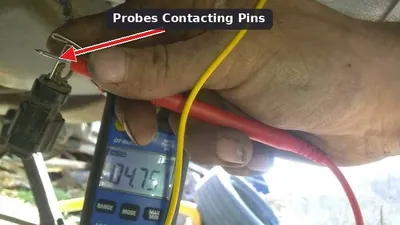
Tools: OBD-II Scan Tool (with Live Data), A/C manifold gauge set (Advanced) - PRO TIP: Test the Sensor's Electrical Circuit (Voltage)
Back-probe the 3-wire sensor. Pin 1 (Ground) needs 0 ohms to chassis. Pin 3 (Reference) needs a steady 5V. Pin 2 (Signal) must output 0.7V to 4.5V depending on pressure.
Tools: Multimeter, Back-probe kit, Wiring Diagram (Advanced) - PRO TIP: Test the Sensor's Electrical Circuit (Resistance)
Disconnect the sensor and A/C Amplifier. Check continuity on all three wires. High resistance indicates a broken wire; low resistance to ground indicates a short.
Tools: Multimeter, Wiring Diagram (Advanced) - Perform a UV Dye or Nitrogen Leak Test
Inject UV dye and use a UV flashlight to pinpoint the exact source of the refrigerant leak.
Tools: UV dye injector, UV flashlight, Safety glasses (Intermediate) - Test Condenser Fan Operation
Start the car and turn on the A/C. If the condenser fans fail to activate, diagnose the fan motor, relay, or fuse.
Tools: Basic hand tools (Intermediate) - Evacuate and Recharge to Verify Charge
Use a professional A/C machine to recover all refrigerant, measure its weight, pull a deep vacuum, and recharge to the exact factory specification.
Tools: Professional A/C recovery/recharge machine (Professional)
When This Code Triggers (Freeze-Frame Conditions)
- A/C Command: ON (Driver has requested air conditioning)
- Engine Coolant Temp: 180-210°F (Engine at normal operating temperature)
- RPM: 800-2500 (Engine at idle or during steady driving)
- Ambient Temperature: > 50°F (Warm enough for A/C to be requested and run)
Related Codes
- P0530 - P0533 — Powertrain equivalents for the A/C pressure sensor circuit. Seeing these alongside B1423 confirms an electrical or pressure fault.
- B1479 — Flow Sensor Circuit Malfunction. A pressure issue (B1423) causes erratic compressor operation, triggering B1479 as a secondary symptom. Fix B1423 first.
- B1476 — A/C Inverter Load System Malfunction (Hybrids). B1423 signals the pressure fault, causing the electric compressor to register an abnormal load (B1476).
- B1497 — Communication Malfunction Bus IC. Indicates a wider network problem. B1423 is likely a symptom of the A/C module losing communication.
Climate & Environmental Factors
- High Ambient Temperature: Hot weather spikes A/C operating pressure. A weak condenser fan fails to keep up, pushing pressure above the 455 PSI limit and triggering B1423.
- High Altitude: Thinner air reduces condenser efficiency. The system works harder to dissipate heat, causing borderline overcharged systems to trigger high-pressure faults.
- High Humidity: Condensing moisture out of humid air increases the thermal load. This forces the compressor to work harder, exposing weak components.
How to Talk to a Mechanic About This Code
Say this: "I have a B1423 code. Please check for leaks and compare the pressure sensor's live data to a manual gauge set to isolate an electrical vs mechanical fault."
Directs the technician to the definitive test, preventing expensive guesswork.
Avoid saying:
- 'Just recharge it.' (Wastes money if there's a leak)
- 'Replace the A/C computer.' (Invites a $1000 misdiagnosis)
Questions to ask before authorizing the repair:
- Did the scan tool pressure match the manual gauges?
- Can you show me the UV dye leak location?
- Does the estimate include recovering the old refrigerant and recharging the system to the factory-specified weight?
- What is the warranty on the parts and labor for this repair?
Where to Take It: Dealer vs Independent vs Chain
- Dealer:
Recommended only if the vehicle is under warranty. For out-of-warranty vehicles, their high cost and potential for misdiagnosis based on official procedures make them a less ideal choice.
Best for: Vehicles still under the basic warranty (e.g., 2020 Highlander with TSB-0127-20)., Complex electrical issues where factory-specific diagnostic tools are essential.
Downsides: Significantly higher labor rates and parts costs., May follow diagnostic trees that incorrectly condemn expensive modules like the A/C Amplifier. (Typical cost: +50% vs. baseline) - Independent Shop:
Best fit. Experienced A/C techs diagnose the actual failure (sensor/leak) rather than blindly replacing modules.
Best for: Out-of-warranty vehicles where cost is a major factor., Accurate diagnosis, as experienced independent technicians are often more aware of common real-world failures versus what official flowcharts say.
Downsides: Quality varies greatly; ensure the shop is ASE certified and has modern A/C service equipment. (Typical cost: +0% vs. baseline) - Chain Shop:
High risk. Lacks advanced diagnostic tools to differentiate between sensor and pressure faults.
Best for: Simple, advertised A/C 'recharge' specials (use with caution).
Downsides: Technician skill and equipment can be inconsistent., Often incentivized to upsell (e.g., turning a leak check into a compressor replacement recommendation)., May lack the advanced diagnostic tools to differentiate between sensor, wiring, and pressure faults. (Typical cost: -10% vs. baseline)
When to Walk Away From the Repair
Walk away if repair exceeds 50% of vehicle value.
- Car worth $4000, fix is $2500: Walk away. Sell as mechanic's special.
- Car worth $15000, fix is $900: Fix it.
- Car worth $5000, fix is $450: Fix it.
What Scan Tool You Need for This Code
Minimum: Reads Body (B) codes and displays live data.
Generic $20 readers cannot see B-codes or display the crucial live pressure data needed for diagnosis.
Budget: BlueDriver Pro (~$100) — Reads Toyota B-codes and graphs live sensor data via smartphone.
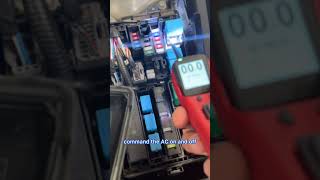
Mid-range: Foxwell NT510 Elite (~$180) — Provides bi-directional control to manually command the A/C clutch and fans.
Professional: Autel MaxiCOM MK808S / MK808BT (~$350-500) — Full bi-directional controls and professional service functions.
Rent vs buy: AutoZone free scanners cannot reliably read B-codes or live data. Buy a BlueDriver.
How to Clear the Code After You Fix It
- Use an OBD-II scan tool to clear Body (B) codes.
- On some Toyotas, hold the front and rear defrost buttons simultaneously for 3 seconds while in diagnostic mode to clear codes.
- Perform a 20-minute drive cycle to verify the repair.
Drive cycle (~20 minutes): Start the engine and turn the A/C to maximum cold. Drive for 15 minutes in mixed city/highway conditions, cycling the A/C off and on three times. Idle for 5 minutes. If the code stays off, the repair is successful.
Readiness monitors affected: None directly, All monitors if battery was disconnected
Watch out for:
- Disconnecting the battery resets emissions monitors, causing an automatic smog test failure.
- The code returns instantly if the underlying leak or sensor fault remains.
Will This Fail Emissions / State Inspection?
No — by itself this code doesn't fail OBD inspection (but it can keep readiness monitors from setting, which causes a separate fail).
- California: A B-code will not fail the smog check. However, if the battery was disconnected for the repair, the vehicle will fail for incomplete readiness monitors. A specific drive cycle must be completed before re-testing.
- New York: The NYVIP3 inspection checks for OBDII compliance based on the Check Engine Light status. B1423 does not trigger this light and is not part of the emissions test criteria.
- Texas: Emissions testing in applicable counties checks for active Powertrain codes (P-codes) that command the Check Engine Light on. A Body code like B1423 is not a cause for failure.
Most Commonly Affected Vehicles
- Toyota Highlander / Highlander Hybrid (2020-2023) — TSB-0127-20 addresses a specific leak at an A/C pipe O-ring connection causing this code.
- Lexus GX460 (2010-2023) — Extremely common. The diagnostic flowchart misleadingly points to a bad A/C Amplifier, but the cause is almost always low refrigerant or a failed pressure sensor.
- Toyota Prius / Prius C (Aqua) (2004-2015) — Frequently sets this code. Diagnosis often reveals leaks, sensor failure, or wiring issues. The common pressure sensor is OEM part 88719-33020.
- Lexus IS250 / IS350 (2006-2015) — Broken wires right at the sensor connector are a frequent culprit, requiring a new pigtail to be spliced in.
- Toyota Camry (2007-2017) — Often triggered by a faulty pressure sensor or broken wires in the harness near the sensor.
- Toyota Tundra (2014-2021) — Known to suffer from broken wires in the harness leading to the pressure sensor, creating an open circuit.
- Toyota RAV4 (2006-2018) — Often appears alongside B1479 (Flow Sensor Circuit). The combination points towards a refrigerant leak affecting both sensors.
- Toyota Previa / Innova (2006-2019) — A common code on these models, often resolved by replacing the A/C pressure sensor after verifying the refrigerant charge.
Manufacturer-Specific Notes
- Toyota/Lexus: Primary user of B1423 for A/C pressure faults. TSB-0127-20 covers a specific O-ring leak on 2020 Highlanders under the basic warranty.
- Suzuki: Defines B1423 as 'ABS Regenerative Axle Pressure Sensor Circuit Short To Battery', an unrelated braking system fault.
- Mitsubishi: Defines B1423 as 'Side-airbag squib short-circuited', a critical safety system fault requiring immediate attention.
- General Motors (GM): Uses B1423 as a generic 'Device power and/or ground circuit malfunction'.
- Mercedes-Benz: Points to a 'Switchover valve block (Y11)' within the climate control system.
Real Owner Stories
2013 Toyota Prius C with B1423
The A/C was not working and a scan tool showed code B1423. Live data showed negative pressure (-0.0006MPa). Unplugging the sensor caused the reading to jump.
Outcome: Replacing the sensor fixed the issue.
Lesson: Illogical live data (negative pressure) strongly points to a failed sensor, not a leak.
2010 Lexus GX460 with A/C blowing warm air
The A/C system was fully charged with refrigerant, but the compressor would not engage. The only diagnostic code present was B1423.
Outcome: The technician ignored the manual, replaced the pressure sensor instead, and fixed the car.
Lesson: Official flowcharts frequently misdiagnose B1423. Always replace the cheap sensor before the expensive computer.
2010 Toyota Prius with intermittent A/C and B1423/B1476 codes
The A/C would work initially but then start blowing warm air. Codes B1423 and B1476 were present.
Outcome: The actual fault was an intermittent sensor causing abnormal load readings.
Lesson: Secondary codes (like B1476) are symptoms of the primary pressure fault (B1423). Fix the pressure issue first.
How to Prevent This Code From Triggering
- Schedule an annual A/C performance check (Once per year, ideally in the spring) — Identifies slow leaks before they trigger a system shutdown.
- Keep the condenser clean (Every 3-6 months) — Removes bugs and debris, preventing high-pressure spikes.
- Replace the cabin air filter (Every 12,000-15,000 miles) — Ensures proper airflow, preventing evaporator freeze-up.
- Run the A/C system periodically in winter (For 10 minutes once a month during the off-season) — Circulates oil to keep O-rings lubricated, preventing spring-time leaks.
Frequently Asked Questions
Can I just add a can of refrigerant from an auto parts store to fix B1423?
No. Adding refrigerant ignores the underlying leak and risks overcharging the system. Overcharging creates dangerously high pressure that destroys the compressor. Find and fix the leak, then charge with the precise factory weight.
My A/C works for a few minutes and then blows warm. Is that B1423?
Yes. This happens when system pressure is borderline or an electrical fault is intermittent. A failing condenser fan causes pressure to spike as the engine heats up, shutting the system down.
My mechanic says the diagnostic tree points to the expensive A/C Amplifier (ECU). Is this correct?
Highly unlikely. Official diagnostic flowcharts frequently mislead technicians into condemning the expensive A/C Amplifier. The actual problem is almost always the $80 pressure sensor or its wiring, so replace the sensor first.
I replaced the A/C pressure sensor, but the code came back. What now?
The original problem was likely a refrigerant leak that emptied the system again. Alternatively, there is a broken wire in the harness or a failed condenser fan. Perform a UV dye leak test immediately.
How can I tell if it's the sensor or a leak without tools?
Look for oily, grimy patches on A/C lines, the condenser, and the compressor. This residue is refrigerant oil and pinpoints the exact location of the leak. If the system is perfectly dry, suspect an electrical fault.
Can I bypass the A/C pressure sensor to make my A/C work?
Never bypass the sensor permanently. Technicians briefly jump the terminals for testing purposes only. Leaving it bypassed removes the primary safety limit, guaranteeing severe compressor damage.
The code appeared after hitting a pothole or driving on a bumpy road. What does that mean?
The impact caused a momentary open circuit in the pressure sensor wiring. Meticulously inspect the sensor connector for loose pins, corrosion, or a broken wire right at the pigtail.
Key Takeaways
- Code B1423 disables your A/C compressor to prevent catastrophic damage when refrigerant pressure drops below 28 PSI or exceeds 455 PSI.
- Over 80% of B1423 codes stem from a physical refrigerant leak or a failed A/C pressure sensor (OEM part 88719-33020 on many Toyotas).
- Compare live scan tool data to manual A/C gauge readings; a 0 PSI scan tool reading alongside an 80 PSI manual gauge reading confirms an electrical fault.
- Never replace the $500+ A/C Amplifier without first testing the $80 pressure sensor, as official diagnostic flowcharts frequently misdiagnose this specific code.
Helpful Videos

Shop the Parts Behind B1423
Below are the parts most often responsible for code B1423, ranked by how frequently each one is the actual culprit (per the diagnosis above). Tap any to see what we have for your vehicle.

The information in this article is provided for general reference and educational purposes only. Vehicle specifications, procedures, and part compatibility can vary by production date, trim level, and region. Always consult your vehicle's factory service manual and verify part numbers before purchasing or performing repairs. Safety-critical components such as airbags, seat belts, and braking systems should be installed by a qualified professional.
- 🧭 Diagnostic Flowchart
- 🎬 Helpful Videos
- 🛍️ Shop This Part
- What Does B1423 Mean?
- Can I Drive With B1423?
- Common Causes
- Symptoms
- Common Fixes & Costs
- Used vs. New Parts: Buying Guide
- What Happens If You Wait — Timeline
- Cost of Not Fixing It
- Diagnosis Steps
- When This Code Triggers (Freeze-Frame Conditions)
- Related Codes
- Climate & Environmental Factors
- How to Talk to a Mechanic About This Code
- Where to Take It: Dealer vs Independent vs Chain
- When to Walk Away From the Repair
- What Scan Tool You Need for This Code
- How to Clear the Code After You Fix It
- Will This Fail Emissions / State Inspection?
- Most Commonly Affected Vehicles
- Manufacturer-Specific Notes
- Real Owner Stories
- 2013 Toyota Prius C with B1423
- 2010 Lexus GX460 with A/C blowing warm air
- 2010 Toyota Prius with intermittent A/C and B1423/B1476 codes
- How to Prevent This Code From Triggering
- Frequently Asked Questions
- Can I just add a can of refrigerant from an auto parts store to fix B1423?
- My A/C works for a few minutes and then blows warm. Is that B1423?
- My mechanic says the diagnostic tree points to the expensive A/C Amplifier (ECU). Is this correct?
- I replaced the A/C pressure sensor, but the code came back. What now?
- How can I tell if it's the sensor or a leak without tools?
- Can I bypass the A/C pressure sensor to make my A/C work?
- The code appeared after hitting a pothole or driving on a bumpy road. What does that mean?
- Key Takeaways
- 🎟️ Get 5% Off