
B1441 on 2016-2017 Lexus IS200T: Passenger Air Mix Servo Failure, Causes, and Fixes
Code B1441 on a 2016-2017 Lexus IS200T almost always means the passenger-side air mix servo motor has failed. This is a very common issue acknowledged by Lexus via service bulletins and a warranty extension program. The part itself is relatively inexpensive (~$190 OEM), but labor is high due to its difficult location deep behind the dashboard, leading to dealer repair quotes of $900 to over $3,000.
- B1441 on your IS200T means the passenger side temperature blend door motor (servo) has failed.
- The most common symptoms are air stuck on hot or cold on the passenger side and a clicking noise from the dash.
- The definitive fix is to replace the servo motor (Part #87106-30550).
- Due to the difficult access, this is a labor-intensive job. DIY is possible for experienced individuals but challenging (4/5 difficulty).
- Before replacing parts, ask a dealer to check if your car is eligible for any warranty extensions or if a simple A/C amplifier software update (per TSBs) could resolve the issue.
What's Unique About the 2016-2017 Lexus IS200T
This is a widely documented issue on the third-generation Lexus IS (including the IS200T), as well as other Lexus models from the same era like the GS and RC that share the same chassis and HVAC components. The failure of these Denso-made servos is so common that Lexus initiated a Customer Support Program (20LE01) extending the warranty for this specific problem and issued multiple Technical Service Bulletins (TSBs) acknowledging that the motors can fail due to internal electrical faults. While the diagnostic path is clear, some owners report extremely high dealer repair quotes ($3,000+) due to the official repair procedure sometimes calling for the removal of the entire dashboard and HVAC unit.
Diagnostic Flowchart
Tap your situation to follow the diagnostic path that matches what you're seeing on this vehicle.
Symptoms You May Notice
- Incorrect air temperature on the passenger side (often stuck on full hot or full cold).
- Inability to change the temperature for the passenger-side vents.
- A clicking, ticking, crunching, or buzzing sound from behind the passenger side of the dashboard, especially on startup or when changing temperature settings.
- Uneven temperature between the driver and passenger vents.
- Center console area becomes unusually hot to the touch if the servo fails while stuck in the heat position.
- Replacing the main HVAC control head on the dashboard.
- Adding refrigerant to the A/C system, which won't fix a temperature blending problem.
Most Likely Causes
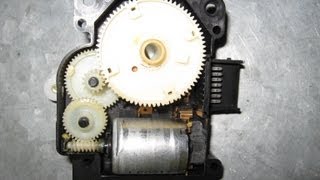
- Failed Passenger Air Mix Servo Motor 🔴 High Probability This is a known weak point on this platform, acknowledged by Lexus through multiple TSBs (L-SB-0019-20, L-SB-0001-21 Rev). The failure is typically internal to the servo motor, due to worn electrical contacts or stripped plastic gears. 🎬 See a teardown of a failed Lexus servo motor.
How to confirm: Use a diagnostic scan tool (like Toyota Techstream) to monitor the servo's target position vs. its actual position ('Air Mix Servo Targ Pulse (P)' vs 'Air Mix Servo Actual Pulse (P)'). If the actual position doesn't change when commanded, the servo has likely failed. A repetitive clicking sound from the passenger dash area is also a very strong indicator. A temporary fix can sometimes be achieved by running the 'Servo Motor Initialization' utility in Techstream, which may restore function for a short time and confirms the servo is the fault.
Typical fix: Replace the faulty servo motor. This requires removing the glove box and blower motor assembly to access the servo. While difficult, it can often be done without removing the entire dashboard.
Est. part cost: $180-$260 - A/C Amplifier Software Issue ⚪ Low Probability → Shop HVAC Control Lexus issued TSB L-SB-0019-20 which specifically calls for reprogramming the A/C Amplifier (the climate control ECU) with an updated calibration file as a potential fix for servo motor malfunctions and related DTCs, including B1441. In some cases, a software glitch can cause the code or prevent a new servo from working correctly.
How to confirm: A Lexus dealer or a qualified independent shop with access to Toyota's TIS (Technical Information System) can check if the A/C Amplifier has the latest software calibration. A Reddit user noted this was a known issue for Lexus models around 2017 and that a 2020 calibration file solved it.
Typical fix: Flash the A/C Amplifier with the updated software calibration file using Techstream. This is often recommended as a first step before replacing hardware, especially if multiple servo codes are present.
Est. part cost: $0
Rare But Worth Checking
- Damaged Wiring or Connector: While less common than motor failure, the wiring harness or connector to the servo could be damaged or have a poor connection. This should be inspected during replacement.
- Mechanical Obstruction: A damper link or the door itself could be mechanically jammed. This can sometimes happen after an improper cabin air filter replacement, where the servo actuator arm is damaged. The TSBs also mention checking for mechanical issues.
Diagnosis Steps
- Confirm the symptom: Verify that the passenger side temperature control does not work while the driver's side does.
- Listen for a repetitive clicking or buzzing noise from behind the passenger side glove box when changing temperature settings or starting the car.
- Scan the vehicle for Diagnostic Trouble Codes (DTCs) with a scanner capable of reading Body ('B') codes. Confirm B1441 is present.
- If available, use an advanced scan tool like Toyota Techstream. Access the HVAC Data List and attempt the 'Servo Motor Initialization' utility. Some owners report this can temporarily restore function.
- In Techstream, command the passenger air mix servo ('Air Mix Damper (P-Side)') to move from 0 to 100 (or full hot to full cold) and observe the 'Air Mix Servo Actual Pulse (P)' value. If it does not change or is erratic, the servo or its circuit is faulty.
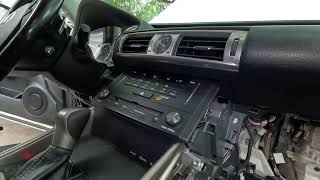
- If a scan tool is unavailable, gain access to the servo by removing the passenger-side lower dash panel and the glove box assembly.
- Visually inspect the servo and its linkage for movement while an assistant operates the temperature controls. If it clicks repeatedly or doesn't move, it has failed.
- If the servo shows no activity, disconnect its connector and use a multimeter to check for power, ground, and signal from the A/C amplifier to rule out a wiring issue. A direct bench test can be performed by applying battery voltage to terminals 4 and 5 of the servo to check for movement.
Parts You'll Likely Need
- Damper Servo Sub-Assembly, Air Conditioner Radiator, No. 4
(OEM #87106-30550)— This is the specific OEM servo motor that controls the passenger side air mix and is the direct cause of code B1441. It is used across many Lexus models.
Trusted brands: Lexus (Genuine OEM), Aisin
OEM price range: $188-$251
Aftermarket price range: $150-$200
Related Codes That Often Appear With This One
- B1442 — This code for the 'Air Inlet Damper Control Servo Motor Circuit' is often cited in the same TSBs as B1441, as the servos are part of the same system and prone to similar failures.
- B1443 — This code for the 'Air Outlet Damper Control Servo Motor Circuit' is also listed alongside B1441 in manufacturer service bulletins for HVAC malfunctions.
- B1446 — This code points to the driver's side air mix servo. It's common for multiple servos to be flagged, though one may be the primary failure.
- B1453 — This code for the 'Driver Side Air Outlet Damper COOL Control Servo Motor Circuit' was reported by a 2016 IS200t owner along with B1441.
Technical Service Bulletins (TSBs) & Recalls
- L-SB-0019-20: Addresses HVAC conditions and DTC B1441 on 2017-2019 models, recommending a flash reprogram of the air conditioning amplifier with a new calibration file.
- L-SB-0001-21 Rev: A 77-page document covering 2013-2017 IS, GS, and RC models. It provides detailed diagnostic flowcharts and replacement procedures for numerous HVAC servos, including the one for B1441.
- Customer Support Program 20LE01: A notification sent to owners acknowledging the defect. It provided free repairs under specific terms, referencing TSB L-SB-0001-21 for the procedure. Primary coverage expired Jan 12, 2022.
Platform-Specific Known Issues
- Lexus issued multiple Technical Service Bulletins (TSBs) for this exact problem, including L-SB-0019-20 and L-SB-0001-21 Rev, covering the 2016-2017 IS200T. This indicates a high frequency of failure.
- Lexus created Customer Support Program 20LE01 (also referenced as 21LE01) that extended warranty coverage for this issue on approximately 328,700 vehicles. Primary coverage ended January 12, 2022, but secondary coverage may last for 7 years/125,000 miles from the date of first use. It is worth checking with a dealer.
- The repair is known to be labor-intensive due to the servo's location deep within the dashboard. A ClubLexus user with a 2016 IS reported a dealer quote of $3,000, citing 11 hours of labor for a full dash removal. However, many DIYers and independent shops can perform the repair in 2-4 hours by removing the glovebox and blower motor only.
- Some owners who tried to use the Customer Support Program reported that dealers required a non-refundable diagnostic fee (e.g., $271) to confirm the issue before proceeding with the free repair.
Mechanic-Grade Diagnostic Values
- Techstream Live Data: 'Air Mix Servo Targ Pulse(P)' vs 'Air Mix Servo Actual Pulse(P)' — expected: The 'Actual Pulse' value should track the 'Target Pulse' value as the temperature is changed. For example, MAX COLD may be a pulse of ~257 and MAX HOT may be ~347.. Failure: The 'Actual Pulse' value does not change, is erratic, or does not match the 'Target Pulse' command.
- Servo Motor Bench Test — expected: Applying battery voltage to terminals 5 (+) and 4 (-) should cause the servo arm to move smoothly to the 'MAX HOT' position. Reversing polarity (terminal 4 positive, terminal 5 negative) should move it to the 'MAX COOL' position.. Failure: The servo motor does not move, moves erratically, or makes a clicking/grinding noise.
- A/C Amplifier Power Supply Voltage — expected: 10-14 Volts between the IG (Ignition) terminal and the GND (Ground) terminal at the A/C amplifier connector with the ignition ON.. Failure: Voltage is below 10V or absent, indicating a problem with the power supply circuit, fuse, or ground connection.
Scan Tool Commands That Help
- Techstream: Servo Motor Initialization — This function should be performed after replacing a servo motor or the A/C amplifier to allow the system to learn the end points of all damper doors. It can also be used as a diagnostic step; sometimes repeatedly running the initialization can temporarily restore function to a sticking servo, confirming it as the faulty component.
- Techstream: Active Test: Air Mix Damper (P-Side) — This allows a technician to directly command the passenger air mix servo to move to specific positions (e.g., full hot, full cold) while observing its behavior on the 'Data List' to confirm if it is responding correctly without having to use the dashboard controls.
Wiring & Ground Locations
- Passenger Air Mix Servo Connector — Behind the passenger side of the dashboard, attached to the HVAC unit, accessible after removing the glove box and lower panels.. This is the direct connection point for the faulty servo. Checking for power, ground, and signal at this connector is a key diagnostic step to differentiate between a failed motor and a wiring/amplifier issue.
- A/C Amplifier Assembly — Located in the center of the dashboard, typically behind the radio and climate control head unit.. This is the control module that sends commands to the servo motor. All wiring for the servo originates here. A failure in this module, though rare, can cause code B1441.
- Ground Points J1 / J2 — J1 is in the driver's side kick panel area. J2 is to the left side of the shift lever.. The A/C Amplifier and other instrument panel components rely on these ground points. A loose or corroded ground here could cause a variety of difficult-to-diagnose electrical issues, including intermittent servo operation or communication faults.
Real Owner Repair Stories
- ClubLexus user 'Kmorgan' (2010 Lexus RX350 (Similar HVAC design)) — Bad mode blend door servo, accessed from passenger footwell.
❌ Tried (didn't work) Replacing the servo assembly did not fix the issue., Replacing the A/C amplifier did not fix the issue.
✅ What actually fixed it The user's problem was ultimately unresolved in the thread, but their experience ruled out the two most common components (servo and amplifier), pointing toward a more complex wiring harness issue. They noted the servo assembly was extremely difficult to remove and required grinding down plastic on the new part to reinstall it without full dash removal. - ClubLexus user (2016 Lexus IS) — B1441 code, passenger side stuck on full hot, center console getting hot.
❌ Tried (didn't work) Attempting DIY replacement but could not physically remove the servo assembly due to clearance issues with the blower case and center console mount.
✅ What actually fixed it The user successfully restored function, at least temporarily, by running the 'Servo Initialization' function in Techstream five times with the car running and A/C fan off. This confirms the servo was the fault and that initialization can sometimes overcome an internal jam.
OEM Part Supersession History
Unknown→87106-30550— This is the current, widely-used OEM part number for the passenger air mix servo across numerous Lexus models of this era (IS, GS, RC).
Model Year Variations Within This Range
- 2016-2017: A facelift occurred for the 2017 model year which included styling changes (grille, lights) and infotainment updates. However, the core HVAC system design, including the servo motors and A/C amplifier, was not changed. Therefore, the B1441 failure mode and repair procedure are identical for both 2016 and 2017 models.
Helpful Videos
We Have This Part in Stock


The information in this article is provided for general reference and educational purposes only. Vehicle specifications, procedures, and part compatibility can vary by production date, trim level, and region. Always consult your vehicle's factory service manual and verify part numbers before purchasing or performing repairs. Safety-critical components such as airbags, seat belts, and braking systems should be installed by a qualified professional.
- Lexus IS200T:
- 🧭 Diagnostic Flowchart
- 🎬 Helpful Videos
- 🛍️ Shop This Part
- What's Unique About the 2016-2017 Lexus IS200T
- Symptoms You May Notice
- Most Likely Causes
- Rare But Worth Checking
- Diagnosis Steps
- Parts You'll Likely Need
- Related Codes That Often Appear With This One
- Technical Service Bulletins (TSBs) & Recalls
- Platform-Specific Known Issues
- Mechanic-Grade Diagnostic Values
- Scan Tool Commands That Help
- Wiring & Ground Locations
- Real Owner Repair Stories
- OEM Part Supersession History
- Model Year Variations Within This Range
- 🎟️ Get 5% Off