
B1453 on 2013-2017 Lexus GS HYBRID: Driver's Side Cool Air Servo Motor Fix
This code indicates a failure in the driver's side cool air servo motor. The most common fix is replacing the faulty servo motor, a labor-intensive job due to its location deep within the dashboard. Expect the part to cost around $150-$250, but shop labor can range from $700 to over $1,900, with some dealer quotes exceeding $3,000. Lexus has acknowledged this widespread issue via a TSB and a Customer Support Program.
- B1453 on a 2013-2017 Lexus GS Hybrid points directly to a failed servo motor that controls cool air for the driver.
- The primary symptoms are warm air from the driver's vents when cooling is requested and/or clicking noises from the dash.
- The fix is to replace the servo motor (OEM Part #87106-30610), which has a blue connector and is located under the driver's side dash.
- While the part is moderately priced, the repair is very labor-intensive and costly at a shop ($700-$3000+), as significant dashboard disassembly is required.
- This is a very common, well-documented problem for this generation of Lexus GS and its platform mates (IS, RC), confirmed by Lexus TSB L-SB-0001-21 and Customer Support Program 20LE01.
What's Unique About the 2013-2017 Lexus GS HYBRID
The fourth-generation Lexus GS (L10), including the hybrid model and its platform mates (IS, RC), uses a complex multi-zone climate control system with numerous servo motors. These servos are a well-documented weak point across this platform due to internal electrical malfunctions. Lexus acknowledged the high failure rate by issuing Technical Service Bulletin (TSB) L-SB-0001-21 Rev, which specifically lists B1453 and provides repair guidance. Furthermore, Lexus initiated Customer Support Program 20LE01 (internally coded as ZLE), which extended warranty coverage for this exact issue across approximately 328,700 vehicles, including over 103,000 GS models, confirming this is a widespread, recognized defect.
Diagnostic Flowchart
Tap your situation to follow the diagnostic path that matches what you're seeing on this vehicle.
Symptoms You May Notice
- Warm or hot air blowing from the driver's side vents when A/C is set to cool.
- Inability to adjust the temperature on the driver's side.
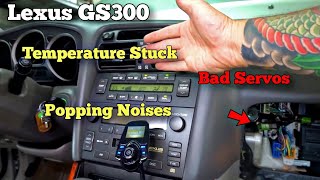
- A clicking, popping, or grinding sound coming from behind the driver's side of the dashboard, especially when changing temperature settings 🎬 See this walkthrough on fixing popping noises and stuck temperatures. or during startup self-check.
- Uneven temperature between driver and passenger side vents.
- Climate control seems stuck on full heat or only blows cold on the 'LO' setting.
- Recharging the A/C refrigerant. This code is electrical, not related to refrigerant levels. If the passenger side blows cold, the refrigerant level is likely fine.
- Replacing the main HVAC control unit on the center console. The fault lies with the motor deep in the dash, not the user interface.
Most Likely Causes
- Failed Driver Side Cool Air Servo Motor 🔴 High Probability As documented in Lexus TSB L-SB-0001-21 and Customer Support Program 20LE01, these specific servo motors are a common failure point due to an internal electrical malfunction. This is the most common cause by a wide margin, with some owners reporting failures just outside the basic warranty period.
How to confirm: Listen for clicking noises from the driver's side lower dash. A technician can use a diagnostic tool like Toyota's Techstream to command the servo to move and compare the 'target pulse' vs. 'actual pulse' values; a large discrepancy confirms failure. A bench test can also be performed by applying 12V to the motor's gold tabs to see if it spins.
Typical fix: Replace the faulty servo motor. The specific servo for this code has a blue electrical connector. After replacement, a 'Servo Motor Initialization' must be performed using a scan tool like Techstream or by disconnecting the battery for over 30 minutes.
Est. part cost: $150-$250 - Wiring Harness or Connector Issue ⚪ Low Probability
How to confirm: After accessing the servo, inspect the blue connector and nearby wiring for any signs of damage, corrosion, or loose pins. Use a multimeter to test for proper voltage and ground at the connector when the temperature is changed.
Typical fix: Repair the damaged section of the wiring harness or clean/re-seat the connector.
Est. part cost: $0-$50 - Faulty A/C Amplifier (HVAC Control Module) ⚪ Low Probability While less common for a single code, a faulty A/C amplifier can cause multiple servo codes to appear at once. Some model years had a known issue that could be resolved with a software reflash.
How to confirm: This should only be considered after the servo motor and wiring have been definitively ruled out, or if multiple, seemingly unrelated servo codes appear simultaneously. Advanced diagnostics with Techstream are required to confirm the module is not sending the correct signal.
Typical fix: Reprogram (reflash) the A/C Amplifier with an updated calibration file, or replace the module if it has failed internally.
Est. part cost: $400-$600
Diagnosis Steps
- Confirm the code B1453 using an OBD-II scanner capable of reading Lexus-specific body codes (e.g., Toyota Techstream).
- Listen for clicking or grinding noises from the driver's side of the dashboard when changing the temperature from full hot to full cold.
- If using Techstream, navigate to the A/C system, select 'Active Test', and command the 'Cool Air Damper (Driver Side)' to move. Monitor the 'target pulse' and 'actual pulse' data; a large difference or no change in the actual pulse indicates a failed servo.
- Access the servo motor area under the driver's side dashboard. TSB L-SB-0001-21 indicates this requires removing the driver's knee airbag assembly.
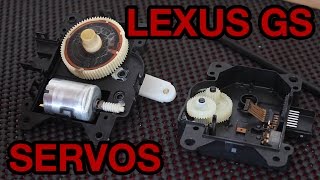
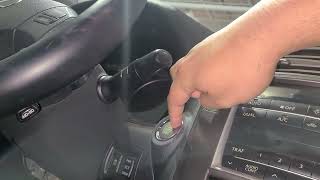
- Locate the correct servo motor. The servo for B1453 is identified by its blue electrical connector. 🎬 Watch: See the exact location of the B1453 driver side servo.
- Visually inspect the connector and wiring for any obvious damage.
- With the ignition on, have an assistant change the driver's temperature settings while you observe the servo. If it does not move, moves erratically, or makes noise, it has likely failed.
- For DIY replacement, a small ratchet with a Phillips bit is considered an essential tool for the tight space. A Reddit user suggests removing the screws holding the servo to its bracket, rather than the bracket to the A/C box, for easier removal.
- Before installing the new servo, manually align the flat part of the damper's protruding shaft with a white mark on the A/C control box housing. This mark can be hard to see and may require a flashlight.
- After installation, perform a 'Servo Motor Initialization' using Techstream or by disconnecting the battery for at least 30 minutes.
Parts You'll Likely Need
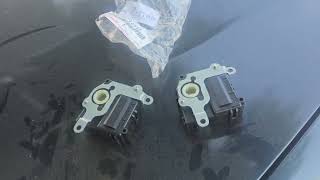
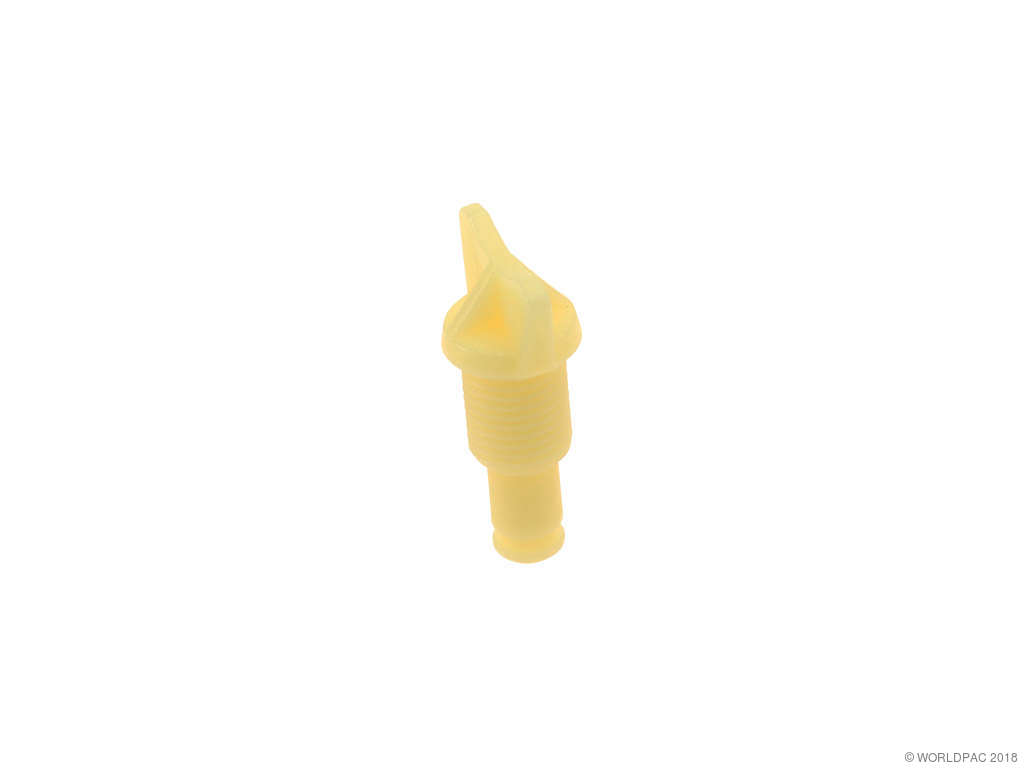
- Damper Servo Sub-Assembly, Air Conditioner Radiator, No. 2
(OEM #87106-30610)— This is the specific servo motor that fails internally, causing the B1453 code. It is the primary fix for this issue. This part number is used for multiple servo locations, so ensure it is being installed in the correct position for the B1453 code (driver side cool air mix).
Trusted brands: Lexus (OEM), Aisin
OEM price range: $170-$250
Aftermarket price range: $120-$180
Related Codes That Often Appear With This One
- B1454 — This is the code for the passenger side equivalent ('Passenger Side Air Outlet Damper COOL Control Servo Motor Circuit'). These servos are of the same design and age, so it's common for them to fail around the same time.
- B1449 — This code for the 'Rear Air Outlet Damper Control Servo Motor Circuit' is also listed in the same TSB and involves a similar component, indicating a potential pattern of failure across the HVAC system's servos.
- B1455 — This is the code for the 'Driver Side Air Outlet Damper FOOT/DEF Control Servo Motor Circuit'. It is another servo located in the same area and is known to fail, sometimes simultaneously with the B1453 servo.
Technical Service Bulletins (TSBs) & Recalls
- L-SB-0001-21 Rev: Defines code B1453 as 'Driver Side Air Outlet Damper COOL Control Servo Motor Circuit' and provides detailed repair procedures. The TSB outlines steps for diagnosis, flash reprogramming the A/C amplifier, and replacing the servo motor, which it confirms requires removing the driver's knee airbag assembly for access.
- L-SB-0019-20: A similar TSB covering 2017-2019 models, also listing B1453 as a known fault code for servo failure, showing the issue persisted in later platform mates.
Platform-Specific Known Issues
- Lexus issued Technical Service Bulletin L-SB-0001-21 Rev, which covers this exact code and issue for 2013-2017 GS models, acknowledging it as a known problem and providing detailed repair procedures.
- Lexus initiated Customer Support Program 20LE01 (also known as ZLE) due to the high failure rate. The primary coverage (expired Jan 2022) covered repairs regardless of mileage, while secondary coverage is for 7 years or 125,000 miles from the date of first use. Owners may need to be persistent with dealers, as some have reported being charged a diagnostic fee if the issue isn't confirmed to be the servo.
- Owner forums like ClubLexus have numerous threads detailing this failure, with dealership repair quotes often exceeding $1,900 and sometimes reaching over $3,000.
Mechanic-Grade Diagnostic Values
- Techstream Live Data: 'Target Pulse' vs. 'Actual Pulse' — expected: The 'Actual Pulse' value should closely track the 'Target Pulse' value as temperature settings are changed. The pulse range is typically 0 to 255.. Failure: A large and persistent discrepancy between the target and actual pulse values. For example, if the target pulse for max cold is near 0 or 152, but the actual pulse remains stuck at a different value like 63 or 254, it indicates a fault.
- Servo Motor Bench Test — expected: The motor shaft should spin when 12V and ground are applied to the two gold tabs on the motor. Reversing the polarity should cause it to spin in the opposite direction.. Failure: The motor does not spin in one or both directions when power is applied.
Hidden / Shadow Codes Worth Checking
- B1497 / B149A: These codes indicate a LIN bus communication error between the A/C amplifier and the servo motors. If one of these codes is present alongside B1453, it could point to a wider communication circuit problem rather than just an individual servo motor failure. The TSB for this issue specifically states that if B1497 or B149A is present, the TSB procedures do not apply and further diagnosis of the communication circuit is needed. (see via A professional scan tool like Toyota Techstream that can read manufacturer-specific Body (B) codes.)
Scan Tool Commands That Help
- Toyota Techstream: Utility: Servomotor Initialization — This function should be performed after replacing any HVAC servo motor, after disconnecting the vehicle battery, or as a first diagnostic step. It forces the A/C amplifier to relearn the end-point travel of all servo motors. This can sometimes resolve issues caused by lost calibration without part replacement and is a required final step after a new motor is installed.
- Toyota Techstream: Active Test: AC Damper Servo Operation — This allows a technician to command a specific servo motor, such as the 'Driver Side Cool A/M Servo', to move to a desired position while observing its response in the live data list (comparing target pulse vs. actual pulse). This is the primary method to confirm if a specific servo is non-responsive.
- Toyota Techstream: Utility: AC Damper Servo Operation Check Tool — Referenced in TSB L-SB-0001-21, this is a special utility that runs an 8-14 minute 'cleaning process' to cycle the servos through their full range of motion. It's intended to be used after a software reflash of the A/C amplifier to confirm operation or potentially free a lightly stuck motor.
Wiring & Ground Locations
- B1453 Servo Connector — On the driver's side of the central HVAC unit, deep in the dashboard. It is specifically identified by its BLUE electrical connector, which helps differentiate it from other nearby servos.. This is the direct connection point for the faulty motor. Checking for power, ground, and signal here is a key diagnostic step. A loose connection or damaged wire at this specific connector will cause code B1453.
- Ground Point J1 — Located in the left kick panel area.. This is a primary ground point for the instrument panel wiring harness. A poor or corroded connection at J1 could cause intermittent electrical issues for multiple components in the driver's side dash, potentially including the A/C servo motor circuit.
- Ground Point J2 — Located on the left side of the shift lever assembly.. This is another key ground point for console and dash components. While less direct than J1, an issue here could contribute to electrical noise or unstable ground references for the HVAC control system.
Real Owner Repair Stories
- Reddit user on r/LexusIS (Lexus IS (shares platform and parts with GS)) — DTC B1453 was present, causing incorrect temperature from vents.
❌ Tried (didn't work) Initial diagnosis was difficult due to the tight space.
✅ What actually fixed it The user performed a DIY replacement of the servo motor (part # 87106-30610). Key tips included: using a small ratchet with a Phillips bit, removing the screws holding the servo to its bracket (not the bracket to the A/C box), and manually aligning the flat part of the damper's protruding shaft with a hard-to-see white mark on the A/C housing before installing the new servo. The repair was completed by performing a servo re-initialization. - ClubLexus user 'JNP1227' (2015 Lexus GS) — Incorrect air temperature with A/C off. The user felt the air was not at the correct ambient temperature.
❌ Tried (didn't work) Explaining the issue to dealership service advisors, who were initially dismissive and stated the air 'felt normal'.
✅ What actually fixed it A technician connected a diagnostic computer and found three stored codes: B1453, B1454, and B1455. Once the codes were found, the dealership acknowledged the issue and replaced the corresponding servo motors under warranty, which resolved the problem. This highlights that codes can be stored without a Check Engine Light and are critical for diagnosis.
When the Usual Fixes Don't Work
- While part replacement is the ultimate fix, some owners and even TSBs suggest that a 'Servo Motor Initialization' or a 'Servo Cleaning Process' performed with a scan tool can sometimes restore function, at least temporarily. One YouTube video demonstrated a non-scanner reset procedure for a Lexus ES by holding the 'AUTO' and 'Recirculate' buttons simultaneously for 5 seconds with the ignition on, then cycling the ignition. While this may not apply to all models, it suggests that a system reset can sometimes be a temporary fix for a stuck servo, differentiating it from one that has completely failed electrically.
OEM Part Supersession History
87106-30610→None found / Discontinued— Part lifecycle update.
Heads up: Multiple OEM parts suppliers list this part number as discontinued. This may indicate that remaining inventory is the only source and a superseding part number might exist but is not listed in public catalogs. Buyers should verify availability before starting work.
Helpful Videos

Used OEM Parts in Stock
New Aftermarket Parts Available

The information in this article is provided for general reference and educational purposes only. Vehicle specifications, procedures, and part compatibility can vary by production date, trim level, and region. Always consult your vehicle's factory service manual and verify part numbers before purchasing or performing repairs. Safety-critical components such as airbags, seat belts, and braking systems should be installed by a qualified professional.
- Lexus GS HYBRID:
- 🧭 Diagnostic Flowchart
- 🎬 Helpful Videos
- 🛍️ Shop This Part
- What's Unique About the 2013-2017 Lexus GS HYBRID
- Symptoms You May Notice
- Most Likely Causes
- Diagnosis Steps
- Parts You'll Likely Need
- Related Codes That Often Appear With This One
- Technical Service Bulletins (TSBs) & Recalls
- Platform-Specific Known Issues
- Mechanic-Grade Diagnostic Values
- Hidden / Shadow Codes Worth Checking
- Scan Tool Commands That Help
- Wiring & Ground Locations
- Real Owner Repair Stories
- When the Usual Fixes Don't Work
- OEM Part Supersession History
- 🎟️ Get 5% Off