
OBD-II Code B1520: Hood Switch Circuit Open
What B1520 means, why it triggers, and how to fix it
- Code B1520 indicates an open circuit in the hood switch, which disables remote start and triggers false car alarms.
- A faulty hood switch causes a constant 200-300mA parasitic battery drain, killing a healthy battery in 2 to 4 days.
- Replacing the hood latch assembly resolves this code in 80% of cases and typically costs between $150 and $350 for parts and labor.
- Bypassing the switch with a paperclip on the harness connector instantly confirms if the switch has failed or if the wiring is damaged.
What Does B1520 Mean?
Code B1520 means the Body Control Module (BCM) detects an open circuit in the hood switch. The computer cannot verify if the hood is closed because the electrical signal from the sensor is lost. The system expects a complete circuit (usually a path to ground) when the hood shuts; this code triggers when that circuit breaks.
Technical definition: The official SAE/OBD-II definition for code B1520 is "Hood Switch Circuit Open". This indicates that the Body Control Module (BCM), Smart Junction Box (SJB), or another control module has detected a loss of continuity in the electrical circuit for the hood latch sensor or switch. On some vehicles, this is defined as a performance code like P257D.
Can I Drive With B1520?
Yes. Driving with code B1520 is safe, but it causes persistent 'hood open' warnings, false car alarms, and disables remote start or engine auto stop/start. Critically, a faulty switch prevents the vehicle's computers from entering sleep mode, causing a constant 200-300 milliamp power draw (normal is <85mA). This drains a healthy battery in 2 to 4 days, leaving you stranded.
Common Causes
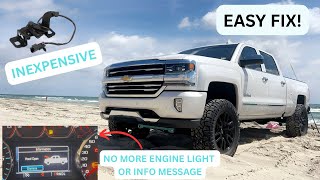
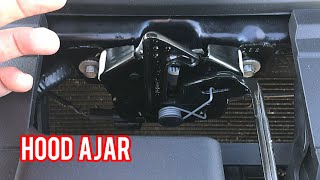
- Faulty Hood Latch Switch/Sensor (Very Common) — The switch itself, often integrated into the hood latch assembly 🎬 Watch: Silverado and Sierra hood latch replacement and diagnosis walkthrough, is the most frequent point of failure. These mechanical switches wear out, break, or get stuck from dirt, rust, and moisture.
- Corroded or Loose Electrical Connector (Common) — The connector for the hood switch becomes loose or corroded due to moisture and vibration, especially on vehicles where it is exposed to road spray. A poor connection at this point interrupts the signal and triggers the code.
- Damaged or Corroded Wiring (Common) — The wires leading to the hood latch sensor are located in the engine bay, where they are exposed to heat and the elements. This causes the insulation to become brittle and break, or the wires to corrode and fail, creating an open circuit.
- Misaligned Hood Latch (Less Common) — If the hood or the latch assembly is physically misaligned (often after minor front-end damage), it fails to properly depress the switch plunger when closed. This prevents the switch from completing the circuit, making the computer think the hood is always open.
- Poorly Installed Aftermarket Accessories (Less Common) — Aftermarket remote starters or alarms that are not installed correctly cause this code. If the installer improperly tapped into or damaged the hood switch circuit, it creates a permanent open that the BCM detects.
- Fluid Contamination in Harness (Rare) — In unusual cases, fluids like coolant leak into a connector and 'wick' or travel up the wiring harness, causing corrosion and opens (or shorts) in completely different circuits. GM notes this happens where a leaking coolant temp sensor causes issues in the hood switch circuit at the ECU connector.
- Blown Fuse (Rare) — A blown fuse for the circuit that the hood switch is on causes this code. However, this triggers other electrical issues as well, as the switch is often on a shared circuit.
- Faulty Body Control Module (BCM) (Very Rare) — In very rare cases, the problem is with the Body Control Module itself. The BCM is the computer that receives the signal from the switch, and it fails internally. This is only considered after all other possibilities—switch, wiring, and connectors—have been thoroughly ruled out.
Symptoms
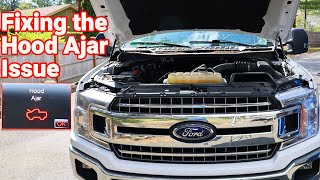
- 'Hood Ajar' or 'Hood Open' Warning Light on Dash — The most common symptom is a persistent warning message on your instrument cluster, even when the hood is firmly closed.
- Remote Start System Inoperative — As a safety feature, most vehicles disable the remote start if the computer thinks the hood is open.
- Car Alarm Triggers Randomly or Won't Arm Properly — The security system uses the hood switch to detect tampering. A faulty switch triggers the alarm randomly or prevents arming. On some cars, the horn refuses to chirp or lights fail to flash to confirm locking.
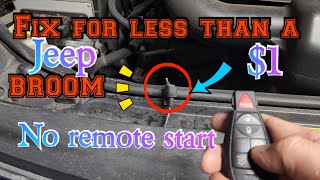
- Engine Stop/Start System Disabled — On many modern vehicles, the automatic engine stop/start feature is disabled for safety if a hood-open signal is detected. This is a very common symptom on newer Jeep and Subaru models. 🎬 See how a faulty hood switch disables Jeep Stop/Start systems
- Parasitic Battery Drain — A faulty switch prevents the vehicle's modules from entering 'sleep mode,' causing a persistent electrical draw that drains the battery in a matter of days.
- Other Warning Lights (e.g., 'Low Oil Level') — On some vehicles like Audi and VW, the system requires the hood to be opened and closed to reset certain warnings, like the 'Low Oil Level' light after an oil top-off. If the switch is faulty, the light stays on even after adding oil because the car never registered the hood being opened.
Diagnostic Flowchart
Tap your situation to follow the diagnostic path that matches what you're seeing on this code.
Common Fixes & Costs
- Replace Hood Latch Assembly (with integrated sensor) — Parts: $50 - $250, Labor: $100 - $300, ~1.2 hr book time (DIY)
- Clean Connectors and/or Repair Wiring — Parts: $5 - $20, Labor: $100 - $250, ~1.5 hr book time (Intermediate)
- Replace Standalone Hood Switch — Parts: $15 - $60, Labor: $50 - $125, ~0.7 hr book time (DIY)
- Adjust Hood and Latch Alignment — Parts: $0, Labor: $50 - $150, ~0.8 hr book time (Intermediate)
- Bypass the Sensor (Not Recommended) — Parts: $1 - $5, Labor: $0 - $50, ~0.2 hr book time (Intermediate)
Used vs. New Parts: Buying Guide
When a used part is worth it: A used hood latch assembly is a cost-effective option for older, higher-mileage vehicles (over 150k miles) where the cost of a new OEM part is a significant portion of the car's value.
Donor-vehicle mileage cap: roughly under 80000 miles for the part to have meaningful remaining life.
Donor quality checklist:
- Verify the donor vehicle has low mileage.
- Avoid parts from vehicles in rust-belt states, as corrosion is a primary cause of failure.
- Match the part number exactly, as variations for features like remote start are common.
- Inspect the used part for signs of excessive rust or physical damage before purchase.
Decision logic:
- If Vehicle is under 8 years old or has low mileage (<80k) → Buy a new OEM or high-quality aftermarket part. The longevity outweighs the minor cost savings of a used part.
- If Vehicle is over 10 years old and budget is the main concern → A used part from a low-mileage, non-rust-belt donor is an acceptable risk.
- If A quality aftermarket part with a lifetime warranty is available → Favor the new aftermarket part over used, as it corrects original design flaws and eliminates risk.
Warranty tradeoff: Used parts typically offer a 30-90 day warranty. New aftermarket parts range from 1-year to a lifetime warranty. New OEM parts carry a 12-month/12,000-mile warranty.
Worst-case if a used part fails: $200 - $400 if a used part fails prematurely, requiring repeat labor costs plus the cost of another replacement part.
What Happens If You Wait — Timeline
- 0-1 week: Code B1520 is set. The 'Hood Ajar' warning light appears on the dashboard. Remote start and Auto Stop/Start systems are disabled as a safety precaution. The car alarm fails to arm correctly or triggers falsely. (MPG impact: 0%% · Added cost: $0)
- 3-14 days: The faulty switch prevents the Body Control Module (BCM) from entering 'sleep mode', causing a parasitic battery drain of 200-300mA. The car becomes difficult to start after being parked for 2-4 days. (MPG impact: 0%% · Added cost: $150 - $350 (Cost of a new battery and potential tow/jump start service after the original battery is prematurely destroyed by repeated deep discharging).)
- 1-3 months: Continued battery drain and jump-starting puts extra strain on the alternator. The owner experiences significant inconvenience, being unable to rely on the vehicle starting and having key features disabled. The security of the vehicle is compromised as the alarm system is not functioning properly. (MPG impact: 0%% · Added cost: $350 - $700 (Potential cost of alternator replacement in addition to the new battery if the strain from frequent charging causes it to fail).)
- 3+ months: The underlying mechanical latch mechanism, if seized from corrosion, worsens. In states with vehicle safety inspections (like New York), a hood that does not latch and secure properly is an automatic failure, preventing registration renewal. (MPG impact: 0%% · Added cost: $50 - $200+ (Cost of failed inspection, re-inspection fees, or potential fines, in addition to all previously mentioned repair costs).)
Cost of Not Fixing It
- Immediate (0-1 week): Annoying 'Hood Ajar' warning, disabled remote start/auto start-stop, and potential car alarm malfunctions. (Added cost: Negligible)
- 1-4 weeks: Parasitic battery drain prevents the car from starting, requiring a jump start or a new battery. (Added cost: $150 - $350 (for a new battery and installation))
- 1+ months: Continued inconvenience and potential for a failed state safety inspection due to a non-functional hood latch, leading to fines or inability to renew registration. (Added cost: $50 - $200+ (in fines or re-inspection fees))
Diagnosis Steps
- Visually Inspect the Hood Latch Area
Open the hood and locate the latch assembly. Look for the hood switch, which is often a small plunger-style switch or integrated into the latch itself. Check for obvious signs of damage, dirt, or debris that prevents the switch from working. Also, inspect the wiring harness connected to it for any visible breaks, burns, or corrosion.
Tools: Flashlight (Beginner) - Check the Electrical Connector
Disconnect the electrical connector from the hood latch sensor. Inspect the pins on both the sensor and the connector for corrosion (green or white powder). Clean any corrosion found with a small brush and electrical contact cleaner. Apply a small amount of dielectric grease before reconnecting to prevent future moisture intrusion. Reconnect it firmly and clear the codes to see if the problem is resolved.
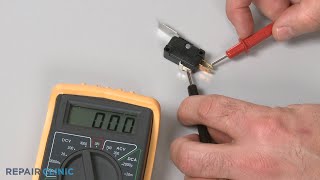
Tools: Electrical contact cleaner, Small brush, Dielectric grease (Beginner) - Test the Wiring by Bypassing the Switch
If the connector is clean, test the wiring. Use a jumper wire or a paperclip on the harness-side connector to 'bypass' the switch, connecting the signal and ground terminals together. This simulates a closed hood. If jumping the terminals makes the 'hood open' light go away, it confirms the wiring from the connector to the BCM is good, and the fault is isolated to the switch itself. If the light stays on, you have an open circuit somewhere in the wiring between the connector and the BCM.
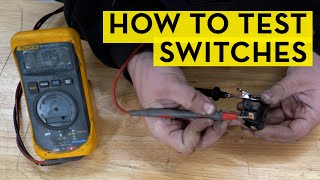
Tools: Jumper wire or paperclip (Intermediate) - Test the Switch with a Multimeter (Resistance)
Set a multimeter to the resistance (Ohms) setting. Disconnect the sensor and place the multimeter probes on the sensor's electrical pins. Manually operate the switch plunger or latch mechanism. A simple switch shows a change from an open circuit (OL or infinite resistance) to a closed circuit (less than 10 Ohms). Some vehicles use resistor-based switches; for example, a GM switch reads 1k Ohm when open and 500 Ohms when closed. If the reading is stuck at OL (Open Loop), the switch has an internal open and is bad.
Tools: Multimeter (Intermediate) - Clean and Lubricate the Latch and Switch
Sometimes the mechanism is simply stuck. Spray the latch assembly and the switch plunger with electrical contact cleaner to remove dirt and grime. Follow up with a light lubricant like white lithium grease on the mechanical parts of the latch. Actuate the switch manually a few times to ensure it moves freely.
Tools: Electrical contact cleaner, Lubricant, Wire brush (Beginner) - Check Scan Tool Live Data (Pro Tip)
Using a bidirectional scan tool, navigate to the Body Control Module (BCM) data stream. Look for a PID (Parameter ID) labeled 'Hood Ajar Switch', 'Hood Switch Status', or similar. This PID changes state from 'Open' to 'Closed' (or 'Ajar' to 'Not Ajar') as you manually operate the latch mechanism. If the PID is stuck in the 'Open' state regardless of the switch's physical position, it confirms the BCM is seeing the open circuit. This is a powerful way to verify the BCM's perspective without any electrical testing.
Tools: Bidirectional Scan Tool (Advanced) - Check for Reference Voltage
Turn the ignition on (engine off). Disconnect the hood switch connector. Set your multimeter to DC Volts. Connect the black probe to a known good ground (like the negative battery terminal). Use the red probe to test each pin in the harness-side connector. One wire has a reference voltage, typically 5V or 12V. If there is no voltage, there is an open in the power or signal wire leading from the BCM. If you have voltage, the issue is likely in the ground side of the circuit.
Tools: Multimeter (Advanced) - Check for Related Fuses
Consult your owner's manual or a fuse diagram for your vehicle to identify any fuses related to the Body Control Module or security system. Visually inspect the identified fuse to see if it is blown and replace it if necessary.
Tools: Owner's manual, Fuse puller or needle-nose pliers (Beginner) - Analyze with an Oscilloscope
Connect a lab scope's signal lead to the switch's signal wire and the ground lead to chassis ground. With the hood open, you see a steady voltage (e.g., 5V). When you close the hood, this voltage drops to near 0V. A waveform that is stuck high and never drops when the hood is closed confirms an open circuit in the switch or ground path. A waveform that is stuck at 0V indicates a short, not an open.
Tools: Oscilloscope (Advanced)
When This Code Triggers (Freeze-Frame Conditions)
- Module Voltage: 11.5-12.5V (Key On, Engine Off)
- Ignition Status: ON (The code is often set during a self-test immediately after the ignition is turned on.)
- Odometer: N/A (Records the mileage at which the fault occurred.)
- Vehicle Speed: 0 mph (Fault is typically detected when the vehicle is stationary, as the BCM performs checks at key-on.)
Related Codes
- P257D / P257F — This code means 'Engine Hood Switch Circuit High' or 'Performance' and is functionally identical to B1520. It indicates the computer is seeing an abnormally high voltage (often from an open circuit), pointing to the same root problem. The diagnostic process is the same.
- P257E — This code means 'Engine Hood Switch Circuit Low,' which points to a short-to-ground in the circuit rather than an open. To tell them apart: with a multimeter, P257E shows continuity to ground on the signal wire at all times, while B1520 shows no continuity to ground at all times.
- P152E — This is a manufacturer-specific code (common on Jeep/Chrysler/Dodge) for 'Engine Hood Switch 2 Circuit High,' often referring to a secondary plunger switch used for the stop/start system. It points directly to a fault in the same system and is often covered by the same TSBs as the primary switch.
- B1527 — This highlights the importance of vehicle-specific definitions. On a Mitsubishi, B1527 indicates a fault with the driver's side seat belt switch, while B1520 is for the passenger's side. On other makes, it relates to a different body circuit entirely. Always verify the code definition for your exact vehicle.
Climate & Environmental Factors
- Cold Weather / Freezing Conditions: Moisture inside the latch mechanism freezes, preventing the mechanical parts from moving correctly. This causes the switch to get stuck in the open or closed position, or prevents the hood from latching securely at all.
- Road Salt / High Humidity: Exposure to road salt in winter climates or high humidity in coastal regions drastically accelerates corrosion of the latch's mechanical components and electrical switch contacts. This corrosion increases friction, causes parts to seize, and degrades electrical connections, leading to an open circuit.
How to Talk to a Mechanic About This Code
Say this: "I have a 'Hood Ajar' warning and a B1520 code. My remote start also isn't working. I'd like to schedule a diagnosis. Can you please check the hood latch switch, its connector, and the wiring for an open circuit? I'd like to confirm the switch has failed before replacing the whole latch assembly."
This signals you've done your research and guides the technician to the most likely cause. It shows you understand the common failure points (switch, connector, wiring) and requests a specific diagnostic test (confirming switch failure) before authorizing a part replacement, which prevents unnecessary costs.
Avoid saying:
- 'My hood light is on, can you fix it?' (Too vague, invites a lengthy and potentially expensive diagnostic process).
- 'My car alarm keeps going off randomly.' (This is a symptom, but not the root cause; providing the code is more direct).
- 'Just replace the hood sensor.' (The problem could be the wiring or connector, not the sensor itself).
Questions to ask before authorizing the repair:
- Did you test the switch directly? Does it show an open circuit on a multimeter?
- Did you check for voltage at the connector to confirm the wiring to the BCM is good?
- Can you show me the old part and point out the failure?
- Is the replacement part an OEM or aftermarket part, and what is the warranty on the part and your labor?
Where to Take It: Dealer vs Independent vs Chain
- Dealer:
Recommended only if your vehicle is under warranty or has a specific TSB that an independent shop might not be aware of. Otherwise, it is not cost-effective.
Best for: Vehicles under warranty., Vehicles with a known TSB (Technical Service Bulletin) for this issue (e.g., certain Jeep, Subaru, GM models)., Complex cases where a BCM software update is required alongside the repair.
Downsides: Highest labor rates, often 1.5-2x more than independent shops., Defaults to replacing the entire latch assembly even if a simpler fix (like cleaning a connector) is possible. (Typical cost: +50% vs. baseline) - Independent Shop:
Best fit for the majority of cases. This is a common and straightforward repair that any competent independent mechanic handles efficiently and affordably.
Best for: Most out-of-warranty vehicles., Straightforward diagnosis and replacement of the hood latch assembly or wiring repair., Cost-conscious owners.
Downsides: Quality varies greatly; it is important to choose a shop with good reviews and ASE-certified technicians., Lacks immediate access to very new or brand-specific TSBs. (Typical cost: +0% vs. baseline) - Chain Shop:
AVOID. This repair requires electrical diagnosis (reading B-codes, testing circuits) that is beyond the scope and training of a typical chain shop technician. The risk of misdiagnosis or unnecessary part replacement is high.
Best for: Simple, routine maintenance like oil changes or tire rotations.
Downsides: Technician skill varies dramatically., Lacks the specific diagnostic tools to read B-codes or troubleshoot electrical circuits effectively., High pressure to upsell services; suggests unnecessary repairs. (Typical cost: -10% vs. baseline)
When to Walk Away From the Repair
If the estimated repair cost exceeds 40-50% of the car's private-party value (e.g., from Kelley Blue Book), you should pause and consider alternatives.
- Car worth $15000, fix is $250: Fix it. The repair cost is a very small fraction of the vehicle's value and restores important safety and convenience features.
- Car worth $2500, fix is $250: Fix it. Even on an older car, this repair is relatively cheap and prevents major annoyances like a dead battery, making it a worthwhile investment.
- Car worth $1000, fix is $250: Borderline. If the car has other significant issues, this might not be worth fixing. If this is the only problem, fixing it makes the car more reliable and easier to sell.
What Scan Tool You Need for This Code
Minimum: A scanner that reads 'B' (Body) trouble codes and, ideally, views live data from the Body Control Module (BCM).
The cheapest $20 code readers only read generic 'P' (Powertrain) codes and completely miss a B1520 code. You need a tool that communicates with the BCM to see the code and confirm the fix.
Budget: BlueDriver Pro or Autel AP200 (~$60-120) — These Bluetooth dongles pair with your smartphone and read codes from all modules, including the BCM. They also show live data, allowing you to see the 'Hood Switch' status change in real-time, which is invaluable for diagnosis.
Mid-range: Foxwell NT510 Elite or Autel MD808 Pro (~$150-250) — These are dedicated handheld units that offer full-system diagnostics, including reading BCM codes and live data. They are faster and more reliable than some app-based solutions and don't require a smartphone. The MD808 Pro is often cited as a great value for its comprehensive module access.
Professional: Autel MaxiCOM MK808 / MK906BT (~$500-1200) — Provides full bidirectional control, allowing you to command modules and test components directly from the scanner. While overkill for just reading a B1520 code, it is the standard for professional diagnosis and troubleshooting complex electrical issues.
Rent vs buy: Many auto parts stores (like AutoZone) offer free code scanning, but their tools may not read B-codes. Call ahead to check. For this specific code, buying a budget-pick scanner for under $100 is a smart investment, as it empowers you to diagnose this and many other non-engine-related issues in the future.
How to Clear the Code After You Fix It
- Use an OBD-II scan tool to clear the code from the Body Control Module (BCM).
- Cycle the ignition off, then on.
- Open and close the hood to confirm the 'Hood Ajar' message disappears.
Drive cycle (~5 minutes): After clearing the code, a formal drive cycle is not usually required. Simply cycling the ignition and operating the hood latch is sufficient for the BCM to re-evaluate the circuit and confirm the fix.
Readiness monitors affected: None
Watch out for:
- Simply clearing the code without replacing the faulty switch or repairing the wiring causes the code to return immediately.
- Disconnecting the battery clears the code but also resets radio presets, clock, and other learned settings.
Will This Fail Emissions / State Inspection?
No — by itself this code doesn't fail OBD inspection (but it can keep readiness monitors from setting, which causes a separate fail).
- California: A B1520 code will NOT cause a failure in the OBD-II portion of the Smog Check, which focuses on emissions-related 'P' codes and the Check Engine Light. However, a latch that is mechanically broken and fails to secure the hood potentially fails a visual safety inspection.
- New York: This code will not fail the OBDII emissions inspection. However, New York performs a separate, comprehensive safety inspection which includes checking that the hood latch operates correctly. A broken or non-functional latch fails the safety inspection, preventing you from getting a valid sticker.
- Texas: In counties requiring inspection, the test includes both an OBDII emissions scan and a safety inspection. The B1520 code itself will not fail the emissions scan, but the underlying mechanical problem (a hood that won't close securely) fails the safety portion of the test.
Most Commonly Affected Vehicles
- Chevrolet/GMC Silverado, Sierra, Tahoe, Suburban, Corvette (C8) (2014-2022) — These trucks are known for premature failure of the hood latch sensor. The C8 Corvette has a TSB (21-NA-094) for water intrusion into the switch connector (X103) or the latch actuator itself, causing a 'Hood Ajar' message.
- Jeep Compass, Grand Cherokee, Wagoneer (2017-2023) — These models have Technical Service Bulletins (e.g., TSB 08-186-22) for faulty hood ajar switches that cause the stop/start system to become inoperative and trigger related codes like P152E. Sometimes a BCM software update is also required to resolve related electrical gremlins.
- Ford F-150, Escape, Focus, Flex (2015-2020) — The 2015-2020 F-150 generation is commonly affected. While the hood switch is a known issue, these models also had recalls for door latches that failed in freezing temperatures, indicating a pattern of latch-related vulnerabilities.
- Subaru Forester, Crosstrek, Outback (2019-2021) — TSB 07-191-21 was issued for 2019-21 Foresters due to corrosion in the micro-switch, which disables the Auto Start-Stop system. The redesigned part is 57310SJ032. Repair costs for a latch replacement are around $140-$180.
- Volkswagen / Audi Jetta, Golf, A4 (2011-2018) — Commonly affected, with a hood latch assembly replacement costing around $200 - $275 for a Jetta. This fault also prevents the oil level warning from resetting after an oil top-up.
- Hyundai / Kia Elantra, Sonata, Optima (2016-2022) — Owners report the plunger switch getting stuck, causing a persistent 'Hood Open' warning. Sometimes this is temporarily fixed by lubricating the switch, but replacement is often necessary.
- Volvo S60, XC60, XC90 (2003-2016) — These models experience the code, often due to corrosion. Replacement of the latch assembly is more expensive than domestic brands, with estimates for an S60 running from $440 - $530 (parts & labor).
- Land Rover Discovery, Range Rover Sport, LR3/LR4 (2005-2016) — These vehicles are prone to corrosion in the hood switch connector due to its location, leading to intermittent or permanent faults.
- Mazda 3, 6, CX-5 (2008-2018) — This code is frequently reported on various Mazda models, typically due to a failed switch within the latch assembly.
Manufacturer-Specific Notes
- : A leaking Engine Coolant Temperature (ECT) sensor causes coolant to travel up the wiring harness and contaminate the Engine Control Module (ECM) connector. This shorts the hood switch circuit pins, triggering a P257D or B1520 code even though the hood switch and its immediate wiring are perfectly fine.
- : On many VW and Audi models, the 'Low Oil Level' warning light is only reset by opening and closing the hood. If the hood switch is faulty, the car never registers that the hood was opened to add oil, so the warning light stays on indefinitely, confusing the owner.
- : The primary reason this code is addressed on modern Jeeps is its direct link to the Engine Stop/Start system. A faulty hood switch is a top cause for the 'Stop/Start Unavailable' message, which many drivers find more annoying than the 'Hood Ajar' warning itself.
- : On many Honda vehicles, the security system and Body Control Module (BCM) will not enter 'sleep mode' if the hood is detected as open. A faulty switch causes a parasitic draw of over 200mA, significantly higher than the typical <50mA sleep current, leading to a dead battery in a few days.
Real Owner Stories
2018 Ford F-150 with random alarm and 'Hood Ajar' message
The truck's alarm started going off randomly, including in the middle of the night. The dash displayed a 'Hood Ajar' warning even though the hood was securely closed.
What they tried:
- Initially tried cleaning and lubricating the latch with spray lube, which didn't solve the intermittent issue.
- Verified the problem by using a jumper wire on the sensor's electrical connector; the 'Hood Ajar' light went off, confirming the wiring was good and the switch was the problem.
- Tested the old switch with a multimeter and confirmed it had an open circuit (OL) even when the latch was manually closed.
Outcome: Replaced the entire hood latch assembly, which includes the integrated switch. The owner purchased the part for $131 and replaced it themselves in under 30 minutes. The random alarms and warning messages were completely resolved.
Lesson: For many modern vehicles like the F-150, the switch is part of the latch assembly and not sold separately. Jumping the connector is a fast and definitive way to confirm the switch has failed before buying parts.
2016 Honda CR-V with a battery that dies in 1-2 days
The vehicle would not start after being parked for a couple of days. The battery tested good, pointing towards a parasitic electrical drain.
What they tried:
- Owner suspected the HandsFreeLink/Bluetooth module, a common source of parasitic drain on older Hondas, but pulling the radio fuse didn't solve the problem.
- A parasitic draw test revealed a high draw of over 1 amp that eventually settled but remained far above the normal <50mA.
- By pulling fuses one by one, the draw was traced to the circuit protected by the 'Back Up' fuse, which powers multiple components including the security system and hood latch switch.
Outcome: The root cause was a faulty hood latch switch that prevented the BCM and related modules from entering sleep mode. Replacing the hood latch assembly resolved the parasitic drain.
Lesson: A parasitic drain is a top symptom of a bad hood switch. When performing a draw test, you must manually close the hood latch (e.g., with a screwdriver) to allow the vehicle's modules to fully go to sleep for an accurate reading.
2019 Subaru Forester with 'Auto Start-Stop Disabled'
The primary complaint was that the Auto Start-Stop system stopped working, and the associated warning light came on. The remote start also refused to function. This was accompanied by a DTC P257E (Engine Hood Switch Circuit Low), which is closely related to B1520.
What they tried:
- The owner took the vehicle to the dealer, referencing Subaru TSB 07-191-21.
- The dealer confirmed the fault was due to corrosion inside the hood latch's micro-switch, a known issue in regions with heavy road salt use.
Outcome: The dealer replaced the original hood latch assembly with the redesigned part (p/n 57310SJ032) as specified in the service bulletin. This resolved the Start-Stop issue and the trouble code.
Lesson: On many modern cars (especially Subaru and Jeep), the first noticeable symptom of a hood switch failure isn't a 'Hood Ajar' light, but the disabling of the Auto Start-Stop system. Always check for TSBs related to your specific symptoms.
How to Prevent This Code From Triggering
- Clean and Lubricate Latch Mechanism (Every 6-12 months, or during oil changes.) — Dirt, road grime, and debris build up in the latch, causing the mechanical parts to bind or stick. This puts stress on the integrated switch and prevents it from actuating properly. Use a brush and cleaner to remove gunk, then apply a silicone or white lithium grease to moving parts.
- Apply Dielectric Grease to the Electrical Connector (Once, or whenever the connector is disconnected.) — The connector is in a vulnerable location exposed to moisture. Dielectric grease is a non-conductive, silicone-based compound that seals the connection, preventing water and salt from corroding the metal pins, which is a direct cause of an open circuit.
- Inspect Wiring Harness Regularly (During routine under-hood checks.) — Engine bay heat makes wire insulation brittle over time. Visually check the wires leading to the latch for cracks, chafing against sharp edges, or signs of rodent damage. Catching a damaged wire early prevents an intermittent open circuit from developing.
- Avoid Slamming the Hood (Daily habit.) — Slamming the hood damages the delicate micro-switch inside the latch assembly and knocks the latch itself out of alignment over time. Close the hood by lowering it to the latch and then applying firm, even pressure with both hands to engage it.
Frequently Asked Questions
Why does my scanner define B1520 as an airbag code?
This is a critical point of misdiagnosis. Some generic scan tool databases incorrectly associate B1520 with an airbag circuit. While true for a few models (like Mitsubishi), for the vast majority of cars, B1520 refers to the Hood Switch Circuit Open.
Can a bad hood latch sensor drain my battery?
Yes, absolutely. A faulty hood sensor prevents the vehicle's computer systems from going into 'sleep mode' because it thinks a door is open. This constant activity creates a parasitic draw that drains a healthy battery over a few days.
How much parasitic drain can a bad hood switch cause?
Normal parasitic draw for a modern vehicle is under 85 milliamps (mA). With a faulty hood switch preventing sleep mode, the draw sticks at 200-300mA. This constant draw drains 6 Amp-hours daily, killing a battery in two to three days.
Can I just bypass the hood latch sensor?
Yes, you can physically bypass the sensor using a jumper wire to permanently close the circuit. However, this disables key safety and security features, including the alarm's hood-tamper sensor and the remote start safety interlock. We strongly advise against permanent bypassing.
My hood is closed, but a 'Low Oil Level' warning won't go away. Could this be related?
Yes, particularly on Volkswagen and Audi vehicles. The system requires seeing the hood open and close via the switch to reset maintenance reminders, including the oil level warning. If the switch fails, the car never gets the reset signal, keeping the warning light on.
Can a weak battery cause a B1520 code?
Yes, though it is not the most common cause. Body Control Modules are sensitive to low voltage during engine cranking, which sometimes leads the BCM to set erroneous codes. If you have B1520 alongside slow cranking and other electrical codes, test your battery.
Where is the hood latch sensor located?
The sensor is almost always located at the front of the engine bay. It is either integrated into the main hood latch assembly or mounted as a separate plunger-style switch nearby on the radiator support.
Key Takeaways
- Code B1520 indicates an open circuit in the hood switch, which disables remote start and triggers false car alarms.
- A faulty hood switch causes a constant 200-300mA parasitic battery drain, killing a healthy battery in 2 to 4 days.
- Replacing the hood latch assembly resolves this code in 80% of cases and typically costs between $150 and $350 for parts and labor.
- Bypassing the switch with a paperclip on the harness connector instantly confirms if the switch has failed or if the wiring is damaged.
Helpful Videos


Shop the Parts Behind B1520
Below are the parts most often responsible for code B1520, ranked by how frequently each one is the actual culprit (per the diagnosis above). Tap any to see what we have for your vehicle.


The information in this article is provided for general reference and educational purposes only. Vehicle specifications, procedures, and part compatibility can vary by production date, trim level, and region. Always consult your vehicle's factory service manual and verify part numbers before purchasing or performing repairs. Safety-critical components such as airbags, seat belts, and braking systems should be installed by a qualified professional.
- 🧭 Diagnostic Flowchart
- 🎬 Helpful Videos
- 🛍️ Shop This Part
- What Does B1520 Mean?
- Can I Drive With B1520?
- Common Causes
- Symptoms
- Common Fixes & Costs
- Used vs. New Parts: Buying Guide
- What Happens If You Wait — Timeline
- Cost of Not Fixing It
- Diagnosis Steps
- When This Code Triggers (Freeze-Frame Conditions)
- Related Codes
- Climate & Environmental Factors
- How to Talk to a Mechanic About This Code
- Where to Take It: Dealer vs Independent vs Chain
- When to Walk Away From the Repair
- What Scan Tool You Need for This Code
- How to Clear the Code After You Fix It
- Will This Fail Emissions / State Inspection?
- Most Commonly Affected Vehicles
- Manufacturer-Specific Notes
- Real Owner Stories
- 2018 Ford F-150 with random alarm and 'Hood Ajar' message
- 2016 Honda CR-V with a battery that dies in 1-2 days
- 2019 Subaru Forester with 'Auto Start-Stop Disabled'
- How to Prevent This Code From Triggering
- Frequently Asked Questions
- Why does my scanner define B1520 as an airbag code?
- Can a bad hood latch sensor drain my battery?
- How much parasitic drain can a bad hood switch cause?
- Can I just bypass the hood latch sensor?
- My hood is closed, but a 'Low Oil Level' warning won't go away. Could this be related?
- Can a weak battery cause a B1520 code?
- Where is the hood latch sensor located?
- Key Takeaways
- 🎟️ Get 5% Off