
Definitive Guide to OBD-II Code B1589: Seatbelt Pretensioner & Beyond
What B1589 means on Chrysler, Dodge, and Jeep, why it triggers, and how to fix it permanently.
What Does B1589 Mean?
B1589 is a manufacturer-specific Body Diagnostic Trouble Code (DTC). On Chrysler, Dodge, Jeep, and Ram vehicles, it signifies the Occupant Restraint Controller (ORC) detected an open circuit in the driver's seatbelt pretensioner system. This system uses a pyrotechnic charge to rapidly tighten the seatbelt during a collision. Note: This code has entirely different meanings on Ford, GM, and Toyota.
Technical definition: Chrysler, Dodge, and Jeep define B1589 as "Driver Seatbelt Pretensioner #1 Squib Circuit Open". A 'squib' is the electronically-fired pyrotechnic igniter inside the pretensioner. An 'open' circuit means a physical break or high-resistance fault exists in the electrical path. The ORC sends a low-voltage diagnostic signal; if resistance exceeds the preset threshold (typically > 4.0-5.0 ohms), it flags the circuit as open.
Can I Drive With B1589?
No — Do Not Drive. No. The vehicle will drive, but this code indicates a critical fault in the Supplemental Restraint System (SRS). The SRS control module disables the entire airbag and seatbelt pretensioner system as a fail-safe. In a crash, the seatbelt will not tighten and airbags will not deploy, dramatically increasing the risk of severe or fatal injury.
Common Causes
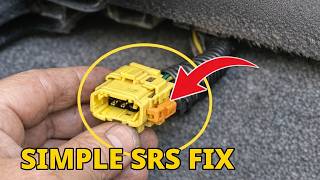
- Damaged Under-Seat Wiring or Loose Connector (Very Common) — The pretensioner wiring harness routes under the driver's seat. Seat movement, debris, or aggressive vacuuming stretches, breaks, or chafes the wires, or loosens the primary yellow connector. 🎬 Watch: How to fix the under-seat SRS connector after cleaning.
- Corroded Connector Pins (Common) — Moisture from spilled drinks, open windows, or clogged sunroof drains wicks into the under-seat connectors. This corrodes the metal pins, creating high resistance that the ORC interprets as an open circuit.
- Failed Seatbelt Pretensioner Assembly (Common) — The pretensioner unit's internal squib charge degrades and develops high resistance over time, causing a hard open circuit fault.
- Improper Accident Repair or Incorrect Part (Less Common) — If the vehicle suffered a prior collision with airbag deployment, incorrect SRS wiring repairs (like poor solder joints or wrong connectors) degrade and separate. Installing a pretensioner from a different model year also causes resistance mismatches.
- Low Battery Voltage During Self-Test (Rare) — A weak battery or failing alternator causes the SRS module to fail its initial startup self-test, storing false codes. Extreme cold exacerbates this voltage drop.
- Faulty Occupant Restraint Controller (ORC) (Rare) — The main SRS computer rarely fails in a way that isolates this specific code. Suspect the ORC only after thoroughly testing all wiring, connectors, and the pretensioner.
Symptoms
- Airbag Warning Light is On — The primary symptom. The red airbag light illuminates continuously on the dashboard while the engine is running.
- Failed State Safety Inspection — Any active airbag or SRS warning light on the dashboard results in an automatic failure for state vehicle safety inspections.
- Seatbelt Light Flashing — On some models, the standard seatbelt reminder light flashes or stays lit even when buckled to indicate a system fault.
- Airbag System Disabled (scan-tool only — no driver-felt sign) — The ORC disables the entire SRS system to prevent unpredictable deployments. No airbags will function in an accident.
Diagnostic Flowchart
Tap your situation to follow the diagnostic path that matches what you're seeing on this code.
Common Fixes & Costs
- Secure and Re-route Under-Seat Harness — Parts: $0-$5, Labor: $0-$75, ~0.5 hr book time (Beginner)
- Repair Damaged Wiring / Replace Pigtail — Parts: $25-$75, Labor: $150-$250, ~1.5 hr book time (Intermediate)
- Rebuild/Repair Original Seatbelt Pretensioner (Mail-in Service) — Parts: $79-$99, Labor: $100-$200, ~1.5 hr book time (DIY)
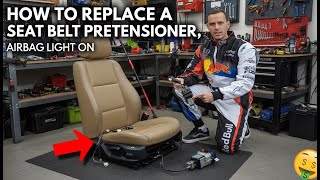
- Replace Driver's Seatbelt Pretensioner/Buckle Assembly — Parts: $150-$350, Labor: $150-$250, ~1.5 hr book time (Intermediate)
- Replace Occupant Restraint Controller (ORC) Module — Parts: $500-$1200, Labor: $250-$500, ~2.5 hr book time (Professional)
DIY vs Professional
- Secure and Re-route Under-Seat Harness — Beginner:
- Repair Damaged Wiring / Replace Pigtail — Beginner:
- Replace Driver's Seatbelt Pretensioner/Buckle Assembly — Beginner:
- Rebuild/Repair Original Seatbelt Pretensioner (Mail-in Service) — Beginner:
- Replace Occupant Restraint Controller (ORC) Module — Beginner:
Used vs. New Parts: Buying Guide
When a used part is worth it: Used OEM pretensioners from a certified auto recycler are cost-effective for older vehicles, provided the donor vehicle has a non-collision history.
Donor-vehicle mileage cap: roughly under 100000 miles for the part to have meaningful remaining life.
Donor quality checklist:
- Verify the donor vehicle was not involved in a collision, flood, or fire.
- Ensure the part number matches your original part exactly.
- Purchase only from certified recyclers who guarantee the part is a non-deployed OEM component.
- Avoid parts with any signs of corrosion or stretched wiring.
Decision logic:
- If The vehicle is under warranty or recall for the part → Use a new OEM part from the dealer for a no-cost repair.
- If The cost difference between a new OEM part and a certified used part is minimal (<$100) → Buy new for the longer warranty and guaranteed quality.
- If The vehicle is over 10 years old and budget is the primary concern → A certified used OEM part is acceptable if it passes a visual inspection and resistance test before installation.
- If You are considering a mail-in repair service → This is often the best value, retaining your vehicle's original part and ensuring a perfect fit.
Warranty tradeoff: Used parts typically come with a 30-90 day warranty. New OEM parts usually carry a 12-month/12,000-mile warranty.
Worst-case if a used part fails: $200-$400 if a used part is faulty, requiring repeat labor for removal and reinstallation.
What Happens If You Wait — Timeline
- Immediate (0 seconds): The B1589 code sets on startup, the airbag warning light illuminates, and the ORC module disables the entire SRS system (airbags and pretensioners) as a fail-safe. (MPG impact: 0%% · Added cost: $0)
- Ongoing: No progressive mechanical damage occurs. The car drives normally, but the critical safety risk of having no airbags persists indefinitely until repaired. (MPG impact: 0%% · Added cost: $0)
- First State Inspection: The vehicle automatically fails any mandatory safety inspection due to the active airbag warning light, preventing legal registration renewal. (MPG impact: 0%% · Added cost: $50-$200 in re-inspection fees and potential fines.)
- At time of sale: The vehicle's resale value drops significantly. Buyers and dealers refuse the car or offer a dramatically lower price due to the known safety defect. (MPG impact: 0%% · Added cost: $1000-$3000 in diminished resale value.)
Cost of Not Fixing It
- Immediate: The entire Supplemental Restraint System is disabled. Airbags will not deploy in a collision, drastically increasing the risk of fatal injury. (Added cost: N/A)
- First Inspection Cycle: Guaranteed failure of state-mandated vehicle safety inspections, preventing legal registration renewal. (Added cost: $50-$200 in fines and re-inspection fees.)
- Long Term: The resale value of the vehicle is significantly diminished until the safety system is properly repaired. (Added cost: Reduced vehicle resale value by $1000+.)
Diagnosis Steps
- Safety First: System De-powering
CRITICAL: Disconnect the negative battery terminal and wait 15 minutes before touching any yellow SRS connector. This discharges the ORC backup capacitors, preventing accidental airbag deployment.
Tools: Wrench or socket for battery terminal (Beginner) - Visual Inspection Under Driver's Seat
Slide the driver's seat fully back and tilt it forward. Inspect the yellow connector and wiring underneath. Look for pinched wires, disconnected plugs, or chaffing against seat brackets.
Tools: Flashlight (Beginner) - Connector Re-seating
With the battery disconnected, unplug the main yellow connector under the seat. Inspect pins for green/white corrosion. If clean, plug it back in until it clicks. Reconnect the battery and start the car to see if the light clears.
Tools: None (Beginner) - Analyze Live Data for Pretensioner Resistance
Connect an SRS-capable OBD-II scanner. View the 'Driver Pretensioner Resistance' live data. A healthy circuit reads 1.8 to 3.5 ohms. A reading above 5.0 ohms or 'OL' (Open Loop) confirms the B1589 open circuit.
Tools: Professional OBD-II Scanner with SRS Live Data (Advanced) - Live Data Wiggle Test
While viewing the live resistance data on the scanner, gently wiggle the under-seat wiring harness at various points. If the resistance jumps from normal (~2.5 ohms) to 'OL', you have pinpointed the intermittent wire break.
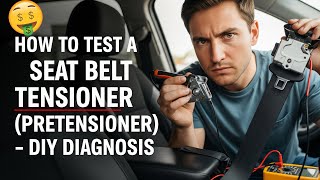
Tools: Professional OBD-II Scanner with SRS Live Data (Advanced) - Measure Pretensioner Squib Resistance
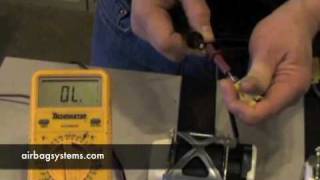
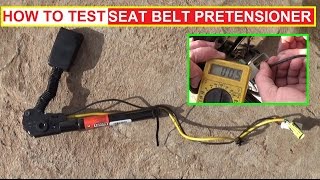
With the battery disconnected and under-seat connector unplugged, use a multimeter set to a low Ohms scale. Measure resistance across the two pins on the pretensioner side. A healthy squib reads 2.0 to 3.0 ohms. 'OL' confirms the pretensioner failed. WARNING: Never use a powered test light.
Tools: Digital Multimeter (Intermediate) - Check Wiring Harness Continuity
Disconnect the harness from the ORC module and the under-seat connector. Set the multimeter to continuity mode. Test each pretensioner wire from end to end. A lack of continuity (no beep) indicates a broken wire in the harness.
Tools: Digital Multimeter, vehicle-specific wiring diagram (Advanced)
When This Code Triggers (Freeze-Frame Conditions)
- System Status: Key-On, Engine Off or Running (The SRS module performs a self-test every time the ignition turns on. The code sets within seconds if the fault is present.)
- Battery Voltage: 11.5V - 14.5V (Normal operating voltage. A code set during a low-voltage condition points to a battery issue, not the pretensioner.)
- Ignition Cycles Since Fault: 0 or 1 (Indicates the fault was detected on the current or immediately preceding drive cycle, confirming it is an active issue.)
- Vehicle Speed: 0 mph (The fault is most often detected during the initial startup self-check before the vehicle moves.)
Climate & Environmental Factors
- High Humidity / Water Intrusion: Moisture from spills or water leaks enters the under-seat connectors. This corrodes the pins, increasing resistance and triggering the B1589 open circuit code.
- Cold Weather: Extreme cold causes electrical connectors to physically contract, creating an intermittent open circuit. It also lowers battery voltage, causing self-test failures at startup.
- Road Salt (Corrosive Environments): Salt-laden water tracked into the vehicle saturates the carpet. This highly corrosive mixture severely damages the pretensioner cable and connectors over time.
How to Talk to a Mechanic About This Code
Say this: "I have an airbag light on and my scanner shows code B1589, for an open circuit in the driver's seatbelt pretensioner. I performed a visual inspection under the seat and the connector is secure. I need a diagnosis to isolate the fault between the wiring harness and the pretensioner assembly."
This signals you understand the code's meaning. It directs the shop to perform targeted resistance tests rather than starting a broad diagnostic process or immediately quoting a costly new SRS module.
Avoid saying:
- 'My airbag light is on, can you look at it?'
- 'Just fix whatever is wrong.'
- 'I think I need a new airbag.'
Questions to ask before authorizing the repair:
- What resistance reading did you get directly from the pretensioner squib pins?
- Did you perform a continuity test on the harness between the seat connector and the ORC module?
- If the wiring needs repair, are you using dedicated, SRS-approved solder sleeves?
- Is the price quote for a new OEM part, a used part, or a rebuilt original part?
- Does the final estimate include clearing the B1589 code and confirming the airbag light stays off?
Where to Take It: Dealer vs Independent vs Chain
- Dealer:
The safest, but most expensive, option. Recommended if the vehicle is under warranty or if other shops cannot diagnose the issue.
Best for: Vehicles under warranty or with an open recall., Complex cases where the ORC module itself is suspected., Owners who prioritize guaranteed OEM parts over cost.
Downsides: Highest labor rates and part costs., Less willing to consider cost-saving options like wiring repairs or used parts. (Typical cost: +50% vs. baseline) - Independent Shop:
Best fit for most out-of-warranty repairs. Choose a shop that highlights electrical or SRS repair capabilities.
Best for: Out-of-warranty vehicles where cost is a factor., Diagnosing and repairing common wiring or connector issues.
Downsides: Shop quality varies greatly; must vet for experience with SRS systems., May lack manufacturer-specific scan tools for module programming. (Typical cost: +0% vs. baseline) - Chain Shop:
AVOID. The risk of an incorrect or unsafe repair on a pyrotechnic safety component is too high.
Best for: Simple maintenance like oil changes and tires.
Downsides: Technician skill with safety-critical SRS systems is highly inconsistent., Generally not equipped or insured for complex airbag system repairs. (Typical cost: -10% vs. baseline)
When to Walk Away From the Repair
If the estimated repair cost exceeds 40-50% of the car's private-party value, seriously consider selling the car as-is rather than repairing it.
- Car worth $4000, fix is $1700: Walk away. The repair cost is over 40% of the car's value and other age-related issues are likely.
- Car worth $12000, fix is $800: Fix it. The repair cost is well below the threshold and is critical for safety and resale value.
- Car worth $2500, fix is $900: Borderline. Get a second opinion. If the fix is a simple wiring repair for under $300, do it. If it requires a new $900 assembly, sell it.
What Scan Tool You Need for This Code
Minimum: An OBD-II scanner that reads and clears Supplemental Restraint System (SRS) codes. Standard engine-only code readers will not work.
A $20 engine code reader cannot communicate with the airbag module. It shows 'no codes' even when the airbag light is on. You need an SRS-capable tool to see B1589 and clear it post-repair.
Budget: Autel AutoLink AL619 (~$90) — Reads and clears engine, ABS, and SRS codes. It retrieves the B1589 code and turns off the light post-repair.
Mid-range: Foxwell NT604 Elite (~$150) — Reads/clears SRS codes and provides live data streams. Crucial for performing a 'wiggle test' to find intermittent wire breaks by watching resistance values in real-time.
Professional: Autel MaxiCOM MK808 (~$500) — Offers full-system diagnostics, live data graphing, and bidirectional controls. Provides dealer-level capabilities for all vehicle modules.
Rent vs buy: Auto parts stores offer free loaner tools, but their basic scanners typically do NOT read SRS codes. You must purchase your own SRS-capable scanner or pay a shop for diagnosis.
How to Clear the Code After You Fix It
- Ensure the physical repair is complete.
- Reconnect the vehicle's negative battery terminal.
- Use an SRS-capable OBD-II scan tool to access the Restraint Control Module.
- Select the option to 'Clear Fault Codes' or 'Erase DTCs'.
- Cycle the ignition off, wait 15 seconds, then turn it back on to confirm the airbag light stays off.
Drive cycle (~10 minutes): SRS codes do not require a complex drive cycle. After clearing the code, a 10-minute drive with a few key-off/key-on cycles confirms the repair. On many Chrysler/Dodge vehicles, a properly fixed fault clears the light automatically after the next startup self-test.
Readiness monitors affected: None. SRS faults do not affect engine emissions readiness monitors.
Watch out for:
- Using a basic code reader that only accesses the engine computer (ECU) and cannot read the SRS module.
- Disconnecting the battery will not clear a 'hard fault' like B1589; it must be cleared with a scanner.
- If the underlying open circuit is not fixed, the airbag light reappears within seconds of startup.
Will This Fail Emissions / State Inspection?
No — by itself this code doesn't fail OBD inspection (but it can keep readiness monitors from setting, which causes a separate fail).
- California: An airbag light will not fail the emissions portion (smog check). However, it is a safety violation and the vehicle is not considered roadworthy.
- New York: An illuminated airbag warning light is noted as an advisory during the safety inspection but is NOT a cause for failure.
- Texas: The airbag warning lamp must illuminate and turn off as intended. An illuminated airbag light results in a safety inspection failure.
Real Owner Stories
2012 Dodge Journey with kids
The airbag light illuminated suddenly. The owner has four children, resulting in high foot traffic and items shoved under the seats.
What they tried:
- The owner inspected under both front seats for loose plugs.
- Discovered a disconnected yellow connector under the driver's seat.
- Turned the vehicle off and plugged the connector back in securely.
Outcome: Upon restarting, the airbag light performed its self-check and turned off. The problem was solved at no cost.
Lesson: Always perform a visual inspection under the front seats first. Items pushed under the seat frequently disconnect the pretensioner plug.
2017 Jeep Grand Cherokee with multiple electrical issues
An airbag warning light appeared, followed by a transmission shifter fault that locked the vehicle in park.
What they tried:
- Suspecting a systemic electrical problem, the owner disassembled and cleaned the main fuse box (TIPM).
- Cleaned all surfaces with alcohol and tightened fuse pins.
- Cleaned all vehicle-side ground contacts showing corrosion.
Outcome: After reassembling the fuse box and cleaning grounds, all warning lights, including the airbag light, cleared.
Lesson: If B1589 appears alongside unrelated electrical faults, the root cause is likely a failing main power distribution center or a poor chassis ground, not the seatbelt circuit.
Dodge Ram with a collision history
The truck was purchased after a front-end collision. The airbag light was on.
What they tried:
- Checked the fuse panel and under-seat plugs, finding no issues.
- Used an OBD2 scanner to pull an open circuit code.
- Removed interior trim to inspect the SRS components and discovered the pretensioner was completely missing.
Outcome: The open circuit was due to a missing component. Installing a new pretensioner cleared the code.
Lesson: On a vehicle with an accident history, an 'open circuit' code often means a deployed component was never replaced by the previous owner.
How to Prevent This Code From Triggering
- Secure Under-Seat Wiring (Once, or after any under-seat work) — Using zip ties to secure the yellow SRS harness away from seat tracks prevents wires from being stretched or pinched, which is the #1 cause of this code.
- Avoid Storing Items Under the Seat (Daily habit) — Objects shoved under the seat catch on the wiring harness, causing it to break or disconnect. Keeping the area clear prevents physical damage.
- Apply Dielectric Grease to Connector Seals (During any connector maintenance) — Applying dielectric grease to the rubber seals of the yellow connector blocks moisture intrusion. This prevents pin corrosion. Do not pack grease onto the metal pins.
- Keep Vehicle Interior Dry (Ongoing) — Promptly clean up spills and fix water leaks. Wet carpet holds moisture against floor-mounted SRS connectors, leading to severe corrosion.
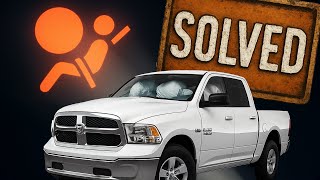
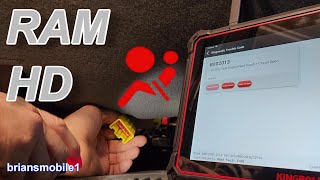
Helpful Videos

Shop the Parts Behind B1589
Below are the parts most often responsible for code B1589, ranked by how frequently each one is the actual culprit (per the diagnosis above). Tap any to see what we have for your vehicle.


The information in this article is provided for general reference and educational purposes only. Vehicle specifications, procedures, and part compatibility can vary by production date, trim level, and region. Always consult your vehicle's factory service manual and verify part numbers before purchasing or performing repairs. Safety-critical components such as airbags, seat belts, and braking systems should be installed by a qualified professional.
- 🧭 Diagnostic Flowchart
- 🎬 Helpful Videos
- 🛍️ Shop This Part
- What Does B1589 Mean?
- Can I Drive With B1589?
- Common Causes
- Symptoms
- Common Fixes & Costs
- DIY vs Professional
- Used vs. New Parts: Buying Guide
- What Happens If You Wait — Timeline
- Cost of Not Fixing It
- Diagnosis Steps
- When This Code Triggers (Freeze-Frame Conditions)
- Climate & Environmental Factors
- How to Talk to a Mechanic About This Code
- Where to Take It: Dealer vs Independent vs Chain
- When to Walk Away From the Repair
- What Scan Tool You Need for This Code
- How to Clear the Code After You Fix It
- Will This Fail Emissions / State Inspection?
- Real Owner Stories
- 2012 Dodge Journey with kids
- 2017 Jeep Grand Cherokee with multiple electrical issues
- Dodge Ram with a collision history
- How to Prevent This Code From Triggering
- 🎟️ Get 5% Off