
B1632 on 2021-2022 Jeep Gladiator: Left Headlight & Park Lamp Fault Causes and Fixes
This code almost always points to a loose ground connection (G905A) located behind the left headlight assembly. Before buying any parts, inspect and tighten this ground, as it is a known issue documented by Jeep and is a no-cost fix. The nut is an M8x1.25, typically requiring a 13mm socket.
- B1632 on a 2021-2022 Gladiator means there is a problem with the left headlight or park lamp circuit.
- The most likely cause is a loose M8x1.25 ground nut (G905A) behind the left headlight, as per a Jeep TSB. Check this first.
- This is a DIY-friendly diagnosis. The fix could be as simple as tightening a nut with a 13mm socket, costing you nothing.
- Do not replace the expensive headlight assembly until you have confirmed the ground connection is secure and clean.
- This code is often accompanied by B162A, B163A, and B16CF, all pointing to the same left front lighting area.
What's Unique About the 2021-2022 Jeep GLADIATOR
The 2021-2022 Jeep Gladiator, along with its platform-mate the 2018+ Jeep Wrangler (JL), is specifically called out in a manufacturer TSB for this issue. Unlike a generic wiring or bulb failure, the most common cause is a specific ground point, G905A, that is known to become loose from the factory. This makes diagnosis much more direct than on other vehicles where a similar code might trigger a lengthy search for the fault.
Diagnostic Flowchart
Tap your situation to follow the diagnostic path that matches what you're seeing on this vehicle.
Symptoms You May Notice
- Left headlight flickers
- Left headlight is completely inoperative
- Left park lamp (amber light) flickers
- Left park lamp is inoperative
- A 'LIGHTS OUT' or similar warning message may appear on the dash
- Error messages on the EVIC for 'Left Turn Signal' may also appear
- Replacing the headlight assembly before checking the G905A ground. The TSB strongly indicates the ground is the first place to look, and failing to do so can lead to an expensive and unnecessary repair.
Most Likely Causes
- Loose G905A Ground Connection 🔴 High Probability This is a documented issue cited in Jeep TSB #S2208000054RevA for this specific vehicle and year range. Forum and owner discussions confirm this is a widespread problem due to the nut not being properly tightened during assembly. Vibrations from normal driving cause the connection to fail over time.
How to confirm: Visually locate the G905A ground stud on the inner fender behind the left headlight housing. A wiring diagram shows this as a primary ground point for the dash harness. Check if the nut is loose by hand or with a socket. The connection should be completely tight and free of corrosion.
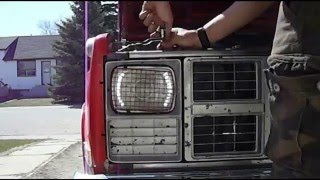
Typical fix: Tighten the M8x1.25 nut securing the ground wires to the stud, typically using a 13mm socket. 🎬 See this quick walkthrough on fixing a bad headlight ground wire For good measure, remove the nut, clean the contact surfaces of the wire eyelets and the chassis with a wire brush, then securely retighten. This is often a permanent, no-cost fix.
Est. part cost: $0 - Faulty Left Headlight Assembly 🟡 Medium Probability → Shop Headlight Assembly Modern vehicles, especially those with factory LED options, use sealed headlight units. An internal failure of the LED driver or circuitry requires replacement of the entire assembly. This should only be considered after the G905A ground is confirmed to be secure.
How to confirm: If the G905A ground is secure and the wiring/connector appear intact, but the light still doesn't work when commanded, the assembly itself is the likely failure point. Testing for power and ground at the headlight connector can confirm this. A video guide shows the pinout for bench testing: the bottom-right pin is ground, top-right is low beam positive, and bottom-left is high beam positive.
Typical fix: Replace the entire left headlight assembly.
Est. part cost: $90-$250 for aftermarket, $400+ for OEM - Damaged Wiring or Connector ⚪ Low Probability Wiring can be damaged from front-end impacts, improper installation of accessories, or chafing against other components. While less common than the ground issue, it's a possibility. A real-world case on a Gladiator showed complex electrical issues stemming from a damaged harness plug near the frame rail.
How to confirm: Visually inspect the wiring harness leading to the left headlight assembly for any signs of cuts, chafing, or melted insulation. Check the connector pins for corrosion or damage. The headlight connector is identified as a Molex MX150 type.
Typical fix: Repair the damaged section of wire or replace the connector pigtail. The 4-wire harness part number is 68414409AB.
Est. part cost: $10-$50
Rare But Worth Checking
- Faulty Body Control Module (BCM): → Shop Body Control Module This is very rare. The BCM is the computer that controls the lights. Before suspecting the BCM, all other possibilities (ground, wiring, headlight assembly) must be exhaustively ruled out, as this is an expensive and complex repair. Sometimes, if aftermarket LED lights are installed without reprogramming the BCM, it can cause flickering or codes, but this is a configuration issue, not a faulty BCM. Incorrectly connecting a battery can also damage specific BCM driver circuits, leading to isolated failures like a halo not working while the rest of the light does.
Diagnosis Steps
- Verify the symptoms: Confirm that the left headlight and/or park lamp is flickering or inoperative.
- Scan for codes: Confirm B1632 is present, and note any other accompanying lighting codes like B162A, B163A, or B16CF.
- Inspect the G905A Ground: This is the most critical step. Locate the ground stud on the chassis/inner fender, behind the left headlight assembly. It will have one or more black wires with eyelet connectors attached. Using a 13mm socket, check that the M8x1.25 nut is tight. If loose, tighten it securely and re-test the lights. This resolves the issue in the vast majority of cases.
- Clean the Ground Connection: For a robust repair, remove the nut, clean the wire eyelets and the chassis contact point with a wire brush to ensure a clean metal-to-metal connection, then retighten.
- Inspect the Headlight Connector: If the ground is good, disconnect the main electrical connector from the back of the headlight assembly. Check for any bent, corroded, or backed-out pins.
- Test for Power and Ground: Using a multimeter and the known pinout, check for appropriate voltage and a good ground at the connector pins when the lights are switched on. For the OEM LED headlight connector, the bottom-right pin is ground, the top-right is low beam positive, and the bottom-left is high beam positive.
- Suspect the Headlight Assembly: If the connector receives proper power and ground but the light does not work, the headlight assembly itself has failed internally.
- Inspect Wiring Harness: If power or ground is missing at the connector, trace the wiring harness back toward the Body Control Module (BCM), looking for any signs of damage, chafing, or breaks.
- Pro Tip: While you are under the hood, check the tightness of the main battery terminals and the nuts on the main fuse array attached to the positive terminal. Loose connections in these areas are a common source of various electrical gremlins on JL/JT platforms. 🎬 Watch: How to fix common electrical gremlins on your Gladiator dash
Parts You'll Likely Need
- Left Headlight Assembly
(OEM #82219141AA (This is a full LED upgrade kit for both sides, replaces 82215136AE and others). Individual replacement part numbers will vary based on Halogen/LED spec.)— If the common ground issue is not the cause, the internal circuitry of the sealed headlight unit is the next likely failure point.
Trusted brands: Mopar, TYC, Depo, Brock
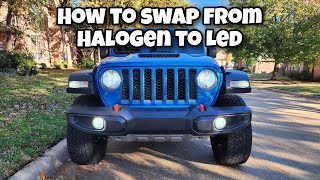
OEM price range: $400-$600+ for a single unit, or ~$1000+ for an LED upgrade kit. 🎬 Watch: Step-by-step guide to upgrading your Gladiator to LED headlights
Aftermarket price range: $90-$250 - M8x1.25 Flange Nut
(OEM #6511542AA)— In the rare case that the original ground nut is missing or too corroded to reuse.
Trusted brands: Mopar, Generic Hardware Store Part
OEM price range: $2-$5
Aftermarket price range: <$1
Related Codes That Often Appear With This One
- B162A — This code specifically relates to the 'Front Left Turn Lamp Control Circuit', which is part of the same headlight assembly and wiring harness.
- B163A — Also for the 'Front Left Turn Lamp Control Circuit', indicating a short to battery or open circuit. It often appears with B1632 due to the shared ground and harness.
- B16CF — This is another related lighting code mentioned in the same TSB, pointing to a fault in the left-side front lighting system.
Technical Service Bulletins (TSBs) & Recalls
- S2208000054RevA: Left Headlight, Park Lamp Flickers Or Is Inoperative. B162A, B163A, B1632, B16CF.
Platform-Specific Known Issues
- A Technical Service Bulletin (S2208000054RevA) was issued for the 2021-2022 Jeep Gladiator specifically for this code and its related symptoms. The bulletin directs technicians to inspect the G905A ground located behind the left headlight housing as the primary cause of the fault.
- This issue is not isolated to the Gladiator; its platform-mate, the 2018+ Jeep Wrangler (JL), shares the same design and is also susceptible to a loose G905A ground causing identical headlight faults.
Mechanic-Grade Diagnostic Values
- OEM LED Headlight Connector Pin Voltage — expected: 12V+ at the specified pin when the function is active.. Failure: 0V or significantly low voltage at a pin when its function (low beam, high beam) is turned on, assuming ground is good.
Scan Tool Commands That Help
- JScan or AlfaOBD: Vehicle Configuration: Left/Right Front Signature Lighting Present — This is used after installing aftermarket or OEM LED headlights on a vehicle that originally had halogens. Enabling these settings in the BCM tells the vehicle to correctly power the DRL/Halo circuits and can prevent flickering or codes that mimic a hardware fault.
- JScan or AlfaOBD: Vehicle Configuration: Headlight Type — When upgrading from halogen to LED bulbs or assemblies, this setting should be changed from 'Halogen' to 'LED'. This adjusts the voltage regulation from the BCM and is a common fix for flickering on aftermarket LED installations.
- Professional Bidirectional Scanner (e.g., Foxwell, Autel): Active Test: Actuate Left Headlight Low/High Beam — This command is used to directly command the BCM to turn the headlight on, bypassing the physical switch. It helps confirm if the BCM, wiring, and headlight assembly are capable of functioning, isolating the problem from the switch side of the circuit.
Wiring & Ground Locations
- G905A — On the inner fender, located behind the left (driver's side) headlight assembly.. This is the primary ground point for the left front lighting circuits. It is cited in TSB S2208000054RevA as the most common cause of code B1632 due to a loose nut from the factory.
- Headlight Connector — Plugs directly into the back of the headlight assembly.. This is the final connection point to the headlight. A video guide provides the pinout for testing: Pin 1 (Top-Left) is DRL, Pin 2 (Top-Right) is Low Beam, Pin 3 (Bottom-Left) is High Beam, and Pin 4 (Bottom-Right) is Ground. The connector itself is a Molex MX150 type.
- CAN Bus Star Connector — Located behind the glove compartment. There are typically two, a green and a white one.. While not a direct cause of an isolated B1632, a problem at this central communication hub can cause widespread electrical issues, including multiple 'lost communication' codes along with lighting faults. A wiggle test here can help diagnose broader network problems.
Real Owner Repair Stories
- YouTube channel 'Wayalife' (Jeep Gladiator (JT)) — Widespread electrical gremlins including center stack buttons blinking, infotainment system rebooting, climate control failure, and multiple error codes for turn signals and blind spot alerts.
❌ Tried (didn't work) Checking the battery cables., Checking the common ground connection on the fender (likely G905A)., Checking for bent pins under the Power Distribution Module (fuse box)., Removing a Tazer programmer., Taking the vehicle to the dealership, who performed a PCM update but could not find the root cause.
✅ What actually fixed it The owner found two issues: 1) A hidden ground connection on the frame rail, obscured by fuel lines, was loose. He cleaned and tightened it. 2) A large harness plug near the gas tank had its locking tab unlocked and was loose. He cleaned it, applied dielectric grease, reconnected it securely, and zip-tied it to the frame to prevent movement. The combination of these two fixes resolved all electrical problems. - JeepGladiatorForum.com user (2020 Jeep Wrangler JL (platform mate)) — After accidentally reversing polarity on the auxiliary battery, the passenger side headlight was dead. After replacing fuses and swapping in a known-good headlight from a Gladiator, everything worked *except* the passenger side DRL/Halo ring.
❌ Tried (didn't work) Visually inspecting and replacing all blown fuses., Swapping the entire headlight assembly with a known-good unit.
✅ What actually fixed it The diagnosis concluded that the specific driver circuit for the halo within the Body Control Module (BCM) was likely fried by the reverse polarity event. This is an example of a rare BCM failure where only a single, specific function is lost, rather than the entire module failing.
When the Usual Fixes Don't Work
- While the TSB and overwhelming community feedback point to the G905A ground stud behind the headlight as the cause for B1632, it is not the only possible point of failure. In one documented case of widespread electrical issues that included lighting faults, the fix was a completely different ground stud on the main frame rail and a loose main harness connector near the rear of the vehicle. This demonstrates that if tightening G905A does not resolve the issue, a full harness and ground inspection is warranted, as other connection points can become loose and cause similar symptoms.
OEM Part Supersession History
N/A (3-wire harness)→68414409AB— Addition of a fourth wire to support DRL/Halo functionality on higher trims or later model years.
Heads up: If installing OEM LED headlights with halos onto a vehicle with a 3-wire harness, this 4-wire pigtail (or custom wiring) is needed to power the halo function.
Model Year Variations Within This Range
- 2021+: Vehicles from 2021 and later are more likely to have the 4-wire headlight harness from the factory, even on lower trims, to support DRL/Halo functions. Earlier 2020 models may only have a 3-wire harness if not equipped with LED lighting from the factory.
Helpful Videos


The information in this article is provided for general reference and educational purposes only. Vehicle specifications, procedures, and part compatibility can vary by production date, trim level, and region. Always consult your vehicle's factory service manual and verify part numbers before purchasing or performing repairs. Safety-critical components such as airbags, seat belts, and braking systems should be installed by a qualified professional.
- Jeep GLADIATOR:
- 🧭 Diagnostic Flowchart
- 🎬 Helpful Videos
- What's Unique About the 2021-2022 Jeep GLADIATOR
- Symptoms You May Notice
- Most Likely Causes
- Rare But Worth Checking
- Diagnosis Steps
- Parts You'll Likely Need
- Related Codes That Often Appear With This One
- Technical Service Bulletins (TSBs) & Recalls
- Platform-Specific Known Issues
- Mechanic-Grade Diagnostic Values
- Scan Tool Commands That Help
- Wiring & Ground Locations
- Real Owner Repair Stories
- When the Usual Fixes Don't Work
- OEM Part Supersession History
- Model Year Variations Within This Range
- 🎟️ Get 5% Off