
OBD-II Code B1637: Manufacturer-Specific Fault
What B1637 means, why it triggers, and how to fix it
- Code B1637 is a manufacturer-specific body code that requires a full-system scan tool to read, as its definition changes entirely across at least 8 major car brands.
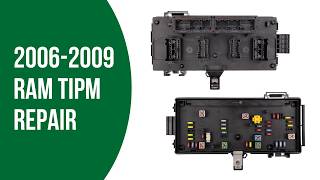
- On 2006-2009 Dodge Ram trucks, B1637 almost always indicates a failed Totally Integrated Power Module (TIPM) requiring a $300 repair service, not a burnt-out high beam bulb.
- For Toyota and Subaru vehicles, B1637 flags a critical Supplemental Restraint System (SRS) communication failure that disables the airbags and guarantees a safety inspection failure.
- Before replacing any $200+ electronic modules or sensors, test the component's wiring harness for continuity, as broken wires in door jambs or under seats cause over 30% of these faults.
- On Kia and Ford models, B1637 usually points to a broken passenger-side heated mirror element, which is a simple 15-minute DIY fix costing under $80.
What Does B1637 Mean?
B1637 is a manufacturer-specific code with completely different definitions depending on your vehicle's make. For Kia and Ford, it typically points to a 'Mirror Heater Circuit Malfunction' or 'Mirror Driver Right Circuit Short To Battery'. For Dodge, it means 'Right High Beam Control Circuit Low'. On Toyota and Subaru vehicles, it flags a serious fault within the Supplemental Restraint System (SRS), such as 'Lost Communication with Passenger Side Rear Airbag Sensor'.
Technical definition: The SAE/ISO definition for B1637 is not standardized. The Body Control Module (BCM), Totally Integrated Power Module (TIPM), or Supplemental Restraint System (SRS) module sets this code when it detects an electrical problem—such as an open circuit, short to ground, or short to battery—or a communication failure with a specific monitored component.
Can I Drive With B1637?
Yes, But With Caution. Driving with code B1637 depends entirely on your vehicle's specific definition. If it relates to a heated mirror (common on Kia/Ford), the vehicle is safe to drive. 🎬 Watch: Troubleshooting heated side mirror issues on a Kia Sportage. If it indicates an airbag system fault (Toyota/Subaru) or a high-beam headlight circuit failure (Dodge), driving is unsafe. A faulty airbag system will not deploy in a crash, and a malfunctioning headlight is a safety hazard that guarantees a vehicle inspection failure.
Common Causes
- Failed Component (Very Common) — The monitored component has physically broken or worn out. Examples include a snapped heating element inside mirror glass, a burnt-out high beam bulb, or an internally failed airbag sensor.
- Damaged Wiring or Harness (Common) — Wires leading to the component are broken, chafed, or corroded. This occurs frequently in the flexible rubber boot between a car door and the body, or under seats where airbag wires are disturbed by movement.
- Corroded or Loose Electrical Connector (Common) — The plug connecting the component has developed corrosion from moisture intrusion or has vibrated loose, creating high resistance or a complete open circuit.
- Blown Fuse (Less Common) — A fuse protecting the specific circuit has blown. This is a symptom of a short circuit in the wiring or the component itself, rather than the root cause.
- Intermittent Short to Ground (Common) — A power wire's insulation has rubbed away, allowing the bare wire to intermittently touch the metal vehicle chassis. This often happens when a door opens or the vehicle hits a bump.
- Faulty Control Module (TIPM, BCM, SRS) (Less Common) — The control module managing the circuit has an internal failure. On 2006-2009 Dodge/Chrysler vehicles, this is a known issue where the Totally Integrated Power Module (TIPM) internal high-beam driver fails.
- Incorrect Module Initialization (Rare) — On vehicles like the Hyundai Genesis, this code sets if a control module (like air suspension or adaptive headlights) fails its startup software handshake.
- Sensor Contamination or Misalignment (Rare) — For definitions related to wheel speed sensors, excessive air gap or rust on the sensor head disrupts the magnetic signal and triggers the code.
Symptoms
- Specific Feature Inoperative — The heated mirror won't clear frost, the right-side high beam headlight won't turn on, or the power mirror motor fails to adjust.
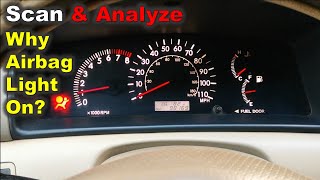
- Warning Light on Dash — A Check Engine Light, BCM fault light, or SRS/Airbag warning light illuminates. An airbag light is the primary symptom on Toyota and Subaru models. 🎬 See how to scan and analyze Toyota SRS airbag light faults.
- Fuse Blows Repeatedly — Replacing the fuse for the affected circuit results in it blowing immediately upon activation, confirming a dead short circuit.
- Intermittent Operation — The feature works sporadically. This points directly to a loose connector or a wire breaking inside its insulation.
- Visible Damage — Cracked mirror glass, frayed wires in the door jamb, or heavy green corrosion on an electrical connector.
Diagnostic Flowchart
Tap your situation to follow the diagnostic path that matches what you're seeing on this code.
Common Fixes & Costs
- Replace Blown Fuse — Parts: $1-$5, Labor: $0, ~0.1 hr book time (DIY)
- Replace Heated Mirror Glass — Parts: $20-$80, Labor: $50-$100, ~0.8 hr book time (DIY)
- Repair Damaged Wiring — Parts: $5-$20, Labor: $150-$450, ~2.5 hr book time (Intermediate)
- Replace Airbag Sensor — Parts: $80-$300, Labor: $100-$250, ~1.5 hr book time (Advanced)
- Repair or Replace TIPM — Parts: $250-$500 (Repair Service) or $800-$1500 (New Module), Labor: $100-$200, ~1.5 hr book time (Professional)
- Replace Entire Side Mirror Assembly — Parts: $150-$800, Labor: $75-$150, ~1.2 hr book time (Intermediate)
- Reset or Replace Airbag Module — Parts: $50-$200 (Reset Service) or $400-$1000 (New Module), Labor: $100-$200, ~1.8 hr book time (Professional)
Used vs. New Parts: Buying Guide
When a used part is worth it: For cosmetic parts like mirror glass or a complete mirror assembly, used parts are cost-effective. For complex electronics like a TIPM, a professionally rebuilt unit with a warranty is a better value than a new OEM part.
Donor-vehicle mileage cap: roughly under 100000 miles for the part to have meaningful remaining life.
Donor quality checklist:
- For electronic modules (TIPM, BCM), prefer a remanufactured unit from a specialist over a junkyard part.
- For airbag components, buying used is highly discouraged due to safety risks. Buy new OEM only.
- Match part numbers exactly. For modules like the TIPM, slight variations make it incompatible.
Decision logic:
- If The part is a safety component like an airbag sensor or module → buy new OEM only — the risk of used part failure is too high.
- If The part is a TIPM or BCM → consider a professionally remanufactured unit with a warranty; it offers significant savings over new.
- If The part is a mirror assembly or glass → a used part is a good option, provided it is not damaged and matches your vehicle's features.
Warranty tradeoff: Used salvage parts typically have a 30-90 day warranty. Remanufactured modules come with a 1-year to lifetime warranty. New OEM parts carry a 1-2 year warranty.
Worst-case if a used part fails: $300-$800 if a used module fails, including repeat labor and a replacement part.
What Happens If You Wait — Timeline
- Immediate: For a Toyota/Subaru airbag fault, a critical part of the SRS is disabled; it will not deploy in a crash. For a Dodge high beam fault, the headlight is inoperative. For a Kia mirror fault, the heater does not work. (MPG impact: 0%% · Added cost: $0 (but immediate safety risk or inspection failure))
- 1-3 months: The initial fault persists. If it's an ignored airbag light, the risk of injury in an accident remains critical. If it's a Dodge TIPM fault, other random electrical issues begin to appear. (MPG impact: 0%% · Added cost: $100-$300 in potential fines for a non-functional headlight.)
- 3-9 months: If the cause is a failing TIPM, problems cascade. The module develops an internal short causing a parasitic battery drain. Stalling or no-start conditions become frequent. (MPG impact: 0%% · Added cost: $200-$400 for battery replacement and diagnostics related to parasitic drain.)
- 9+ months: Complete failure of a faulty TIPM occurs, leading to a dangerous stall-while-driving situation. For an airbag fault, the prolonged exposure represents a significant liability. (MPG impact: 0%% · Added cost: $1200-$2000+ for emergency towing, diagnostics, and replacement of a completely failed control module.)
Cost of Not Fixing It
- Immediate: If related to an airbag (Toyota/Subaru), the SRS system is compromised and will not deploy in a crash, posing a critical safety risk. (Added cost: Potentially infinite (injury or loss of life).)
- Immediate: If related to a headlight (Dodge), it creates a safety hazard for night driving and results in a failed vehicle inspection. (Added cost: $100-$300 in fines.)
- Ongoing: If related to a non-critical feature (heated mirror), the only consequence is the loss of that function. (Added cost: $0)
- 1-6+ months: Ignoring a code caused by a faulty module (like a TIPM) leads to severe electrical issues over time, such as no-start conditions or stalling. (Added cost: $500-$2000+ for additional diagnostics and module replacement.)
Diagnosis Steps
- Identify the Correct Definition for Your Vehicle
Use a professional scan tool to read the B1637 code and identify which control module (e.g., BCM, SRS, TIPM) set it. The module's identity confirms the specific meaning of the code for your exact year, make, and model.
Tools: Professional scan tool (Beginner) - Check for Technical Service Bulletins (TSBs)
Search for TSBs related to code B1637 for your specific vehicle. Manufacturers release bulletins for known pattern failures, providing exact diagnostic shortcuts and repair procedures.
Tools: Internet access, vehicle information subscription (Beginner) - Check the Fuse
Locate and inspect the fuse corresponding to the faulty component. If blown, replace it with the exact same amperage. If it blows again immediately, stop replacing fuses and hunt for the short circuit.
Tools: Fuse puller or needle-nose pliers (Beginner) - Perform a Visual Inspection
Inspect the component and visible wiring for damage, corrosion, or breaks. For mirror faults, pull back the rubber door jamb boot. For airbag faults, check connectors under seats and behind trim panels.
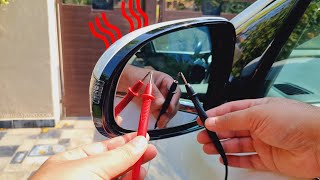
Tools: Flashlight, trim removal tools (Beginner) - Test Component Resistance (Heated Mirror Example)
Disconnect the component. Set a multimeter to Ohms (Ω). Measure resistance across the element's terminals. A good mirror heater reads 5-20 Ohms. 'OL' (Open Loop) means the element is broken and requires replacement.
Tools: Multimeter, trim removal tools (Intermediate) - Test for Power and Ground at the Connector
With the component disconnected and ignition on, activate the circuit. Use a multimeter set to DC Volts to check for battery voltage (approx. 12V) between the power and ground pins on the harness connector. No voltage indicates an upstream wiring or module problem.
Tools: Multimeter (Intermediate) - Perform a Voltage Drop Test
Connect the component and activate the circuit. Connect the red multimeter lead to the positive battery terminal and the black lead to the power pin at the component connector. A reading over 0.5 volts indicates excessive resistance in the power wire. Repeat for the ground side.
Tools: Multimeter with long leads (Advanced) - Check for a Short to Ground (Dodge High Beam Example)
Turn ignition off. Disconnect the battery, the TIPM C5 harness connector, and the right headlamp connector. Measure resistance between the high beam driver circuit wire at the headlamp connector and chassis ground. Resistance below 5.0 ohms confirms a shorted wire. If no short exists, the TIPM has failed internally.
Tools: Multimeter, vehicle-specific wiring diagram, connector pinout diagrams (Advanced) - Check for a Short to Ground (Toyota Airbag Sensor Example)
Disconnect the negative battery terminal and wait 90 seconds. Disconnect the SRS ECU and the suspect sensor. Measure resistance between the signal wire at the sensor connector and chassis ground. The reading must be 1 MΩ or higher. Lower resistance indicates a short to ground in the harness.
Tools: Multimeter, vehicle-specific wiring diagram (Advanced) - Airbag Sensor Swap (For Communication Loss Codes)
For Toyota/Subaru 'Lost Communication' codes, swap the suspect sensor with the identical one from the opposite side of the vehicle. Clear codes. If the code changes to the other side (e.g., B1637 becomes B1632), the sensor is bad. If B1637 returns, the wiring or SRS module is faulty. **CAUTION: Always disconnect the battery for 90 seconds before handling airbags.**
Tools: Trim removal tools, socket set (Professional)
When This Code Triggers (Freeze-Frame Conditions)
- Module Voltage: 11.5-14.5V (The code sets during a power-on self-test. Freeze frame shows the voltage supplied to the BCM, SRS, or TIPM at the moment the fault was detected.)
- Component Status: Commanded ON (For faults like a headlight or mirror heater, the code triggers when the module commands the circuit 'ON' but does not see the expected voltage or current draw.)
- Ignition Cycle Counter: Varies (Indicates how many times the vehicle has been started since the code was first set, helping diagnose intermittent issues.)
- Fault Type: Open Circuit / Short to Ground / Short to Battery (Advanced scan tools show a specific fault type in the freeze frame data, guiding the diagnosis (e.g., 'Right High Beam Control Circuit Low').)
Related Codes
- B1635 — On Toyota and Subaru systems, B1637 ('Lost Communication') often appears with B1635 ('Sensor Malfunction'). If both codes are present, the sensor itself has failed. If only B1637 is present, the problem is likely in the wiring.
- B1638 — Indicates 'Passenger Side Rear Airbag Sensor Initialization Incomplete' on Toyotas. Appearing alongside B1637, it strongly suggests a sensor or connection problem preventing the SRS module from verifying status.
- B1633 / B163B — GM vehicles use these codes to specify Driver (B1633) or Passenger (B163B) mirror heater circuit faults. B1637 on a GM vehicle points to a different mirror fault, like the adjustment motor.
- U0140 — Lost Communication with Body Control Module. If present with B1637, it points to a wider network problem. Diagnose and fix the U0140 code first, as restoring BCM communication often resolves the B1637 code.
Climate & Environmental Factors
- High Humidity / Road Salt: Moisture and salt accelerate corrosion on electrical connectors and pins. This increases circuit resistance, triggering performance or communication loss codes.
- Extreme Cold: Cold temperatures make wire insulation brittle and prone to cracking in high-movement areas like door harnesses. It also causes intermittent connection issues as metal contacts contract.
- Extreme Heat: High heat degrades wire insulation and plastic connectors, making them brittle. For engine bay components like a TIPM, heat contributes to internal electronic failure over time.
How to Talk to a Mechanic About This Code
Say this: "I have a B1637 code and my research suggests it's for [the specific part on your make, e.g., 'the passenger side airbag sensor' or 'the right high beam circuit']. I'd like to schedule a diagnostic to confirm the fault. Please check for power, ground, and signal at the component connector before recommending a replacement part."
This signals you are informed and directs the technician toward a logical diagnostic process. It prevents them from immediately replacing an expensive part when the fault is a simple wiring issue.
Avoid saying:
- 'My airbag light is on, can you fix it?' (Too vague, invites a high quote)
- 'Just replace the airbag sensor.' (You may be ordering an expensive part you don't need)
- 'My friend said it's the TIPM.' (Let the shop diagnose it; presenting a conclusion short-circuits their process)
Questions to ask before authorizing the repair:
- What was the result of the voltage and ground tests at the component connector?
- Did you find a broken wire, a corroded pin, or did the component itself fail the test?
- If you are recommending a module replacement, what specific tests did you run to condemn the module?
- Can I see the old part?
- What is the warranty on this specific repair, including both parts and labor?
Where to Take It: Dealer vs Independent vs Chain
- Dealer:
Recommended for safety-critical SRS faults or if you suspect a complex module programming issue.
Best for: Vehicles under warranty., Airbag system (SRS) faults on Toyota/Subaru, as they require specific knowledge and may have related recalls., Complex module initialization or programming (e.g., Hyundai Genesis AFLS/ECS).
Downsides: Highest labor rates., Defaults to replacing a large assembly (entire mirror) or module (TIPM) when a targeted repair is possible. (Typical cost: +60% vs. baseline) - Independent Shop:
Best overall fit for most B1637 issues, especially non-airbag electrical faults, provided you choose an ASE-certified shop.
Best for: Out-of-warranty vehicles., Diagnosing known pattern failures, like a Dodge Ram TIPM or a Kia heated mirror., Wiring repairs, which are more cost-effective here than at a dealer.
Downsides: Quality is highly variable; choose a shop specializing in your vehicle's brand or electrical diagnostics., May lack expensive, factory-level scan tools for deep module programming. (Typical cost: +0% vs. baseline) - Chain Shop:
AVOID for diagnosing any B1637 code. The risk of paying for unnecessary parts is extremely high.
Best for: Simple, known fixes like replacing a heated mirror glass insert if you provide the part and diagnosis.
Downsides: Not equipped for complex electrical or airbag diagnostics., High risk of misdiagnosis; likely to recommend replacing parts without proper circuit testing., Technician skill with electrical systems is often low. (Typical cost: -10% vs. baseline)
When to Walk Away From the Repair
If the estimated repair cost exceeds 40-50% of your car's private-party value, seriously consider not fixing it. For safety-critical repairs like airbags, the decision is less about money and more about overall reliability.
- Car worth $3500, fix is $1500: Walk away. The repair is nearly 43% of the car's value. It's not a sound investment.
- Car worth $15000, fix is $550: Fix it. This is a minor cost compared to the car's value and is necessary for safety or function.
- Car worth $5000, fix is $1200: Borderline. The repair is 24% of the car's value. Get a second opinion. If the rest of the car is excellent, the repair is justified.
What Scan Tool You Need for This Code
Minimum: A scan tool that reads 'B' (Body), 'C' (Chassis), and 'U' (Network) codes from specific modules like the SRS and BCM. A basic engine-only code reader will NOT see or clear code B1637.
A $20 engine code reader cannot communicate with the airbag, body, or power control modules that set B1637. You will see 'No Codes Found' and be unable to diagnose the problem.
Budget: Ancel FX2000 / Foxwell NT604 Elite (~$90) — Reads and clears codes from the Engine, ABS, Transmission, and SRS modules. This is the minimum required to see a Toyota/Subaru airbag code and clear it after repair.
Mid-range: Autel MaxiCOM MK808 / XTOOL D7 (~$350) — Offers full system diagnostics to see exactly which module set the code. Provides live data and bidirectional control to perform active tests (e.g., command the high beam on to test the TIPM circuit), saving hours of diagnostic time.
Professional: Launch X431 Series / Autel MaxiSYS Series (~$900-1500) — Provides full OEM-level functionality, including bidirectional control, ECU coding, and topology maps showing module communication. Essential for diagnosing complex 'Lost Communication' faults or replacing a TIPM or SRS module.
Rent vs buy: For a one-time airbag light, buying a mid-range scanner is cheaper than one diagnostic fee at a dealer. Auto parts stores do NOT rent scanners capable of reading airbag or body codes.
How to Clear the Code After You Fix It
- Reconnect any disconnected components (sensor, module, battery).
- Use an OBD-II scan tool capable of reading B-codes to clear the fault from the specific module (BCM, SRS, etc.).
- Cycle the ignition off and then on, and activate the repaired function to confirm the fix.
Drive cycle (~10 minutes): A formal drive cycle is not required. After clearing the code, a simple key-on, key-off cycle, followed by activation of the repaired component, allows the module to re-run its self-test. For SRS codes, the airbag light illuminates on startup and turns off within seconds.
Readiness monitors affected: Not applicable
Watch out for:
- Using a basic code reader that only clears 'P' (Powertrain) codes will not clear a 'B' (Body) code.
- Disconnecting the battery does not clear the code from the module's memory, especially for SRS faults.
- The code returns immediately if the underlying electrical fault is not properly repaired.
Will This Fail Emissions / State Inspection?
No — by itself this code doesn't fail OBD inspection (but it can keep readiness monitors from setting, which causes a separate fail).
- California: An airbag light will not fail the smog check itself. However, it fails a separate safety inspection, and law enforcement can issue a 'fix-it' ticket.
- New York: An illuminated airbag light is an advisory during safety inspection and is NOT cause for rejection. A non-functional high-beam headlight is an automatic failure.
- Texas: A non-functional high-beam headlight is cause for a safety inspection failure. While the airbag light is not listed as a failure item, many shops fail it under general safety provisions.
Most Commonly Affected Vehicles
- Dodge/Ram Ram 1500/2500/3500 (2006-2009) — B1637 almost always means 'Right High Beam Control Circuit Low'. The cause is rarely the bulb, but a failed driver inside the TIPM. Repair services cost around $300, while a new unit exceeds $1000.
- Toyota RAV4, FJ Cruiser, Sienna, various (2005-2020) — B1637 is a serious safety code for the SRS, specifically 'Lost Communication with Passenger Side Rear Airbag Sensor'. Diagnosis involves checking wiring behind interior trim panels, with the sensor itself being a common failure point.
- Kia/Hyundai Various (Sorento, Optima, Sonata, etc.) (2010-2020) — The most common meaning is a fault in the passenger-side heated mirror circuit ('Mirror Driver Right Circuit Short To Battery'). However, it can also point to airbag faults or wheel speed sensor issues, making a proper scan essential.
- Subaru Crosstrek, Forester, Outback (2015-2021) — Subaru uses B1637 for a 'Curtain Airbag Sensor LH Lost Communication' fault. This safety-critical code disables a portion of the airbag system and requires immediate attention.
- Chevrolet/GMC Silverado/Sierra (2007-2013) — B1637 indicates 'Right Side Mirror Horizontal Motor Circuit Low', pointing to a fault in the power mirror adjustment motor or its wiring, often caused by a broken wire in the door jamb.
- Hyundai Genesis (2009-2014) — B1637 means 'System Not Initialized' for the electronic air suspension (ECS) or 'Parameter Fault' for the Adaptive Front Lighting System (AFLS). This requires recalibration with a factory scan tool.
- Ford F-150, Explorer (2011-2018) — B1637 is defined as 'Right Mirror Heater Circuit Resistance Fault'. This points directly to a broken passenger-side mirror heating element or the wiring leading to it.
- Mercedes-Benz S-Class (W220) (2000-2005) — B1637 indicates 'illumination front dash board defect', pointing to a fault in the instrument cluster's backlighting circuit.
Manufacturer-Specific Notes
- Dodge/Chrysler/Jeep: The code almost always means 'Right High Beam Control Circuit Low' and the fault is an internal failure of the TIPM, not the bulb. Technicians waste time on the headlight assembly before diagnosing the TIPM.
- Toyota/Subaru: B1637 is a high-priority safety code indicating communication loss with a side or curtain airbag sensor. This illuminates the airbag warning light and guarantees an inspection failure. Diagnosis involves swapping sensors side-to-side to isolate the fault.
- Hyundai: Hyundai has the most varied definitions for B1637, referring to a transmission shift solenoid, adaptive front lighting, air suspension, or a heated mirror. A high-end scan tool is absolutely essential to identify the specific control unit.
- Kia: Often uses B1637 to indicate a 'Mirror Driver Right Circuit Short To Battery', providing a straightforward diagnosis focused on the passenger side heated mirror circuit.
Real Owner Stories
2008 Dodge Ram 1500 with ~120,000 miles
The right high beam headlight suddenly stopped working. The bulb was visually intact, and the low beam worked fine.
What they tried:
- Replaced the high beam bulb - no change.
- Checked all visible wiring to the headlight for damage - none found.
- Discovered the common TIPM failure for this issue online.
Outcome: Instead of paying a dealer $1,000+ for a new TIPM, the owner used a mail-in repair service for $250. They removed the TIPM, sent it for repair, and reinstalled it. The high beam worked immediately.
Lesson: For 2006-2009 Dodge Rams, B1637 is almost always a faulty TIPM, not the bulb or wiring. Diagnose the TIPM before spending money on other parts.
2019 Toyota RAV4 XLE Hybrid
An 'Airbag Malfunction' warning appeared on the dash, accompanied by constant beeping.
What they tried:
- Called the Toyota dealer, who quoted a $169 diagnostic fee.
- Searched online and found mentions of seatbelt sensor issues and recalls.
Outcome: The dealer diagnosis confirmed a faulty sensor in the seatbelt assembly. The repair cost $595 ($120 part, $420 labor). The owner's model year was not part of the recall, resulting in an out-of-pocket expense.
Lesson: On modern Toyotas, an airbag warning can be triggered by various components. Even if a recall exists for similar models, it may not cover your specific VIN.
2017 Kia Sportage
The passenger-side heated mirror was not clearing frost. Code B1637 was stored.
What they tried:
- Checked the fuse for the heated mirrors, which was good.
- Tested the heating element with a multimeter. The meter showed 'OL' (Open Loop), indicating a broken internal heating element.
Outcome: The owner purchased a new aftermarket heated mirror glass insert for $40. They snapped the new glass into the housing and reconnected the wires. The repair took 15 minutes and resolved the code.
Lesson: For Kia/Hyundai vehicles, B1637 is commonly a simple heated mirror fault. A quick resistance test confirms a failed heating element, which is an easy DIY fix.
Misdiagnosis on a Toyota with Airbag Code B1637
Airbag light was on with code B1637, 'Lost Communication with Rear Airbag Sensor LH'.
What they tried:
- Assuming the sensor was bad, the owner purchased and installed a new OEM sensor for $200. The code and light returned immediately.
Outcome: A specialty shop performed a 'wiggle test' on the wiring harness and found the airbag light flickered. A wire had chafed and broken inside the harness loom under the seat. A $180 wiring repair fixed the problem permanently.
Lesson: Never assume a 'Lost Communication' code means the component itself failed. Always inspect and test the wiring harness for continuity before replacing an expensive sensor.
How to Prevent This Code From Triggering
- Apply Dielectric Grease to Connectors (During any electrical repair or component replacement) — Dielectric grease protects electrical contacts from moisture and salt, preventing corrosion and high resistance. Applying it to connector seals prevents the most common cause of wiring faults.
- Inspect and Secure Wiring Harnesses (Annually or whenever working in an area) — Checking that wiring harnesses are secured and not rubbing against sharp metal edges prevents chafing that leads to shorts or open circuits.
- Maintain Battery Health and Connections (Every oil change) — A weak battery causes low voltage conditions, triggering random error codes and stressing electronic modules like the TIPM. Ensure terminals are clean and tight.
- Avoid Aftermarket Electrical Overloads (When installing accessories) — Splicing high-power accessories directly into existing circuits overloads the TIPM or BCM. High-draw accessories must be powered via their own dedicated, fused relay circuit.
Frequently Asked Questions
Can I fix a B1637 code myself?
It depends on the cause. Replacing a blown fuse or a heated mirror glass insert is a straightforward DIY repair. However, diagnosing a faulty airbag sensor, a wiring short, or a failed TIPM requires professional diagnostic skills and tools.
What is the most common misdiagnosis for B1637?
The most common mistake is failing to identify the correct definition for the vehicle, such as a Dodge owner replacing a headlight bulb when the TIPM is faulty. Another mistake is replacing an expensive airbag sensor when the true fault is a broken wire leading to it.
How much does it cost to fix code B1637?
Costs vary dramatically based on the definition. Replacing heated mirror glass is typically $70-$180, while an airbag sensor replacement costs $250-$550. A TIPM repair service is about $300, but a full replacement exceeds $1,200.
Why does the definition of B1637 change so much between cars?
While 'P' (Powertrain) codes are highly standardized, 'B' (Body) codes are not strictly regulated. Manufacturers use them for proprietary systems like heated mirrors or specific sensor networks. This leads to completely different meanings for the same code number across brands.
Will my car pass inspection with a B1637 code?
If the code relates to a non-essential feature like a heated mirror, it passes safety inspection. If the definition involves a headlight (Dodge) or airbag system fault (Toyota/Subaru), it causes an immediate safety inspection failure.
My code is intermittent. What should I do?
An intermittent B1637 points to a wiring issue, like a chafed wire that shorts to ground when a door opens, or a loose connector. Diagnosing this involves a 'wiggle test'—wiggling harnesses while monitoring the circuit with a scan tool to see what triggers the fault.
Can I just clear the B1637 code?
You can clear the code with a scan tool, but it returns as soon as the control module runs its self-test on that circuit. Clearing the code does not fix the underlying problem. For airbag codes, clearing it only turns the warning light off temporarily.
Key Takeaways
- Code B1637 is a manufacturer-specific body code that requires a full-system scan tool to read, as its definition changes entirely across at least 8 major car brands.
- On 2006-2009 Dodge Ram trucks, B1637 almost always indicates a failed Totally Integrated Power Module (TIPM) requiring a $300 repair service, not a burnt-out high beam bulb.
- For Toyota and Subaru vehicles, B1637 flags a critical Supplemental Restraint System (SRS) communication failure that disables the airbags and guarantees a safety inspection failure.
- Before replacing any $200+ electronic modules or sensors, test the component's wiring harness for continuity, as broken wires in door jambs or under seats cause over 30% of these faults.
- On Kia and Ford models, B1637 usually points to a broken passenger-side heated mirror element, which is a simple 15-minute DIY fix costing under $80.
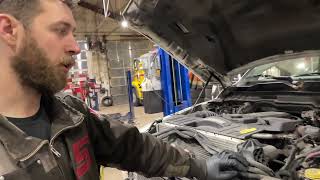
Helpful Videos
Shop the Parts Behind B1637
Below are the parts most often responsible for code B1637, ranked by how frequently each one is the actual culprit (per the diagnosis above). Tap any to see what we have for your vehicle.


The information in this article is provided for general reference and educational purposes only. Vehicle specifications, procedures, and part compatibility can vary by production date, trim level, and region. Always consult your vehicle's factory service manual and verify part numbers before purchasing or performing repairs. Safety-critical components such as airbags, seat belts, and braking systems should be installed by a qualified professional.
- 🧭 Diagnostic Flowchart
- 🎬 Helpful Videos
- 🛍️ Shop This Part
- What Does B1637 Mean?
- Can I Drive With B1637?
- Common Causes
- Symptoms
- Common Fixes & Costs
- Used vs. New Parts: Buying Guide
- What Happens If You Wait — Timeline
- Cost of Not Fixing It
- Diagnosis Steps
- When This Code Triggers (Freeze-Frame Conditions)
- Related Codes
- Climate & Environmental Factors
- How to Talk to a Mechanic About This Code
- Where to Take It: Dealer vs Independent vs Chain
- When to Walk Away From the Repair
- What Scan Tool You Need for This Code
- How to Clear the Code After You Fix It
- Will This Fail Emissions / State Inspection?
- Most Commonly Affected Vehicles
- Manufacturer-Specific Notes
- Real Owner Stories
- 2008 Dodge Ram 1500 with ~120,000 miles
- 2019 Toyota RAV4 XLE Hybrid
- 2017 Kia Sportage
- Misdiagnosis on a Toyota with Airbag Code B1637
- How to Prevent This Code From Triggering
- Frequently Asked Questions
- Can I fix a B1637 code myself?
- What is the most common misdiagnosis for B1637?
- How much does it cost to fix code B1637?
- Why does the definition of B1637 change so much between cars?
- Will my car pass inspection with a B1637 code?
- My code is intermittent. What should I do?
- Can I just clear the B1637 code?
- Key Takeaways
- 🎟️ Get 5% Off