
OBD-II Code B1749: Driver Seat Position Sensor Circuit Failure
The Ultimate 2026 Guide: What B1749 Means, Why It Triggers, and How to Fix It for Good
- Code B1749 stems from a broken or chafed wire under the driver's seat in over 80% of cases.
- Driving with B1749 is mechanically safe, but it disables or alters driver airbag deployment, creating a severe crash risk.
- Never replace a $400+ Body Control Module until a multimeter test definitively proves the under-seat wiring and sensor are functional.
- A standard $20 engine code reader cannot see B1749; you must use an advanced scanner capable of reading Body (B) and SRS codes.
What Does B1749 Mean?
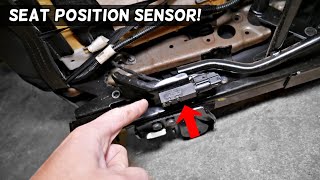
Code B1749 indicates the Body Control Module (BCM) or Seat Control Module (SCM) detects a short to ground in the driver's seat horizontal position sensor circuit. This sensor tracks the seat's fore-and-aft position 🎬 Watch: Learn how seat position sensors work on Ford vehicles. on its track. Advanced Airbag Systems require this precise data to calculate the appropriate deployment force. When a short grounds the signal, the computer flags the data as invalid and triggers the DTC.
Technical definition: The SAE/ISO definition for B1749 is 'Driver Seat Position Sensor Circuit Short To Ground'. The control module reads near zero volts on the sensor's signal circuit instead of the expected operating range, preventing it from determining the seat's physical position.
Can I Drive With B1749?
Yes, But With Caution. Yes, the vehicle is mechanically safe to drive. However, the Supplemental Restraint System (SRS) is compromised. The airbag control module loses the driver's proximity data, causing it to either disable the driver's airbag entirely or deploy it at a default, non-optimal force during a collision. Repair this immediately to restore crash safety.
Common Causes
- Damaged or Chafed Wiring Under the Driver's Seat (Very Common) — The under-seat wiring harness flexes constantly during seat adjustment. Over time, wires rub against the metal seat frame, pinch in the tracks, or stretch and break, creating a direct short to ground.
- Corroded or Loose Electrical Connector (Common) — Spilled liquids, wet shoes, or flood damage introduce moisture to the vulnerable under-seat connector. This causes pin corrosion, while physical kicks from rear passengers loosen the connection, leading to a short.
- Faulty Driver Seat Position Sensor (Common) — The Hall-effect or resistive sensor fails internally due to age, vibration, or electronic component degradation, causing it to send a permanently grounded signal.
- Debris Obstructing the Seat Track (Less Common) — Coins, pens, or trash fall into the seat track mechanism. When the seat moves, these objects pinch or sever the sensor's wiring, causing an immediate short circuit.
- Improperly Installed Aftermarket Accessories (Less Common) — Installers often tap into existing under-seat wiring for remote starters, amplifiers, or lighting. A poorly executed splice into the seat's power or ground wires creates a short.
- Blown Seat Control Module Fuse (Less Common) — A direct short to ground blows the circuit's protective fuse. Replacing the fuse without fixing the underlying short causes it to blow again instantly.
- Faulty Seat Control Module (SCM) or Body Control Module (BCM) (Very Rare) — Internal module failure is extremely uncommon. Exhaustively test the wiring, connectors, and sensor before considering a module replacement to avoid a costly misdiagnosis.
Symptoms
- Airbag or SRS Warning Light Illuminated — The airbag warning light activates because the system lacks the seat position data required for safe deployment.
- Memory Seat and Easy Entry Functions Inoperative — Memory recall and automatic exit features fail because the system cannot determine the seat's current location.
- Warning Message on Instrument Cluster — A 'Service Airbag System' or 'Check Seat' text message appears on the driver information center.
- Power Seat Moves Erratically or Not At All — The control module disables power seat movement as a safety precaution upon receiving an invalid position signal.
Diagnostic Flowchart
Tap your situation to follow the diagnostic path that matches what you're seeing on this code.
Common Fixes & Costs
- Repair Damaged Under-Seat Wiring — Parts: $10-$30, Labor: $150-$300, ~1.5 hr book time (Intermediate)
- Clean or Replace Electrical Connector — Parts: $15-$50, Labor: $100-$150, ~1 hr book time (DIY)
- Replace Driver Seat Position Sensor
— Parts: $75-$250, Labor: $125-$225, ~1.5 hr book time
(DIY)
Ford Explorer (2002-2010): OEM 6L2Z-14B422-AA (Alt: Dorman 924-213, Standard Motor Products HLS1448)
Ford Expedition (2003-2006): OEM 6F9Z-14B416-A (Alt: Dorman 924-213, Standard Motor Products HLS1448) - Replace Blown Fuse and Repair Short — Parts: $5-$15, Labor: $150-$300, ~1.5 hr book time (Professional)
- Replace and Program Control Module — Parts: $400-$1000, Labor: $150-$300, ~2 hr book time (Professional)
DIY vs Professional
- Repair Damaged Under-Seat Wiring — Beginner: No
Tools: Wire strippers, butt connectors, heat shrink tubing, heat gun, digital multimeter. - Replace Driver Seat Position Sensor — Beginner: Yes
Tools: Socket set, torque wrench, trim removal tools. - Clean or Replace Electrical Connector — Beginner: Yes
Tools: Electrical contact cleaner, small wire brush/pick set, dielectric grease.
Used vs. New Parts: Buying Guide
When a used part is worth it: Buying a used seat position sensor is not recommended. The labor to access the part is significant, and used electronics carry high failure risks. Only buy used if replacing the entire seat track assembly.
Donor-vehicle mileage cap: roughly under 40000 miles for the part to have meaningful remaining life.
Donor quality checklist:
- Verify exact part number match.
- Avoid sensors from flood-damaged vehicles.
- Inspect connector pins for corrosion.
Decision logic:
- If The part is a wiring pigtail or connector. → Always buy new. Never use a cut/spliced used connector.
- If The part is the electronic seat position sensor. → Buy a new OEM or high-quality aftermarket part to ensure reliability.
- If The entire seat track assembly requires replacement. → A low-mileage used assembly is cost-effective, provided you verify functionality before installation.
Warranty tradeoff: Used parts offer 30-90 day warranties. New aftermarket parts carry 1-year to lifetime warranties. New OEM parts offer 1-2 year warranties.
Worst-case if a used part fails: $300-$500 to repeat the labor of removing the seat if a used sensor fails.
What Happens If You Wait — Timeline
- Immediate: Code B1749 sets. The Airbag light illuminates, disabling memory seat functions and compromising driver airbag deployment. (MPG impact: 0%% · Added cost: $0 (Immediate safety risk))
- 1-6 months: The vehicle fails state safety inspections. The constant airbag light causes 'warning fatigue,' masking new SRS faults. (MPG impact: 0%% · Added cost: $25-$100 (Re-inspection fees))
- 6-12 months: The shorted wire degrades further, potentially arcing to adjacent CAN bus lines and creating complex network failures. (MPG impact: 0%% · Added cost: $200-$500 (Increased diagnostic time))
- 12+ months: Continuous electrical load on the shorted circuit destroys the Seat Control Module or Body Control Module. (MPG impact: 0%% · Added cost: $400-$1000 (Module replacement))
Cost of Not Fixing It
- Immediate: The driver's airbag system is compromised, deploying with incorrect force or not at all during a collision. (Added cost: N/A (Safety Risk))
- 0-6 months: Memory seat functions remain dead. The constant airbag light masks new, critical SRS faults and causes safety inspection failures. (Added cost: 0)
- 6+ months: The persistent short-to-ground places continuous load on the control module, potentially causing irreversible module damage. (Added cost: $400-$1000 (Module replacement))
Diagnosis Steps
- Scan for All Trouble Codes
Use an advanced OBD-II scanner capable of reading Body (B) and Communication (U) codes. Note any other codes related to the SRS or BCM to identify broader network issues.
Tools: Advanced OBD-II scanner (Beginner) - Thorough Visual Inspection Under the Seat
Move the seat to its highest and most forward position. Use a flashlight to meticulously examine the wiring harness for pinched, chafed, or broken wires, focusing on bend points and metal frame contacts.
Tools: Flashlight, inspection mirror (Beginner) - Check Relevant Fuses
Locate the fuse panels and inspect all fuses related to the 'Driver Seat Module', 'Memory Seats', and 'SRS'. A blown fuse confirms an active short circuit.
Tools: Owner's manual, fuse puller (Beginner) - Perform a Live Data 'Wiggle Test'
Connect your scanner and view live data for the seat position sensor. Carefully wiggle the under-seat wiring harness. If the data value jumps erratically or drops to zero, you have located the internal wire break.
Tools: Advanced OBD-II scanner (with live data) (Intermediate) - Test Connector Power and Ground
Disconnect the sensor. With the key on, probe the harness connector. You must see a stable 5.0V reference voltage and less than 0.1V on the ground wire. Readings outside this range indicate a wiring issue upstream of the sensor.
Tools: Digital multimeter, vehicle wiring diagram (Intermediate) - Test Sensor Signal for Internal Short
With the sensor disconnected, measure resistance (Ohms) between its signal and ground pins. A reading under 5 ohms confirms the sensor has shorted internally and requires replacement.
Tools: Digital multimeter (Intermediate) - Isolate Signal Wire for Short to Ground
Disconnect the harness from both the sensor and the control module. Measure continuity between the signal wire pin and a clean chassis ground. Any continuity reading confirms the wire is shorted to ground within the harness.
Tools: Digital multimeter, vehicle wiring diagram (Advanced) - Check Scope Pattern (Advanced)
Back-probe the connected sensor's signal wire with a lab scope. Moving the seat should produce a clean square wave or changing analog voltage. A flat line at zero volts confirms the short to ground.
Tools: Automotive oscilloscope, wiring diagram (Advanced)
When This Code Triggers (Freeze-Frame Conditions)
- Battery Voltage: 11.8-12.5V (Key On, Engine Off (KOEO) during module self-test)
- Ignition Status: Run/On (The fault is detected immediately upon powering the control module.)
- Seat Adjustment Command: Inactive (The short-to-ground fault is continuously present and logged when the module is powered, regardless of seat movement.)
- Module State: Initialization/Self-Test (The BCM or SCM checks sensor circuits at key-on, registering this 'hard' fault instantly.)
Related Codes
- B1754 — Indicates a 'Driver Seat Front Vertical Position Sensor Circuit Short'. Seeing B1749 and B1754 together strongly suggests a shared wiring harness failure rather than two broken sensors.
- B1869 — Indicates 'Air Bag Indicator Lamp Circuit Short'. The airbag module triggers this because it lacks reliable seat data. Fix B1749 first; B1869 usually clears with it.
- U0159 — Indicates lost communication. If U-codes appear with B1749, a damaged under-seat harness likely shorted the CAN bus wires, disrupting the entire network.
Climate & Environmental Factors
- High Humidity and Road Salt: Moisture and winter salt accelerate corrosion on connector pins, increasing resistance and creating short circuits.
- Cold Weather: Low temperatures harden plastic wire insulation. Seat movement cracks the brittle insulation, exposing the wire to the metal frame.
- Vibration and Mechanical Stress: Constant seat adjustment rubs wires against sharp metal tracks, wearing through insulation and causing direct shorts to ground.
How to Talk to a Mechanic About This Code
Say this: "I have an airbag light and a B1749 code for the driver's seat position sensor circuit. Please start the diagnosis by inspecting the under-seat harness for broken wires before testing the sensor or control module."
This directs the technician to the most likely point of failure first, preventing them from immediately quoting an expensive sensor or module replacement.
Avoid saying:
- 'My airbag light is on, can you fix it?'
- 'I think I need a new seat sensor.'
- 'Just do whatever it takes to turn the light off.'
Questions to ask before authorizing the repair:
- Did you find a broken or chafed wire in the harness under the seat?
- If the wiring is good, did you test the sensor itself for an internal short?
- Can you show me the damaged wire or provide the resistance reading from the faulty sensor?
- What is the warranty on this specific repair?
Where to Take It: Dealer vs Independent vs Chain
- Dealer:
Not recommended unless under warranty. Independent shops perform cost-effective wiring repairs more frequently.
Best for: Vehicles still under warranty., Complex repairs involving module programming.
Downsides: Labor rates are 50-100% higher than independent shops., More likely to replace an entire seat track assembly rather than repair a single wire. (Typical cost: +75% vs. baseline) - Independent Shop:
Best fit. Reputable independent shops handle targeted wiring repairs efficiently.
Best for: Out-of-warranty vehicles., Common electrical faults like B1749 on Ford and GM vehicles.
Downsides: Diagnostic skill varies; vetting through ASE certification reviews is crucial. (Typical cost: +0% vs. baseline) - Chain Shop:
Avoid. Chain shops frequently misdiagnose SRS issues or refer you to a dealer.
Best for: Routine maintenance like oil changes and tires.
Downsides: Technicians lack specialization in complex electrical or SRS diagnostics., Often lack the advanced scan tools needed to read body codes. (Typical cost: -10% vs. baseline)
When to Walk Away From the Repair
If the estimated repair cost for B1749 exceeds 40% of your car's private-party value, reconsider the repair. An active airbag light reduces resale value by 20-40%.
- Car worth $3500, fix is $700: Fix it. The repair is 20% of the value, restoring a critical safety feature.
- Car worth $4000, fix is $1800: Borderline. Get a second opinion from a shop focused on wiring repair before replacing expensive modules.
- Car worth $2500, fix is $1500: Walk away. Investing 60% of the car's value into a single issue is not economical.
What Scan Tool You Need for This Code
Minimum: A scanner capable of reading and clearing codes from the Supplemental Restraint System (SRS) and Body Control Module (BCM). Basic engine readers cannot see B-codes.
A $20 code reader shows 'No Codes Found' because it only checks the engine. You need live data capabilities to perform a wiring 'wiggle test'.
Budget: BlueDriver Pro (~$99) — Connects via Bluetooth to read SRS codes and display live seat position data to pinpoint wiring faults.
Mid-range: Foxwell NT510 Elite (~$150) — A dedicated handheld unit that reads SRS codes, displays live data, and offers limited bidirectional controls.
Professional: Autel MaxiCOM MK808 (~$500) — A professional tablet scanner with full bidirectional control, essential for performing seat position sensor calibrations after replacement.
Rent vs buy: Buy a budget or mid-range scanner. Auto parts stores offer free scans, but their tools often cannot read SRS codes or display live data.
How to Clear the Code After You Fix It
- Correct the physical fault (broken wire, faulty sensor).
- Reconnect all components and the battery.
- Use an OBD-II scan tool to erase the B1749 fault from the BCM, SCM, and SRS modules.
- Cycle the ignition off and on. Verify the airbag/SRS warning light illuminates briefly and turns off.
- Test all memory seat functions to confirm restoration.
Drive cycle (~5 minutes): A formal drive cycle is unnecessary. Perform multiple ignition cycles to allow the control module to re-run internal self-tests. Some models require a seat position sensor calibration via scan tool after replacement.
Watch out for:
- Using a basic engine code reader that cannot clear body codes.
- Forgetting to clear the code from the SRS module, leaving the airbag light on.
- Skipping the required seat position sensor calibration procedure after replacement.
Will This Fail Emissions / State Inspection?
No — by itself this code doesn't fail OBD inspection (but it can keep readiness monitors from setting, which causes a separate fail).
- California: Will NOT fail a smog check. California ignores the airbag light for emissions testing.
- New York: WILL FAIL the annual safety inspection. An illuminated airbag warning light is an automatic failure.
- Texas: Will NOT fail the safety inspection. The airbag system is not an inspected item under Texas law.
- Virginia: WILL FAIL the safety inspection. Active airbag lights result in immediate failure.
Most Commonly Affected Vehicles
- Ford Explorer (2002-2010) — The main harness under the driver's seat frequently chafes and breaks wires.
- Lincoln Town Car (2003-2011) — Wiring harness failure under the seat is a frequent cause due to complex memory functions.
- Ford Expedition (2003-2006) — Shares the Explorer's seat design and suffers identical under-seat wiring vulnerabilities.
- Chevrolet Tahoe / Suburban (2007-2014) — Heavy, feature-rich seats stress the harness, breaking wires for the position sensor and heaters.
- Cadillac Escalade (2007-2014) — Complex seat modules and wiring are highly susceptible to harness damage from movement.
- Dodge Grand Caravan (2008-2016) — The Stow 'n Go seating mechanism places unique stress on electrical connections, breaking wires.
- Mercury Mountaineer (2002-2010) — Experiences identical wiring harness failures to the Ford Explorer.
- Lincoln Navigator (2003-2006) — Advanced memory features rely heavily on this sensor, and the under-seat wiring is a known weak point.
Manufacturer-Specific Notes
- Ford / Lincoln / Mercury: On Explorer and Expedition platforms, the fault is almost invariably broken wires within the first 12 inches of the harness where it exits the floor carpet. Focus diagnosis here first.
- General Motors (GM): For GMT900 trucks, B1749 often appears alongside seat heater codes. The wires run in the same harness and fail together due to flexing.
- Chrysler / Dodge / Jeep: In minivans, Stow 'n Go seats pinch wires in the folding mechanism. Inspect the hinge points carefully.
- Toyota / Lexus: Toyota uses different code numbers (B14xx series) for seat sensors, but the diagnostic principle of testing the 5V reference, ground, and signal wire remains identical.
Real Owner Stories
2007 Ford Explorer at 145,000 miles
Airbag light stayed on and memory seat functions stopped working.
What they tried:
- Took it to a general mechanic who read the code but suggested a costly dealership diagnostic.
- Researched the code on an Explorer forum.
Outcome: The owner moved the seat forward and inspected the harness underneath. They found a completely broken purple wire. Repairing it with a butt connector and heat shrink cost under $10 and restored all functions.
Lesson: For Ford Explorers, a meticulous visual inspection of the under-seat harness is the mandatory first step. A broken wire is the culprit almost every time.
2011 Chevy Suburban at 110,000 miles
Airbag light was on, but a basic OBD-II scanner showed no codes.
What they tried:
- Got a free scan at an auto parts store, which also found no codes.
- Ignored the light for a month.
Outcome: An independent shop used a professional scanner to pull B1749. A live-data 'wiggle test' confirmed an intermittent short. The technician found chafed insulation rubbing against the seat frame and repaired it for $250.
Lesson: Basic scanners only read Powertrain (P) codes. You must use a scanner capable of reading Body (B) codes to diagnose airbag lights.
2014 Dodge Grand Caravan with 85,000 miles
Airbag light illuminated alongside random electrical failures and a 'NO BUS' dash message.
What they tried:
- Suspected a major computer failure.
- Replaced the battery, which did nothing.
Outcome: A technician traced the issue to a shorted wire in the rear entertainment system harness. This shorted the entire CAN bus network to ground, triggering B1749 and multiple U-codes. Disconnecting the faulty module restored the seat functions.
Lesson: If B1749 appears with communication codes (U-codes), a shorted wire in one system has crashed the shared data bus.
How to Prevent This Code From Triggering
- Install Protective Wire Loom (Once, especially on high-risk Ford and GM vehicles) — Adding split loom tubing over the under-seat harness prevents wires from chafing against sharp metal seat frames.
- Clean Under Seats Regularly (Every 3-6 months) — Removing debris prevents objects from lodging in the seat track and severing wires.
- Secure Loose Harnesses (During any under-seat inspection) — Zip-tying dangling harnesses to the frame prevents them from catching in the tracks or being kicked.
- Apply Dielectric Grease to Connector (Once, as a preventative measure) — Greasing the connector's weather-pack seal blocks moisture and prevents pin corrosion.
Frequently Asked Questions
Can I fix a B1749 code myself?
Yes, repairing a visibly broken wire with a butt connector and heat shrink is straightforward for DIYers. Replacing the sensor requires unbolting the seat but uses basic hand tools. Diagnosing intermittent shorts requires a multimeter and patience.
Will clearing the code make it go away?
No. B1749 is a 'hard fault', meaning the short circuit is active. The module will instantly re-log the code upon its next self-test.
What are the most common mistakes when diagnosing B1749?
The biggest mistake is replacing the expensive Seat Control Module without testing the wiring. The second is replacing a blown fuse without finding the short that caused it.
Where is the driver seat position sensor located?
The sensor mounts on the seat track assembly underneath the driver's seat. It is typically a small plastic module located on the inboard rail.
Why did my airbag light come on with the seat code?
The airbag system uses seat position to tailor deployment force. Without this data, the system flags a safety risk and illuminates the SRS warning light.
Is the seat position sensor the same as the seat weight sensor?
No. The position sensor tracks horizontal location. The weight sensor (Occupant Classification System) is in the passenger seat to control the passenger airbag.
How do I reset the airbag light after fixing the B1749 code?
Clear the B1749 fault with an OBD-II scanner capable of reading SRS codes. Cycle the ignition, and the airbag light will turn off if no other faults exist.
A mechanic quoted me $600 to fix this. Is that reasonable?
Yes, $400-$700 is realistic. This includes 1-2 hours of diagnostic time to pinpoint the short and 1-2 hours of labor to repair the harness or replace the sensor.
Key Takeaways
- Code B1749 stems from a broken or chafed wire under the driver's seat in over 80% of cases.
- Driving with B1749 is mechanically safe, but it disables or alters driver airbag deployment, creating a severe crash risk.
- Never replace a $400+ Body Control Module until a multimeter test definitively proves the under-seat wiring and sensor are functional.
- A standard $20 engine code reader cannot see B1749; you must use an advanced scanner capable of reading Body (B) and SRS codes.
Helpful Videos


Shop the Parts Behind B1749
Below are the parts most often responsible for code B1749, ranked by how frequently each one is the actual culprit (per the diagnosis above). Tap any to see what we have for your vehicle.


The information in this article is provided for general reference and educational purposes only. Vehicle specifications, procedures, and part compatibility can vary by production date, trim level, and region. Always consult your vehicle's factory service manual and verify part numbers before purchasing or performing repairs. Safety-critical components such as airbags, seat belts, and braking systems should be installed by a qualified professional.
- 🧭 Diagnostic Flowchart
- 🎬 Helpful Videos
- 🛍️ Shop This Part
- What Does B1749 Mean?
- Can I Drive With B1749?
- Common Causes
- Symptoms
- Common Fixes & Costs
- DIY vs Professional
- Used vs. New Parts: Buying Guide
- What Happens If You Wait — Timeline
- Cost of Not Fixing It
- Diagnosis Steps
- When This Code Triggers (Freeze-Frame Conditions)
- Related Codes
- Climate & Environmental Factors
- How to Talk to a Mechanic About This Code
- Where to Take It: Dealer vs Independent vs Chain
- When to Walk Away From the Repair
- What Scan Tool You Need for This Code
- How to Clear the Code After You Fix It
- Will This Fail Emissions / State Inspection?
- Most Commonly Affected Vehicles
- Manufacturer-Specific Notes
- Real Owner Stories
- 2007 Ford Explorer at 145,000 miles
- 2011 Chevy Suburban at 110,000 miles
- 2014 Dodge Grand Caravan with 85,000 miles
- How to Prevent This Code From Triggering
- Frequently Asked Questions
- Can I fix a B1749 code myself?
- Will clearing the code make it go away?
- What are the most common mistakes when diagnosing B1749?
- Where is the driver seat position sensor located?
- Why did my airbag light come on with the seat code?
- Is the seat position sensor the same as the seat weight sensor?
- How do I reset the airbag light after fixing the B1749 code?
- A mechanic quoted me $600 to fix this. Is that reasonable?
- Key Takeaways
- 🎟️ Get 5% Off