
OBD-II Code B1884: Passenger Airbag Indicator Light Failure
What B1884 means, why it triggers, and how to fix it
- Code B1884 indicates the small incandescent bulb inside the 'Passenger Airbag Off' indicator switch has burned out in over 95% of cases.
- The primary symptom is a solid main airbag warning light, which flashes Lamp Flash Code 27 (2 flashes, pause, 7 flashes) on Ford vehicles.
- The RCM disables the passenger airbag as a fail-safe when this code triggers, meaning it will not deploy in a collision.
- Fixing this costs under $5 if you solder a new 12V micro-bulb yourself, or $150-$250 at a shop to replace the entire PAD switch assembly.
- You must use an SRS-capable OBD-II scanner to clear the B1884 code from the module after repair; the light will not turn off automatically.
What Does B1884 Mean?

Code B1884 indicates the Restraints Control Module (RCM) detected a fault in the passenger airbag deactivation (PAD) indicator light circuit. This light proves out the circuit during a self-test every time you start the car. If the RCM does not detect the expected electrical load from the bulb, it flags this code and illuminates the main dashboard airbag warning light.
Technical definition: Passenger Airbag Deactivation (PAD) Warning Lamp Circuit Failure. The Restraints Control Module (RCM) detected an open circuit or a short to ground in the PAD indicator lamp circuit for more than 2.2 seconds. The RCM expects a specific resistance and voltage drop during the startup prove-out test; failure to meet these parameters sets DTC B1884.
Can I Drive With B1884?
Yes, But With Caution. Yes, but the Restraints Control Module (RCM) has disabled the passenger airbag as a fail-safe. It will NOT deploy in a crash. Fix this immediately to ensure passenger safety.
Common Causes

- Burned-out indicator bulb (Very Common) — The small incandescent bulb inside the Passenger Airbag Deactivation (PAD) switch assembly has a fragile filament that breaks from age and vibration. This causes over 95% of B1884 codes, especially on Ford, Mazda, and Nissan models. 🎬 Watch: How to repair the B1884 code on a Ford F150.
- Faulty PAD switch assembly (Common) — The entire switch unit requires replacement when the internal soldered bulb fails, as dealerships do not sell the bulb as a separate component.
- Damaged wiring, loose connector, or corrosion (Less Common) — Pinched, disconnected, or corroded wiring to the PAD switch breaks the circuit. This frequently occurs when the connector is left unplugged or jarred during dashboard work, like installing an aftermarket radio.
- Blown fuse (Less Common) — A blown fuse (typically 7.5A or 10A in the passenger compartment panel) cuts power to the PAD switch circuit, triggering the code immediately at startup.
- Incorrect bulb replacement (Less Common) — Installing an LED or an incorrect incandescent bulb alters the circuit resistance. The RCM interprets this unexpected electrical load as a fault and resets the code.
- Failed Restraints Control Module (RCM) (Very Rare) — The RCM rarely fails internally, but requires replacement if it stops sending the 12V prove-out signal to the PAD circuit after all wiring and bulb issues are ruled out.
Symptoms

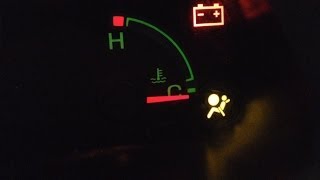
- Airbag warning light is on — The main red or orange SRS/airbag warning light on the instrument cluster illuminates constantly.
- Flashing airbag light (Ford specific) — On Ford, Lincoln, and Mercury vehicles, the airbag light flashes Lamp Flash Code (LFC) 27 (2 flashes, pause, 7 flashes) before staying on solid.
- Passenger airbag 'OFF' indicator does not light up — The 'Passenger Airbag Off' light fails to illuminate for its 3-5 second self-test when starting the vehicle.
- Inability to manually switch airbag status — Turning the manual passenger airbag key switch has no effect on the indicator light status.
- Passenger airbag is always disabled (scan-tool only — no driver-felt sign) — The RCM disables the passenger airbag as a fail-safe, preventing deployment in an accident.
Diagnostic Flowchart
Tap your situation to follow the diagnostic path that matches what you're seeing on this code.
Common Fixes & Costs
- Solder in a new indicator bulb — Parts: $1-$5, Labor: $0 (DIY), ~0.7 hr book time (DIY)
- Replace the PAD switch assembly
— Parts: $40-$130, Labor: $75-$150, ~0.7 hr book time
(Intermediate)
Ford F-150 (2004-2008): OEM 4L3Z-14B268-AA (Alt: Dorman 924-901)
Ford F-250/F-350 (1999-2007): OEM F81Z-14B268-AA (Alt: Dorman 924-900) - Replace blown fuse — Parts: $1-$5, Labor: $0-$50, ~0.2 hr book time (Beginner)
- Repair damaged wiring or connector — Parts: $5-$20, Labor: $100-$300, ~1.5 hr book time (Professional)
- Replace Occupant Classification Sensor Mat — Parts: $300-$800, Labor: $150-$400, ~2.0 hr book time (Professional)
Used vs. New Parts: Buying Guide
When a used part is worth it: A used PAD switch assembly from a salvage yard makes sense for tight budgets, as the switch housing rarely fails. However, the internal bulb in a used part has unknown hours and may burn out soon.
Donor-vehicle mileage cap: roughly under 100000 miles for the part to have meaningful remaining life.
Donor quality checklist:
- Match the part number exactly; identical-looking switches have different internal wiring.
- Visually inspect the connector pins for corrosion.
- Test the bulb resistance with a multimeter before purchasing.
Decision logic:
- If You have soldering skills → Buy a new $3 micro-bulb and repair the original assembly for maximum savings.
- If You want maximum peace of mind and a longer-lasting repair → Buy a new OEM or reputable aftermarket (e.g., Dorman) part for $40-$130.
- If You are on a strict budget and accept the risk of premature failure → Buy a used assembly for $10-$30.
Warranty tradeoff: Used parts carry 30-90 day warranties. New aftermarket parts offer 1-year to lifetime warranties. OEM parts carry 1-2 year warranties.
Worst-case if a used part fails: $75-$150 for repeat labor if a used part fails after the warranty period.
What Happens If You Wait — Timeline
- Immediate: The RCM detects an open circuit during startup. Code B1884 is stored, the airbag light illuminates, and the passenger airbag is disabled. (MPG impact: 0%% · Added cost: $0)
- Ongoing: The airbag light remains on constantly. No further mechanical degradation occurs, but the safety risk persists. (MPG impact: 0%% · Added cost: $0)
- At next state safety inspection: The vehicle automatically fails inspection due to the illuminated airbag warning light. (MPG impact: 0%% · Added cost: $150-$250 (Mandatory repair cost))
- In the event of a collision: The passenger-side front airbag fails to deploy, significantly increasing the risk of serious injury. (MPG impact: 0%% · Added cost: Potentially catastrophic)
Cost of Not Fixing It
- Immediate: The passenger airbag is disabled and will not deploy in a collision, creating a severe safety risk. (Added cost: $0)
- At Next Inspection: The vehicle automatically fails safety inspections in most states, preventing registration renewal. (Added cost: $150-$250 (Cost of mandatory repair))
- In Case of Accident: Increased risk of serious injury or fatality to the passenger, plus potential legal liability. (Added cost: Potentially catastrophic)
Diagnosis Steps

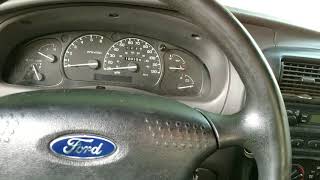
- Observe the PAD Indicator and Airbag Light
Turn the ignition to 'ON' (engine off). Watch the passenger airbag indicator light. It must light up for 3-5 seconds. If the main dash airbag light flashes code 27 (on Fords) and stays solid, you have confirmed a B1884 fault.
Tools: None (Beginner) - Scan for SRS Codes
Use an OBD-II scanner capable of reading SRS/RCM 'B' codes to verify B1884 is the active fault. Basic engine code readers cannot access this module.
Tools: SRS-capable OBD-II Scanner (Beginner) - Check the Fuse
Locate the fuse for the PAD switch or Occupant Classification System (OCS) in the passenger footwell fuse box (often 7.5A or 10A). Replace it if blown.
Tools: Fuse puller or small pliers (Beginner) - Access and Inspect the PAD Switch Connector
Remove the dash trim panel surrounding the PAD switch. Disconnect the electrical connector and inspect for pushed-out pins, corrosion, or damaged wires. Verify it was plugged in securely.
Tools: Trim removal tools, flashlight (Intermediate) - Pro Tip: Test the Circuit with a Test Bulb
Insert the wire leads of a standard 12V/194 incandescent bulb into the two indicator light terminals on the vehicle's harness connector. Turn the ignition on. If the test bulb lights up for a few seconds, the vehicle's wiring and RCM are perfect, proving the PAD switch assembly is faulty.
Tools: 12V test bulb (e.g., 194 marker bulb) (Intermediate) - Pro Tip: Test PAD Bulb with a Multimeter (Resistance)
Remove the PAD switch assembly. Set a multimeter to Ohms and probe the two pins corresponding to the indicator bulb. A good bulb shows 5 to 50 Ohms. Infinite resistance ('OL') confirms a broken bulb filament.
Tools: Multimeter (Advanced) - Pro Tip: Test Circuit with a Multimeter (Voltage)
Set a multimeter to DC Volts. Ground the black probe. Probe the power wire terminal on the unplugged PAD connector. Turn the ignition to 'ON'. A brief pulse of ~12V confirms the RCM is sending the correct prove-out signal.
Tools: Multimeter (Advanced) - Clear Codes and Re-Test
After replacing the bulb or switch, use an SRS-capable scanner to clear the B1884 code from the RCM. Cycle the ignition off and on to confirm the light stays off. The light will not turn off automatically without clearing the code.
Tools: OBD-II Scanner (SRS capable) (Intermediate)
When This Code Triggers (Freeze-Frame Conditions)
- Ignition Status: ON (The fault is detected during the key-on-engine-off (KOEO) self-test.)
- System Voltage: 11.5-13.5V (Normal battery voltage is present during the startup sequence.)
- PAD Lamp Circuit Status: Open / Short to Ground (The RCM did not detect the expected resistance from the indicator bulb filament.)
- Ignition Cycles Since Fault: 0-255 (Counts the number of times the vehicle has been started since the fault was first detected.)
Related Codes
- LFC 27 — Lamp Flash Code 27 (2 flashes, pause, 7 flashes) is the visual dashboard equivalent of B1884 on Ford vehicles.
- B1890 — Indicates a 'short to battery' in the PAD warning lamp circuit, whereas B1884 indicates an 'open or short to ground.' B1890 usually means a shorted wire keeping the light on constantly.
- B0091 — A GM code for a 'Front End Sensor 1' fault. B1884 is the cabin indicator light; B0091 is the actual crash sensor behind the grille.
- B2296 — A Ford code for a seat belt pre-tensioner or impact sensor fault. If present with B1884, suspect a wider harness or RCM issue.
Climate & Environmental Factors
- Vibration and Rough Roads: Constant vibration breaks the fragile incandescent bulb filament inside the PAD switch, making this the primary cause of failure on work trucks.
- High Humidity or Liquid Spills: Moisture from spills on the center console or high cabin humidity corrodes the PAD switch connector pins, creating high resistance.
- Extreme Cold: Cold temperatures cause electrical connectors to contract, occasionally creating an intermittent open circuit that triggers the code only on freezing days.
How to Talk to a Mechanic About This Code
Say this: "I have an airbag light on, and my scanner shows code B1884, pointing to the passenger airbag indicator light. I'd like to schedule a diagnostic to confirm the fault is in the PAD lamp circuit and get a quote to replace the switch assembly."
This signals you know the specific, high-probability cause. It directs the technician to the correct circuit and prevents them from jumping to a costly, unnecessary diagnosis of the entire SRS system.
Avoid saying:
- 'My airbag light is on, can you fix it?' (Invites a lengthy, expensive diagnostic process).
- 'I think my airbag is broken.' (The airbag itself is fine; the issue is a small indicator light circuit).
- 'Just do whatever it takes to turn the light off.' (Gives the shop a blank check to replace expensive parts).
Questions to ask before authorizing the repair:
- Can you confirm the fault is isolated to the PAD indicator circuit and not the RCM or main harness?
- What is the cost to replace the PAD switch assembly?
- Does the estimate include scanning and clearing the B1884 code from the SRS module after the repair?
Where to Take It: Dealer vs Independent vs Chain
- Dealer:
Not recommended unless covered by warranty. Their standard procedure is unnecessarily expensive for this common fault.
Best for: Vehicles still under the 5-year/60,000-mile SRS warranty., Complex cases where wiring and RCM have been ruled out by an independent shop.
Downsides: Highest labor rates., Will always replace the entire PAD switch assembly rather than attempting a simple bulb solder. (Typical cost: +100% vs. baseline) - Independent Shop:
Best fit. Experienced independent technicians are familiar with this common issue and can quickly diagnose and replace the switch assembly.
Best for: Most out-of-warranty vehicles., Cost-conscious owners who want a correct and safe repair.
Downsides: Quality varies; ensure the shop has experience with SRS/airbag systems and proper scan tools. (Typical cost: +0% vs. baseline) - Chain Shop:
AVOID. This requires specific diagnostic knowledge of the SRS system. High risk of misdiagnosis or the shop declining the work.
Best for: Tires, brakes, and oil changes.
Downsides: Many chain shops refuse to work on airbag systems due to liability or lack of expertise. (Typical cost: -10% vs. baseline)
When to Walk Away From the Repair
If the estimated repair cost exceeds 40-50% of the car's private-party value, you should pause and evaluate. However, for B1884, this rule rarely applies.
- Car worth $3000, fix is $250: Fix it. The repair cost is minimal compared to the vehicle's value and is essential for safety and legal operation.
- Car worth $15000, fix is $250: Fix it. This is a minor and inexpensive repair on a valuable vehicle.
What Scan Tool You Need for This Code
Minimum: A scanner that reads and clears 'B' (Body) codes from the SRS (Supplemental Restraint System) module. Basic engine code readers will NOT work.
A standard $20 engine code reader cannot communicate with the Restraints Control Module (RCM). You need a tool with SRS compatibility to read the B1884 code and clear it after the repair.
Budget: BlueDriver Pro (~$100) — Connects to your smartphone via Bluetooth. Reads and clears SRS codes (like B1884) for most major brands. Excellent choice for DIYers.
Mid-range: Foxwell NT510 Elite (~$180) — A powerful handheld scanner offering deep diagnostic capabilities for a specific car brand. Easily reads and clears SRS codes and views live sensor data.
Professional: Autel MaxiCOM MK808 (~$500) — A professional tablet scanner providing comprehensive diagnostics for all vehicle systems, including SRS. Offers clear steps to read and erase airbag fault codes.
Rent vs buy: For a one-time B1884 fix, using a local independent shop is often more cost-effective. If you plan to do your own maintenance, buying a budget pick like the BlueDriver Pro pays for itself quickly.
How to Clear the Code After You Fix It
- Complete the physical repair (replace PAD switch or bulb).
- Reconnect the vehicle battery if disconnected.
- Connect an SRS-capable OBD-II scan tool.
- Navigate to the Restraints Control Module (RCM) or SRS menu.
- Select the option to 'Clear/Erase DTCs'.
- Cycle the ignition off, then on, and confirm the airbag light performs its self-check and stays off.
Drive cycle: No drive cycle is required. The fault clears and the light goes out immediately after the code is erased with a scan tool.
Readiness monitors affected: None
Watch out for:
- Using a basic engine code reader that cannot communicate with the SRS module.
- Forgetting to clear the code after the repair; the light will not turn off on its own.
- Assuming disconnecting the battery will clear a hard SRS fault code (it will not).
Will This Fail Emissions / State Inspection?
No — by itself this code doesn't fail OBD inspection (but it can keep readiness monitors from setting, which causes a separate fail).
- California: An airbag light does not cause a smog failure, but an inspector may refuse to perform the test on safety grounds.
- New York: An illuminated airbag warning light is an automatic failure of the annual state safety inspection.
- Texas: As of 2025, non-commercial vehicles are exempt from mandatory annual safety inspections, but driving with a disabled airbag remains a severe safety risk.
Most Commonly Affected Vehicles
- Ford F-150 (1997-2008) — Extremely common. The PAD switch sits near the radio. Jarring the dash during radio installation breaks the bulb filament instantly.
- Ford F-250/F-350 Super Duty (1999-2007) — Shares the exact RCM and PAD switch components as the F-150, suffering identical bulb failures.
- Ford Explorer (2002-2010) — The indicator is a separate unit above the aftermarket radio opening, highly susceptible to vibration damage.
- Chevrolet Silverado / GMC Sierra (2003-2007) — The PAD indicator is integrated into the rearview mirror or headliner console; bulb failure triggers the same circuit fault.
- Nissan Titan (2004-2015) — The passenger airbag indicator light assembly fails frequently, requiring replacement of the center dash unit.
- Mazda CX-7 (2007-2012) — Uses Ford-derived electronics. The PAD indicator in the center stack fails identically to Ford models.
- Honda Pilot, Accord, CR-V (2003-2012) — The indicator LED fails, setting a 'high resistance' code in the indicator circuit, mirroring the B1884 fault logic.
Manufacturer-Specific Notes
- Ford: Jarring the dashboard during an aftermarket radio installation is a textbook way to break the fragile bulb filament and trigger code B1884.
- GM (Chevrolet/GMC): The PAD indicator is often integrated into the rearview mirror assembly, sometimes requiring replacement of the entire mirror unit.
- Honda: Honda uses an LED rather than an incandescent bulb. When it fails, it sets a 'high resistance' code rather than an open circuit code.
Real Owner Stories
2003 Ford F-150 with 100k miles
Airbag light came on immediately after swapping the factory radio for a used replacement.
What they tried:
- Disconnected battery.
- Replaced the PAD switch with a used one from eBay.
- Scanned with FORScan, cleared B1884, but it returned instantly.
Outcome: The replacement used PAD switch also had a burned-out bulb. The owner tested the bulb pins with a multimeter, found infinite resistance, and soldered a new $2 bulb onto the board to fix it permanently.
Lesson: Never assume a used electrical part is functional. Test a used PAD switch with a multimeter before installation. Faults appearing immediately after dash work are almost always broken bulb filaments.
1999 Ford F-150 with flashing airbag light
Airbag light flashed code 27 (2 flashes, pause, 7 flashes) then stayed solid. The PAD indicator light never illuminated.
What they tried:
- Heard a relay clicking near the dash.
- Fiddled with the key switch and momentarily got the PAD light to work before it failed again.
Outcome: The intermittent function confirmed a failing bulb filament making poor contact. The owner replaced the entire PAD switch assembly for $80, resolving the issue.
Lesson: Flashing code 27 directly points to the B1884 fault. Intermittent operation confirms a failing electrical component (the bulb), ruling out module or wiring harness failures.
How to Prevent This Code From Triggering
- Exercise extreme caution when working around the dashboard. (During any radio installation or trim removal.) — Prevents jarring the PAD switch, which easily breaks the fragile incandescent bulb filament.
- Use proper plastic trim removal tools. (Whenever removing dash panels.) — Prevents metal screwdrivers from slipping and damaging the PAD switch wiring harness.
- Disconnect the battery before unplugging SRS components. (Before any airbag system repair.) — Prevents accidental short circuits and avoids setting additional hard fault codes in the RCM.
Frequently Asked Questions
Is it safe to drive with code B1884?
You can drive the car, but the passenger airbag is disabled and will not deploy in an accident. This poses a major safety risk for any passenger. The driver's airbag continues to function normally.
Will code B1884 cause me to fail an inspection?
Yes. In jurisdictions with vehicle safety inspections, an illuminated airbag warning light is an automatic failure. You must repair the issue and clear the code to pass.
I just replaced my radio and now my airbag light is on. Is it related?
Almost certainly. Jolting the PAD switch while working on the dash breaks the fragile bulb filament. You may have also forgotten to plug the switch's connector back in securely.
My basic OBD-II scanner shows no codes, but my airbag light is on. Why?
Basic engine code readers only pull 'P' (Powertrain) codes. Airbag codes are 'B' (Body) codes, requiring an advanced scanner that reads the Supplemental Restraint System (SRS) module.
I soldered a new bulb in, but the light is still on. What did I do wrong?
You likely forgot to clear the B1884 code from the RCM with an SRS-capable scanner; the light will not go out automatically. Alternatively, you used an LED with incorrect resistance, or created a weak solder joint.
What is Lamp Flash Code 27 on a Ford?
It is the visual equivalent of the B1884 trouble code. The airbag light flashes twice, pauses, then flashes seven times, pointing directly to a PAD warning lamp circuit failure.
My mechanic quoted me $1,000+ to fix this. Why is your estimate so much lower?
A quote over $1,000 suggests a misdiagnosis, likely for an expensive Occupant Classification Sensor mat. Code B1884 specifically targets the indicator light circuit, which costs $150-$250 to fix at a shop. Politely ask the mechanic to confirm the diagnosis isolates the PAD indicator circuit.
Can I just put tape over the airbag light?
No. Covering the light ignores a critical safety failure and knowingly puts your passenger at risk of the airbag not deploying. It is illegal in many places and guarantees a safety inspection failure.
Key Takeaways
- Code B1884 indicates the small incandescent bulb inside the 'Passenger Airbag Off' indicator switch has burned out in over 95% of cases.
- The primary symptom is a solid main airbag warning light, which flashes Lamp Flash Code 27 (2 flashes, pause, 7 flashes) on Ford vehicles.
- The RCM disables the passenger airbag as a fail-safe when this code triggers, meaning it will not deploy in a collision.
- Fixing this costs under $5 if you solder a new 12V micro-bulb yourself, or $150-$250 at a shop to replace the entire PAD switch assembly.
- You must use an SRS-capable OBD-II scanner to clear the B1884 code from the module after repair; the light will not turn off automatically.
Helpful Videos
Shop the Parts Behind B1884
Below are the parts most often responsible for code B1884, ranked by how frequently each one is the actual culprit (per the diagnosis above). Tap any to see what we have for your vehicle.


The information in this article is provided for general reference and educational purposes only. Vehicle specifications, procedures, and part compatibility can vary by production date, trim level, and region. Always consult your vehicle's factory service manual and verify part numbers before purchasing or performing repairs. Safety-critical components such as airbags, seat belts, and braking systems should be installed by a qualified professional.
- 🧭 Diagnostic Flowchart
- 🎬 Helpful Videos
- 🛍️ Shop This Part
- What Does B1884 Mean?
- Can I Drive With B1884?
- Common Causes
- Symptoms
- Common Fixes & Costs
- Used vs. New Parts: Buying Guide
- What Happens If You Wait — Timeline
- Cost of Not Fixing It
- Diagnosis Steps
- When This Code Triggers (Freeze-Frame Conditions)
- Related Codes
- Climate & Environmental Factors
- How to Talk to a Mechanic About This Code
- Where to Take It: Dealer vs Independent vs Chain
- When to Walk Away From the Repair
- What Scan Tool You Need for This Code
- How to Clear the Code After You Fix It
- Will This Fail Emissions / State Inspection?
- Most Commonly Affected Vehicles
- Manufacturer-Specific Notes
- Real Owner Stories
- 2003 Ford F-150 with 100k miles
- 1999 Ford F-150 with flashing airbag light
- How to Prevent This Code From Triggering
- Frequently Asked Questions
- Is it safe to drive with code B1884?
- Will code B1884 cause me to fail an inspection?
- I just replaced my radio and now my airbag light is on. Is it related?
- My basic OBD-II scanner shows no codes, but my airbag light is on. Why?
- I soldered a new bulb in, but the light is still on. What did I do wrong?
- What is Lamp Flash Code 27 on a Ford?
- My mechanic quoted me $1,000+ to fix this. Why is your estimate so much lower?
- Can I just put tape over the airbag light?
- Key Takeaways
- 🎟️ Get 5% Off