
OBD-II Code B2021: Body Electrical Circuit Fault Explained
The Ultimate Guide to Diagnosing and Fixing B2021 Faults
- Scan your vehicle with an advanced OBD-II tool to get the exact manufacturer definition for B2021, as it points to over 20 different body circuit faults depending on the brand.
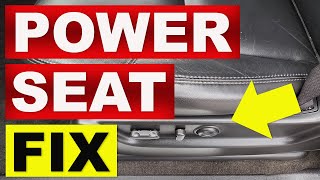
- Inspect the 12V fuses and under-seat wiring harnesses first, as physical wire damage or a blown fuse causes 80% of B2021 power seat failures.
- Test the malfunctioning component's connector with a multimeter for a solid 12V power and ground before spending $300+ on a replacement motor.
- Drive the vehicle safely with a B2021 code active, as it only disables body comfort features like power seats or liftgates without affecting engine performance.
What Does B2021 Mean?
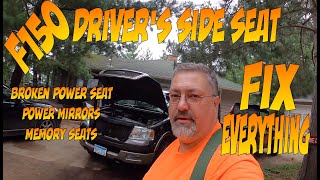
B2021 is a manufacturer-specific Body Diagnostic Trouble Code (DTC), meaning its exact definition varies significantly between car brands. For General Motors (GM) vehicles, it specifically indicates a problem with the passenger's power seat motor. 🎬 Watch: How to fix power seat issues on GM trucks and SUVs. For Ford, it signals a fault in a different body electrical circuit, such as the power liftgate module or a seat memory module. It serves as a generic alert that an electrical component in the vehicle's body has a circuit performance issue.
Technical definition: B2021 lacks a universal SAE/ISO definition because it is manufacturer-specific. The 'B' indicates a Body system, the '0' signifies a generic fault, and the '21' points to a specific circuit area defined by the automaker. A common General Motors example is 'RF/Passenger seat motor #3 (front vertical) circuit range/performance'. A Ford example relates to a 'Seat Memory Module' error or a 'Power Liftgate Module' circuit fault. An advanced scan tool is required to read the exact manufacturer-specific definition.
Can I Drive With B2021?
Yes. This code relates to body comfort and convenience features, like power seats, windows, or liftgates. It does not impact the engine's performance, braking, or steering systems. The vehicle is safe to drive, but the affected accessory remains inoperative until repaired.
Common Causes
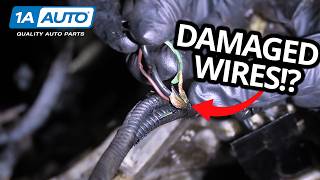
- Damaged or Frayed Wiring (Very Common) — Wiring located under seats, in door jambs, or near hatch hinges sustains constant movement and flexing. This repeated stress, or accidental pinching from previous interior repairs, breaks wires or creates short circuits, making it the primary cause 🎬 Watch: A step-by-step guide to repairing broken electrical wires in your car. for body electrical faults.
- Blown Fuse (Common) — A blown fuse instantly disables an electrical circuit. This occurs as a protective measure when a short circuit or a failing component draws excessive current.
- Faulty Component Switch (Common) — The control switch for a power function (e.g., power seat, window, or liftgate) wears out from heavy use or suffers from internal contact corrosion, preventing it from sending the correct electrical signal.
- Failing Electrical Component Motor (Less Common) — The motor responsible for the movement (e.g., a power seat or liftgate motor) fails due to age, internal wear, or liquid damage. A failing motor draws too much current, operates erratically, or stops working entirely.
- Corroded Electrical Connector (Less Common) — Moisture from spills, rain, or high humidity seeps into electrical connectors and corrodes the metal pins. This corrosion creates high resistance or a complete open in the circuit, triggering the fault code.
- Low Battery Voltage (Uncommon) — Many vehicle platforms, particularly from Chrysler/Dodge/Jeep, are highly sensitive to low battery voltage. A weak or dying battery causes the Body Control Module (BCM) to set spurious and seemingly random body codes.
- Aftermarket Accessory Interference (Uncommon) — Improperly installed aftermarket devices like remote starters, alarms, or audio systems interfere with body circuits by causing voltage drops or data bus communication errors.
- Faulty Body Control Module (BCM) (Rare) — The BCM acts as the central computer for the vehicle's electronic accessories. An internal failure in the BCM leads to multiple, seemingly unrelated electrical issues, including setting a B2021 code.
Symptoms
- Power Accessory Not Working — A specific feature, such as a power seat, window, mirror, or liftgate, fails to respond when its switch is activated.
- Intermittent Operation — The accessory works sporadically depending on door position, seat movement, or temperature changes, pointing directly to a loose wire or a poor connection.
- Repeatedly Blown Fuses — A specific fuse blows every time you attempt to use the related function, indicating a hard short circuit in the wiring or the component itself.
- Audible Clicks Without Movement — You hear a clicking sound from a relay or the component itself when pressing the switch, but the motor doesn't move. This confirms the control side works, but the motor or power side has failed.
- Parasitic Battery Drain — A shorted module or component fails to 'go to sleep' when the vehicle is off, causing a steady battery drain that leaves it dead overnight.
- No Check Engine Light (also visible on scanner) — As a body code, B2021 never illuminates the Check Engine Light. It only triggers a specific warning message on the driver information center or appears during a full vehicle scan.
Diagnostic Flowchart
Tap your situation to follow the diagnostic path that matches what you're seeing on this code.
Common Fixes & Costs
- Repair Damaged Wiring — Parts: $10-$40, Labor: $150-$400, ~2 hr book time (Intermediate)
- Replace Power Seat/Window Switch — Parts: $60-$350, Labor: $80-$125, ~0.8 hr book time (DIY)
- Replace Power Seat or Liftgate Motor — Parts: $300-$600, Labor: $150-$250, ~1.5 hr book time (Professional)
- Diagnose Electrical System — Parts: $0, Labor: $125-$250, ~1.5 hr book time (Professional)
- Replace Body Control Module (BCM) — Parts: $400-$800, Labor: $200-$450, ~2 hr book time (Professional)
DIY vs Professional
- Repair Damaged Wiring — Beginner: No
Tools: Multimeter, wire strippers, soldering iron or crimp connectors, heat shrink tubing, flashlight. - Replace Power Seat/Window Switch — Beginner: Yes
Tools: Plastic trim removal tools, screwdriver, small socket set (often 7mm). - Replace Power Seat or Liftgate Motor — Beginner: No
Tools: Socket set (including Torx bits), basic hand tools, potentially a helper to lift the seat. - Replace Body Control Module (BCM) — Beginner: No
Tools: Socket set, trim removal tools, and a professional bi-directional scan tool with manufacturer-specific software for programming.
Used vs. New Parts: Buying Guide
When a used part is worth it: For simple, mechanical components like a seat motor or a switch from a low-mileage vehicle, a used part is a cost-effective option. It is best when the part is easily accessible, minimizing labor costs if it fails prematurely.
Donor-vehicle mileage cap: roughly under 100000 miles for the part to have meaningful remaining life.
Donor quality checklist:
- Match the part number exactly, as parts from the same model year have different wiring for different trim levels.
- For electronic modules like a BCM, ensure the seller guarantees it is 'unlocked' or has been reset.
- Visually inspect for corrosion, cut wires, or any signs of heat damage on the part and its connectors.
Decision logic:
- If The part is a simple switch or relay and the cost savings are over 50% → A used part is a reasonable gamble.
- If The part is a Body Control Module (BCM) → Strongly favor a new or professionally remanufactured unit with a warranty, as used BCMs are often VIN-locked and cannot be reprogrammed for your vehicle.
- If The part is a motor or requires significant labor to access (e.g., inside a seat) → Buy new or remanufactured to avoid paying for labor twice if the used part fails.
Warranty tradeoff: Used parts from salvage yards typically offer a 30-90 day warranty. New aftermarket parts usually come with a 1-year to limited lifetime warranty. New OEM parts carry a 1-2 year warranty.
Worst-case if a used part fails: $300-$600 if a used motor or BCM fails after installation, primarily due to repeated labor charges and the cost of a second replacement part.
What Happens If You Wait — Timeline
- 0-1 month: An intermittent fault occurs. The accessory (e.g., power seat) fails to work occasionally. The B2021 code is stored but may not be active. (MPG impact: 0%% · Added cost: $0)
- 1-3 months: The fault becomes permanent. The accessory no longer functions at all. If the fault is a shorted module or wire, a small parasitic battery drain (50-200mA) begins. (MPG impact: 0%% · Added cost: $0)
- 3-6 months: If a parasitic drain is present, it weakens the battery, leading to slow engine cranking or a dead battery after the car sits for a few days. This repeated deep cycling permanently damages the battery. (MPG impact: 0%% · Added cost: $150-$300)
- 6+ months: A persistent, unfixed short circuit generates heat, melting wire insulation and plastic connectors. In a worst-case scenario, this damages the output driver of the Body Control Module (BCM). (MPG impact: 0%% · Added cost: $500-$1500+)
Cost of Not Fixing It
- Immediate: Loss of function for the specific accessory, such as being unable to adjust a power seat or open a power liftgate. This is primarily an inconvenience. (Added cost: $0)
- 1-6 months: If the fault is a short circuit or a failing module, it causes a parasitic battery drain, leading to a dead battery and the need for jump-starts or a new battery. (Added cost: $150-$300)
- 6+ months: An unfixed short circuit overheats wiring, melts connectors, and damages the Body Control Module (BCM). In rare cases, a persistent electrical short poses a fire risk. (Added cost: $500-$1500+)
Diagnosis Steps
- Retrieve Manufacturer-Specific Code Definition
Use an advanced OBD-II scanner to read the manufacturer-specific definition. A generic B2021 'Body Electrical Circuit Fault' is insufficient. You need the detailed definition (e.g., 'Passenger Seat Vertical Motor Circuit High') to identify the exact component.
Tools: Advanced OBD-II Scan Tool (Beginner) - Check the Fuses
Consult the owner's manual to locate the fuse for the malfunctioning accessory. Visually inspect the fuse for a broken filament. If blown, replace it with a new fuse of the exact same amperage rating. If the new fuse blows immediately, you have a short circuit.
Tools: Owner's Manual, Fuse Puller or Pliers (Beginner) - Perform a Thorough Visual Inspection
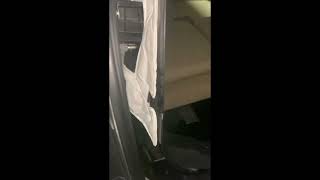
Inspect the wiring harnesses associated with the faulty component. Look under the seat for power seats, near the hinge for power liftgates, and inside the rubber boot in the door jamb for door components. Search for pinched, chafed, or broken wires and corroded connectors.
Tools: Flashlight, Mirror (Beginner) - Test the Switch
Swap the suspect switch with a known good one from another location if possible. Otherwise, use a multimeter to test for continuity and voltage. The switch must have continuity when pressed and show voltage on its output pin when activated.
Tools: Trim Removal Tools, Multimeter (Intermediate) - Test for Power and Ground at the Component (Pro Tip)
Unplug the electrical connector from the non-working motor. Use a multimeter to check for voltage and ground at the harness-side connector while a helper operates the switch. You must see battery voltage (approx. 12V) and a solid ground. If both are present, the motor is the prime suspect. No voltage or ground points to an upstream wiring or switch problem.
Tools: Multimeter, Basic Hand Tools (Intermediate) - Test the Component Motor Directly
If you confirmed good power and ground but the motor doesn't run, apply power directly to it. Use a 12V power probe or fused jumper wires from the vehicle's battery to briefly energize the motor's terminals. If it doesn't run, the motor is confirmed faulty.
Tools: Power Probe or Fused Jumper Wires (Intermediate) - Perform a Voltage Drop Test (Pro Tip)
Connect the positive multimeter lead to the positive battery terminal and the negative lead to the power pin on the component's connector while it is plugged in and activated. A reading over 0.5 volts indicates excessive resistance in the power circuit. Repeat on the ground side; a reading over 0.2 volts indicates a bad ground connection.
Tools: Multimeter with long leads (Advanced) - Check Component Internal Resistance (Pro Tip)
With the component unplugged, use a multimeter set to Ohms (Ω) to measure the resistance across the motor's power and ground terminals. A reading of OL (Over Limit) indicates an open circuit inside the motor, confirming failure. A reading near 0 Ohms indicates an internal short circuit.
Tools: Multimeter (Advanced) - Diagnose the Body Control Module (BCM)
If multiple unrelated body accessories fail, or if there is no power coming from the BCM to the switch, the BCM is likely at fault. Use a bi-directional scan tool to read live data and command outputs. If the BCM shows it is sending the command but no voltage is present at the output pin, the BCM has an internal failure.
Tools: Advanced Bi-Directional Scan Tool (Advanced)
When This Code Triggers (Freeze-Frame Conditions)
- Battery Voltage: 11.5-14.5V (The fault was logged when battery voltage was within normal operating range.)
- Ignition Status: ON/RUN (The key was in the 'ON' or 'RUN' position, powering the body modules.)
- Component Status: Commanded ON (The BCM detected the fault at the moment the driver attempted to use the accessory (e.g., pressed the seat switch).)
- Fault Type: Circuit Performance/Range (The module detected a voltage or resistance reading that was incorrect, but not a dead short or a complete open circuit.)
Related Codes
- B2022 — On GM vehicles, this code indicates a 'circuit low' (short to ground) condition for the passenger seat motor circuit. A multimeter reading near 0 volts on the signal circuit confirms a short to ground.
- B2023 — On GM vehicles, this indicates a 'circuit high' (short to power) condition for the passenger seat motor circuit. A multimeter reading near battery voltage (12V) when inactive confirms a short to power.
- U0140 — This communication code means 'Lost Communication With Body Control Module'. If present alongside a B-code, diagnose the U-code first. Fixing the network-level U0140 failure often resolves the B2021 automatically.
- B101D — This generic hardware failure code sometimes accompanies B2021. B101D indicates an electronic control unit hardware issue within the BCM, while B2021 points to the specific output circuit controlled by that ECU.
Climate & Environmental Factors
- High Humidity: Moisture in the air accelerates corrosion on electrical connectors, fuse blocks, and ground points. This corrosion increases electrical resistance, triggering a performance-related code like B2021.
- Road Salt (Salt Belt Regions): Salty slush splashes onto under-vehicle wiring and seeps into the cabin. This saline moisture is highly corrosive and significantly speeds up the degradation of wiring harnesses and ground connections.
- Water Leaks: Clogged sunroof drains or failing door seals allow water to enter the vehicle, soaking carpets and the electronics underneath. This directly causes short circuits and severe connector corrosion.
How to Talk to a Mechanic About This Code
Say this: "I have a body code, B2021, and my [power seat/liftgate] is not working. I'd like to schedule a diagnostic appointment to trace the specific circuit. Please start with the basics like checking for power and ground at the component before recommending a new motor or module."
This signals you are an informed customer. It directs the technician to perform a proper electrical diagnosis instead of just replacing expensive parts, and it sets clear expectations, potentially saving you money on diagnostic time.
Avoid saying:
- 'My power seat is broken, fix it.' (Too vague, invites part-swapping)
- 'Just do whatever it takes.' (Gives the shop a blank check)
- 'I think I need a new seat motor.' (Don't diagnose it for them; you may be wrong and end up paying for a part you didn't need)
Questions to ask before authorizing the repair:
- Can you confirm you tested for 12-volt power and a good ground at the component connector?
- Was the failure a broken wire, a bad switch, or the motor/module itself?
- Can you show me the failed part or the damaged wiring before you proceed with the repair?
- Is any programming required after the part is replaced?
- What is the warranty on the recommended parts and labor?
Where to Take It: Dealer vs Independent vs Chain
- Dealer:
Best for: Vehicles under warranty., Repairs that require manufacturer-specific software updates or BCM programming., Known issues covered by a Technical Service Bulletin (TSB) or recall.
Downsides: Typically higher labor rates and part costs., May default to replacing an entire assembly (e.g., seat track) when only a smaller part (e.g., a single motor) has failed. (Typical cost: +40% vs. baseline) - Independent Shop:
Best fit for initial diagnosis. A good independent electrical specialist solves most B2021 causes (wiring, switch, motor) for less than a dealer. If the diagnosis confirms a failed BCM requiring programming, visit the dealer.
Best for: Out-of-warranty vehicles where cost is a major factor., Diagnosing and repairing common electrical faults like broken wires, bad switches, or corroded connectors., Shops with a technician who specializes in electrical diagnostics.
Downsides: Quality and expertise vary greatly; research reviews and ASE certifications., May not have the expensive, proprietary tools to program a new BCM if one is needed. (Typical cost: +0% vs. baseline) - Chain Shop:
AVOID for diagnosis. While they might replace a switch, they are generally not equipped for the circuit tracing or module-level diagnostics that a B2021 code requires.
Best for: Simple, routine maintenance like oil changes, tires, and battery replacements.
Downsides: Technicians lack the specialized training for complex electrical diagnostics., Business model pressures technicians to upsell unnecessary services or replace parts without a thorough diagnosis. (Typical cost: -10% vs. baseline)
When to Walk Away From the Repair
If the estimated repair cost for the B2021 fault exceeds 40% of your vehicle's private-party market value, sell the vehicle or leave the accessory broken.
- Car worth $3500, fix is $1400: Walk away. A $1400 repair (e.g., BCM replacement) represents 40% of the car's value. It's not a sound investment, especially on an older vehicle likely to have other issues.
- Car worth $15000, fix is $450: Fix it. A $450 repair (e.g., wiring repair or new switch) is only 3% of the car's value and restores full functionality.
- Car worth $6000, fix is $700: Borderline. A $700 fix (e.g., seat motor replacement) is a significant cost. Get a second opinion and consider the vehicle's overall condition before proceeding.
What Scan Tool You Need for This Code
Minimum: A scanner that can read manufacturer-specific Body ('B') codes from the Body Control Module (BCM).
A cheap, generic OBD-II reader only checks for engine codes ('P' codes) and reports 'No Codes Found'. For B2021, you need to access the BCM to get the specific fault definition, which is impossible with a basic reader.
Budget: BlueDriver Pro (~$100) — Connects to your smartphone and reads enhanced, manufacturer-specific codes from modules like the BCM, ABS, and Airbag for many major brands. It gives you the specific B2021 definition and freeze-frame data.
Mid-range: Foxwell NT510 Elite (~$180) — A powerful handheld tool that provides full-system access and bi-directional control, allowing you to command a component (like a seat motor or liftgate latch) to activate, which is extremely useful for confirming if the motor or the wiring is the problem.
Professional: Autel MaxiCOM MK808 / MK808BT (~$450-600) — A professional-grade tablet scanner that offers extensive vehicle coverage, full bi-directional control, and numerous service functions. It reads live data from all modules and provides an intuitive interface to quickly diagnose the root cause of the B2021 code.
Rent vs buy: Most parts store loaner tools are basic code readers that cannot access BCM codes, making them useless for B2021. If you plan to do your own car repairs more than once, buying a capable scanner like the BlueDriver or Foxwell NT510 is a worthwhile investment.
How to Clear the Code After You Fix It
- Reconnect any disconnected components (e.g., battery, seat connector).
- Use an OBD-II scan tool to erase the fault code from the Body Control Module (BCM).
- Cycle the ignition off and on.
- Operate the repaired accessory through its full range of motion multiple times to confirm the fix.
Drive cycle (~5 minutes): Unlike engine codes, body codes do not require a complex drive cycle. After clearing the code, simply start the vehicle and test the function. If the fault is fixed, the code will not reappear. If the code immediately returns, the underlying electrical problem has not been solved.
Readiness monitors affected: None
Watch out for:
- Simply disconnecting the battery fails to clear the code from the BCM's memory.
- If the code returns immediately, it indicates the repair was unsuccessful or the problem was misdiagnosed.
- Forgetting to test all functions of the repaired component (e.g., all directions of a power seat) before considering the job complete.
Will This Fail Emissions / State Inspection?
No — by itself this code doesn't fail OBD inspection (but it can keep readiness monitors from setting, which causes a separate fail).
- California: A 'B' code will not cause a smog check failure. The inspection focuses on powertrain ('P') codes and readiness monitor status.
- New York: The NYS inspection checks for an illuminated Check Engine Light, which a B2021 code does not trigger. It will not cause a failure.
- Texas: In the 17 counties requiring emissions testing, the OBD-II scan looks for powertrain-related codes that turn on the Check Engine Light. A 'B' code will not cause a test failure.
Most Commonly Affected Vehicles
- Chevrolet Tahoe / Suburban (2007-2014) — Prone to issues with power seat motors and the underlying wiring harnesses. These models frequently log B2021 for passenger seat motor circuit faults.
- GMC Yukon / Yukon XL (2007-2014) — Shares the same GMT900 platform and power seat components as the Tahoe/Suburban, making it equally susceptible to front vertical seat motor circuit faults.
- Cadillac Escalade (2007-2014) — Uses similar body control modules and power seat systems as the Tahoe. The complex interior features contribute to this code appearing frequently.
- Chevrolet Silverado (2007-2013) — Models equipped with full-feature power seats experience failures in the seat adjustment motors or the switches, leading to a B2021 code.
- GMC Sierra (2007-2013) — Mechanically identical to the Silverado, these trucks log B2021 for faults in the passenger power seat circuits, especially in higher trim levels.
- Ford F-150 (2015-2020) — The B2021 code is often related to the driver's power seat memory module or the wiring harness under the driver's seat, which is subject to frequent movement and wear.
- Ford Explorer (2011-2019) — B2021 is triggered by faults in the power liftgate module circuit or its associated wiring harness, which flexes and breaks at the hatch hinge.
- Hyundai Sonata (2015-2019) — Indicates a fault within the smart junction box related to various interior power accessory circuits. Diagnosis requires checking for communication errors with the junction box.
Manufacturer-Specific Notes
- General Motors (GM): GM's definition for B2021 frequently points to the front vertical adjustment motor on the passenger's power seat. Diagnosis must immediately focus on that motor, its connector, and its dedicated wiring harness.
- Ford: On F-150 and Expedition models, TSB 20-2170 addresses a water leak from the A/C evaporator drain that saturates the passenger floor carpet and corrodes nearby wiring, leading to various electrical faults.
- Chrysler/Dodge/Jeep: These vehicles are notoriously sensitive to low battery voltage. A weak battery causes the BCM to set random, unrelated body codes. Always fully charge and test the battery before diagnosing any electrical issue.
- Hyundai/Kia: The functions of a traditional BCM are integrated into a 'Smart Junction Box'. Diagnosis involves checking the integrity and communication status of this junction box in addition to the specific component circuit.
Real Owner Stories
2016 Ford F-150 with ~80K miles
The driver's power seat, power mirrors, and memory functions all stopped working at the same time. The passenger seat worked fine.
What they tried:
- Checked the fuse for the driver's seat module and found it was good.
- Visually inspected wiring under the dash and driver's side kick panel.
Outcome: Found a corroded factory splice in an orange wire with a green tracer in the kick panel area. After repairing the single broken wire, all related functions (seat, mirrors, memory) were restored.
Lesson: When multiple related functions fail simultaneously, the root cause is often a single shared power or ground wire, not multiple failed components. A wiring diagram is key to finding these shared circuits.
2021 Chevy Tahoe with ~15K miles
The driver's power seat would not move to the correct memory position or would only move slightly. The easy entry/exit feature was also inoperative.
What they tried:
- Deleted and reset seat memory settings.
- Checked for physical obstructions in the seat track.
- Verified wiring harnesses under the seat appeared secure.
Outcome: A GM dealer diagnosed the issue as a software anomaly in the Driver Seat Adjuster Memory Module. The fix was to reprogram the module per Technical Service Bulletin (TSB) #21-NA-131, which resolved the problem without replacing any parts.
Lesson: For late-model vehicles, always check for applicable TSBs before replacing expensive electronic modules. A simple software update often fixes issues that appear to be hardware failures.
2020 Ford Explorer with ~30K miles
The power liftgate would not open or close using any button (key fob, dash, or tailgate). It would only make a clicking noise or sometimes open partially on its own.
What they tried:
- Manually forced the liftgate closed.
- Disconnected the vehicle battery for 20 minutes to reset the modules.
- Checked the power liftgate fuse.
Outcome: The battery disconnect provided a temporary fix, but the problem returned. The owner learned of Ford TSB SSM 49015, which addresses a software error in the Rear Gate Trunk Module (RGTM). A dealer reprogrammed the RGTM, which permanently fixed the intermittent operation.
Lesson: If a problem is intermittent or is temporarily fixed by a battery reset, it strongly points to a software or module communication issue rather than a completely failed motor or switch.
2016 Ford F-150 with unknown mileage
The owner's dog chewed through the wiring harness under the passenger seat, causing the passenger airbag warning light to illuminate.
What they tried:
- Verified that the power seat functions still worked.
- Posted photos of the damaged wires to an online forum for identification.
Outcome: Forum members identified the damaged wires as belonging to the Occupant Classification System Module, explaining the airbag light. The owner repaired the chewed wires by splicing them back together with heat shrink tubing, resolving the fault code.
Lesson: Physical damage to under-seat wiring from pets, cargo, or corrosion is a common cause of body electrical faults. A careful visual inspection often reveals the problem before any complex diagnosis is needed.
How to Prevent This Code From Triggering
- Periodically clean and inspect battery terminals (Every 6 months) — Corrosion on battery terminals increases resistance and causes low voltage conditions throughout the vehicle, leading to spurious codes from sensitive modules like the BCM.
- Apply dielectric grease to exposed electrical connectors (When performing other repairs or during major service) — Dielectric grease is a non-conductive sealant that blocks moisture and oxygen from reaching the metal pins in connectors, preventing the corrosion that causes high resistance.
- Regularly inspect wiring in high-movement areas (Annually) — Visually check wiring harnesses under seats and in the flexible boots between doors and the car body. Catching chafed insulation early prevents a wire from shorting to ground.
- Avoid overloading accessory circuits (Daily habit) — Plugging too many high-draw devices into your vehicle's power outlets overloads circuits. Ensure aftermarket accessories are professionally installed with their own fused power relays.
- Keep the vehicle interior and undercarriage clean (Seasonally) — Regularly washing the car removes corrosive road salt. Keeping the interior dry and cleaning up spills promptly prevents moisture from seeping under carpets and damaging under-seat modules.
- Take a longer drive at least once a week (Weekly) — Frequent short trips don't allow the alternator enough time to fully recharge the battery. A chronically undercharged battery is a primary cause of random electrical faults.
Frequently Asked Questions
Can I fix code B2021 myself?
If the problem is a simple blown fuse or a faulty seat switch, it is a manageable DIY job for a beginner or intermediate hobbyist. If it requires repairing a wire, it is better for an intermediate DIYer. Replacing a seat motor or BCM requires a professional due to the complexity and mandatory post-installation programming.
Will B2021 cause my car to fail an emissions test?
No. This is a body control code and is completely unrelated to the engine or emissions system. It will not affect the results of a smog check.
Why did the code appear after I spilled a drink on my seat?
Liquid easily seeps into the power seat switch or the electrical connectors located under the seat. This moisture causes a short circuit or leads to corrosion that creates high resistance, triggering a fault code like B2021.
What are common misdiagnosis mistakes for B2021?
A frequent error is replacing an expensive component like a seat motor or the BCM without first confirming the basics. Always test for power and ground at the component's connector to rule out upstream issues like blown fuses or broken wires. Never condemn a working switch without verifying the wiring integrity between the switch and the motor.
My battery died and now I have a B2021 code. Are they related?
Yes, a low voltage condition during engine cranking causes various electronic modules, including the BCM, to set spurious codes. Clear all codes after fully charging or replacing the battery. If the B2021 code returns, begin your electrical diagnosis.
Is it expensive to diagnose this code?
Most auto repair shops charge a standard diagnostic fee for one to two hours of labor to investigate an electrical problem, typically costing between $125 and $250.
The code is gone. Should I still be worried?
B2021 is often an intermittent code caused by a loose wire or a corroded connector making a poor connection. Even if the code is not currently active, the underlying problem still exists and will return. Diagnose it immediately to prevent a permanent failure or parasitic battery drain.
Can a bad ground cause code B2021?
Yes, a poor ground connection is a primary cause of electrical failures. The circuit has power, but without a solid path to ground, the component cannot function and triggers a B2021 code. Perform a voltage drop test on the ground side to confirm this issue.
Key Takeaways
- Scan your vehicle with an advanced OBD-II tool to get the exact manufacturer definition for B2021, as it points to over 20 different body circuit faults depending on the brand.
- Inspect the 12V fuses and under-seat wiring harnesses first, as physical wire damage or a blown fuse causes 80% of B2021 power seat failures.
- Test the malfunctioning component's connector with a multimeter for a solid 12V power and ground before spending $300+ on a replacement motor.
- Drive the vehicle safely with a B2021 code active, as it only disables body comfort features like power seats or liftgates without affecting engine performance.
Helpful Videos

Shop the Parts Behind B2021
Below are the parts most often responsible for code B2021, ranked by how frequently each one is the actual culprit (per the diagnosis above). Tap any to see what we have for your vehicle.


The information in this article is provided for general reference and educational purposes only. Vehicle specifications, procedures, and part compatibility can vary by production date, trim level, and region. Always consult your vehicle's factory service manual and verify part numbers before purchasing or performing repairs. Safety-critical components such as airbags, seat belts, and braking systems should be installed by a qualified professional.
- 🧭 Diagnostic Flowchart
- 🎬 Helpful Videos
- 🛍️ Shop This Part
- What Does B2021 Mean?
- Can I Drive With B2021?
- Common Causes
- Symptoms
- Common Fixes & Costs
- DIY vs Professional
- Used vs. New Parts: Buying Guide
- What Happens If You Wait — Timeline
- Cost of Not Fixing It
- Diagnosis Steps
- When This Code Triggers (Freeze-Frame Conditions)
- Related Codes
- Climate & Environmental Factors
- How to Talk to a Mechanic About This Code
- Where to Take It: Dealer vs Independent vs Chain
- When to Walk Away From the Repair
- What Scan Tool You Need for This Code
- How to Clear the Code After You Fix It
- Will This Fail Emissions / State Inspection?
- Most Commonly Affected Vehicles
- Manufacturer-Specific Notes
- Real Owner Stories
- 2016 Ford F-150 with ~80K miles
- 2021 Chevy Tahoe with ~15K miles
- 2020 Ford Explorer with ~30K miles
- 2016 Ford F-150 with unknown mileage
- How to Prevent This Code From Triggering
- Frequently Asked Questions
- Can I fix code B2021 myself?
- Will B2021 cause my car to fail an emissions test?
- Why did the code appear after I spilled a drink on my seat?
- What are common misdiagnosis mistakes for B2021?
- My battery died and now I have a B2021 code. Are they related?
- Is it expensive to diagnose this code?
- The code is gone. Should I still be worried?
- Can a bad ground cause code B2021?
- Key Takeaways
- 🎟️ Get 5% Off