
OBD-II Code B2425: Driver Seat Heater Fault
What B2425 means, why it triggers, and how to fix it
- Code B2425 indicates a driver's heated seat circuit fault on GM and Saab vehicles, but means 'Keyless Entry Out of Sync' on Fords.
- On 2007-2014 GM trucks and SUVs, inspect the large X305 connector under the front passenger seat first, as melting pins cause the majority of these failures.
- Stop using the heated seat immediately if you smell burning plastic, as a melting module connector poses a severe fire risk.
- Test the seat cushion heating element with a multimeter; a reading of 'OL' (infinite resistance) confirms a broken internal wire requiring replacement.
What Does B2425 Mean?
Code B2425 indicates the Body Control Module (BCM) or Heated Seat Module (HSM) detected an electrical fault in the driver's side heated seat circuit. The module shuts down the heater to prevent damage. As a body code, it does not trigger the Check Engine Light.
Technical definition: The official definition is 'Driver Seat Cushion Heater Circuit Malfunction'. On GM vehicles, a two-digit symptom byte provides precise diagnostics: '0D' means High Resistance (broken wire or bad connection), while '0E' or '0B' indicates a short circuit.
Can I Drive With B2425?
Yes, But With Caution. Yes, you can safely drive. This code affects a comfort feature and does not impact drivability. However, if you smell burning plastic, stop using the heated seat immediately to prevent a potential fire from a melted connector.
Common Causes
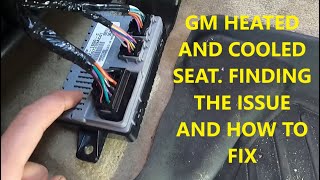
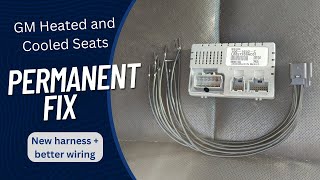
- Melted Heated Seat Module Connector (Very Common) — On 2007-2014 GM trucks and SUVs, the main electrical connector for the heated seat module under the passenger seat is a major weak point. High current overheats the single power and ground pins, melting the plastic and creating a high-resistance fault. 🎬 Watch: How to fix heated seat modules in GM vehicles.
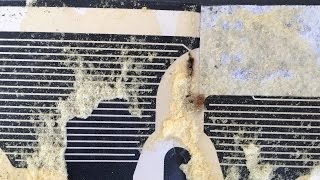
- Broken Heating Element in Seat Cushion (Common) — Constant stress from entering and exiting the vehicle fatigues the thin heating grid wires inside the bottom seat cushion, eventually snapping them and 🎬 See this walkthrough for replacing a lower seat heater element. creating an open circuit.
- Damaged Wiring Under the Driver's Seat (Common) — The wiring harness under the driver's seat frequently snags, chafes, or breaks due to items stored under the seat or the seat's movement along its tracks.
- Broken Heating Element in Seat Back (Less Common) — While the seat cushion element fails more often due to direct weight, the heating element in the seat back also breaks from flexing and age, sometimes scorching the internal foam.
- Failed Heated Seat Module (Rare) — The electronic control module itself rarely fails independently, but is sometimes destroyed as a direct result of the main connector melting and fusing to the module's pins.
- Incorrectly Installed Accessory Harness (Rare) — According to GM TSB PIT5215A, the connectors for the seat back and seat cushion elements are identical. Reversing them during an accessory installation causes a fault and sets code B2425.
- Faulty Heated Seat Switch (Rare) — The dashboard or door panel switch controlling the heated seat can fail internally, preventing the module from receiving the activation command.
- Failed Seat Temperature Sensor (Rare) — Systems using a temperature sensor (thermistor) to regulate heat shut down if the sensor fails and provides an out-of-range reading to the module.
Symptoms
- Driver's heated seat does not work — The seat produces zero heat when the switch is turned on.
- Heated seat light turns on, then off — The switch indicator lights up for a few seconds, then turns off automatically as the module detects the fault and shuts the system down for protection.
- Burning plastic smell — A distinct smell of burning plastic originating from under the front passenger seat indicates an actively melting control module connector.
- Heated seat light stays on, but no heat — The indicator light remains illuminated, but the seat never warms up. This occurs when the heating element wire breaks, but the module's software logic fails to shut the indicator light off.
- Intermittent operation — The heated seat works sporadically, pointing to a loose connection, a chafed wire making intermittent contact, or a failing heating element.
Diagnostic Flowchart
Tap your situation to follow the diagnostic path that matches what you're seeing on this code.
Common Fixes & Costs
- Replace Melted Module Connector and Perform Redundant Wiring Mod — Parts: $35-$60, Labor: $150-$250, ~1.5 hr book time (Intermediate)
- Replace Driver's Seat Cushion Heating Element — Parts: $80-$160, Labor: $300-$500, ~3.0 hr book time (Professional)
- Repair Damaged Wiring Under Seat — Parts: $5-$20, Labor: $150-$300, ~1.5 hr book time (DIY)
- Replace Driver's Seat Back Heating Element — Parts: $90-$180, Labor: $250-$450, ~2.5 hr book time (Professional)
- Replace Heated Seat Module (HSM) — Parts: $150-$350, Labor: $80-$150, ~1.0 hr book time (Intermediate)
Used vs. New Parts: Buying Guide
When a used part is worth it: A used Heated Seat Module from a salvage yard is a cost-effective fix, provided the pins are undamaged. Never buy used heating elements, as they are prone to wear and break during removal.
Donor-vehicle mileage cap: roughly under 100000 miles for the part to have meaningful remaining life.
Donor quality checklist:
- Verify the part number on the used module is an exact match.
- Inspect the pins on a used module for discoloration or melting from a previous connector failure.
- Buy new OEM or aftermarket heating elements to guarantee longevity.
Decision logic:
- If The part is a heating element. → Buy new. The labor to install is significant, and a used part has an unknown lifespan.
- If The part is the Heated Seat Module and your connector was not melted. → A used module with a matching part number is an acceptable budget option.
- If Your module was damaged by a melted connector. → Buy a replacement module AFTER replacing the connector pigtail to avoid destroying the new module.
Warranty tradeoff: Salvage yard parts carry a 30-90 day warranty. New aftermarket parts offer 1-year to limited lifetime warranties. New OEM parts have a 1-year warranty.
Worst-case if a used part fails: $200-$500 if a used heating element fails prematurely, requiring repeat labor.
What Happens If You Wait — Timeline
- 0-1 week (Initial Fault): The module detects an out-of-spec resistance or current. The heated seat indicator flashes on and off. The seat produces no heat. Code B2425 is stored. (MPG impact: 0%% · Added cost: $0)
- 1-6 months (Ongoing Attempts to Use): If the cause is a high-resistance connector, each attempt to use the seat generates excessive heat, causing the plastic to slowly melt and deform. (MPG impact: 0%% · Added cost: $0)
- 6-12 months (Module Damage): Continuous overheating from the melting connector damages the pins on the Heated Seat Module. The connector fuses to the module. (MPG impact: 0%% · Added cost: $150-$350 (The module requires replacement in addition to the connector pigtail.))
- 12+ months (Worst Case Fire Risk): A shorted heating element or severely melted connector overheats and ignites nearby carpet padding or seat foam, creating a vehicle fire. (MPG impact: 0%% · Added cost: $2,000+ (Cost to repair interior fire damage.))
Cost of Not Fixing It
- Immediate: Loss of driver's side heated seat function. This is a comfort feature with no impact on drivability. (Added cost: $0)
- Ongoing Use: If the cause is a melting connector, continued attempts to use the heated seat worsens the melting and damages the module's pins. (Added cost: $150-$350 (Requires module replacement in addition to the connector))
- Worst Case: A severely melted connector or shorted wiring overheats and ignites nearby carpet or seat foam, causing a vehicle fire. (Added cost: $2,000+ (Interior fire damage repair))
Diagnosis Steps
- Scan for Codes & Interpret Symptom Bytes
Use a Body-code capable OBD-II scanner to confirm B2425. Note the two-digit symptom code. '0D' (High Resistance/Open Circuit) is the most common. '0E' (Low Resistance) or '0B' (High Current) indicates a short circuit.
Tools: OBD-II Scanner (Body Code Capable) (Beginner) - Inspect the Heated Seat Module Connector (GM)
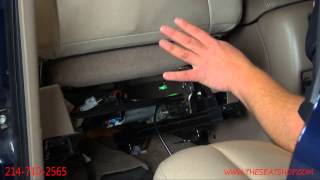
On GM vehicles, locate the module under the front passenger seat. Disconnect the large electrical connector (X305) and inspect both the connector and module pins for melting, charring, or discoloration on the large power and ground wires.
Tools: Flashlight, Trim Removal Tools (Beginner) - Test Heater Element Resistance
Disconnect the driver's seat cushion and backrest heater connectors. Set a multimeter to Ohms (Ω). A good GM cushion element reads 1.4-2.5 ohms; a backrest reads 0.8-2.4 ohms. A reading of 'OL' (Open Loop) means the element is broken and requires replacement.
Tools: Multimeter (Intermediate) - Visually Inspect Under-Seat Wiring
Inspect the wiring harnesses under the driver's seat for pinched, stretched, or frayed wires. Check where the harness flexes during seat movement and look for chafing near the sharp plastic edges of the lumbar support frame.
Tools: Flashlight (Beginner) - Check for Power and Ground at the Module
Use a multimeter to verify the heated seat module receives battery voltage (12V+) and has a solid ground connection at its main connector. This confirms the vehicle's core wiring supplies the module correctly.
Tools: Multimeter (Advanced) - Pro Tip: Stress-Test the Heater Elements
Heating elements sometimes fail only under load. While measuring resistance, have an assistant sit in the seat and bounce firmly. If the multimeter reading jumps to 'OL' or fluctuates erratically, an internal break exists.
Tools: Multimeter, Assistant (Intermediate) - Perform a Voltage Drop Test
With the circuit activated, set a multimeter to DC Volts. Place the positive lead on the battery's positive terminal and the negative lead on the power pin at the heater element connector. A reading above 0.5 volts indicates excessive resistance in the power side.
Tools: Multimeter with long leads (Advanced) - Pro Tip: Use Scan Tool Bidirectional Controls
Use a professional scan tool to bypass the physical switch and command the heated seat module to activate. If the seat heats up via the scan tool but not the switch, replace the switch.
Tools: Professional Bi-Directional Scan Tool (Advanced) - Test the Seat Temperature Sensor (Thermistor)
Disconnect the sensor and measure its resistance. At 70°F (21°C), it typically reads 1000-2000 ohms. Resistance decreases when warmed with a hairdryer and increases when cooled with ice. No change or an 'OL' reading indicates a failed sensor.
Tools: Multimeter, Heat Gun/Hairdryer (Advanced)
When This Code Triggers (Freeze-Frame Conditions)
- System Voltage: 9-16V (The module requires normal vehicle voltage to operate and run diagnostics.)
- Driver Command: On (The fault is detected when the driver presses the heated seat switch, initiating the circuit test.)
- Heater Element Resistance: Out of Spec (The module measures resistance. High resistance (open circuit) or low resistance (short circuit) sets the DTC.)
- Heater Element Current: Out of Spec (The module monitors current draw. A short circuit causes high current, while an open circuit results in zero current.)
Related Codes
- B2430 — Identical fault code for the passenger's side heated seat. If both B2425 and B2430 are present, suspect a shared component like the main power connector or the module itself.
- B1935 — Also indicates a driver's seat heater circuit fault on GM vehicles. The diagnostic procedure is identical to B2425.
- B2180 — Indicates a 'Right Seat Back Heater Circuit' fault on GM vehicles. Helps pinpoint a failure in the passenger seat backrest element.
- B1325 — Indicates a 'Device Power Circuit Voltage' issue. A foundational power supply problem that causes the heated seat module to set code B2425. Diagnose B1325 first.
Climate & Environmental Factors
- Cold Weather: Heated seats are used frequently in cold weather, correlating with higher failure discovery rates. Extreme temperature cycles stress wires and connectors.
- High Humidity: Moisture accelerates corrosion on electrical connectors and compromised wiring insulation, creating the high resistance that triggers code B2425.
How to Talk to a Mechanic About This Code
Say this: "I have a B2425 code for the driver's heated seat. The light comes on for a second and then turns off. I know on these GM vehicles it's often the connector under the passenger seat or the heating element itself. I'd like a diagnosis to confirm which part has failed."
This directs the technician to the most likely causes and prevents them from starting with a blind diagnosis or immediately suggesting a new control module.
Avoid saying:
- 'My heated seat is broken, fix it.'
- 'The internet says it's the module, so just replace that.'
- 'Can you just clear the code?'
Questions to ask before authorizing the repair:
- Did you inspect the main connector under the passenger seat for melting or charring?
- What was the resistance reading (in ohms) for the seat cushion and seat back heating elements?
- If the heating element is bad, is the problem in the seat cushion or the backrest?
- Is the quoted price for an OEM or aftermarket heating element?
- What is your warranty on this electrical repair?
Where to Take It: Dealer vs Independent vs Chain
- Dealer:
A safe but expensive choice for out-of-warranty repairs. Use if you prioritize brand-specific expertise over cost.
Best for: Vehicles under warranty, Repairs related to an open safety recall (like GM recall 18286), Complex electrical issues requiring OEM-level bidirectional scan tools
Downsides: Highest labor rates., Defaults to replacing expensive assemblies (e.g., replacing a whole seat base instead of splicing a $35 connector). (Typical cost: +50% vs. baseline) - Independent Shop:
Best overall fit. An experienced independent technician has likely repaired dozens of B2425 faults on GM trucks and will be very efficient.
Best for: Out-of-warranty vehicles, especially common domestic models., Cost-conscious owners who want good value., Shops with good reviews for electrical and diagnostic work.
Downsides: Quality and expertise vary widely; you must vet the shop., May lack access to the very latest manufacturer-specific tools for brand-new models. (Typical cost: +0% vs. baseline) - Chain Shop:
AVOID for this repair. Diagnosing and fixing a B2425 correctly requires specific electrical skills and upholstery work outside the core competency of chain shops.
Best for: Simple, routine maintenance like oil changes, tires, and batteries.
Downsides: Technician skill is highly variable., Lacks the deep diagnostic tools and experience for complex electrical or upholstery work., Business model encourages upselling unnecessary parts. (Typical cost: -10% vs. baseline)
When to Walk Away From the Repair
Since this is a non-essential comfort feature, the decision is based on personal budget. Many owners choose not to fix it if the cost exceeds $300. However, if a burning smell is present, it is a safety issue that must be addressed.
- Car worth $8000, fix is $650: Walk away. The cost is high for a non-essential feature on an older vehicle.
- Car worth $25000, fix is $700: Fix it. The repair cost is a small percentage of the vehicle's value and restores a desirable feature for comfort and resale.
- Car worth $5000, fix is $250: Borderline. This is a reasonable cost to restore full functionality if you value the feature.
What Scan Tool You Need for This Code
Minimum: An OBD-II scanner that reads Body ('B') codes. A basic engine-only code reader will NOT see code B2425.
A standard code reader only pulls powertrain ('P') codes and reports 'No Codes Found,' even when B2425 is active. You need a tool that communicates with the Body Control Module (BCM).
Budget: BlueDriver Pro or XTool A30D (~$90-120) — These Bluetooth dongle scanners pair with a smartphone app and read Body codes, display the crucial symptom byte (e.g., '0D'), and view live data.
Mid-range: Foxwell NT510 Elite or Autel MK808 (~$150-350) — These handheld scanners offer bidirectional controls, allowing you to command the heated seat module to turn on directly from the tool to test the switch and module.
Professional: Autel MaxiCOM MK906BT or Launch X431 Series (~$500-1200) — Provides full OEM-level bidirectional control, advanced coding options, and access to detailed wiring diagrams directly on the tool.
Rent vs buy: Auto parts store loaner tools are basic powertrain readers that cannot see Body codes. If you plan to do DIY work, buying a budget scanner capable of reading all system codes is a worthwhile investment.
How to Clear the Code After You Fix It
- Use an OBD-II scan tool capable of reading body codes to clear the fault.
- Cycle the ignition off and then back on.
- Activate the repaired heated seat to ensure the module passes its self-test.
Drive cycle (~1 minutes): No specific drive cycle is required. Clear the code, turn the ignition off, start the vehicle, and activate the heated seat. The module performs its self-test immediately.
Readiness monitors affected: None
Watch out for:
- Clearing the code without fixing the electrical problem causes the code to return instantly on the next use.
- Disconnecting the battery resets the module but does not clear a stored history code.
Will This Fail Emissions / State Inspection?
No — by itself this code doesn't fail OBD inspection (but it can keep readiness monitors from setting, which causes a separate fail).
- California: This is a body ('B') code and does not cause a Smog Check failure, which focuses exclusively on powertrain ('P') codes.
- New York: Code B2425 does not illuminate the Check Engine Light and will pass the NYS emissions inspection.
- Texas: This code passes Texas state inspections as it is unrelated to emissions or required safety equipment.
Most Commonly Affected Vehicles
- Chevrolet Suburban, Tahoe, Avalanche (2007-2014) — Highly prone to a melted main connector on the heated seat module under the passenger seat. The Motorcraft WPT-928 pigtail is the standard robust replacement.
- GMC Yukon, Yukon XL, Sierra (2007-2014) — Susceptible to the same melted connector and heating element failures as Chevrolet. Broken plastic lumbar support frames also chafe wires.
- Cadillac Escalade (2007-2014) — Experiences the same common failure points in the heated seat system, particularly the melted module connector.
- Chevrolet Silverado (2007-2014) — Frequently experiences broken heating elements in the seat cushions from wear and tear, alongside the melted connector issue.
- Ford Expedition, Focus, F-Series (1999-2007) — On Ford models, B2425 indicates 'Remote Keyless Entry Out of Synchronization' and is completely unrelated to heated seats. Fix by reprogramming key fobs.
- Kia Sedona (Carnival) (2006-2014) — B2425 points to a fault with the power sliding door's anti-pinch sensor strip.
- Vauxhall/Opel Astra, Insignia (2009-2015) — Heated seats turning off shortly after activation trace back to a failed heating mat requiring replacement.
- Saab 9-5, 9-4x (2010-2011) — Sets B2425 for a seat heater circuit malfunction. Service info recommends testing resistance (1-7Ω) with the seat both occupied and unoccupied.
Manufacturer-Specific Notes
- General Motors: The most common cause is a melted connector under the front PASSENGER seat, even though the code is for the DRIVER'S seat. The single module controls both seats.
- Ford: B2425 means 'Remote Keyless Entry Out of Synchronization', an issue related to the key fob failing to communicate with the vehicle.
- Lexus/Toyota: On models with adaptive front lighting (AFS), B2425 indicates a 'Headlight Leveling Motor RH Communication Malfunction', often caused by aftermarket headlight assemblies.
- Hyundai: On the Veracruz (2007-2012), B2425 signifies 'Left Pinch Strip Open or Stuck High', a fault with the power tailgate anti-pinch sensor.
- Saab: Official diagnostic procedures require measuring heating element resistance twice: once unoccupied, and again occupied to simulate stress and expose intermittent breaks.
- Cadillac: GM safety recall 18286 for 2014-2016 CTS sedans addressed damaged heating mats creating high resistance and fire risks during remote start.
Real Owner Stories
2008 GMC Yukon at 130K miles
Driver's heated seat indicator lit up for 2 seconds then turned off. Passenger seat worked fine. Code B2425 0D was present.
What they tried:
- Initially suspected the driver's seat bottom heating element was broken.
- Checked the heated seat module under the front PASSENGER seat.
- Found the large X305 connector visibly melted and charred around the main power and ground pins.
Outcome: Replaced the melted connector with a Motorcraft WPT-928 pigtail for $35. Spliced the new connector in, using the pigtail's redundant power and ground wires to distribute the electrical load. Cleared the code and restored normal function.
Lesson: On GMT900 vehicles, always check the module connector under the passenger seat first, even if the fault is for the driver's side. This saves you from unnecessarily disassembling the driver's seat.
2011 Chevy Silverado 1500 at 115K miles
Heated seat light stayed on, but the seat produced no heat. A burning smell was noticed.
What they tried:
- Replaced the driver's seat bottom heating element. Code B2425 returned immediately.
- Disassembled the driver's seat again and checked the seat BACK heating element.
- Found the seat back element had burned out, scorching the internal foam cushion.
Outcome: Replaced the driver's seat back heating element (OEM Part #20792749). This resolved the code and restored heat. The burning smell was from the failing backrest element.
Lesson: A B2425 code triggers for either the seat cushion or seat back heating element. Test the resistance of BOTH elements with a multimeter before ordering parts or disassembling the seat.
2007 Ford Focus at 85K miles
The remote key fob stopped locking and unlocking the doors. The physical key only operated the driver's door.
What they tried:
- Replaced the key fob battery.
- Scanned the vehicle and found code B2425: 'Remote Keyless Entry Out of Synchronization'.
- Attempted the standard key fob reprogramming procedure (cycling ignition 8 times) but it failed.
Outcome: Disconnected the General Electronic Module (GEM) for a few minutes to reset it. After reconnecting, the standard 8-cycle ignition procedure worked, and the key fob was successfully reprogrammed.
Lesson: The same code number has completely different meanings depending on the manufacturer. For Fords, B2425 relates to the key fob, not heated seats.
How to Prevent This Code From Triggering
- Avoid Kneeling on Seats (Daily habit) — Placing concentrated pressure, like a knee, on the seat cushion snaps the brittle heating element wires.
- Keep Under-Seat Area Clear (Every car cleaning) — Items rolling under the seat catch in the wiring harness as the seat moves, severing wires and causing an open circuit.
- Perform the Redundant Ground Mod (GM) (During connector replacement) — Wiring a replacement pigtail to use its second, redundant ground pin splits the electrical load, reducing heat buildup and preventing repeat failures.
- Use Split Loom Tubing on Exposed Wires (During any under-seat wiring repair) — Encasing repaired wires in plastic split loom tubing provides abrasion resistance against sharp edges on the seat frame.
Frequently Asked Questions
Can I fix a B2425 code myself?
Yes, some common fixes are DIY-friendly. Inspecting and repairing a chafed wire under the seat is achievable for many. Replacing a melted connector pigtail is an intermediate task, while replacing the heating element requires upholstery removal and is best left to professionals.
Why did my heated seat stop working but the light still comes on?
This happens when the heating element wire inside the seat breaks. The control module sends power and illuminates the light, but the open circuit prevents heat generation. The module detects this lack of current and shuts the system down after a few moments.
What does B2425 0D mean on my Chevy or GMC?
The '0D' symptom byte means 'High Resistance'. This points to an open circuit caused by a broken wire in the heating element grid or a poor connection. The most common culprit on GM vehicles is a melted connector under the passenger seat.
I replaced the heating element but the code came back. What now?
If you are certain the new element is good, re-inspect all under-seat wiring for missed damage. Check GM TSB #PIT5215A, which warns that the seat cushion and seat back heater connectors are identical. Swapping them during installation causes the code to persist.
The code is for the driver's seat, so why should I check under the passenger seat?
On many popular 2007-2014 GM trucks and SUVs, a single control module operates BOTH front heated seats. This module is physically located under the passenger seat. The main power connector attached to this module frequently melts, making it the primary diagnostic target.
Can I just reset the heated seat module by pulling a fuse?
Pulling the 'DSM' or 'SEAT' fuse resets the module but does not fix the problem. B2425 is a 'hard fault' indicating a physical electrical issue. The code returns the next time you use the heated seat until the underlying problem is repaired.
What are the most common mistakes when diagnosing B2425?
The biggest mistake is replacing the expensive Heated Seat Module without confirming it failed. The root cause is almost always damaged wiring, a melted main connector, or broken heating elements. Always test element resistance and visually inspect connectors before condemning the module.
Key Takeaways
- Code B2425 indicates a driver's heated seat circuit fault on GM and Saab vehicles, but means 'Keyless Entry Out of Sync' on Fords.
- On 2007-2014 GM trucks and SUVs, inspect the large X305 connector under the front passenger seat first, as melting pins cause the majority of these failures.
- Stop using the heated seat immediately if you smell burning plastic, as a melting module connector poses a severe fire risk.
- Test the seat cushion heating element with a multimeter; a reading of 'OL' (infinite resistance) confirms a broken internal wire requiring replacement.
Helpful Videos

Shop the Parts Behind B2425
Below are the parts most often responsible for code B2425, ranked by how frequently each one is the actual culprit (per the diagnosis above). Tap any to see what we have for your vehicle.


The information in this article is provided for general reference and educational purposes only. Vehicle specifications, procedures, and part compatibility can vary by production date, trim level, and region. Always consult your vehicle's factory service manual and verify part numbers before purchasing or performing repairs. Safety-critical components such as airbags, seat belts, and braking systems should be installed by a qualified professional.
- 🧭 Diagnostic Flowchart
- 🎬 Helpful Videos
- 🛍️ Shop This Part
- What Does B2425 Mean?
- Can I Drive With B2425?
- Common Causes
- Symptoms
- Common Fixes & Costs
- Used vs. New Parts: Buying Guide
- What Happens If You Wait — Timeline
- Cost of Not Fixing It
- Diagnosis Steps
- When This Code Triggers (Freeze-Frame Conditions)
- Related Codes
- Climate & Environmental Factors
- How to Talk to a Mechanic About This Code
- Where to Take It: Dealer vs Independent vs Chain
- When to Walk Away From the Repair
- What Scan Tool You Need for This Code
- How to Clear the Code After You Fix It
- Will This Fail Emissions / State Inspection?
- Most Commonly Affected Vehicles
- Manufacturer-Specific Notes
- Real Owner Stories
- 2008 GMC Yukon at 130K miles
- 2011 Chevy Silverado 1500 at 115K miles
- 2007 Ford Focus at 85K miles
- How to Prevent This Code From Triggering
- Frequently Asked Questions
- Can I fix a B2425 code myself?
- Why did my heated seat stop working but the light still comes on?
- What does B2425 0D mean on my Chevy or GMC?
- I replaced the heating element but the code came back. What now?
- The code is for the driver's seat, so why should I check under the passenger seat?
- Can I just reset the heated seat module by pulling a fuse?
- What are the most common mistakes when diagnosing B2425?
- Key Takeaways
- 🎟️ Get 5% Off