
OBD-II Code B2486: Climate Control Seat Module Voltage Out of Range
What B2486 means, why it triggers, and how to fix it
- Code B2486 disables your heated and cooled seats because the control module detected an input voltage below 10V or above 15V.
- Test your battery and alternator first; a resting battery voltage below 12.4V or a running alternator output outside 13.2V-14.8V are the most common triggers.
- On 2009-2017 Ford and Lincoln SUVs, inspect the passenger seat module connector for melted plastic, which requires a $40 replacement pigtail (part WPT-928).
- Verify the code definition for your exact vehicle before buying parts, as Hyundai and Ford sometimes use B2486 for unrelated door latch or turn signal failures.
What Does B2486 Mean?
Code B2486 indicates the vehicle's computer detected abnormal voltage at the climate control seat module. If the voltage drops below 10 volts or spikes above 15 volts, the system disables the heated and cooled seats as a safety measure. Always verify the code definition for your specific vehicle, as manufacturers like Hyundai and Ford sometimes use B2486 for unrelated systems like door latches or turn signals.
Technical definition: The Dual Climate Controlled Seat Module (DCSM) or Seat Climate Control Module (SCME) monitors its input voltage. If it detects voltage below 10 volts or above 15 volts for a specified period, it stores DTC B2486. The module then enters standby mode, suspending seat heating and cooling until voltage normalizes and a seat switch is reactivated. On certain platforms (e.g., Ford Mustangs, Hyundai Genesis), this code corresponds to unrelated faults like a 'Left Side Repeater Lamp Output Circuit Failure' or a door latch adapter issue.
Can I Drive With B2486?
Yes, But With Caution. Yes, but your heated or cooled seats will not work. Address this soon, as B2486 often signals a failing battery or alternator. Ignoring the underlying voltage issue will eventually prevent the vehicle from starting, leaving you stranded. Driving will not damage the seat components, but the root cause requires prompt attention.
Common Causes
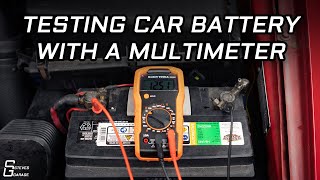
- Weak or failing battery (Very Common) — An old or failing battery is the most frequent cause. 🎬 Watch: How to test your battery with a multimeter. The seat module is highly sensitive to voltage drops, and a struggling battery cannot provide a steady 12+ volts during engine startup.
- Faulty alternator (Common) — A failing alternator causes voltage spikes above 15 volts or drops below 13 volts while the engine runs. This unstable voltage immediately triggers the B2486 code.
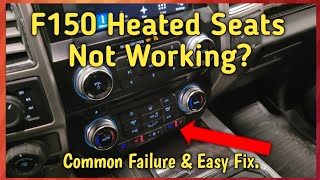
- Melted module connector or damaged wiring (Common) — The wiring harness or connector for the climate control seat module often overheats and melts, especially on Ford SUVs. 🎬 See this walkthrough on fixing Ford heated seat modules. This creates high resistance and a localized voltage drop at the module.
- Recent jump-start or battery charge (Common) — Jump-starting a vehicle or connecting a high-amp battery charger creates temporary voltage fluctuations that the module flags as a hard fault.
- Corroded battery terminals or poor grounds (Less Common) — Corrosion at the battery terminals or chassis grounds creates electrical resistance, leading the seat module to detect a system-wide low voltage condition.
- Parasitic battery drain (Less Common) — A module failing to sleep when the ignition is off drains the battery overnight. This results in low voltage on startup, triggering the code even if the battery and alternator are healthy.
- Incorrect code definition (Rare) — On specific vehicles (like the Hyundai Genesis), B2486 points to a door latch issue, not the climate seats. Always verify the definition in a model-specific service manual.
- Faulty Climate Control Seat Module (Rare) — The module itself rarely fails. It is almost always the victim of an external voltage issue and should only be replaced after ruling out the battery, alternator, and wiring.
Symptoms
- Heated and/or cooled seats not working — The indicator lights on the seat switch turn on for a second and immediately turn off, or they fail to illuminate entirely.
- Slow engine crank or difficulty starting — If a weak battery or failing alternator is the root cause, the engine struggles to turn over, especially in cold weather.
- Dimming or flickering lights — Headlights or interior lights dimming at idle indicates a failing alternator unable to maintain system voltage.
- Erratic operation of other electronics — System-wide low or high voltage causes the radio, navigation, or power windows to glitch or shut down unexpectedly.
- Check Engine or Battery Warning Light — While B2486 is a Body code, the underlying voltage issue often triggers the main battery warning light or Check Engine Light.
Diagnostic Flowchart
Tap your situation to follow the diagnostic path that matches what you're seeing on this code.
Common Fixes & Costs
- Replace vehicle battery — Parts: $150-$450, Labor: $50-$100, ~0.5 hr book time (DIY)
- Replace alternator — Parts: $350-$800, Labor: $200-$350, ~2 hr book time (Intermediate)
- Repair melted module connector/pigtail — Parts: $20-$50, Labor: $100-$200, ~1.5 hr book time (Intermediate)
- Replace Climate Control Seat Module — Parts: $250-$600, Labor: $50-$150, ~0.8 hr book time (Professional)
- Module Reprogramming / Software Update — Parts: $0, Labor: $100-$250, ~1 hr book time (Professional)
DIY vs Professional
- Replace vehicle battery — Beginner:
- Replace alternator — Beginner:
- Repair melted module connector/pigtail — Beginner:
- Replace Climate Control Seat Module — Beginner:
- Module Reprogramming / Software Update — Beginner:
Used vs. New Parts: Buying Guide
When a used part is worth it: Buy new for batteries, alternators, and wiring pigtails. A used Climate Control Seat Module is a cost-effective option only if sourced from a reputable seller guaranteeing it came from a non-flood vehicle.
Donor-vehicle mileage cap: roughly under 75000 miles for the part to have meaningful remaining life.
Donor quality checklist:
- Verify the exact part number matches your original module; software differences cause incompatibility.
- Purchase from a seller offering a minimum 30-day warranty.
- Inspect the used module's connector pins for any signs of melting or scorch marks.
Decision logic:
- If The fix is a battery or alternator → Buy new or remanufactured with a lifetime warranty. The risk of a used part failing and leaving you stranded is too high.
- If The fix is the Climate Control Seat Module and your vehicle is over 10 years old → A tested, used module from a low-mileage donor saves $200-$400.
- If The part is a wiring pigtail connector → Always buy new. A new part ensures a solid, low-resistance connection.
Warranty tradeoff: Used parts carry a 30-90 day parts-only warranty. New alternators include 1-year to lifetime warranties. New OEM modules installed at a dealer carry a 2-year warranty.
Worst-case if a used part fails: $300-$600 if a used alternator or module fails, requiring repeat labor costs and a second replacement part.
What Happens If You Wait — Timeline
- 0-1 month: Code B2486 appears intermittently on cold days. Heated/cooled seats stop working. The engine cranks slightly slower. (MPG impact: 0%% · Added cost: $0)
- 1-3 months: The code becomes persistent. The weak battery forces the alternator to work at maximum capacity, increasing heat and strain. (MPG impact: 1-3% (due to increased alternator load)% · Added cost: $50 in wasted fuel and increased alternator wear.)
- 3-6 months: The battery fails to start the car. The constant high-output demand causes the alternator to fail prematurely. (MPG impact: 3-5%% · Added cost: $350-$1150 (cost of replacing the alternator due to cascading failure).)
- 6+ months: The vehicle dies while driving. Unstable voltage spikes damage the PCM, instrument cluster, or radio. (MPG impact: N/A (Vehicle won't run)% · Added cost: $1500-$3000 (cost of battery, alternator, and replacement control modules).)
Cost of Not Fixing It
- Immediate: Loss of heated and cooled seat function. (Added cost: $0)
- 0-3 months: A weak battery forces the alternator to work at maximum capacity, causing it to overheat and fail prematurely. You risk being stranded. (Added cost: $150-$500 (for towing and emergency diagnosis))
- 3+ months: Driving with a failing alternator damages sensitive electronic modules due to severe voltage spikes. It permanently destroys the battery. (Added cost: $800-$2500 (cost of replacing the battery, alternator, and damaged control modules))
Diagnosis Steps
- Verify Code Definition & Read All Codes
Use an advanced OBD-II scanner to read codes from all modules. Verify the definition of B2486 for your exact year, make, and model using service data. Clear the codes and drive the vehicle for 15 minutes. If B2486 does not return, it was a one-time voltage fluctuation.
Tools: OBD-II Scanner, Service Manual/Database (Beginner) - Inspect & Test the Battery
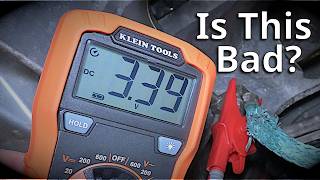
Clean any corrosion off the battery terminals. Use a multimeter to test the battery voltage with the engine off; it must read 12.4 volts or higher. Have a helper start the car while you watch the multimeter. If voltage drops below 9.6 volts during cranking, replace the battery.
Tools: Wrench set, wire brush, multimeter (Beginner) - Test the Charging System
With the engine running, test the battery voltage with a multimeter. A healthy alternator outputs between 13.2 and 14.8 volts. Turn on the headlights, HVAC fan, and radio, holding the engine at 1,500 RPM. If voltage drops below 13.2V or spikes above 15V, replace the alternator.
Tools: Multimeter (Beginner) - Inspect the Module Connector
Locate the seat module under the passenger seat. Disconnect the main electrical connector and inspect it for melted plastic, scorch marks, or backed-out pins. A melted connector at the power and ground pins is a highly common failure point requiring a new pigtail.
Tools: Socket set, flashlight (Intermediate) - Inspect the Module Fuse
Locate the fuse for the Dual Climate Control Seat Module (e.g., a 40A fuse in the Battery Junction Box). Visually inspect the fuse to confirm it is not blown and check the fuse box socket for signs of heat damage or melting.
Tools: Owner's manual, fuse puller, flashlight (Intermediate) - Check for Voltage at the Module
With the module unplugged, use a multimeter and wiring diagram to probe the power supply wire in the harness. You must see steady battery voltage (over 12V). If there is no voltage, locate the break in the wiring between the fuse box and the module.
Tools: Multimeter, vehicle-specific wiring diagram (Advanced) - Perform a Voltage Drop Test
Set the multimeter to DC Volts. Place the positive lead on the battery's positive terminal and the negative lead on the power supply pin at the module's connector. With the key on and seat function requested, a reading above 0.5 volts proves excessive resistance in the power circuit. Repeat on the ground side; readings above 0.2 volts indicate a bad ground.
Tools: Multimeter, vehicle-specific wiring diagram, back-probe kit (Advanced) - Check for Parasitic Draw
Disconnect the negative battery terminal. Connect a multimeter in series (set to 10A) between the terminal and cable. Close all doors and wait 40 minutes for modules to sleep. The reading must drop below 50-85 milliamps. If higher, pull fuses one by one until the draw drops to identify the draining circuit.
Tools: Multimeter with Amp setting, wrench set (Advanced)
When This Code Triggers (Freeze-Frame Conditions)
- Module Voltage: <10V or >15V (Triggers when the module's supply voltage goes outside the acceptable safety range.)
- Event: N/A (Occurs during engine cranking (low voltage) or due to a charging system fault (low or high voltage).)
- Engine State: Cranking or Running (Sets during startup if the battery is weak, or while driving if the alternator fails.)
- Ambient Temperature: Low (< 32°F / 0°C) (Occurs frequently in cold weather, which reduces battery performance and exposes weak cells.)
Related Codes
- B1676 — 'Battery Pack Voltage Out of Range'. Often sets alongside B2486. B1676 is a general system voltage flag, while B2486 is the seat module specifically shutting down due to that same instability.
- B1317 / B1318 — 'Battery Voltage High/Low'. Set by the Driver Seat Module (position memory), whereas B2486 is set by the Climate Seat Module (heating/cooling). Seeing both confirms a vehicle-wide voltage issue.
- P0562 / P0563 — 'System Voltage Low/High'. Powertrain codes set by the main engine computer. If present with B2486, the alternator or battery is definitively failing.
- U3003:16 / U3003:17 — 'Battery Voltage - Voltage Below/Above Threshold'. Network codes indicating a module detected a CAN bus voltage issue, reinforcing that the problem is not isolated to the seat circuit.
Climate & Environmental Factors
- Cold Weather: Cold temperatures significantly reduce a battery's cranking amps. A weak battery only shows symptoms like the B2486 code when the temperature drops, as its resting voltage falls below the module's threshold.
- High Humidity: Accelerates corrosion on battery terminals, ground connections, and the seat module connector. This corrosion adds resistance, causing voltage drops that trigger the code.
How to Talk to a Mechanic About This Code
Say this: "I have a B2486 code and my heated seats aren't working. I understand this is a voltage code, so I'd like to authorize one hour of diagnostic time to perform a complete battery and charging system test, including checking for voltage drops at the battery terminals and alternator."
Frames the problem as a basic electrical issue, directing the mechanic to the cheapest causes first and preventing an immediate jump to a costly module replacement.
Avoid saying:
- 'My heated seats are broken, can you fix it?'
- 'I have a B2486 code, just replace the seat module.'
- 'Just do whatever it takes to fix it.'
Questions to ask before authorizing the repair:
- What was the battery's cranking voltage during the load test?
- What was the alternator's voltage output at idle and under load?
- Did you perform a voltage drop test on the power and ground circuits to the module connector?
- Did you visually inspect the module connector under the passenger seat for melting?
- Can you provide a written estimate breaking down parts and labor?
- What is the warranty on the recommended parts and labor?
Where to Take It: Dealer vs Independent vs Chain
- Dealer:
Use only for warranty work, software updates, or verifying oddball code definitions. Avoid for initial diagnosis on out-of-warranty vehicles.
Best for: Vehicles under warranty., Confirming manufacturer-specific code definitions (e.g., Hyundai door latch)., Performing software updates or module programming.
Downsides: Highest labor rates., Quick to recommend expensive module replacement over component-level wiring repair. (Typical cost: +50% vs. baseline) - Independent Shop:
Best overall fit. An experienced independent technician tests the battery and alternator first, saving you money.
Best for: Out-of-warranty vehicles., Diagnosing battery, alternator, and wiring issues., Splicing in a new pigtail connector.
Downsides: Electrical diagnostic skill varies; vet the shop based on ASE certifications., Lacks access to the latest manufacturer software for reprogramming. (Typical cost: +0% vs. baseline) - Chain Shop:
Avoid for diagnosis. Only use for a simple battery replacement if you are 100% certain that is the problem.
Best for: Quick and convenient battery replacement if you confirmed the battery is the sole cause.
Downsides: Not equipped for in-depth electrical diagnostics., High pressure to upsell unnecessary alternators or parts., Technician skill is highly variable. (Typical cost: -10% vs. baseline)
When to Walk Away From the Repair
If the estimated repair cost exceeds 50% of your car's private-party value, seriously consider selling or trading it in.
- Car worth $8000, fix is $400: Fix it. A battery replacement is routine maintenance and well below the threshold.
- Car worth $4000, fix is $1100: Borderline, but likely fix it. An alternator is a significant repair, but at 28% of the car's value, it is cheaper than replacing the vehicle.
- Car worth $3000, fix is $1800: Walk away. The repair cost is 60% of the car's value. Do not sink this much into an older vehicle.
What Scan Tool You Need for This Code
Minimum: A scanner that reads Body ('B') codes and views live data for module voltage. A basic engine-only code reader will not see the B2486 code.
Cheap scanners only read engine codes. You must access the Body Control Module and view live voltage data to confirm a voltage drop or over-voltage condition.
Budget: BlueDriver Pro or ANCEL BD310 (~$100) — Connects to a smartphone app, reads codes from all modules including the BCM, and displays live voltage data.
Mid-range: Foxwell NT510 Elite or Autel MaxiCOM MK808 (~$180-350) — Offers full system diagnostics, reads manufacturer-specific codes, and provides detailed live data graphing.
Professional: Autel MK808BT Pro or Launch X431 CRP919XBT (~$450-600) — Offers full bidirectional control to command modules directly, and performs battery registration required on modern vehicles.
Rent vs buy: For a one-time diagnosis, borrow a tool from an auto parts store. You must ask for a scanner that reads 'ABS and SRS' or 'All-System' codes to ensure it sees Body codes.
How to Clear the Code After You Fix It
- Reconnect the battery if disconnected for repair.
- Use an OBD-II scan tool to clear the Diagnostic Trouble Code from the Body Control Module.
- Start the vehicle and let it idle for 2-3 minutes.
- Activate the heated/cooled seat function to confirm the repair.
Drive cycle (~20 minutes): A complex emissions drive cycle is not required. After clearing the code, a 20-minute drive with mixed city/highway conditions confirms the alternator is charging properly and the code does not return.
Readiness monitors affected: None directly. This is a Body code and does not affect emissions readiness monitors., If the battery was disconnected for repair, all readiness monitors reset and require a full drive cycle before an emissions test.
Before emissions retest: drive at least 50 miles to fully set monitors.
Watch out for:
- Clearing the code without fixing the underlying voltage issue causes the code to return immediately upon pressing the seat button.
- Disconnecting the battery clears the code but resets emissions readiness monitors, causing an automatic failure at a smog check.
Will This Fail Emissions / State Inspection?
No — by itself this code doesn't fail OBD inspection (but it can keep readiness monitors from setting, which causes a separate fail).
- California: A B-code like B2486 does not cause a smog check failure. However, if the underlying voltage issue triggers a P-code (like P0562) and illuminates the Check Engine Light, it is an automatic failure.
- New York: A B-code will not cause a failure unless the Check Engine Light is on. If you disconnected the battery to fix the issue, you must complete a drive cycle to set readiness monitors before inspection.
- Texas: The OBD-II scan looks for powertrain codes (P-codes) that command the Malfunction Indicator Lamp on. A body code like B2486 passes inspection.
Most Commonly Affected Vehicles
- Ford Expedition (2009-2017) — Highly prone to melted power connectors at the Dual Climate Control Seat Module (DCSM) under the passenger seat.
- Ford F-150 (2009-2014) — Shares the DCSM architecture with the Expedition. TSB 15-0137 for Fuse 27 relocation highlights under-hood electrical stress on this platform.
- Ford Explorer (2011-2019) — Experiences frequent failures of the seat module wiring. The WPT-928 connector pigtail is the standard repair part.
- Ford Edge (2011-2014) — Susceptible to voltage-related faults setting this code. TSB 13-11-18 for blank instrument clusters indicates broader module voltage sensitivity.
- Lincoln Navigator (2009-2017) — Uses the exact same DCSM as the Expedition and suffers identical melted connector and voltage drop failures.
- Infiniti QX56/QX80 (2011-2019) — Code triggers due to the Variable Voltage Control System undercharging the battery, or internal seat component failures.
- Hyundai Genesis, Genesis G80 (2014-2020) — WARNING: On these models, B2486 indicates a fault with the 'Adapter-Door Latch', completely unrelated to the seats.
Manufacturer-Specific Notes
- Ford: The connector for the Dual Climate Control Seat Module under the passenger seat is a known weak point that melts, requiring a new pigtail connector (p/n WPT-928).
- Ford / Lincoln: Multiple TSBs exist for electronic modules requiring software updates to correct false electrical faults. Checking for a DCSM software update is a mandatory diagnostic step.
- Ford: On the Mustang, B2486 is defined as 'Left Side Repeater Lamp Output Circuit Failure' and has nothing to do with the seats.
- Infiniti: The 'Variable Voltage Control System' intentionally drops alternator output to save fuel, which inadvertently triggers this code. Disabling the smart charging system often resolves the issue.
- Ford: A known issue on 2009-2014 F-150s is the melting of the fuel pump fuse (Fuse 27). This highlights systemic electrical issues in the under-hood fuse box that cause system-wide voltage drops.
Real Owner Stories
2013 Ford F-150 with 120K miles
Heated seats stopped working during a cold snap, with the light turning on then immediately off.
What they tried:
- Owner suspected a bad module or switch.
- Tested the battery at an auto parts store, which failed the load test.
Outcome: Replaced the 5-year-old battery with a new AGM battery for $250. After clearing the codes, the heated seats worked perfectly.
Lesson: Start with the simplest cause. A weak battery is the number one trigger for B2486, especially in cold weather.
2015 Ford Expedition with 100K miles
B2486 code present, heated seats inoperative. Battery and alternator tested good.
What they tried:
- Shop inspected the wiring under the passenger seat.
- Found the main power and ground wires on the DCSM connector (WPT-928) melted and charred.
Outcome: Spliced in a new Motorcraft WPT-928 pigtail connector for $40 plus one hour of labor. This permanently restored seat function.
Lesson: If the battery and alternator are healthy on a Ford SUV, visually inspect the module connector under the passenger seat before paying for advanced diagnostics.
2014 Infiniti QX80
Owner experienced repeated dead batteries, slow cranking, fluctuating voltage, and the B2486 code.
What they tried:
- Replaced the battery multiple times and the dealer replaced the alternator, but the problem returned.
- Researched the Infiniti Variable Voltage Control System on forums.
Outcome: Disabled the 'smart' charging system by clipping a specific wire at the alternator, forcing a constant 14-volt charge. This resolved all issues.
Lesson: Manufacturer-specific charging strategies cause persistent voltage codes. Forum research uncovers non-obvious fixes that professional shops miss.
2016 Hyundai Genesis
Check Engine Light on with code B2486. Owner prepared to replace the climate seat module.
What they tried:
- Looked up the code on a generic database.
- Consulted a model-specific forum before ordering parts.
Outcome: Discovered B2486 refers to a fault with the 'Adapter-Door Latch' on this specific vehicle. Replaced the faulty door latch mechanism.
Lesson: Always verify the code definition in a factory service manual. Generic code definitions lead to expensive misdiagnoses.
How to Prevent This Code From Triggering
- Test battery health (Every 6 months) — Identifies a weakening battery before it fails and triggers electrical codes. A healthy battery rests at 12.4V or higher.
- Clean battery terminals (Annually) — Removes corrosion that acts as a resistor, preventing voltage drops and ensuring full current flow to modules.
- Ensure battery is securely mounted (During battery testing) — Prevents excessive vibration that causes internal plate damage and premature battery failure.
- Take 20+ minute drives (Every two weeks) — Allows the alternator sufficient time to fully recharge the battery, preventing gradual discharge from short trips.
- Use a battery tender (If vehicle sits for 3+ weeks) — Prevents the battery from discharging due to normal parasitic draw from vehicle computers.
- Inspect the alternator drive belt (Every 30,000 miles) — Prevents belt slip, ensuring the alternator spins at the correct speed to generate proper voltage.
Frequently Asked Questions
Can I just clear the B2486 code?
Yes, you can clear it with a scanner. If caused by a one-time event like a jump-start, it will not return. If it comes back immediately, you have a persistent battery, alternator, or wiring problem.
What is the most common misdiagnosis for a B2486 code?
The most costly misdiagnosis is assuming B2486 always refers to the heated seat module. On vehicles like the Ford Mustang or Hyundai Genesis, this code indicates a turn signal or door latch failure. Always verify the code definition for your specific vehicle.
My battery and alternator tested good. What else is it?
Inspect the electrical connector under the passenger seat for melting or scorch marks, which is a common failure point. Next, perform a voltage drop test on the power and ground circuits to find hidden resistance.
Why did my heated seats stop working after a jump-start?
Jump-starting causes a severe voltage spike. The sensitive climate control seat module detects this, sets the B2486 code, and shuts down to protect its internal circuitry.
Is it safe to drive with the B2486 code?
Yes, driving will not damage the seat components. However, because it points to a failing battery or alternator, ignoring it will eventually leave you stranded when the vehicle fails to start.
The lights for my heated seats turn on for a second and then turn off. Is this related?
Yes. The control module performs a self-test at startup, detects the voltage fault, and immediately shuts down the system, turning off the indicator light.
Do I need to replace the whole seat to fix this?
No. The problem is with the electrical power supply or the small control module under the seat. The most common fixes are replacing the battery, alternator, or a melted electrical connector.
Where is the climate control seat module located?
In most affected Ford, Lincoln, and GM vehicles, the module is bolted under the front passenger seat. You must unbolt and tilt the seat back to access the module and its connectors.
Key Takeaways
- Code B2486 disables your heated and cooled seats because the control module detected an input voltage below 10V or above 15V.
- Test your battery and alternator first; a resting battery voltage below 12.4V or a running alternator output outside 13.2V-14.8V are the most common triggers.
- On 2009-2017 Ford and Lincoln SUVs, inspect the passenger seat module connector for melted plastic, which requires a $40 replacement pigtail (part WPT-928).
- Verify the code definition for your exact vehicle before buying parts, as Hyundai and Ford sometimes use B2486 for unrelated door latch or turn signal failures.
Helpful Videos

Shop the Parts Behind B2486
Below are the parts most often responsible for code B2486, ranked by how frequently each one is the actual culprit (per the diagnosis above). Tap any to see what we have for your vehicle.


The information in this article is provided for general reference and educational purposes only. Vehicle specifications, procedures, and part compatibility can vary by production date, trim level, and region. Always consult your vehicle's factory service manual and verify part numbers before purchasing or performing repairs. Safety-critical components such as airbags, seat belts, and braking systems should be installed by a qualified professional.
- 🧭 Diagnostic Flowchart
- 🎬 Helpful Videos
- 🛍️ Shop This Part
- What Does B2486 Mean?
- Can I Drive With B2486?
- Common Causes
- Symptoms
- Common Fixes & Costs
- DIY vs Professional
- Used vs. New Parts: Buying Guide
- What Happens If You Wait — Timeline
- Cost of Not Fixing It
- Diagnosis Steps
- When This Code Triggers (Freeze-Frame Conditions)
- Related Codes
- Climate & Environmental Factors
- How to Talk to a Mechanic About This Code
- Where to Take It: Dealer vs Independent vs Chain
- When to Walk Away From the Repair
- What Scan Tool You Need for This Code
- How to Clear the Code After You Fix It
- Will This Fail Emissions / State Inspection?
- Most Commonly Affected Vehicles
- Manufacturer-Specific Notes
- Real Owner Stories
- 2013 Ford F-150 with 120K miles
- 2015 Ford Expedition with 100K miles
- 2014 Infiniti QX80
- 2016 Hyundai Genesis
- How to Prevent This Code From Triggering
- Frequently Asked Questions
- Can I just clear the B2486 code?
- What is the most common misdiagnosis for a B2486 code?
- My battery and alternator tested good. What else is it?
- Why did my heated seats stop working after a jump-start?
- Is it safe to drive with the B2486 code?
- The lights for my heated seats turn on for a second and then turn off. Is this related?
- Do I need to replace the whole seat to fix this?
- Where is the climate control seat module located?
- Key Takeaways
- 🎟️ Get 5% Off