
OBD-II Code B2592: Trunk/Liftgate Latch Circuit Malfunction
What B2592 means, why it triggers, and how to fix it
- Scan the Body Control Module (BCM) to confirm code B2592, which indicates a complete electrical failure in the power trunk, liftgate, or sliding door latch circuit.
- Broken wires inside the flexible rubber hinge boot cause over 50% of B2592 faults, followed closely by a burned-out latch actuator motor.
- Check the glovebox 'valet lock' switch and the 25A/30A liftgate fuse before buying any replacement parts.
- Ford Explorer and Subaru Outback models frequently trigger this code due to software glitches, requiring a 15-minute battery disconnect reset or a dealer module update.
- On 1997-2004 C5 Corvettes, B2592 is a critical anti-theft steering column lock fault that disables the vehicle, completely unrelated to the trunk.
What Does B2592 Mean?
Code B2592 means the Body Control Module (BCM) detected a problem in the electronic circuit for the trunk or liftgate latch. The BCM commanded the trunk or liftgate to unlatch but received no electrical response or position change from the circuit, indicating a complete failure in communication or power delivery.
Technical definition: The generic SAE/ISO definition is 'Liftgate/Trunk Unlatch Circuit Malfunction.' A frequent variation is 'PSD Not Fully Closed (Module Commanded Successfully),' where 'PSD' stands for Power Sliding Door on minivans. On 1997-2004 GM Corvettes, this code has a completely different meaning related to the anti-theft steering column lock.
Can I Drive With B2592?
Yes, But With Caution. Yes, but secure the liftgate first. If the liftgate fails to latch securely, it is a major safety hazard and must be tied down before driving to prevent it from flying open. An unlatched gate allows toxic exhaust fumes to enter the cabin and poses a risk of cargo falling onto the road. Additionally, a related fault keeps the 'trunk ajar' light on, draining the battery overnight.
Common Causes
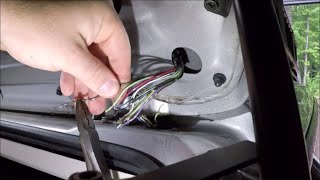
- Broken or Chafed Wiring (Very Common) — The wiring harness passing from the vehicle's body to the liftgate is housed inside a flexible rubber boot. 🎬 Watch: How to repair a broken liftgate wiring harness. Constant opening and closing fatigues these wires, causing them to break or short circuit. This is the most common point of failure on SUVs, wagons, and minivans.
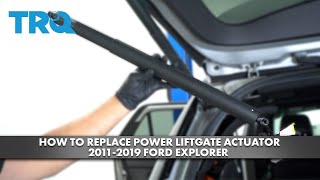
- Failed Trunk/Liftgate Latch Actuator (Very Common) — The latch assembly contains a small electric motor and a position sensor. The motor burns out from wear, or the internal plastic gears strip, 🎬 See this step-by-step guide to replacing a liftgate actuator. leading to a clicking or buzzing sound without movement. The position sensor also fails, preventing the BCM from knowing the latch status.
- Water Intrusion and Corrosion (Common) — Water leaking past failing seals around the liftgate or taillights seeps into the latch mechanism or its electrical connector. This moisture corrodes the pins and wires, creating high resistance or a complete open in the circuit. Ford issued TSB 20-2425 specifically for this issue on 2020-2021 Explorers.
- Faulty Release Switch (Common) — The release button on the dashboard, key fob, or exterior liftgate handle fails due to dirt and moisture exposure. These switches develop internal shorts, sometimes causing the trunk to open unexpectedly (phantom opening).
- Blown Fuse or Faulty Relay (Common) — The latch circuit is protected by a fuse and controlled by a relay. A short circuit in the wiring or a seized latch motor causes a power surge that blows the fuse. A faulty relay causes intermittent or zero operation.
- Weak Gas Lift Struts (Less Common) — On power liftgates, weak gas struts force the electric motor to work significantly harder to lift the gate. The control module detects this excess current draw as an obstruction and aborts the operation as a safety measure, logging a fault code.
- Misaligned Latch or Striker (Less Common) — A mechanical issue where the latch on the gate and the striker loop on the body are misaligned prevents proper closing. The BCM interprets the failure to receive a 'closed' signal as a circuit malfunction.
- Software Glitch in Control Module (Less Common) — The Body Control Module (BCM) or Rear Gate Trunk Module (RGTM) develops software errors. Ford released TSBs SSM 49015 and SSM 49914 for 2020+ Explorers to fix intermittent operation and phantom opening via a software update.
- Faulty Body Control Module (BCM) (Rare) — While the BCM is the brain of the operation, it is the least likely component to fail. Its failure usually accompanies other seemingly unrelated electrical issues in the vehicle. Exhaust all other possibilities before condemning the BCM.
Symptoms
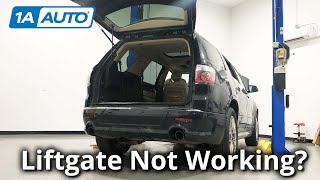
- Power trunk or liftgate will not open or close — The primary symptom where the latch does not release or engage when using the key fob, interior button, or exterior handle.
- Multiple beeps when trying to operate liftgate — On modern SUVs (like Kia Telluride and Subaru Outback), pressing the liftgate button results in three or more beeps. This is the system's audible alert that it detected a fault and aborted the operation.
- 'Trunk Ajar' or 'Liftgate Open' warning light stays on — The dashboard displays a persistent warning that the trunk is open, even when physically closed, leading to a parasitic battery drain.
- Clicking or buzzing noise from the latch area — Pressing the release button produces a distinct noise from the latch, indicating the motor receives power but is mechanically jammed or stripped.
- Trunk or liftgate opens on its own — Known as 'phantom opening,' this is caused by a shorted release switch, chafed wiring making intermittent contact, or a software bug.
- Intermittent operation — The power latch works sporadically, heavily influenced by temperature changes, humidity, or the physical angle of the liftgate.
Diagnostic Flowchart
Tap your situation to follow the diagnostic path that matches what you're seeing on this code.
Common Fixes & Costs
- Repair Broken Wires in Harness — Parts: $5 - $20, Labor: $150 - $250, ~1.5 hr book time (Intermediate)
- Replace Trunk/Liftgate Latch Actuator
— Parts: $90 - $300, Labor: $100 - $200, ~1 hr book time
(DIY)
Ford Explorer (2013-2019, with power liftgate): OEM {'part_number': 'BB5Z-7843150-C', 'price': '~$340'} (Alt: {"brand": "Dorman", "part_number": "931-911", "price": "~$200"})
GMC Acadia (2017-2023): OEM {'part_number': '13542450', 'price': '~$155'} (Alt: {"brand": "Dorman", "part_number": "931-276", "price": "~$100"}, {"brand": "ACDelco", "part_number": "13524683", "price": "~$165"})
Honda Odyssey (2011-2017, Power Sliding Door, Right): OEM {'part_number': '72610-TK8-A12', 'price': '~$310'} (Alt: {"brand": "Standard Motor Products", "part_number": "DLA1073", "price": "~$250"}) - Replace Blown Fuse — Parts: $1 - $5, Labor: $0, ~0.1 hr book time (DIY)
- Replace Power Liftgate Motor/Strut Assembly — Parts: $600 - $1300, Labor: $165 - $627, ~2.5 hr book time (Professional)
- Reprogram Control Module — Parts: $0, Labor: $125 - $250, ~1 hr book time (Professional)
Used vs. New Parts: Buying Guide
When a used part is worth it: For a simple latch actuator on an older vehicle (>120k miles) where budget is the primary concern, a used OEM part from a reputable salvage yard is a cost-effective option.
Donor-vehicle mileage cap: roughly under 80000 miles for the part to have meaningful remaining life.
Donor quality checklist:
- Source from a vehicle of the same model year range with a verified low-mileage donor.
- Inspect the part for corrosion, especially around the electrical connector pins.
- Ensure the part number matches exactly, as variations exist even within the same model year.
- Avoid parts from regions with heavy road salt usage to minimize internal corrosion risk.
Decision logic:
- If The vehicle is less than 8 years old or the new part costs under $150 → Buy a new OEM or high-quality aftermarket part (e.g., Dorman, ACDelco) for better reliability and warranty.
- If The vehicle is over 10 years old and the repair is for personal use, not resale → A used part is an acceptable risk to save money, provided it comes with a short-term warranty (30-90 days).
- If The failure is known to be electronic (internal sensor) rather than mechanical (broken gear) → Favor a new part, as the electronic lifespan of a used part is unknown.
Warranty tradeoff: Used parts typically offer a 30-90 day warranty covering only the part itself. New aftermarket parts come with a 1-year to limited lifetime warranty. New OEM parts carry a 1-2 year warranty.
Worst-case if a used part fails: $200 - $400 (If a used latch fails after the warranty period, you pay for a second replacement part and repeat the installation labor.)
What Happens If You Wait — Timeline
- 0-2 Weeks: Intermittent failure. The liftgate occasionally fails to open or close, or beeps without moving. It works again after a few tries or after the vehicle is restarted. (MPG impact: 0%% · Added cost: $0)
- 2 Weeks - 2 Months: Failure becomes consistent. The 'Trunk Ajar' warning light illuminates and stays on, indicating the latch position switch has failed, causing a parasitic drain. (MPG impact: 0%% · Added cost: $150 - $350 (High risk of a dead battery, requiring a jump start or new battery.))
- 2-6 Months: Complete functional failure. The latch no longer operates electronically. If the failure was due to water intrusion, corrosion spreads from the latch connector to the wiring harness itself. (MPG impact: 0%% · Added cost: $450 - $1,500+ (Potential cost of water damage remediation if the trunk is stuck open in the rain, including carpet and trim replacement.))
- 6+ Months: Risk of cascading electronic failure. If the root cause was a shorted wire that was ignored, it causes a permanent fault in the Body Control Module's driver circuit. The BCM itself must be replaced. (MPG impact: 0%% · Added cost: $600 - $1200 (Cost to replace and reprogram a BCM, in addition to fixing the original latch/wiring fault.))
Cost of Not Fixing It
- Immediate: Significant safety hazard if the liftgate cannot be securely latched. Cargo falls out, and toxic exhaust fumes enter the cabin. The vehicle is not legally safe to drive. (Added cost: $250+ (Potential fine for unsecured load or causing a road hazard))
- 1-7 Days: If the 'Trunk Ajar' light stays on, it causes a parasitic battery drain, leaving you with a dead battery. A faulty latch position switch prevents the BCM from entering sleep mode. (Added cost: $150 - $350 (Cost of a new battery and potential tow/service call))
- 1+ Month: Ongoing inconvenience and security risk. An inoperable trunk limits cargo use, and a trunk that opens unexpectedly makes the vehicle vulnerable to theft and water damage. (Added cost: Variable (Cost of stolen items, potential water damage to trunk interior from rain))
Diagnosis Steps
- Perform a System Reset and Check for Lockouts
Disconnect the vehicle's battery for 15 minutes to clear module glitches. Thoroughly check for a 'valet' or 'trunk lock' button in the glove box or on the latch itself, which disables electronic release. On Nissans and Kias, perform the specific manual open/close reset procedure outlined in the owner's manual.
Tools: Socket set (for battery terminal) (Beginner) - Visually Inspect the Wiring Harness
Open the liftgate and pull back the flexible rubber boot connecting the body to the gate. Meticulously inspect the wires inside for breakage, chafing, or cracked insulation. Pay close attention to the point where the harness flexes most. This is the single most common failure point.
Tools: Trim tool, flashlight (Intermediate) - Check All Fuses and Relays
Locate the main fuse for the liftgate/door module in the engine bay fuse box (typically a 25A or 30A J-case fuse) and the smaller control circuit fuse in the interior panel. Swap the liftgate relay with an identical one from a non-critical system (like the horn) to test for a faulty relay.
Tools: Owner's manual, fuse puller or pliers (Beginner) - Check Latch and Striker Alignment
Visually inspect the latch mechanism and the U-shaped striker on the body for wear or damage. Close the liftgate slowly and watch how they engage. If misaligned, the latch binds, causing the motor to strain and the BCM to register a fault.
Tools: Torx/socket set (Intermediate) - Test Component-Level Electrical Values
Disconnect the latch motor connector and have a helper press the release button; your multimeter should show a momentary reading of battery voltage (~12V). If you get voltage but no movement, the latch motor is dead. Test release switches for resistance (Ohms). A good switch shows infinite resistance (O.L.) when not pressed, and near zero Ohms when pressed.
Tools: Digital Multimeter, Trim Removal Tools, Wiring Diagram (Advanced) - Scan the BCM with a Bi-Directional Tool
Use an advanced OBD-II scanner to communicate with the Body Control Module (BCM). Check for related codes (B153F, U-codes). Use the bi-directional control to command the latch to 'unlatch.' If it makes a noise but doesn't open, the latch is mechanically bad. If it does nothing, the problem is in the wiring or BCM.
Tools: Advanced Bi-Directional OBD-II Scanner (Advanced) - Analyze Live Data PIDs for Precise Diagnosis
Monitor live data PIDs like 'Liftgate Ajar Switch' and 'Liftgate Angle'. The 'Liftgate Ajar Switch' should change from 'Ajar' to 'Closed' as you manually click the latch closed with a screwdriver. Any PID that is stuck or doesn't respond indicates a fault in that specific component's circuit.
Tools: Advanced Bi-Directional OBD-II Scanner with Live Data (Advanced) - Perform a Parasitic Draw Test
If the symptom includes a dead battery, perform a parasitic draw test. With the vehicle off and asleep, connect a multimeter in series with the negative battery terminal. Pull the fuse for the liftgate module. If the amp draw drops significantly (over 50mA), the fault is within that circuit, usually caused by a faulty latch position switch keeping the BCM awake.
Tools: Multimeter with 10A capability (Advanced)
When This Code Triggers (Freeze-Frame Conditions)
- Fault Trigger: On Command (Code B2592 sets the instant the BCM commands the liftgate latch to open or close and does not receive the expected electrical feedback. It is independent of engine running conditions.)
- Battery Voltage: 11.5V - 14.5V (Low battery voltage (below 11V) prevents the high-current latch motor from operating correctly and triggers the code alongside low-voltage faults.)
- Vehicle Speed: 0 mph (The liftgate is operated when the vehicle is stationary. Freeze frame always shows 0 mph.)
- Ambient Temperature: Any (Failures are more common in extreme cold or heat, but the code triggers at any temperature. Freeze frame records the outside air temperature at the exact moment of failure.)
Related Codes
- B153F — Specific to GM, this code means 'Liftgate Object Sensor Malfunction.' The liftgate opens a few inches then stops. TSB 21-NA-123 suggests the cause is frequently bent pins in the sensor's electrical connector. Inspect this connector before replacing parts.
- B2587 / B2592 (on C5 Corvette) — On C5 Corvettes, these codes appear together and relate to the 'Column Lock/Unlock Drive' anti-theft system. They indicate a failure in the steering column lock actuator circuit and trigger a 'Service Column Lock' message. This is completely unrelated to the liftgate.
- B1327 — A generic code for 'Vehicle Battery Voltage Low.' BCMs disable high-current features like power liftgates when battery voltage drops below a specific threshold (e.g., 10.5V). If you see this alongside B2592, diagnose your battery and charging system first.
- U-codes (e.g., U0140) — Network communication codes like U0140 (Lost Communication with BCM) alongside B2592 point towards a broader system issue. The root cause is a failing BCM, a wiring problem on the CAN bus network, or a bad ground connection. Diagnose the U-code first.
Climate & Environmental Factors
- Cold Weather: Temperatures below freezing (32°F / 0°C) thicken the hydraulic fluid in power struts, increasing the current draw on the motor and causing the system to abort. Batteries are weaker in the cold, providing less amperage, and plastic wiring insulation becomes brittle and prone to cracking.
- Humidity and Water: High humidity, rain, and snowmelt lead to moisture entering connectors, switches, and the latch mechanism. This causes corrosion on electrical pins, leading to high resistance and intermittent signals. In freezing weather, this moisture turns to ice, physically jamming the mechanism.
How to Talk to a Mechanic About This Code
Say this: "I have a B2592 code and my power liftgate isn't working. I'd like to schedule a diagnostic. Based on my research, the most common causes are broken wires in the flexible harness or a failed latch assembly. Can you please start the diagnosis by inspecting those specific areas?"
This signals you are an informed customer. It directs the technician to the most probable causes first, saving diagnostic time and preventing them from immediately suggesting a more expensive, less likely repair like replacing the entire Body Control Module.
Avoid saying:
- 'My trunk is broken, just fix it.'
- 'My car is acting weird, can you just look at it?' (This is too vague and invites a broad, expensive diagnostic process).
- 'Do whatever you think is best.' (This gives up your right to approve specific repairs and costs).
Questions to ask before authorizing the repair:
- Can you show me the broken wire or explain how the latch failed its electrical test?
- If the wiring is broken, what is your splicing method? Will you be using heat-shrink butt connectors to ensure a durable, moisture-proof repair?
- Is the recommended replacement part OEM or aftermarket, and what is the warranty on both the part and the labor?
- Can you provide a written estimate that breaks down the cost of parts and labor before you begin the work?
Where to Take It: Dealer vs Independent vs Chain
- Dealer:
A strong, safe choice if a software update is needed, but the most expensive option for an out-of-warranty repair.
Best for: Vehicles under warranty., Repairs requiring a vehicle-specific software update (like Ford TSBs)., Complex electrical issues where manufacturer-specific diagnostic tools are essential.
Downsides: Typically the highest labor rates and part costs., More inclined to replace an entire assembly rather than performing a detailed component repair (e.g., replacing the whole latch vs. fixing a wire). (Typical cost: +40% vs. baseline) - Independent Shop:
Best overall fit for most out-of-warranty B2592 repairs. An experienced independent technician easily diagnoses and repairs the common causes at a lower cost than the dealer.
Best for: Out-of-warranty vehicles where cost is a factor., Common electrical problems like broken wires or component replacement., Building a long-term relationship with a trusted mechanic.
Downsides: Quality and expertise vary greatly; it is crucial to find a shop with strong reviews for electrical diagnostics., Lacks access to the very latest manufacturer software or specialized tools for brand-new models. (Typical cost: +0% vs. baseline) - Chain Shop:
AVOID for this code. B2592 requires specific diagnostic skills that are beyond the scope of a typical chain shop, increasing the risk of misdiagnosis and unnecessary part replacement.
Best for: Simple, high-volume jobs like oil changes, tires, and brake pads.
Downsides: Technicians lack the specialized electrical diagnostic experience needed for B-codes., Business model creates pressure for upselling unnecessary services. (Typical cost: -10% vs. baseline)
When to Walk Away From the Repair
If the estimated repair cost exceeds 40-50% of the car's private-party value, seriously consider selling or trading it in rather than repairing it.
- Car worth $8000, fix is $500: Fix it. This is a relatively low-cost repair that restores significant functionality and is well below the threshold.
- Car worth $4000, fix is $1200: Borderline. The repair is 30% of the car's value. If the rest of the car is in excellent shape, proceed. If it has other pending issues, it is time to walk away.
- Car worth $2500, fix is $1500: Walk away. The repair cost is 60% of the vehicle's value. It is not financially sound to invest this much into an older, lower-value car.
What Scan Tool You Need for This Code
Minimum: A scanner that reads manufacturer-specific Body Control Module (BCM) codes ('B' codes) and displays live data from body sensors.
A cheap, generic $20 OBD-II reader only checks for engine codes ('P' codes) and will not see the B2592 code at all. You need a tool that communicates with the BCM to read the code, view live data, and perform bi-directional tests.
Budget: XTOOL A30D / MUCAR BT200 Max (~$90) — These Bluetooth dongle-style scanners perform an all-system scan to read BCM codes and show live data, which is essential. Some offer limited bi-directional control to command the latch.
Mid-range: Autel MaxiCOM MK808S / Foxwell NT510 Elite (~$350) — This is the sweet spot for serious DIYers. These tablet-style scanners offer robust bi-directional control, allowing you to command the liftgate latch to open and close directly from the tool. This function is critical for quickly determining if the fault is in the wiring, the switch, or the latch motor itself.
Professional: Autel MaxiSys MS906 Pro / XTOOL D7 (~$500-1200) — Provides full, OE-level diagnostic functions, including advanced bi-directional controls, module coding, and detailed topology mapping to visualize module communication.
Rent vs buy: Most auto parts store loaner tools are basic code readers that cannot access BCM codes. For a one-time B2592 diagnosis, paying a shop's diagnostic fee ($120-$300) is more cost-effective than buying a mid-range scanner. Buy a scanner only if you plan to perform your own diagnostics regularly.
How to Clear the Code After You Fix It
- Fix the underlying mechanical or electrical fault.
- Reconnect the battery if it was disconnected for the repair.
- Use an OBD-II scan tool to clear the B-code from the Body Control Module.
- Operate the power liftgate/trunk through 3 full open-and-close cycles to confirm the repair is successful and recalibrate the module.
Drive cycle (~5 minutes): A traditional engine 'drive cycle' is not required. The BCM confirms the fix as soon as the component operates correctly. Cycle the liftgate power function 2-3 times to ensure the code does not return.
Readiness monitors affected: None
Watch out for:
- Clearing the code with a scanner does not fix the problem; the code returns immediately upon the next attempt to use the liftgate.
- Disconnecting the battery clears the code from some modules, but forces other systems (like power windows or sunroofs) to require a manual reset procedure.
Will This Fail Emissions / State Inspection?
No — by itself this code doesn't fail OBD inspection (but it can keep readiness monitors from setting, which causes a separate fail).
- California: This code does NOT cause a smog check failure. Emissions tests focus exclusively on 'P' (Powertrain) codes and readiness monitors. 'B' (Body) codes are ignored.
- New York: A B2592 code passes the emissions portion of the NYS inspection. However, if the liftgate cannot be securely latched, it fails the separate safety inspection for body integrity.
- Texas: This code passes the OBD emissions inspection required in 17 Texas counties. The test only checks for powertrain-related faults that illuminate the Check Engine Light.
Most Commonly Affected Vehicles
- Ford Explorer (2011-2021) — Extremely common issues. Failures include broken wires in the harness, faulty latch assemblies, and software glitches. TSBs SSM 49015 and 16-0102 address software fixes. For 2020-2021 models, TSB 20-2425 notes water leaks causing corrosion.
- GMC / Chevrolet Acadia / Traverse / Enclave (2017-2023) — Prone to the liftgate opening a few inches and stopping. TSB 21-NA-123 points to bent pins in the object sensor connector as a cause for related code B153F, which must be checked first.
- Honda Odyssey (2005-2017) — Power sliding door issues align with the 'PSD' definition of B2592. Causes are typically broken wires in the door harness, a gummed-up latch needing cleaning, or a failed door motor.
- Chrysler / Dodge Town & Country / Grand Caravan (2008-2020) — Plagued by power sliding door failures. The most frequent cause is broken wires in the flexible track at the bottom of the door. Fuse M38 (25A) is the main fuse for all door lock motors.
- Nissan Murano (2015-2022) — Failures are often linked to the system losing its programming after a battery disconnect or low voltage event. A reset procedure is required. Check the main power switch in the glove box first.
- Kia / Hyundai Telluride / Palisade (2020-2024) — A very common complaint is the liftgate beeping 3-6 times but failing to open or close. This is caused by a faulty latch assembly or failing power struts. A system reset procedure temporarily resolves the issue.
- Subaru Outback / Forester (2017-2024) — Owners report erratic power rear gate (PRG) operation, often signaled by three beeps. The issue is a software glitch requiring a reset, a bad latch, or failing power struts.
- Jeep Grand Cherokee (2014-2021) — Primary causes are broken wires in the flexible harness between the body and liftgate, and failure of the latch assembly itself. Water intrusion into the handle switch is also a known problem.
Manufacturer-Specific Notes
- Chevrolet (GM): On C5 Corvettes (1997-2004), B2592 means 'Column Lock/Unlock Drive (B).' It is unrelated to the trunk. It appears with B2587, causes a 'Service Column Lock' message, and prevents the car from moving faster than 2 MPH as a security measure.
- Ford: A liftgate control module reprogram is a common fix for erratic behavior. Always check for TSBs before replacing hardware. After replacing a latch or disconnecting the battery, a reset is needed by opening and closing the liftgate manually a few times.
- Honda / Chrysler (Minivans): Power sliding door issues are often mistaken for a bad motor when the root cause is simpler. Always check the master lockout switch on the dashboard first. On Hondas, a parasitic drain is caused by a gummed-up latch mechanism failing to actuate a position switch.
- Hyundai / Kia: A 'valet switch' or lockout lever is integrated directly into the trunk latch mechanism on some models. This mechanical lever is easily accidentally flipped, disabling all electronic release functions and leading to a misdiagnosis of a failed part.
- Subaru: Subaru issued a warranty extension under campaign 12-289-20 for the rear gate stays (struts) on 2014-2018 Forester models, extending coverage to 8 years or 100,000 miles for failures like weakness or binding. Check vehicle eligibility via VIN before repairs.
Real Owner Stories
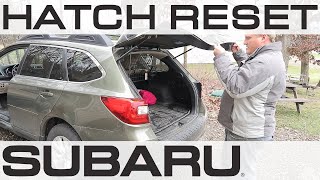
2019 Subaru Outback with 3-beeps and no operation
After the battery died and was jump-started, the power liftgate stopped working and only beeped 3 times when any button was pressed.
What they tried:
- Tried manually opening and closing the gate.
- Attempted various button-hold reset procedures found on forums.
Outcome: A successful reset was achieved by manually opening the liftgate fully, then slowly closing it until the auto-latch engaged and pulled it shut. The system then began operating normally.
Lesson: After a battery event, the liftgate control module 'forgets' its position. A manual open/close cycle is the first and easiest fix to try, as it recalibrates the system.
2017 Hyundai Veloster with dead battery and stuck hatch
The owner accidentally closed the hatch on an object, preventing it from latching. The 'hatch open' light stayed on. The next morning, the vehicle's battery was completely dead and the hatch was stuck shut.
What they tried:
- Attempted to open the hatch manually from the outside, which failed.
- Used the interior emergency release to open the hatch and diagnose further.
Outcome: The root cause was a parasitic battery drain created by the faulty latch position switch. Because the switch never signaled 'closed' to the BCM, the module remained awake overnight, draining the battery. The fix required replacing the latch assembly.
Lesson: A 'Trunk Ajar' light that stays on is a major red flag for a parasitic battery drain. The fault lies within the latch's internal position switch and will leave you stranded.
2006 Honda Odyssey with non-functional power sliding door
The driver's side power sliding door would not operate with the key fob or interior buttons. The door seemed slightly ajar and could be moved manually.
What they tried:
- Checked fuses and tried the main power switch reset procedure, with no success.
Outcome: The problem was a failed center roller assembly. The plastic bushings on the roller disintegrated, causing the metal parts to jam in the track. Replacing the center roller assembly (a $50 part) and its cables restored full operation.
Lesson: For minivan power sliding doors, the issue is often mechanical wear of rollers and cables, not a complex electrical failure. Inspect the physical track and roller assemblies for damage before suspecting expensive motors.
2002 C5 Corvette with 'Service Column Lock' message
While driving, the DIC suddenly displayed multiple 'ajar' warnings, and a relay in the passenger footwell began clicking continuously. The car threw codes B2587 and B2592.
What they tried:
- Checked battery voltage, which was good.
- Cleared codes, but they returned.
- Inspected BCM for water damage, finding none.
Outcome: This is a classic C5 Corvette issue where B2592 is NOT related to the liftgate. It indicates a failure in the steering column's anti-theft lock system. The fix involves installing a 'Column Lock Bypass' (CLB) module and having the dealer reprogram the BCM.
Lesson: Always verify the vehicle-specific meaning of a code. On a C5 Corvette, B2592 is a critical anti-theft system fault that disables the vehicle, and has nothing to do with the trunk.
How to Prevent This Code From Triggering
- Lubricate Latch Mechanism and Hinges (Every 1-2 years) — Use a quality spray-on white lithium grease or silicone lubricant on the latch's moving parts and the liftgate hinges. This prevents binding and reduces strain on the motor and actuators.
- Clean and Lubricate Power Strut Shafts (Annually) — Wipe down the shiny metal shafts of power liftgate struts with a clean cloth, then apply a thin layer of dry PTFE lubricant. This reduces friction and binding, preventing false obstruction aborts.
- Inspect and Clear Drain Plugs (Annually, especially after fall) — Liftgate and sunroof assemblies have drain tubes that clog with debris. When clogged, water backs up and leaks into the vehicle, corroding connectors, switches, and the latch mechanism.
- Periodically Inspect Wiring Harness Boot (Every 2-3 years) — Gently pull back the rubber boot between the liftgate and the body to check for cracked or chafing wire insulation. Catching wire damage early prevents a complete circuit failure or a short that damages the BCM.
- Maintain Battery Health (Ongoing) — The latch and liftgate motors draw significant current. A weak battery fails to provide enough power, leading to sluggish operation, incomplete cycles, and fault codes.
Frequently Asked Questions
What are the most common mistakes when diagnosing B2592?
The biggest mistake is replacing an expensive liftgate motor when the actual cause is a broken wire in the hinge boot or weak gas struts. Mechanics also frequently overlook simple fixes like a flipped 'valet lockout' switch in the glove box. Finally, owners often misinterpret vehicle-specific definitions, such as the C5 Corvette's unrelated steering column lock issue.
My trunk opens by itself. Can this be related to B2592?
Yes, this 'phantom opening' is a classic symptom. It is caused by a short circuit in one of the release switches, chafed wiring making intermittent contact, or a software bug in the control module.
Can I open my trunk manually if the power latch is broken?
Yes. Nearly all vehicles have a mechanical emergency release lever accessible from inside the trunk. Fold down the rear seats, crawl inside, and pry off the small plastic cover on the liftgate's interior panel to access the lever.
My liftgate starts to open a few inches and then stops or reverses. What causes that?
This happens when the system detects an obstruction and aborts the operation for safety. The most common causes are weak gas lift struts that cannot support the gate's weight, or a faulty pinch sensor. On GM vehicles, this specifically points to bent pins in the object sensor connector.
How do I reset my power liftgate after replacing the battery?
For many vehicles like Nissan and Subaru, disconnecting the battery for 15 minutes forces a module reset. For Kia and Hyundai, you must press and hold the open/close button on the liftgate and the handle button simultaneously until it chimes, then manually close the gate. Always consult your owner's manual for the exact relearn procedure.
Why does my liftgate beep three times and not open?
The three-beep warning is the control module's universal signal that it detected a fault in the system and aborted the operation for safety. The fault is a bad latch, a wiring issue, a faulty sensor, or low battery voltage. A scan tool is needed to find the specific cause.
Is it expensive to diagnose code B2592?
Most auto repair shops charge a diagnostic fee for electrical issues, ranging from one to two hours of labor ($120 - $300). This fee covers the technician's time using advanced scan tools and multimeters to trace the circuit and pinpoint the exact cause.
Key Takeaways
- Scan the Body Control Module (BCM) to confirm code B2592, which indicates a complete electrical failure in the power trunk, liftgate, or sliding door latch circuit.
- Broken wires inside the flexible rubber hinge boot cause over 50% of B2592 faults, followed closely by a burned-out latch actuator motor.
- Check the glovebox 'valet lock' switch and the 25A/30A liftgate fuse before buying any replacement parts.
- Ford Explorer and Subaru Outback models frequently trigger this code due to software glitches, requiring a 15-minute battery disconnect reset or a dealer module update.
- On 1997-2004 C5 Corvettes, B2592 is a critical anti-theft steering column lock fault that disables the vehicle, completely unrelated to the trunk.
Helpful Videos
Shop the Parts Behind B2592
Below are the parts most often responsible for code B2592, ranked by how frequently each one is the actual culprit (per the diagnosis above). Tap any to see what we have for your vehicle.


The information in this article is provided for general reference and educational purposes only. Vehicle specifications, procedures, and part compatibility can vary by production date, trim level, and region. Always consult your vehicle's factory service manual and verify part numbers before purchasing or performing repairs. Safety-critical components such as airbags, seat belts, and braking systems should be installed by a qualified professional.
- 🧭 Diagnostic Flowchart
- 🎬 Helpful Videos
- 🛍️ Shop This Part
- What Does B2592 Mean?
- Can I Drive With B2592?
- Common Causes
- Symptoms
- Common Fixes & Costs
- Used vs. New Parts: Buying Guide
- What Happens If You Wait — Timeline
- Cost of Not Fixing It
- Diagnosis Steps
- When This Code Triggers (Freeze-Frame Conditions)
- Related Codes
- Climate & Environmental Factors
- How to Talk to a Mechanic About This Code
- Where to Take It: Dealer vs Independent vs Chain
- When to Walk Away From the Repair
- What Scan Tool You Need for This Code
- How to Clear the Code After You Fix It
- Will This Fail Emissions / State Inspection?
- Most Commonly Affected Vehicles
- Manufacturer-Specific Notes
- Real Owner Stories
- 2019 Subaru Outback with 3-beeps and no operation
- 2017 Hyundai Veloster with dead battery and stuck hatch
- 2006 Honda Odyssey with non-functional power sliding door
- 2002 C5 Corvette with 'Service Column Lock' message
- How to Prevent This Code From Triggering
- Frequently Asked Questions
- What are the most common mistakes when diagnosing B2592?
- My trunk opens by itself. Can this be related to B2592?
- Can I open my trunk manually if the power latch is broken?
- My liftgate starts to open a few inches and then stops or reverses. What causes that?
- How do I reset my power liftgate after replacing the battery?
- Why does my liftgate beep three times and not open?
- Is it expensive to diagnose code B2592?
- Key Takeaways
- 🎟️ Get 5% Off