
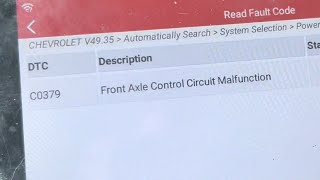
OBD-II Code C0379: Front Axle Control Circuit Malfunction
The Ultimate 2026 Guide to What C0379 Means, Why It Triggers, and How to Fix It
- Code C0379 disables your 4WD because the Transfer Case Control Module (TCCM) timed out waiting for the front axle actuator to engage.
- Check the frame ground under the driver's door and the actuator wiring harness for corrosion before replacing any expensive parts.
- You can safely drive the vehicle in 2WD, but the lack of 4WD poses a severe traction risk in snow, ice, or mud.
- On Ford F-150s, a grinding noise accompanying this code indicates a vacuum leak in the IWE system, often fixed by a $50 solenoid replacement.
- Never test a new front axle actuator while it hangs uninstalled; it will overextend and permanently break the internal mechanism.
What Does C0379 Mean?

Code C0379 signifies the Transfer Case Control Module (TCCM) detected a fault in the front axle actuator's control circuit. The TCCM commanded the front axle to engage or disengage, but did not receive the correct electrical confirmation signal from the actuator's internal position switch within the 10-second timeout window. To prevent mechanical damage, the TCCM disables the 4WD system and illuminates the 'Service 4WD' light.
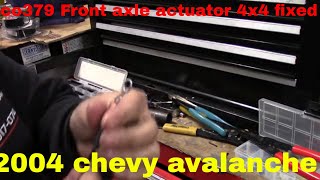
🎬 Watch: How to fix C0379 on Silverado and GMC trucks.Technical definition: The SAE/ISO definition is "Front Axle Control Circuit Malfunction." This indicates a logic failure where the Transfer Case Control Module (TCCM) misses expected feedback from the front axle engagement actuator's position switch. The TCCM sends a voltage signal to lock the front axle and waits for a return signal confirming completion. If that return signal fails to arrive, is incorrect, or takes longer than 10 seconds, the code sets and the 4WD system disables.
Can I Drive With C0379?
Yes, But With Caution. Yes, but your four-wheel drive (4WD) or all-wheel drive (AWD) system is disabled, leaving the vehicle in two-wheel drive. This is mechanically safe for normal road use and causes no cascading damage. However, the lack of 4WD is a significant safety risk in slippery conditions like snow, ice, or off-road situations.
Common Causes

- Corroded or Damaged Wiring/Connectors (Very Common) — Moisture, road salt, and grime frequently cause corrosion on the front axle actuator's electrical connector or within the wiring harness. On GM trucks, a large harness connector near the underhood fuse box traps water and rots the pins, breaking the electrical connection.
- Faulty Front Axle Actuator (Very Common) — The actuator is a small electric motor that physically moves a fork to lock the front axle. These motors burn out, develop internal shorts, or become sluggish in cold weather. If the actuator fails to complete its movement within 10 seconds, the TCCM times out.
- Bad Ground Connection (Common) — On many GM trucks, a critical 4WD ground point (G110) sits on the frame rail under the driver's side door. This exposed connection rusts, creating high resistance and blocking the electrical path. Cleaning the rust to bare metal often resolves the issue.
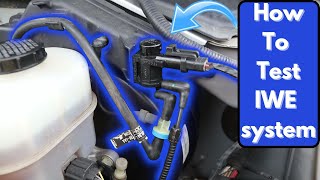
- Vacuum Leak (Ford IWE Systems) (Common) — On Ford F-150s with an Integrated Wheel End (IWE) system, vacuum controls the hubs. A cracked vacuum line, faulty check valve, or bad IWE solenoid causes a loss of vacuum, making the hubs partially engage while driving and triggering a timeout.
- Faulty 4WD Selector Switch (Common) — The dash-mounted 4WD selector switch fails internally over time. It sends an erratic signal, incorrect voltage, or no signal to the TCCM, preventing the engagement sequence from starting.
- Faulty Transfer Case Control Module (TCCM) (Less Common) — The TCCM itself rarely fails. Only consider replacement after thoroughly testing all wiring, grounds, the selector switch, and the actuator.
- Low System Voltage / Faulty Ignition Switch (Rare) — On platforms like the Chevrolet Trailblazer, a failing ignition switch causes a voltage drop to the TCCM. This triggers erratic behavior and multiple codes, including C0379.
- Internal Front Differential Problem (Rare) — The actuator motor works correctly, but a broken engagement fork, damaged sleeve, or worn gears inside the front differential prevent the axle from physically locking. The actuator cannot complete its travel, so the position sensor never sends the 'locked' signal.
Symptoms

- Service 4WD Light On — The 'Service 4WD' or similar warning message illuminates on the dashboard instrument cluster.
- 4WD System Inoperative — The vehicle defaults to two-wheel drive. You cannot engage 4HI, 4LO, or AUTO 4WD modes.
- Flashing 4WD Selector Lights — Pressing a 4WD mode button causes the indicator light to flash for several seconds before returning to 2WD, indicating a failed shift.
- No Response from 4WD Switch — Pressing the 4WD selector switch yields zero response—no light changes, and no clicking sounds from the transfer case or axle.
- Grinding or Clicking Noise from Front Axle — Common on Ford models with failing IWE systems, an intermittent grinding or clicking noise occurs from the front end as the hubs partially engage while driving. 🎬 See this in-depth guide for diagnosing Ford IWE grinding noises.
Diagnostic Flowchart
Tap your situation to follow the diagnostic path that matches what you're seeing on this code.
Common Fixes & Costs
- Clean or Repair Wiring and Grounds — Parts: $5-$30, Labor: $120-$280, ~1 hr book time (Intermediate)
- Replace Front Axle Actuator — Parts: $70-$220, Labor: $100-$180, ~1.2 hr book time (DIY)
- Replace 4WD Selector Switch — Parts: $30-$100, Labor: $50-$150, ~0.8 hr book time (DIY)
- Repair Vacuum Lines or Replace IWE Solenoid (Ford) — Parts: $20-$90, Labor: $100-$200, ~1.3 hr book time (Intermediate)
- Replace Transfer Case Control Module (TCCM) — Parts: $250-$650, Labor: $100-$300, ~1.5 hr book time (Professional)
DIY vs Professional
- Clean or Repair Wiring and Grounds — Beginner: Yes
Tools: Socket set, wire brush, sandpaper, electrical contact cleaner, dielectric grease. - Replace Front Axle Actuator — Beginner: Yes
Tools: Socket set, torque wrench, drain pan (for differential fluid), new fluid and gasket/sealant. - Replace 4WD Selector Switch — Beginner: Yes
Tools: Trim removal tools, small screwdriver, socket set. - Repair Vacuum Lines or Replace IWE Solenoid (Ford) — Beginner: Yes
Tools: Hand vacuum pump with gauge, utility knife, zip ties. - Replace Transfer Case Control Module (TCCM) — Beginner: No
Tools: Professional scan tool with programming capabilities, socket set.
Used vs. New Parts: Buying Guide
When a used part is worth it: Buying used electronic parts like the front axle actuator is not recommended. The failure mode is often electronic or wear-related, carrying a high risk of premature failure.
Donor-vehicle mileage cap: roughly under 40000 miles for the part to have meaningful remaining life.
Donor quality checklist:
- Verify the donor vehicle was not scrapped due to front-end damage or flood.
- Avoid parts from regions in the 'Rust Belt' as corrosion is a primary failure cause.
- Match the part number exactly. Even slight differences in the electrical connector make it incompatible.
Decision logic:
- If The cost of a new aftermarket actuator is under $150 → buy new. The savings from a used part are not worth the risk of premature failure and repeated labor.
- If The part is a simple mechanical component with no electronics (e.g., a wiring connector pigtail) → used is acceptable if in good condition.
- If The vehicle is very old and the budget is extremely tight → a used actuator is a temporary gamble. Expect a much shorter lifespan.
Warranty tradeoff: Used parts from a salvage yard typically have a 30-day warranty at best. New aftermarket parts (like Dorman) often come with a 1-year to limited lifetime warranty. New OEM parts carry a 1-2 year warranty.
Worst-case if a used part fails: $200-$400 if a used actuator fails shortly after installation, representing the cost of a new part plus repeated labor.
What Happens If You Wait — Timeline
- Immediate: Code C0379 is set, 'Service 4WD' light illuminates, and the 4WD system is disabled. Vehicle operates only in 2WD. (MPG impact: 0%% · Added cost: $0)
- 1-3 months (Ford IWE System with vacuum leak): An intermittent grinding noise begins as the front hubs partially engage due to lack of vacuum. The grinding wears down the teeth on the IWE actuators. (MPG impact: 1-3%% · Added cost: $50 in wasted fuel)
- 3-6 months (Ford IWE System with vacuum leak): The grinding becomes constant. The internal gears of the IWE actuators are destroyed. Continued driving risks damaging the wheel hub assembly. (MPG impact: 3-5%% · Added cost: $300 - $800 (Cost to replace both IWE actuators and potentially front hubs).)
- Ongoing (All Models): The vehicle remains in 2WD, posing a significant safety risk in adverse weather. The persistent dashboard warning light causes an automatic failure of state vehicle safety inspections. (MPG impact: 0%% · Added cost: $0 (excluding potential for an accident due to lack of 4WD))
Cost of Not Fixing It
- Immediate: Inability to use 4WD. The vehicle is restricted to 2WD operation, posing a severe traction risk in adverse conditions. (Added cost: Negligible)
- 1-6 months (Ford IWE System): A vacuum leak causes the hubs to partially engage while driving, creating a grinding noise that destroys the IWE actuator teeth. (Added cost: $300 - $800)
- Ongoing: The 'Service 4WD' light remains illuminated, failing state safety inspections and masking other dashboard warnings.
Diagnosis Steps

- Read All Trouble Codes
Use a TCCM-capable OBD-II scanner to read codes. Note if C0379 is current or history, and check for related codes like C0374, C0327, or U1000 for diagnostic clues.
Tools: OBD-II Scan Tool (TCCM capable) (Beginner) - Check 4WD System Fuses
Locate the fuse box and find all 4WD-related fuses (labeled '4WD', 'TCCM', 'TREC', 'ATC'). Pull each fuse and visually inspect the internal metal strip. Replace blown fuses.
Tools: Owner's Manual, Fuse Puller (Beginner) - Inspect the Frame Ground Wire
On the driver's side, locate the black ground wires bolted to the frame rail below the door. Unbolt the wires, use a wire brush to clean the terminal and frame to shiny bare metal, apply dielectric grease, and reattach.
Tools: Socket Set, Wire Brush, Dielectric Grease (Beginner) - Inspect Wiring and Connectors
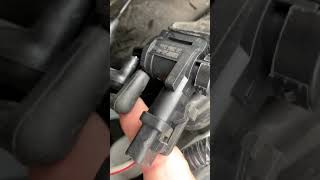
Trace the wiring from the front axle actuator into the engine bay. Unplug the actuator connector and main harness connector to inspect for green/white corrosion, bent pins, or water intrusion.
Tools: Flashlight, Electrical Contact Cleaner (Intermediate) - Test for Power and Ground at the Actuator
Use a multimeter to check for battery voltage (12-14V) at the actuator's electrical connector with the key on, engine running. Missing voltage or ground confirms an upstream wiring, fuse, or TCCM problem.
Tools: Multimeter (Intermediate) - Pro Tip: Scan and View Live TCCM Data
Use an advanced scan tool to view live TCCM data. Monitor the 'Front Axle Switch' parameter. Command a shift to 4HI. If the TCCM commands 'Engage' but the switch feedback doesn't change, suspect the actuator or wiring.
Tools: Advanced Bi-Directional Scan Tool (Advanced) - Pro Tip: Perform Actuator Circuit Voltage Test
Back-probe the actuator's signal wire. In 2WD, read the specific feedback voltage (e.g., ~10.6V on GM). Command 4WD; the TCCM grounds this circuit, dropping voltage to near 0V. If voltage doesn't drop, the TCCM isn't sending the command.
Tools: Multimeter with Back-Probes, Wiring Diagram (Advanced) - Advanced: GM Actuator Pinpoint Voltage Test
On a 5-pin GM actuator: Pin A (Light Blue) is the position sensor signal (~4-5V in 2WD, ~0V in 4WD). Pin B (Brown) is 12V+ power. Pin C (Black) is ground. Pin D (Light Blue/Black) is the feedback signal. Pin E (Gray) is motor control.
Tools: Multimeter, Back-Probes, Vehicle-Specific Wiring Diagram (Advanced) - Advanced: Ford IWE Solenoid Resistance Test
Set a multimeter to Ohms (Ω) and test resistance across the Ford IWE solenoid pins. A healthy solenoid reads 50-100 Ohms. Infinity (OL) means an open circuit; near zero means a short.
Tools: Multimeter (Advanced) - Bench Test the Actuator (with Caution)
Apply 12V power directly to the actuator motor pins. CRITICAL: The actuator must be installed in the axle housing during testing. Activating an uninstalled actuator overextends and destroys the internal mechanism.
Tools: Power Probe or Jumper Wires (Advanced)
When This Code Triggers (Freeze-Frame Conditions)
- Ambient Temperature: < 32°F (0°C) (Cold weather startup thickens actuator grease, causing a timeout.)
- Vehicle Speed: 0 mph (Attempting to engage 4WD while stationary.)
- RPM: Idle (600-800 RPM) (Engine running, but vehicle not in motion during the 4WD shift command.)
- Time Since Key-On: < 2 minutes (Fault occurs shortly after starting the vehicle during the first 4WD engagement attempt.)
Related Codes
- C0374 — C0374 indicates a direct electrical short or open in the wiring. C0379 means the command sent, but the actuator timed out, pointing to a sluggish actuator or poor connection.
- C0327 — Indicates a transfer case encoder motor fault. If you hear no whirring from the transfer case when selecting 4WD, diagnose C0327 first.
- U1000 — A network communication loss. Paired with C0379, it strongly suggests a bad main 4WD frame ground or a failing TCCM disrupting the data bus.
- C0306 — Fault in the transfer case motor's A/B control circuit. Diagnose the transfer case encoder motor first, as its failure prevents the TCCM from signaling the front axle.
Climate & Environmental Factors
- Cold Weather: In temperatures below 32°F (0°C), grease inside the front axle actuator thickens, slowing the motor. This slow response exceeds the TCCM's 10-second timeout window, triggering the code.
- Road Salt and Humidity (Rust Belt): Salt and moisture accelerate corrosion on the frame ground connection, wiring harness connectors, and actuator pins, causing high resistance.
- Altitude: High altitude exacerbates small vacuum leaks in Ford IWE systems due to lower atmospheric pressure, making it harder to keep hubs disengaged.
How to Talk to a Mechanic About This Code
Say this: "I have a C0379 code. Please start by inspecting the front axle actuator connector for corrosion, testing the main 4WD frame ground, and verifying power/ground at the actuator harness before quoting any parts."
This signals you know the most common, low-cost failures for this code. It directs the mechanic to perform a logical, cost-effective diagnosis instead of immediately quoting an expensive actuator or TCCM replacement.
Avoid saying:
- 'My 4WD is broken, can you fix it?'
- 'The four-wheel drive light is on, just do whatever it takes.'
- 'My truck makes a weird noise when I try to use 4WD.'
Questions to ask before authorizing the repair:
- Did you find corrosion on the actuator connector, the frame ground, or the harness connector under the fuse box?
- If you are recommending an actuator replacement, did you confirm it's receiving proper power and ground at its connector?
- If you are recommending a TCCM, can you show me why you've ruled out the actuator, wiring, grounds, and the 4WD selector switch?
- Is the recommended repair covered by a warranty?
Where to Take It: Dealer vs Independent vs Chain
- Dealer:
Recommended only if the vehicle is under warranty or if a TCCM replacement and programming is confirmed necessary.
Best for: Vehicles still under the 5-year/60,000-mile powertrain warranty (which covers the actuator)., Complex cases where the TCCM needs to be replaced and programmed.
Downsides: Highest labor rates., May be less inclined to perform detailed wiring repairs and more likely to replace entire harnesses or modules. (Typical cost: +50% vs. baseline) - Independent Shop:
Best fit. An experienced independent mechanic efficiently diagnoses common electrical faults at a lower cost.
Best for: Out-of-warranty vehicles where cost is a factor., Diagnosing and repairing the most common causes like wiring, grounds, and actuator replacement.
Downsides: Shop quality and diagnostic skill vary; look for ASE certifications and good reviews., May not have the specific software to program a new TCCM if required. (Typical cost: +0% vs. baseline) - Chain Shop:
Not recommended. High risk of misdiagnosis or unnecessary parts replacement due to lack of specialized 4WD diagnostic experience.
Best for: Simple, unrelated maintenance like oil changes or tires.
Downsides: Technicians lack the specific experience with 4WD diagnostic procedures., High pressure to sell parts leads to replacing the actuator without properly diagnosing the circuit first. (Typical cost: -10% vs. baseline)
When to Walk Away From the Repair
If the estimated repair cost exceeds 40-50% of the vehicle's private-party market value, consider your options.
- Car worth $8000, fix is $350: Fix it. This is a common repair cost for an actuator or wiring issue and is well below the threshold.
- Car worth $5000, fix is $1200: Borderline. This likely involves a TCCM replacement. Get a second opinion to confirm no cheaper fix was missed before proceeding.
- Car worth $3000, fix is $1500: Walk away. The repair cost is 50% of the vehicle's value, and it's likely other age-related repairs are also needed.
What Scan Tool You Need for This Code
Minimum: A scanner that can read Chassis (C-codes) from the Transfer Case Control Module (TCCM). A basic engine-only code reader will not see C0379.
A cheap, generic OBD-II reader typically only scans the Powertrain Control Module (engine/transmission) for 'P' codes. It cannot communicate with the TCCM to read the 'C' code that identifies the 4WD fault.
Budget: BlueDriver Pro Scan Tool (~$100) — Reads and clears chassis codes like C0379, but lacks bi-directional control to command the actuator.
Mid-range: Foxwell NT510 Elite (with GM Software) (~$180) — Offers OE-level diagnostics. Reads TCCM codes, views live data, and performs bi-directional active tests to command the actuator.
Professional: Autel MaxiCOM MK808 / MK808BT (~$450-600) — Provides full system diagnostics with extensive bi-directional control for all vehicle makes.
Rent vs buy: Most auto parts stores offer free code reading, but their loaner tools are often basic and cannot read TCCM codes. Buying a mid-range scanner like the Foxwell NT510 Elite is a worthwhile investment that provides necessary functions for a fraction of a single shop diagnostic fee.
How to Clear the Code After You Fix It
- Use an OBD-II scan tool to clear the C0379 trouble code from the TCCM.
- Disconnect the negative battery terminal for 15-20 minutes to reset all modules.
- Perform a 4WD functional test by cycling through 2WD, 4HI, and 4LO (if applicable) to confirm the repair.
Drive cycle (~20 minutes): After clearing the code, start the engine. While stationary, shift from 2WD to 4HI, wait for the indicator light to become solid, then shift back to 2WD. Repeat 3-5 times to confirm functionality.
Readiness monitors affected: This is a chassis code (C-code) and does not directly affect emissions readiness monitors like the Catalyst or O2 sensor monitors.
Watch out for:
- Simply clearing the code without fixing the root cause results in the code returning immediately upon the next attempt to use 4WD.
- Forgetting to pull the 4WD/TCCM fuse or disconnect the battery leaves the TCCM in a fault state even after repair.
Will This Fail Emissions / State Inspection?
Yes — this code typically fails an OBD-II emissions inspection.
- California: The illuminated 'Service 4WD' light causes an automatic failure of the visual inspection portion of the smog test.
- New York: An illuminated 'Service 4WD' light is a safety-related fault and grounds for failure during the annual safety inspection.
- Texas: Any active diagnostic trouble code that illuminates a warning light results in an automatic failure of the annual safety inspection.
Most Commonly Affected Vehicles
- Chevrolet Silverado, Tahoe, Suburban, Avalanche (2007-2013) — GM TSB #PIE0225B targets these models for moisture in the front axle actuator connector. The fix is replacing the actuator and connector pigtail.
- GMC Sierra, Yukon, Yukon XL (2007-2013) — Covered under the same GM TSB #PIE0225B as their Chevrolet counterparts for corroded actuator wiring.
- Chevrolet TrailBlazer (2002-2008) — TSB #PIT3832C notes a failing ignition switch causes system-wide voltage loss, triggering C0379. Actuators also fail frequently in cold weather.
- GMC Envoy (2002-2008) — Shares the GMT360 platform and 4WD system with the TrailBlazer, suffering identical ignition switch and actuator issues.
- Cadillac Escalade (2007-2013) — Shares the identical 4WD system with the Tahoe/Yukon and is covered by TSBs regarding actuator connector corrosion.
- Ford F-150 (2004-2018) — C0379 is often a symptom of a failing vacuum-operated IWE system. The cause is typically a bad IWE solenoid, cracked vacuum hose, or faulty check valve.
- Dodge / Ram 1500 (2006-2018) — The electronic Front Axle Disconnect (FAD) actuator frequently fails. It is covered under the standard 5-year/60,000-mile Powertrain Limited Warranty.
- Hummer H3 (2006-2010) — Built on the Colorado/Canyon platform, the H3 experiences C0379 due to vulnerabilities in wiring, the front axle actuator, and the TCCM.
Manufacturer-Specific Notes
- General Motors (GM): TSB #PIE0225B targets 2007-2013 trucks for moisture in the front axle actuator connector. Actuators also become sluggish in temperatures below 30°F, triggering the timeout.
- Ford: The vacuum-operated IWE system defaults to locked if vacuum is lost, causing a grinding noise. TSBs 20-2306 and 24-2189 address IWE noise and wear.
- GM (Trailblazer/Envoy Platform): TSB #PIT3832C notes a worn ignition switch causes intermittent voltage loss to the TCCM, triggering C0379 alongside HVAC and electrical glitches.
- Dodge / Ram: The electronic Front Axle Disconnect (FAD) actuator frequently fails. It is covered under the standard 5-year/60,000-mile Powertrain Limited Warranty.
Real Owner Stories
2004 Chevy Avalanche - Misdiagnosis Leads to Simple Fix
Service 4WD light on with code C0379. Owner initially assumed the actuator was bad, then the encoder motor, and replaced both.
What they tried:
- Tested the original actuator with direct power; it worked.
- Replaced the transfer case encoder motor because it wasn't making noise.
- Cleaned the frame ground connection under the driver's door, but the problem persisted.
Outcome: The owner cut off the old, corroded ground wire terminals, crimped on new ones, and reattached them. This permanently fixed the problem.
Lesson: A component can test fine, but bad grounds prevent it from working. Don't just clean ground points; verify the connection's integrity by checking for voltage drop or replacing corroded terminals.
2003 GMC Sierra - The Danger of Bench-Testing New Parts
DIYer trying to fix a C0379 code. Replaced the actuator, but the code immediately returned.
What they tried:
- Replaced the front axle actuator.
- To verify the new part worked, he connected it to the harness while it was hanging by the wires and activated the 4WD switch to watch it move.
Outcome: By activating the new actuator while it was uninstalled, he overextended the internal mechanism, permanently damaging the brand-new part. The fix required buying a second new actuator.
Lesson: Never test a new front axle actuator before it is fully threaded and installed in the differential housing. Doing so breaks the new part, wasting money and time.
2011 GMC Sierra - The Hidden Connector Corrosion
Intermittent C0379 code. 4WD would sometimes work, sometimes not. The owner replaced the actuator connector pigtail, which seemed to fix it, but the code returned.
What they tried:
- Replaced the corroded connector at the front axle actuator.
- Performed a voltage test on the brown power wire and noticed the voltage fluctuated when wiggling the harness.
Outcome: The owner traced the harness to a large secondary connector located under the underhood fuse box. This connector was packed with green corrosion. He soldered the wires directly, permanently resolving the code.
Lesson: Corrosion isn't always at the component itself. If a new pigtail doesn't fix an intermittent issue, check for voltage drops while wiggling the harness to find hidden connection problems further upstream.
How to Prevent This Code From Triggering
- Apply Dielectric Grease to Connectors (Every 2-3 years or during any related service) — Applying dielectric grease to the front axle actuator connector and frame grounds creates a barrier against moisture and road salt, preventing corrosion.
- Exercise the 4WD System Monthly (Once per month) — Engaging the 4WD system from 2WD to 4HI and back keeps the actuator motor and differential fork mechanism lubricated and moving freely.
- Wash Vehicle Undercarriage Regularly (Seasonally, especially after winter) — Regularly washing the underbody, particularly the frame rail under the driver's door, removes corrosive road salt.
- Change Transfer Case and Differential Fluids (Every 30,000-50,000 miles) — Keeping the transfer case and differential fluids clean ensures mechanical health, preventing binding that strains electrical components.
Frequently Asked Questions
Can I just clear the C0379 code to fix it?
You can clear the code, but it returns the next time you attempt to engage 4WD. Clearing the code erases the fault record but does not fix the underlying electrical or mechanical failure.
I replaced the actuator and the C0379 code came back. What now?
If a new actuator didn't fix it, the problem lies in the wiring. Thoroughly clean the frame ground under the driver's door to bare metal. Next, inspect the large wiring harness connectors in the engine bay for hidden corrosion.
Why does my 4WD only fail in the winter?
Grease inside the front axle actuator thickens in freezing temperatures, making the electric motor move slower. This sluggish response exceeds the TCCM's 10-second timeout window, triggering the code.
What is a common misdiagnosis for code C0379?
The most common misdiagnosis is immediately replacing the expensive Transfer Case Control Module (TCCM). The actual culprit is usually a corroded frame ground wire, a bad dash switch, or a corroded actuator connector.
Is it hard to replace the front axle actuator yourself?
Yes, it is a straightforward DIY job requiring basic hand tools. You typically remove a small skid plate, unplug the electrical connector, and unscrew the old actuator from the axle housing.
My 4WD works sometimes but not others. Could it still be C0379?
Yes, intermittent failures are classic symptoms of a poor electrical connection. A loose ground, corroded pin, or internally broken wire makes contact randomly, causing the system to work one minute and fail the next.
What does a working 4WD system sound like when it engages?
Selecting 4HI produces two distinct sounds: a brief whirring from the transfer case encoder motor, followed by a faster 'click' from the front axle actuator. Hearing the whir but missing the click isolates the problem to the front axle.
Key Takeaways
- Code C0379 disables your 4WD because the Transfer Case Control Module (TCCM) timed out waiting for the front axle actuator to engage.
- Check the frame ground under the driver's door and the actuator wiring harness for corrosion before replacing any expensive parts.
- You can safely drive the vehicle in 2WD, but the lack of 4WD poses a severe traction risk in snow, ice, or mud.
- On Ford F-150s, a grinding noise accompanying this code indicates a vacuum leak in the IWE system, often fixed by a $50 solenoid replacement.
- Never test a new front axle actuator while it hangs uninstalled; it will overextend and permanently break the internal mechanism.
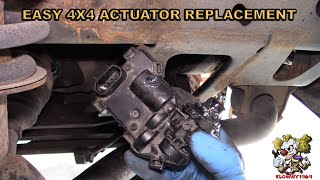
Helpful Videos
Shop the Parts Behind C0379
Below are the parts most often responsible for code C0379, ranked by how frequently each one is the actual culprit (per the diagnosis above). Tap any to see what we have for your vehicle.


The information in this article is provided for general reference and educational purposes only. Vehicle specifications, procedures, and part compatibility can vary by production date, trim level, and region. Always consult your vehicle's factory service manual and verify part numbers before purchasing or performing repairs. Safety-critical components such as airbags, seat belts, and braking systems should be installed by a qualified professional.
- 🧭 Diagnostic Flowchart
- 🎬 Helpful Videos
- 🛍️ Shop This Part
- What Does C0379 Mean?
- Can I Drive With C0379?
- Common Causes
- Symptoms
- Common Fixes & Costs
- DIY vs Professional
- Used vs. New Parts: Buying Guide
- What Happens If You Wait — Timeline
- Cost of Not Fixing It
- Diagnosis Steps
- When This Code Triggers (Freeze-Frame Conditions)
- Related Codes
- Climate & Environmental Factors
- How to Talk to a Mechanic About This Code
- Where to Take It: Dealer vs Independent vs Chain
- When to Walk Away From the Repair
- What Scan Tool You Need for This Code
- How to Clear the Code After You Fix It
- Will This Fail Emissions / State Inspection?
- Most Commonly Affected Vehicles
- Manufacturer-Specific Notes
- Real Owner Stories
- 2004 Chevy Avalanche - Misdiagnosis Leads to Simple Fix
- 2003 GMC Sierra - The Danger of Bench-Testing New Parts
- 2011 GMC Sierra - The Hidden Connector Corrosion
- How to Prevent This Code From Triggering
- Frequently Asked Questions
- Can I just clear the C0379 code to fix it?
- I replaced the actuator and the C0379 code came back. What now?
- Why does my 4WD only fail in the winter?
- What is a common misdiagnosis for code C0379?
- Is it hard to replace the front axle actuator yourself?
- My 4WD works sometimes but not others. Could it still be C0379?
- What does a working 4WD system sound like when it engages?
- Key Takeaways
- 🎟️ Get 5% Off